post

How Do You Hire a Contractor?

Why Do You Need a Contractor?

Before setting out to hire a contractor, know who and why you are hiring them. Do you need a general contractor or are you able to do some of the work yourself and will hire skilled subcontractors? In your search for a contractor, be sure to check reviews in professional service websites.  Houzz, Angi and Home Advisor are popular sites. Also check professional organizations such as NARI (The National Association of Remodeling Industry) Better Business Bureau and other local agencies.


ll Costs Need to Be Set in the Contract

Once your budget is established and the bid is accepted, it needs to be followed by both parties. When you hire a contractor make sure everything is agreed upon in writing.  Change orders and add-ons can be endless because of the “while we are at it” syndrome. Be sure to research thoroughly the contractor’s history of completing projects. Watch for reviews that reference overcharges.

Do You Need the Contractor You Hire to Be Licensed, Insured and/or Bonded?

Licensing Not all cities, counties or state governments require education, certification and licensing in the building industry. If you live in an area that doesn’t, you will need to do more research on the builder’s experience and reputation. Insurance and bonds There are three different insurance types that good contractors carry. They carry insurance on the work they perform, which allows them to offer a warranty. They carry workers’ compensation insurance, as required by law, to cover themselves and their employees in the event of an on-the-job injury. The third type of insurance good contractors carry is actually a bond that protects them and you in the event that the contract is not fulfilled or that there is damage to your home while they are working on it.

How to Compare Bids?

To compare bids, make sure all materials are of the same quality if not the same exact item. You will want to be sure each bid has both materials and labor listed separately, so you can make a good comparison on what you are purchasing. Especially in today’s busy remodeling market timeline may need to be very flexible. At this time all good contractors are busy. If you can, make allowances in your timeline to get quality materials and workmanship.

When You Hire a Contractor Make Sure You Are Hiring a Professional

When you hire a contractor, compatibility is a good thing to have. More importantly, you want someone who is trustworthy and dependable. General contractors should be stopping by often to check on the progress of the work. A good contractor complies with all building codes, permit and inspection requirements. How and why you hire a contractor will make a big difference in the success of your project. Knowing the language spoken by the industry will help you to understand the process and set your expectations for the outcome. Your home and your project are valuable and worth the extra time it takes to research contractors before you sign on the dotted line.


The post How Do You Hire a Contractor? appeared first on CliqStudios.

post

Bathroom Remodeling With CliqStudios

Planning a bath remodeling project? Whether you’re trying to get more storage, update the style and quality of your bathroom vanity, or design a more efficient space, a designer can help you to succeed.

Renovating homeowners often work on several projects in a row. They enjoy the convenience of getting bathroom cabinets that come fully assembled and equipped with the same timeless styles, construction quality, and design services that CliqStudios is known for. CliqStudios designers provide complimentary design consultation, and with just a few measurements, will  help you lay out a custom-fit plan for your bathroom cabinets.

A bathroom project is a great way to  introduce yourself to CliqStudios! Previous clients find that bathroom projects are a great way to try out our unique process. Please be aware that free shipping is only available on purchases of $3,500 or greater.

Single Vanity Bathrooms

If you’re updating a powder room, a single vanity is all you’ll typically need. For most transitional or modern designs, a shaker or recessed-panel door style is versatile and timeless. CliqStudios vanities are available in all of our finishes and stains. The standard vanity cabinet box depth is 21”, and the standard height is 34 ½”. Furthermore, a designer can help you determine the proper cabinet widths for your space.

CliqStudios bath cabinets shown in Austin White door style and finish


This master bathroom vanity matches the kitchen island. Style: Dayton, Finish: Carbon

Double Vanity Master Bathrooms

For master baths, a double vanity is typical, and supports two sink bases cabinets. Additionally, it supports a combination drawer and door combinations. Available in 42” and 48” widths. Custom features include central vanity towers, tall linen closets, knee drawers, wall cabinet shelving, and more. 

double vanity with white Shaker cabinets, gray countertop with two black beveled mirrors above
A double vanity provides ample storage in this master bathroom.

Photo gallery of remodeled bath features CliqStudios Austin Painted White cabinets
Remodeled inset-style bathroom featuring two double vanities and a 1-door, 1-drawer single vanity, and a tall linen cabinet. Style: Austin-CH. Finish: Painted White.
Beautifully designed new construction home features master bathroom including CliqStudios.com Austin inset-style cabinets in painted White to create furniture-style double vanity.
Master bathroom featuring two 6-drawer sink base vanities, a 3-drawer vanity, and a vanity tower stacked on a furniture drawer.
Bath remodeling project features shaker-style cabinetry by CliqStudios.com, shown in Dayton style in Birch Sable finish.
Modern bath design includes double vanity built with dark shaker cabinets. The custom-cut mirror creates a central focal point, making the space feel extra spacious. Style: Dayton. Finish: Birch Sable
double vanity in white bath is built of semi-custom shaker cabinets topped with white marble
Beautiful master bath with a double vanity topped with white marble. Style: Rockford; Finish: Painted White
bath has generous cabinetry, including double vanity, open shelves and ceiling-high stacked cabinets in white shaker style with brushed nickel trim
Stacked cabinetry and a base corner cabinet provide this master bathroom with plenty of storage. Style: Dayton; Finish: Painted White
Owners ensuite (master bath) in new home includes custom vanity featuring inset cabinets, glass display case stacked on counter and gray marble vanity to with undermount sinks and vintage-look light fixtures.
Owners ensuite (master bath) in new home includes custom vanity featuring inset cabinets, glass display case stacked on counter and gray marble vanity to with undermount sinks and vintage-look light fixtures. Style: Austin-CH. Finish: Painted White
double vanity features low counter between sink units and stacked cabinets on ends, built of white shaker semi-custom cabinets with furniture detailing
Master bathroom featuring shaker style 3-drawer sink base vanities with stacked storage towers, a floating furniture drawer, and ogee base molding. Style: Dayton. Finish: Painted White
CliqStudios bath cabinets shown in Cambridge Studio Gray door style and finish


Remodeled master bathroom featuring abundant storage. Style: Dayton. Finish: Painted White
3d rendering of cliqstudios kitchen design with white shaker cabinets and tea leaf kitchen island with seating

Ready to start your free design?

Send us a sketch with your room measurements

and we’ll connect you with your personal designer.

GET STARTED

The post Bathroom Remodeling With CliqStudios appeared first on CliqStudios.

post

The Decorative Style Cabinet Door

The History of the Decorative Door Style

The decorative cabinet door styles ebb and flow in popularity. Both the seventies era and then the nineties saw the popularity of solid wood, stained, decorative style, cabinet doors. In the seventies the focus was earthy and natural, so the stained wood doors were the height of popularity. In the nineties the decorative door style, in stained wood, was once again very popular. This time it was with lighter more natural stains combined most often with white.  The focus was the warmth and coziness this created, with a country feel.

What Defines the Decorative Door Style?

The decorative style, sometimes with a raised panel, gives the door an extra level of detail. These cabinets provide a canvas to display the craftsmanship of the cabinetmaker and the beauty of the wood product. It provides a dynamic design element of depth and dimension to the cabinetry. Decorative style are cabinet doors that have extra trim details. A raised panel style is when the center portion of the panel is flush with the door framing. Decorative style doors call attention to themselves and elevate the look of the cabinetry, contributing an upscale look to the kitchen design.

CliqStudios offers several beautiful, raised panel or decorative style cabinet doors. Each line has styles in both stained wood and painted surfaces. Many of today’s styles have a more subtle design than doors of the past, but they reflect the dimension and depth of design that this style is known for.

Craftsman Line

Mason Style

 Traditional styling with a farmhouse flair. The 1 1/4 overlay adds visual interest while the back bevel profile on all four edges, adds  dimension and a feeling of sturdiness.

Signature Plus Line

Fairfield Style

Tailored details like the stepped interior profiling and eased outside edge provide simple and fresh styling.

Lenox Style

Elegant, mitered applied molding offers a sophisticated style in a flat panel door.

Signature Line

Carlton Style

A raised panel style featuring mitered corners, crisp stepped inside waterfall profile and a slab drawer front.

Mendota Style

A raised panel door and slab drawer front with gracefully stepped outside edges and beveled center panel provides a clean, crisp profile.

Lyndale Style

Scalloped raised panel, 5-piece doors and drawer fronts with eased-waterfall edges blends beautifully with traditional home décor.

Cambridge Style

A raised panel door and 5-piece drawer front with gracefully stepped outside edges and beveled center panel provides a clean, crisp profile.

Bayport Style

Scalloped raised panel, 5-piece doors and slab drawer fronts with eased-waterfall edges blends beautifully with traditional home décor.

For complete information on all of the decorative door styles available at CliqStudios, please visit us here . Or if you would like assistance connect with our  team of designers .

The post The Decorative Style Cabinet Door appeared first on CliqStudios.

Did you miss our previous article…
https://www.centrecountyfood.org/?p=210

post

How To Create Your Temporary Kitchen During a Remodel

During the course of a major remodel, the kitchen is often out of use for nearly two months. Your family will still need to eat. Restaurants will quickly grow old (and expensive), so you will want to plan an area to create quick meals. If your home doesn’t have a second, smaller kitchen, you will want to create a temporary kitchen to use during the remodel.


Temporary kitchens may not be very glamorous, but will suffice for a few months while the new kitchen is being built.

There are seven steps to creating a temporary kitchen:

Find a location in the home with a sink and faucet. A low-traffic bathroom or utility room generally works.Designate the countertop as a food preparation area. A small card table can also be moved into the area for additional work space.Move your microwave into this location as well. You’ll want it out of the real kitchen, and close to where the food is.If you can, move your refrigerator near the temporary kitchen area too. If your full-size refrigerator won’t fit, consider buying or borrowing one that will. An under-counter, college dorm room fridge to store the necessities is an easy fix.Don’t pack away all of your small appliances. Crock pots, hot plates, toasters, etc. are great to keep around for a variety of meals.Store silverware, dishes, kitchen utensils, and napkins nearby in large storage containers. If they are breakable, make sure to keep them far from ledges and out of reach from pets and small childrenKeep cleaning products, paper towels, and oven mitts readily available.

Having a space to eat and prepare food while undergoing a kitchen renovation can make a huge difference. While you might not want to host a dinner party in a temporary kitchen, it gets the job done for the few weeks you’ll be using it.

The post How To Create Your Temporary Kitchen During a Remodel appeared first on CliqStudios.

Did you miss our previous article…
https://www.centrecountyfood.org/?p=207

post

How to Design Mudroom Cabinets: A Step-by-Step


Mudroom cabinets designed for the MinnePHit House.

With three small children, our clients, the Brazelton’s, needed a mudroom that could stand the test of time. To create this space we needed to answer an important question: What are the most important features in a laundry room?

1) What do you need to store there? Create a checklist.

Here are some examples: jackets, boots, shoes, scarves, mittens, flashlight, dog leash, keys, briefcases, totes, reusable grocery bags, outdoor toys, towels for muddy feet, etc.

2) Then determine the best type of storage for each of these items.

Is it drawer or cubby storage? Do you need open shelves or shelves with bins or baskets? If you have a hard time visualizing, go to your current closet and pull out what you’d need to store. This will help determine the type of storage you need.

3) How many people need to have their space for storage?

For example, the Brazelton’s need at least three bays for storage, and if there can be five, that would be even better. They have two dogs, too. So there will need to be some space for their toys and leashes.

4) Think about doors and determine how much you want to see.

Are you okay with seeing hanging jackets and baskets in cubbies? Or do you need everything out of sight?

The Brazelton’s don’t mind jackets and coats hanging in the open for easier access for their kids, and they opted for some drawers and hidden storage behind doors.

If children need to use the space, keep their dedicated storage closer to the floor so that they can reach. If you are going to use baskets inside the cubbies, be sure to source those before you size your cabinetry to make sure they will fit. As we’ve found in the past, basket sizes are not standardized.

5) Determine if you’d like a bench or a seat built into the cabinetry.

In the case of the Brazelton’s, we built in a bench so that all three children can sit and put their shoes or boots on at the same time. Consider your morning routine and how much space you might need.

6) Measure the space that you need to fit into.

Don’t forget about trim, crown molding, and where the cabinetry meets the door or other architectural details in your home.

7) Now draw up your ideal storage.

If you don’t have room for everything, prioritize your spaces. Can you store some of the seasonal items elsewhere? If you need more help, contact CliqStudios for a complete plan and more guidance on your project.

The post How to Design Mudroom Cabinets: A Step-by-Step appeared first on CliqStudios.

Did you miss our previous article…
https://www.centrecountyfood.org/?p=204

post

10 Best Topiary Plants to Grow

Topiary plants are easier to grow than any other ornamental tree or shrub. The best topiaries among trees, herbs, and shrubs bear small leaves. They also grow quickly and have a dense branching pattern.

If you want to add interesting shapes and forms into your garden without having to spend too much effort on them, topiaries are something worth considering. Here’s a list of several popular choices that we’ve picked out so you can decide which ones would work best for your gardening needs.

1. Boxwood (Buxus sempervirens)

Buxus spp, or box, is a versatile plant for topiary projects since it can tolerate almost any type of soil and exposure. This makes it ideal for growing indoors as well as outdoors. It’s an old-time favorite to craft a refined look by using its natural features.


Image credit: https://i5.walmartimages.com/

The only problem is the high maintenance requirements when you try a complex design. They can be shaped however you like because they provide a dense style with insignificant flowers. You can use boxwood topiaries to balance your entryway and other simple applications like creating a basic hedge.

For its optimal growth, it requires consistent moisture and proper mulching. It’s also important to provide it with well-drained soil, and it prefers full sun to partial shade.

2. Yew Bush

Yews are conifers that require very minimal care effort. They have a needle structure and dense leaves. Yews are considered an evergreen shrub but don’t need a lot of sunlight. It’s suggested you place them under partial shade. However, it’s important to provide them with well-draining soil and water during the blooming season. 

Taxus bushes are available in many different varieties. Some of them can be used as foundation plants, while others can be used for landscaping needs. If you have a cylindrical topiary in mind, then go for Anglo-Japanese yew. They are the common yew because they grow in a cylindrical shape.

Yew Bush
Image credit: https://www.igardenplanting.com/

The only drawback is that they’re toxic to animals and humans, so avoid growing them where dogs roam, or kids play. If you want to achieve the topiary shape, then Taxus baccata is the most popular choice.

3. Privet Shrubs

Some hedge plants can double as excellent choices for topiaries, and Ligustrum spp is one of them. Its timeless aesthetic makes it perfect for privacy. This topiary plant grows and requires less effort to shape than other topiaries. You’ll also appreciate its superior tolerance to salt and urban pollution.

When it comes to growing conditions, this plant is very versatile. It’s hardy within USDA zones 5 through 9. It’s also resistant to drought, disease, and pests. Once planted, the shrubs need an acidic soil with pH levels of 6.2 to 7.0 so you must test the soil pH to ensure it’s the correct one for your plants.

They grow well in full sun to partial shade conditions with at least six hours of sunlight daily. However, too much sun can cause some bleaching on leaves, so keep that in mind. It produces large leaves and has dense foliage. The larger leaves make it suitable for large-scale topiary.

4. Japanese Holly Shrub

The name of this plant comes from the evergreen leaves. The leaves are a dark, solid green color with a toothed edge. They have an attractive appearance and grow in clusters. They’re 2 to four inches long and 1 ½ to three inches wide, making them ideal for topiary projects.

Its rounded form makes this shrub ideal for topiary projects that involve geometrical shapes. The ilex spp is an evergreen with broad leaves instead of needles. It has dense foliage and a bushy appearance with many glossy leaves. Hollies with traditional holly leaves can be trimmed to the shape that you desire.

It grows upright at a moderate rate and requires occasional pruning to prevent it from growing large. It’s appreciated by landscape designers, thanks to its remarkable qualities of blossoms. Growing hardy USDA zones of Ilex crenata are 5 to 8, full sun and part shade.

5. Rosemary Herb

Who doesn’t know this excellent herb? Rosemary, with the Latin name of Rosmarinus spp, is an evergreen with needle-like leaves. It can grow up to 3 feet tall and 15 inches wide at full-grown, but it needs little pruning to be used for topiary projects. It’s also known for its white flowers and pleasant scent. 

Rosemary has a strong and fragrant scent and is tolerant to heat and drought. Rosemary can also be used in herbal tea, meats, and fish. Thrives best in USDA growing zones 8 to 10, full sun exposure.

6. Lavender

Lavandula angustifolia or lavender for short can be used as a topiary if not for its beautiful and fragrant flowers. It has a greyish hue and is drought tolerant, thriving in USDA zones 4 to 9, full sun exposure. Lavender can be used in soaps and lotions, but this plant is also known as an insect repellent.

A good choice of companion plant since lavender can protect other plants from insects. Other benefits of Lavandula spp include the ability to draw butterflies and repel deer. You can also take advantage of its evergreen leaves if you’re living in a warmer climate. Lavender can also be grown as a small topiary plant.

7. Thyme

When it comes to small-scale topiaries, herbs like thymus spp or thyme should be your choice. Thyme isn’t only a culinary favorite, but it’s also a suitable plant for topiaries because of its compact nature and tidy appearance.

It has small green leaves and can grow between 6 inches (15 cm) and 2 feet (60 cm). Thyme has deep purple, white flowers, and an earthy scent. This makes it a great choice for a fragrant topiary that can also add color to your garden.

8. Vines

Ivies or Hedera spp are great for this purpose, although some are considered invasive. Therefore, choose non-invasive varieties like Lady Frances, Gold Child, or Duckfoot. It is not very difficult, and it is fun making one in your garden or yard.

Vines
Image credit: https://images.squarespace-cdn.com/

You can grow any variety in a container, but make sure that the plant is not invasive. Dwarf forms of English ivy (Hedera helix “Hahn’s”) can be grown in a pot because they are non-invasive. The same thing can be said about creeping fig (Ficus pumila) and Persian ivy (Ternstroemia gymnanthera).

As for the plants that you might want to avoid, think about English ivy varieties like Pagoda, Imperial Gold, or Queen Emmarentia because these are the ones that might invade other parts of your garden. Working with ivy is incredibly easy and provides flexibility for any topiary artist.

9. Sphagnum Moss

Sphagnum moss is a small flowerless plant that grows in dense green clumps. It’s mostly found in shady and damp locations. When you want to make this topiary plant, you need to find a proper frame then fill it with moss. Once it’s full, it can stand alone and you can use it as a base to plant trailing vines, herbs, and flowers.

10. Dwarf Alberta Spruce Trees

This is another slow grower plant, but it6 makes up for it with dense and fragrant foliage. This dwarf tree is very important if you’re looking for a topiary with pyramidal and conical shapes.

FAQs on Best Topiary Plants to Grow

Which plants make the best topiaries?

Such plants as holly, laurel, boxwood, and privet are excellent choices for topiary. But boxwood, especially morris dwarf, is the best topiary plant choice because of its compact shape, even if it’s trimmed.

Which Buxus is best for topiary?

The best buxus for topiary include English box, Dutch box, and Japanese box.

Final Thought on Best Topiary Plants to Grow

As you can see, there are so many topiary plants to grow and so many different types of topiary styles. Even though there are so many choices, you can always find something that will work for your landscaping project.


The post 10 Best Topiary Plants to Grow appeared first on Kitchen Infinity.

post

How to Grow Colorado Blue Spruce

The Colorado blue spruce is a beautiful tree from North American native selection. It’s very slow growing but has an excellent pyramidal shape. As a landscape plant, it reaches 15-20 feet maturity in ten years. They were first discovered in 1862, growing in the Rocky Mountains.

But nowadays, they’re widely planted landscape trees. If you live in the right climate and have good soil, this tree will thrive, but only if you plant it the right way.

This guide tells you everything about how to grow blue spruce trees, from seedlings to mature specimens suitable for your yard or garden. You’ll learn what type of soil they need and how much sunlight they require. You’ll also learn tips on pruning them and other maintenance tasks that are necessary for their survival. Let’s get started!

Propagating and Planting Blue Spruce

Grafting is the most successful propagation method as it allows you to get earlier crops than cuttings do, but the downside is that this method requires more knowledge and experience. You can use either whip or cleft grafts with scions taken from the upper part of mature trees or use root cuttings. Colorado blue spruce grows very slowly, so, you have to be patient for seedlings to fully grow.


Image credit: https://forestnation.com/

To plant colorado blue spruce, dig a deep hole of two to three times as wide as the root ball of the tree. Then, place the tree in the hole so that the root ball is even with the surrounding soil. If your soil is poor, add water to the soil to remove air pockets. 

Other special features that come with this plant include bird-friendly, dramatic foliage color, easy-care, North American Native Selection, Tolerates Road Salt, and year-round interest. And the companion plants include spirea, Butterfly Bush and Blanket Flower, Weigela, and Stonecrop.

Colorado Blue Spruce Tree Care

Other common names of Colorado blue spruce include green spruce, white spruce, and Colorado spruce. The main requirement for these trees is an adequate water supply during dry periods. Colorado blue spruce tree requires the following maintenance to keep it healthy and vigorous:

Position

It is essential to plant blue spruce trees in moist soil locations with full sun and light shade. However, blue spruce Picea Punjeb is also drought-tolerant, but growing it in heavily polluted areas can affect the blue color coating of the needle.

Soil

It is not fussy about the soil type as long as it is well-drained. Colorado blue spruce trees require moist soil to grow healthy and well. Spruce prefers acidic, boggy soils which are sandy or loamy with low levels of organic material. 

Soil
Image credit: https://worldofgardenplants.com/

On soil pH, Colorado spruce requires a range of 6.0 to 7.5, even though they can tolerate extremely acidic and alkaline soils. Make sure you test the soil pH just to be sure.

Light

Plant Colorado blue spruce trees in full sun and ensure they get at least six hours of unfiltered sun per day. The Colorado blue spruce thrives in full to partial sun. It also tolerates partial shade but does better in spots with plenty of sunshine.

Water

Blue Spruce Picea punjens require an ample supply of water and also good drainage. Although blue spruce tolerates drought, it does best when watered consistently throughout the entire year. Water your blue spruce about once every two weeks if rainfall is less than 1 inch per week during the first growing season to keep the soil moist.

Once it’s established, water it only during dry spells and avoid water logging or creating muddy soil. The Colorado blue spruce can tolerate dry soil as long as the plant is watered regularly during its first growing season. At that point, it develops a deep root system and requires less frequent watering.

Fertilizer

Blue spruce does not require frequent fertilization to thrive. If you want to fertilize your Colorado blue spruce, do so in early spring or late summer using a balanced 10-10-10 formula. This will give the tree an added nutrition boost. It will increase the length of the needles and improve the needle color. 

The fertilizers will also give full nutrients and help the plant to grow vigorously with a nice look and denser foliage. Better yet, you can consider using green manure for your plants. Learn how to make a composter to make this even better.

Pruning

The Colorado blue spruce should be pruned to remove dead needles and any diseased branches in its first winter. After the tree has gone through one growing season, it should no longer require any pruning. But a good thumb requires you not to prune them because they do best when their branches are allowed to grow to the ground.

Pruning them will also promote denser foliage. So, apply two to three inches of garden mulch around the plant’s base in a wide circle to keep the soil from splashing during rainy weather.

Temperature and Humidity

The Colorado blue spruce will prefer cool conditions, but they’ll tolerate full sun more readily than other evergreens. Give your tree some protection from the hot afternoon sun. It would prefer cold winters and moderate summers, with an annual minimum of about -20 degrees Fahrenheit.

The Colorado blue spruce is also tolerant of cold weather, but it will not thrive in extremely hot and humid weather conditions.

Pests and Diseases

Aphids, scale insects, and spider mites are all pests that bother picea punjens. An infestation of whiteflies can cause leaves to have a dusty appearance and also cause root rot. If you see any symptoms of pest damage on your Colorado blue spruce, it’s important to take care of the problem immediately before it becomes an irreversible situation.

Use a magnifying glass to examine your tree. Look for any eggs that may be about to hatch, and remove them by hand if they’re spotted early enough in the process. If you find a fully grown pest, spray it with a strong stream of water from a hose or use an insecticidal soap that can be applied with a garden sprayer.

Failure to treat those fuzzy black spots can make your spruce needles turn purple to brown and eventually fall. However, fungus won’t kill your tree, but these blue spruce trees are also susceptible to white pine weevils.

Potting and Repotting Blue Spruce Tree

Since these trees are used for Christmas decorating, you can add them as potted landscaping plants when the holiday is over. The blue spruce tree can also be added to the Rocky Mountains or any area with good drainage and full sun exposure. Once the season is over, dig a hole and keep the dirt loose to provide enough air for the roots.

Potting and Repotting Blue Spruce Tree
Image credit: https://worldofgardenplants.com/

The Colorado Blue Spruce Landscape Uses

This plant makes an exceptional accent tree. You cannot also go wrong with this tree if you’re looking for a windbreak or privacy screen. And if you’re living in areas with a large wildlife population, these ornamental trees resist deer, thanks to their strong smell and prickly texture. This also makes it a perfect habitat for local rabbits and birds.

FAQs on How to Grow Colorado White Spruce

Can you grow Colorado blue spruce indoors?

No, blue spruce trees are too large to be grown indoors. They can be grown outdoors where they can get natural sunlight.

How can you make blue spruce grow faster?

Make sure your blue spruce tree is planted in a location with lots of sunlight for at least half a day. You can also fertilize the soil around the plant with triple phosphate and potassium to help it grow faster.

Final Thought on How to Grow Colorado Blue Spruce

As you can see, growing these Christmas trees is not that difficult. As long as your location has full sun and is well-drained, you can grow this plant and enjoy its Christmas beauty. Even if you do not use it as a Christmas tree, the blue spruce will still look good around your home. It can also help you separate tall multistory buildings.


The post How to Grow Colorado Blue Spruce appeared first on Kitchen Infinity.

Did you miss our previous article…
https://www.centrecountyfood.org/?p=161

post

13 Best Microfiber Cloths

Most microfiber cloths are eco-friendly and come in several sizes to help them pick up small dust and bacteria particles. Larger clothes are suitable for heavier, messier cleanups, while smaller and fine fibers are suitable for computer screens and glass tables.

But not all microfiber cloths can get the work done the way you want it done. So, what are the best microfiber cloths? This article outlines some of the best microfiber cloths based on their quality, affordability, and durability. Let’s get started!

1. AIDEA Cleaning Cloths

AIDEA Cleaning Cloths are highly durable and have been processed to be extra soft so that you can get a safe and reliable clean for your laptop, cell phone, or other electronic devices. The specially crafted fiber is 100% polyester blended with a mixture of micro-polyester and polyamide, allowing the cloth to pick up dust particles much more efficiently than ordinary fabrics. You can use AIDEA cleaning cloths on your laptop, cell phone, and clean electronics without fear of scratching their surfaces.


Image credit: https://m.media-amazon.com/

AIDEA Cleaning Cloth’s durability has been tested in a laboratory to ensure that they will hold up against repeated washing. 

The AIDEA cleaning cloths have also been UV-treated which means they can be used in direct sunlight and will not damage the screen of your electronic device. They contain antibacterial properties, allowing you to clean surfaces throughout your house without worrying about building up bacteria or mold. 

2. Polyte Microfiber Cleaning Towel

Don’t let go of this microfiber cloth when you lay your hands on it. It comes with quick-drying cloths of natural bamboo fiber and a special quality microfiber. It ensures that your device will be clean and free from bacteria. You can wash it in a washing machine and can be reused up to 300 times, making it very cost-effective in the long term. It’s suitable for both household and automotive use.

3. E-Cloth Microfiber Home Cleaning

This type of microfiber cloth is designed for deep cleaning. The brand boasts of eliminating 99% of surface bacteria, mold, and pollen. It does this by locking contaminants inside the dense fibers until they are washed thoroughly in the machine. This cloth is made in Korea and comes in nine different purposes: dusting, polishing, drying, wet polishing, and much more.

It covers a wide range of home cleaning needs such as kitchen cloth with scrubbing pocket, a range, and a stovetop cloth. It also covers two glass polishing cloths, a bathroom cloth, a window cloth, a dusting cloth, and a stainless steel cloth. Each of these cloths comes with a different pattern and color to shine any room and appliance in your home.

4. MagicFiber Microfiber Cleaning Cloths Review

The microfiber cleaning cloths are great; they take out all the dust and dirt even from the hardest-to-reach places. It is a must-have for everyone who likes an extremely clean home. This set of IXL Korean extra-thick 9-piece Microfiber Cleaning Cloth Set is as useful as it is beautiful as it is durable. 

You can use it either wet or dry, for any job in the home you may have. This set includes one multipurpose cloth, two glass polishing cloths, a stovetop cloth, a bathroom cloth, a window cloth, and a dusting cloth in addition to the stainless steel cloth.

You can also use it as an eyeglass cleaner. MagicFiber cloths are good for most delicate surfaces, especially computers and smartphones. Each pack of MagicFiber comes with a protective bag, making it stay clean and ready for use. You should thoroughly clean microfiber cloths and follow the care instructions carefully. These finely woven cloths should be washed gently without harsh chemicals.

5. Kirkland Signature Ultra High Pile Premium Microfiber Towels

These microfiber towels are great for cleaning cars and trucks because of their high fiber density and affordable price. With their thick and plush weave, they can absorb liquids such as oils quickly and completely. You can also use them with or without water for a gentle, deep clean. It’s also the best microfiber cloth for glass.

The company claims that its fibers can get rid of up to 99% of surface bacteria. You can reuse them even a hundred times, and their care is quite easy- you just machine wash in cold water and tumble dry on low. It’s also designed for automotive use and the set of 36 will also protect other delicate surfaces such as car panels and interiors.

6. CleanGreen Microfiber Cleaning and Dusting Gloves

Do your cleaning with microfiber by using a pair of gloves made of this super soft material. They are perfect for dusting TV and computer screens, blinds, photo frames, and other small surfaces. These microfiber cloths are reusable up to 500 times, so you can forget about buying paper towels, window cleaner, or any other cleaning product.

CleanGreen Microfiber Cleaning and Dusting Gloves
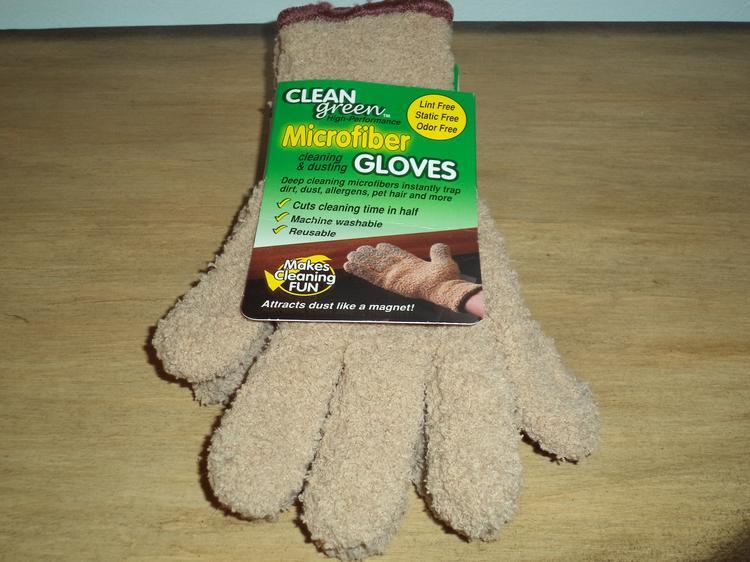
Image credit: https://www.jennsblahblahblog.com/

7. AmazonBasics Microfiber Cleaning Cloth

These microfiber cleaning cloths are Amazon’s best-selling cleaning cloths. They contain 90% polyester and 10% polyamide, making them super absorbent. They are great for a gentle clean and are also affordable and eco-friendly solutions for your cleaning.

They have also accumulated more than 9300 positive reviews on Amazon. So, what are you waiting for? Get yourself this cleaning microfiber cloth and save a little cash plus the environment.

8. Meguiar’s Water Magnet Microfiber Drying Towel

These microfiber towels are super absorbent, well made, and great for drying your car. It has a special weave to soak up water quickly and easily. They are also quite affordable compared to other microfiber cloths in the market because they offer you 16 different sizes to choose from, making them ideal for any use.

They are super absorbent, meaning that you can use them too quickly to clean off a car without any soap and water and without leaving back any streaks. It’s capable of absorbing up to twice as many traditional terry cloth towels. Apart from detailing cars, you can also use these microfiber towels to clean other areas in your home.

9. Microfiber Wholesale Microfiber Glass Cleaning Cloths

These are some of the best microfiber cloths in the market today. They are made from high-quality materials, making them soft and durable at the same time. They are great when it comes to cleaning glass and polishing.

The eight-piece set comes with a total of four 16-inch microfiber cloths and four 12-inch microfiber cloths. You can use them to clean windows, mirrors, lights, and many other surfaces in the house. They are also great for removing stains and marks from wallpaper without leaving any scratches behind.

They are made from a blend of polyester and nylon. They have a very high absorption rate, making them great for cleaning surfaces without leaving streaks behind. The towels also have a plush microfiber pile that traps dust and other particles to make the cloth more effective when polishing surfaces. These microfibers cloths are also reusable and can be machine washed.

Microfiber Wholesale Glass Cleaning Cloths come in four different colors: blue, yellow, red, and green. This is because different colors work best for specific purposes. For example, the blue microfiber towel is excellent for polishing chrome surfaces such as your car’s headlights or trim pieces since it has a very high luster. The green cloth is best to help you clean windows and mirrors since it produces a high level of transparency, allowing the glass to sparkle when dry.

10. SimpleHouseware Microfiber Cleaning Cloth

This is another small microfiber cloth. With their small and mighty towels, they can hold up eight times their weight but still dry quickly. They’re smaller than human hair. These microfiber cleaning cloths are made up of 85 percent polyester and 15 percent nylon for a soft, non-abrasive material that can clean your surfaces at home.

These highly adaptable cloths come in packs of 5, 10, 15, 20, and even 150. But it’s up to you to decide on what number seems good to you. It’s always difficult to know how many microfiber cloths you’ll need in a pack, but for a long-term supply, this microfiber cloth will give you more than enough.

The set includes 50 packs, each measuring 12 by 16. Other than sheer quantity, this microfiber cloth is good for larger cleanups around your home electronic cloth that might fail to clean. The set comes in four assorted colors, including green, yellow, orange, and blue.

11. Mr. Siga Microfiber Cleaning Cloth

This is also the best choice if you’re looking for something colorful. The cloth measures 12 x 16 inches which are just enough to fit into your hand and cover larger spaces. It’s made with 80% polyamide and 20% polyester material, which are safe, especially around electronic devices. 

This microfiber cleaner can be used for dusting and cleaning. This is the best choice if you need a cloth that can remove tough stains because it has greater absorption capabilities.

If you’re looking for an affordable cleaning cloth that can work on shower tiles, car windows, and anything in between, then a multi-use towel is the right choice. It can absorb five times more liquid than traditional towels, and it dries faster than a regular towel. This microfiber towel is made from 100% microfiber material, making it safe to use on electronic devices such as smartphones, cameras, and other valuables.

They’re absorbent and are scratch-free microfiber with high-quality stitching and reinforced edges to ensure they will not fray after repeated use.

12. Buff Microfiber Cleaning Cloth

Buff microfiber cleaning towels are made of 50/50 polyester and microfiber blends to help with deep cleaning. This durable material is designed to continue working, even after 500 washes. Each set comes with 12 pieces of clothing, so you don’t need to replace them any time soon. They are also easy to wring out and dry quickly after use. They’re so perfect for heavy-duty cleaning.

13. Unger 18-Inch Microfiber Cloths

The Unger microfiber cloths are perfect for windows, bathrooms, or anywhere that needs a deep cleaning. They are quite big so that you can use them on large surfaces easily. The material of the cloth is very absorbent, making it useful for drying wet floors as well.

They are highly flexible and adaptable to keep your home’s hard surface clean. Whether you’re cleaning your kitchen surfaces, bathroom, floor, glass window, and hardwood floors, this cloth stands out to get the job done.

The cloths themselves are made with a unique weave of tiny, strong microfiber strands that hold effectiveness when used with conventional cleaning fluids. Even without chemical cleaners, it’s eco-friendly and inexpensive to use. Designed for wet and dry use, you can keep this three-pack set around your home for natural, chemical-free cleanups when necessary.

FAQs on Best Microfiber Cloths

re some microfiber cloths better than others?

Microfiber technology is a relatively new cleaning product, which was not always available for purchase. Today, countless companies sell microfiber products, and competition has driven many of these companies to create innovative and high-quality products. 

Microfiber goes through several steps in the process before it becomes a cloth. So, you should look for a company that takes the time to produce high-quality products.

How often should I wash my microfiber cloth?

It is best not to wash your microfiber cloth too frequently, as this causes wear and tear on the fibers.

Final Thought on Best Microfiber Cloths

There you go! There are so many amazing microfiber cloths on the market. So, take your time to choose the right microfiber cloth for your needs. There are so many brands available in the market at an affordable price. Also, make sure you keep them clean to serve you for many years to come. Do not use fabric softeners if you want them to last for long.


The post 13 Best Microfiber Cloths appeared first on Kitchen Infinity.

post

Guide to Standard Drywall Sizes and Thicknesses

When building your own house or making repairs, you’ll need to decide what type of wall and ceiling surfaces you want. Drywall is widely used for interior walls and ceilings because it’s very economical and easy to install. The flat white and clean appearance makes it ideal for ceiling finishes and residential construction.

But choosing the right sizes and thicknesses for drywall isn’t an easy thing, but you definitely won’t need professional help. This guide shows different types of drywall sheets in various sizes and thicknesses. So, you can easily compare them by size, making it easier for you to choose which ones would work best for your project. Let’s get started!

Drywall Thickness

Drywall comes in 3/8″, 1/2″ and 5/8″ thicknesses or in metric 6, 9.5, or 12.7mm. Standard US drywall is 1/2″ (12.7mm) thick, while the other two are called “non-standard.” Building codes also have some requirements when it comes to standard thickness. The building code dictates the thickness of each application.

1/4 Inch-Thick Drywall

This is not very common, and it’s used as a skimming material for placing over an existing surface. You can also use these thin drywall sheets to install drywall on the slightly curved surface. If the drywall is not meeting the curve, you need to add a layer of mesh tape and compound before applying another thin sheet.


Image credit: https://diy.sndimg.com/

1/2 Inch Drywall

This is the most common type of drywall used in construction, and it can be found in all building and construction material stores and outlets. Thanks to their standard thickness, the regular 1/2″ (12.7mm) sheets are suitable for interior walls. 

They’re very easy to carry and hang. It’s the most versatile board and common thickness for the 16-inch on-center interior walls. It provides a great balance between strength and weight.

5/8-Inch drywall

If your ceilings or walls require a prescribed fire-resistant rating, then this is the right drywall thickness for you. It’s a heavier product that can resist sagging in your ceilings and 24-inch wall. It’s also the thickness standard for fire-resistant or fire-code drywall, mostly found in garages. This added thickness also improves soundproofing.

Due to its excellent soundproofing qualities, 5 8 works well in bedrooms and living areas. However, you’ll have to pay more for this type of drywall than 1 2 inches thick and smaller.

3/8-Inch drywall

When you’re looking to fix drywall patches or if your drywall is damaged and worn out, this is a great drywall thickness you need to consider. It’s the best option for home remodeling projects. Note that it doesn’t offer the strength of 1/2-inch panels.

Drywall Sizes

The length and width of drywall sheets usually come in 4x. The most common ones include 4-foot by 8-foot, 4-foot by 12-foot, and 4-foot by 16-foot sheets. The building codes don’t dictate the requirements for drywall sizes. The sizes are determined by the needs of the architect, builder, and client. 

4-Foot by 8-Foot drywall

This is the most common size of drywall. It’s commonly used because it’s easy to carry. Working and installing this type of drywall is very easy. However, it’s not the best option for remodeling jobs because its small size is limiting. You can’t use this type of drywall in rooms more than 8-feet wide and 12-feet long.

A drywall board size with these dimensions together with the thickness of 1 2 makes it manageable. It’s the biggest sheet ideal for a DIY project because you can easily carry and lift it into place. It allows for both vertical and horizontal installation. 

4-Foot by 12-Foot drywall

For long and tall drywall, you can find drywall in lengths of 12 or 16 feet. So, if you have long and tall walls, go for this size of drywall. If you also want an unbroken line from floor to ceiling and prefer a smooth surface when working with a long and high wall, this is the best solution.

These longer sheets also produce fewer butt joints than 8-foot-long sheets. However, they are heavy to carry by a single person, so if you’re going to install them at your home, make sure you have people around to help you. 

2-Foot by 2-Foot drywall

This type of drywall size is best when you have small spaces. When you also need to do some patchwork around your stairs, alcove, and nooks, opt for this drywall size. It’s not the standard size of drywall, but you’ll find it at local hardware stores and home improvement stores.

lternatives to Drywall Sizes

When your wall panels come in lengths and widths instead of four feet multiples, then those are not drywall panels. They are cement board or drywall alternatives such as DRIcor Smartwall. 4-1/2-foot wide drywall sheets are not very common in the consumer market, but you can get them with special orders. They are rarely available in home improvement centers and are only used by professionals.

Types of Drywall

While standard drywall works well for bedrooms and living areas, there are other types of drywall for special purposes. Here are the types of drywall that you should consider on your next home project. They are excellent in humid areas such as bathrooms, kitchens, and laundry rooms.

Types of Drywall
Image caption: https://www.homestratosphere.com/

Fire-Resistant Drywall

Fire-resistant drywall contains glass fibers and other materials, enabling them to endure flames more than any other type of drywall. You can use it in the laundry room, near furnaces, stairwells, and garage ceilings. It will help reduce flames from spreading in case of fire break out.

In addition, they enable the walls to generate less smoke and are also good for sound control. When renovating your home, the building codes will request you to use a fireboard with fiberglass in areas where you have rooms with wood studs. You’ll also be required to install this type x drywall if you have furnaces, garages, and utility rooms.

buse-Resistant Drywall

This is the type of drywall that can withstand any abuse. It has a polystyrene layer that bonds well to the non-decorative gypsum board.

Mold and Moisture-Resistant Drywall

Both mold and moisture-resistant drywall panels are paperless panels with a special coating that blocks moisture and helps prevent mold growth. So, if you’re wondering how to get rid of mold from your home, installing this drywall will be your first solution. This combination is an excellent choice for bathrooms, kitchens, and laundry rooms. As it reduces mold, it extends the appearance and lifespan of surfaces.

Cement Board Drywall

Cement board drywall is durable drywall that’s designed to be installed on plywood or studs. It is available in 1/2-inch and 5/8-inch thicknesses. The cement board is made by sandwiching a cement core between two layers of fiberglass mat. You can use this type of drywall behind ceramic tile and marble for high moisture areas. It’s the hardest material to cut.

It’s also known as a backer board and can also be used under floors and counters. Its moisture-resistant quality makes it ideal for high-moisture areas.

Standard Sheet Drywall

This is the common type of drywall. It is ideal for residential remodeling and basements. It doesn’t have any interesting features and can be used for ceilings and residential interior walls.

Square-Edged Drywall

This type of drywall is most common, and it’s fitted into standard studs 16 inches apart. If you’re looking to plaster your ceiling or wall, here is the drywall solution for you.

Fire Code Drywall

Fire code drywall is thicker than half-inch material. It has a special gypsum core that resists heat and provides fire protection. Despite having a heavier core, it’s still easy to cut.

Tapered-Edge Sheets

This type of drywall sheet is great for finishing walls. The tapered ends allow the compound fillers between gaps.

Foil-Backed Drywall

They don’t offer much moisture resistance like moisture-resistant boards. But, it’s suitable for areas with less moisture but more for colder temperatures.

FAQS on Guide to Standard Drywall Sizes and Thicknesses

What is the best thickness of standard drywall?

Most drywall measures 1/2-inch thickness, which is the most common for interior walls. This is because they are easy to carry and hang, unlike other types of thickness.

What sizes does drywall come with?

The standard size of drywall includes 8, 9, 10, 12, 14, and 16 feet. However, 8, 12, and 16 work well for residential construction, so you’ll find it in most retail hardware stores.

Is it better to hang drywall vertically or horizontally?

Fire codes require seams to fall on the length of the framing, especially on commercial jobs, so ensure you hang your drywall horizontally. If your walls are 9 feet higher or shorter, hanging your drywall horizontally will leave you with more benefits.

Final Thought on the Guide to Standard Drywall Sizes and Thicknesses

As you can see, it’s very important to be careful when choosing drywall because choosing the wrong size and thickness can break your project. You don’t want to spend a lot of money and time on your home improvement project only to end up with losses.


The post Guide to Standard Drywall Sizes and Thicknesses appeared first on Kitchen Infinity.

Did you miss our previous article…
https://www.centrecountyfood.org/?p=133

post

How to Clean Silver with Frugal Silver Cleaner

How to Clean Silver with Frugal Silver Cleaner

Cleaning your antique and silver jewelry is very simple and easy. But only if you use the right products. The best way to ensure your pieces’ longevity is to use a frugal recipe for cleaning silver.

Instead of using harsh chemicals that might damage the finish or cause it to darken, this frugal silver cleaner uses common household ingredients like baking soda and vinegar.  This method of cleaning sterling silver is simple, cheap, and doesn’t use any heavy chemicals.

But how do you do it? This article will teach you how to clean sterling silver with a simple method that’s easy on your hands, as well as saving you money.

What You’ll Need

Aluminum foilGlass baking panBaking sodaSoft, clean white ragHot waterTwo tablespoon saltTea kettle or coffee pot for boiling water

Instructions

Line the Baking Pan with the Aluminum Foil in the Washtub

Lay down a layer of aluminum foil in the bottom of a large wash-tub for easy cleanup later. Fill your container with hot water, especially the boiling water from a coffee pot or any other container from which you can pour it safely. After that, place your jewelry on top of the aluminum foil.

Don’t worry if you don’t have aluminum foil, instead, use a clean aluminum lasagna-style baking dish. Make sure you throw away your dish after using it to clean the silver.

Cover Baking Pan with Boiling Water

Pour some boiling water into the baking pan that’s large enough to hold your silverware, until it’s more than halfway full. You will need more water if you’re cleaning heavily tarnished silver. This will help restore the shine to your silver, and it will also help the boiling water dissolve the grime.

dd Salt and Baking Soda

Sprinkle in two tablespoons of salt and two tablespoons of baking soda. After sprinkling baking soda, pour some boiling water to cover the jewelry in the pan and allow it to sit for a few minutes. 


Image credit: https://i.ytimg.com/

Your solution will bubble and smell. The chemical reaction will cause a sulfur smell, but will not be too strong as it will go away quickly once it’s done. You can also achieve a great silver polish by adding washing soda to hot water.

dd the Silver

Place your silver into the water and ensure they are touching the aluminum foil. However, the silver pieces should not touch each other. Add the dishwashing soap and let the silver set for about 12 hours. Use wooden or plastic utensils to turn over your solver pieces.

Do not use metal and avoid using your fingers in hot water to allow as many surfaces of the item to touch the aluminum foil. The chemical reaction taking place in the container should be able to eliminate dirt and stains.

Soak the Silver

Allow your silver to soak for about two to three minutes on each side. For lightly tarnished silver, you’ll require several minutes for it to be restored. But for heavily tarnished silver, you may require a few treatments. So, soak heavily tarnished items for as long as five minutes and if the water cools down, don’t hesitate to add more hot water, plus salt and baking soda.

Remove the Silver

Take your silver items out of the water. The tarnish should have already started to peel off, which means it’s time to clean the item with a gentle brush or towel. You can use a soft cloth or paper towel for this task in case you prefer not to use your hands in hot water. 

Once your silver is clean, remove it from the pan then rinse it with clean water. Let it air dry before storing away. Never use gloves when you’re cleaning silver as this may cause the items to become scratched. 

Tips for Keeping Your Silver Clean for Long

Shine and Polish

You need to keep your silver jewelry shiny all the time with a quick and routine washing using warm water and mild dishwashing soap. Swish your jewelry around in the water for some minutes, rinse, and then buff dry.

Shine and Polish
Image credit: https://cdn.shopify.com/

void Bleach and Harsh Chemicals

You must not use your silver jewelry with cleaning detergent and bleach that can ruin their surface. Some jewelers suggest using vinegar and baking soda for brightening the silver’s finish when cleaned at home. Vinegar is also safe for all metals, including sterling silver, but if you do not feel comfortable using it, commercial silver cleaners are also good.

Store Your Silver Jewelry in a Dry Location

Never expose your jewelry to direct sunlight or heat because it can cause tarnishing when the metal reacts with sulfur and other chemicals in the air. Store your items in a dry location if you are not wearing them regularly to stop tarnishing too. 

Also, do not put your silver pieces away when they are still damp. Moisture causes silver to tarnish faster, so make sure your pieces are completely dry before storing them.

Soak the Naturally in Sea Salt

Leave the metal pieces in sea salt overnight, especially if you have already tried all-purpose cleaning products and have not noticed any improvements. Seawater is known for its high volume of natural salts that can help remove tarnish very easily. This helps clean silver naturally without damaging it.

Salt and baking soda are great cleaning products to use when you want to make your own silver polish. Combine one part salt with two parts baking soda, put them on a cloth or paper towel, and apply the mixture directly onto tarnished silver pieces. 

Rub the piece gently to remove any signs of tarnishing, rinse off all the mixture, and dry the piece with a clean cloth. This homemade silver cleaner will remove tarnish without harming your silver plating.

Use Toothpaste

Toothpaste also can be used in a pinch when a silver cleaner is not available. Apply a small amount of toothpaste onto a dry cloth or paper towel and apply it directly to the piece that you would like to clean. Gently rub the silver in a circular motion, rinse with water, and dry with a clean cloth. This method will remove tarnish from the silver piece without scratching it.

After you are finished cleaning your silver, make sure to properly store them so they do not tarnish again. Keep the pieces in air-tight containers and place a piece of tissue paper on top of the container before sealing it. This will help absorb any moisture that may seep into the container and cause tarnish.

Use Your Silver Jewelry

It’s recommended to use silver jewelry and silverware more often as this will prevent them from tarnishing. Be sure to wipe each piece before you put it away and seal it properly in a container. If your silver is already tarnished, it may be too late for simple cleaning.  If this is the case, consider taking a trip to see a professional who can remove the tarnish from your silver effectively.

FAQs on How to Clean Silver with Frugal Silver Cleaner

Can you use silver cleaner on sterling silver?

 Yes, you can use silver cleaner on sterling silver. This silver cleaner quickly removes tarnish and restores shine and brilliance to your silverware.

How often do you clean your silverware?

You should be cleaning your silverware at least once per week in order to prevent tarnish. This is not only for aesthetic reasons, but because the chemicals used in most silverware can actually eat away at your skin and cause reactions that will be costly to treat.

Final Thought on How to Clean Silver with Frugal Silver Cleaner

Improper cleaning of your antique silver plate and good-quality silver jewelry can make it lose value. Therefore, it’s important to know how to clean silver and the correct way of cleaning it. If you’re in doubt about how to clean your valuable silver, it may be best to call in professional help.


The post How to Clean Silver with Frugal Silver Cleaner appeared first on Kitchen Infinity.