post

How to Clean the Burners on a Gas Stove

Cleaning gas stove burners can be difficult to do by yourself, especially if you don’t have the right tools. There are many different kinds of cleaning products available in your local store, but not all of them will work for all types of stoves. If you’re looking for a quick and easy way to clean your burners on a gas stove, then look no further. 

This article will help you eliminate any build-up of grime from inside your stove’s ports as well as its burners within minutes. If you follow these tips, you’ll understand why you should not ditch your gas stove as it will be as clean as new. Let’s get started!

How Gas Burner Works

The burners on your gas stovetop consist of a burner assembly attached to a small gas intake valve on the front or at the top of the stove. Gas stove burners operate by receiving an air-gas mixture that is sent through the main gas line. Gas stoves have a gas valve that attaches the main gas line to the stove and sends the air-gas mixture to each burner. 


Image credit: https://engineer.decorexpro.com/

When the burner control knob opens the intake valve, it allows gas to flow through the venturi tube. The gas then enters the venturi tube through one of the wide ends, increasing in pressure as it passes into the narrow section of the tube. The burner head is a hollow metal disk with holes and slots in the outside edge.

The burner head sits atop and directs flames emerging from the burner head. The older burners have a pilot light, while the newer gas stove burners have a small spark pilot located on the side of each burner. A light pilot or electric spark pilot controls the airflow, allowing you to generate more or less flames as possible.

How Often Should You Clean Your Stove’s Gas Burners?

Gas stoves are simple and trouble-free. Typically, you can clean the burner once a year. But, it’s important to clean it when the flow of gas becomes hindered due to food residue that may spill on the pots and pans. Food residue can clog the ports around the burner heads.

If left unattended, this food residue can be quite hard to remove. Clean your burners whenever the burner becomes irregular and exhibits a yellow color. Below are the steps you need to take to clean your gas stove burner properly. Take time and refer to your owner’s manual if necessary:

What You’ll Need

Old toothbrushNon-abrasive scrubbing padDish soapDry towelBaking SodaPaper clipDamp cloth

Read Manufacturer’s Instructions

Before you start cleaning, it’s always a good idea to refer to your owner’s manual. This can serve as a safety reminder, and it may reveal some tips on the best way to clean your burners.

If your cooktop didn’t come with the manual, you could always download a manual online via the manufacturer’s site. The manual will recommend tools and cleaning products, saving you from many hassles.

Turn Off Gas Supply Valve

Clean gas stove burners before turning them off. Make sure you shut off the valve before doing anything else. Before removing the burner caps, ensure your gas is off. Look under the burner caps and access the burner heads. 

Proper gas flow is dependent on clean burner heads, so ensure you clean stove burners first. A valve will be nearby, connecting your stove to the main gas line. Make sure you turn off the valve before cleaning. Also, ensure the stovetop and burners are completely cooled before you begin cleaning.

Remove Burner Caps

Remove the burner caps and set them aside. Once a sturdy grip is established, twist each cap counter-clockwise to remove it from the stovetop. The order of the caps does not matter because you will reattach them later on during the cleaning process.

Remove Burner Caps
Image credit: https://www.thespruce.com/

Many gas burners have a removable ceramic disc that sits atop the burner to diffuse flame. If you have this kind of burner, lift the disc off the burner, making sure that the burner is completely cool before doing so.

Remove Burner Heads

Use a flathead screwdriver or other suitable tool to loosen and remove the burner heads and caps. Take care not to damage the gas line connected to the burner because you will be reinstalling them later on during the cleaning process. Set aside and inspect each burner head as you remove it from the stovetop.

Look for built-up debris inside the gas jets, at the edge of the burner head, where it sits on top of the stovetop surface. Be careful not to damage the venturi tube beneath when lifting the burner head.

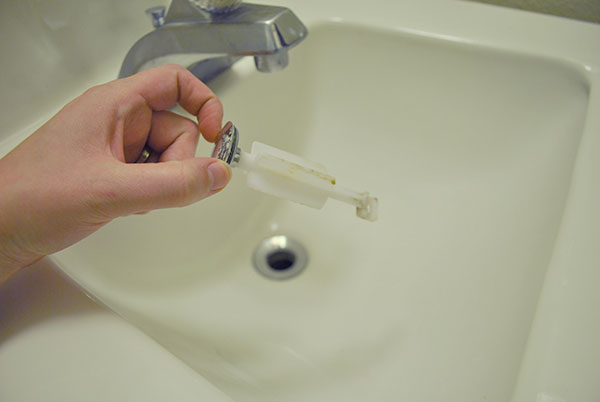
Soak and Scrub the Removed Parts

Place the burner heads and caps into a bowl or other suitable container. Fill this with warm water and liquid dish soap and let it soak for 30 minutes. If you find that there is still residue on the parts, try soaking them overnight instead.

Once they’ve soaked, pull them out and scrub them with an old toothbrush to remove debris. If the toothbrush can’t remove some debris, use a straightened paper clip to unclog the head and cap holes. Make sure you don’t damage the metal of the burner head as you clean. 

You can also use one part water and one part baking soda to remove stuck-on debris. You can also make your cleaning paste with one cup of baking soda and half a cup of vinegar. Apply a paste on the surface of your stove using a clean cloth or sponge.

Rinse the Parts

Use whatever you used to make the paste and rinse it off with running water. Make sure the area is dry before replacing the parts. Shake to remove excess water, then dry with a damp cloth.

Rinse the Parts
Image credit: https://www.thespruce.com/

Allow all the parts to air dry completely before reassembling the burners. As the parts are drying, turn your attention to cleaning other parts of your stove. Make sure you learn how to clean drip pans and grills. soak and scrub all these parts well.

Reassemble and Test Your Burners

After you’ve washed and rinsed your burners, pat them dry with a towel and set them aside. Let them air dry until they’re entirely free of water. Once the burners are dry, reassemble them. Reassemble the drip pans, grills, burner heads, and caps. 

Reassemble and Test Your Burners
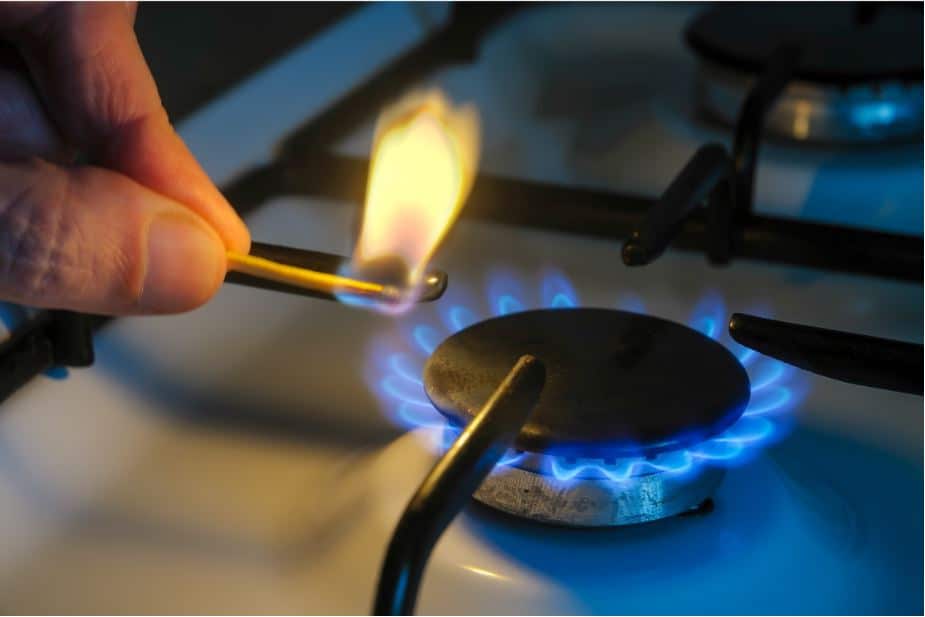
Image credit: https://www.forkandspoonkitchen.org/

Before turning on your stove, inspect all of them to make sure they aren’t dripping water. On electronic ignition stoves, take care not to bend or damage the ignition electrode as you install the heads.

Relight the Pilot Lights

After you’ve reassembled your burners, relight the pilot lights by pressing down gently on each knob. Open each gas valve slowly and light the burners. If there’s no flame, ensure that the knobs are turned to the pilot setting. 

As you do this, make sure you follow the manufacturer’s instructions for relighting the pilot flames. Test the burners to ensure they operate correctly as unusual flame color and shape may indicate that the burner heads are not completely dry.

FAQs on How to Clean the Burners on a Gas Stove

How do you clean the grates and burners on a gas stove?

If the grates contain dirt, grime, or grease, mix three parts of baking soda into one part of water. Coat the grates in the mixture and wait for 20 minutes. Wipe down the burners with a soft cloth and if you have burners coated in baking soda paste, rinse first to avoid damaging the finish.

How do you deep clean a gas stovetop?

You can use a soft bristle brush and a mixture of vinegar and water in a spray bottle with baking soda paste when deep cleaning your gas stove top. If you notice sputtering, shut off the burner and clean out any food build-up left in the gas line before turning the gas back on.

Final Thought on How to Clean the Burners on a Gas Stove

Cleaning your gas stove burner shouldn’t be an uphill task. Take your time and be thorough with your cleaning process. Make sure everything is properly rinsed before drying. This way, you’ll have clean stove top burners that are ready to fire up your next meal. 


The post How to Clean the Burners on a Gas Stove appeared first on Kitchen Infinity.

Did you miss our previous article…
https://www.centrecountyfood.org/?p=444

post

Feng Shui Tips for a Bed Aligned with the Door

You’ve just moved into a new home, and you’re looking for some Feng Shui tips to help improve your health. The first thing you’re probably learning is how to feng shui your bedroom and the bed becomes the first priority in this. The bed is a very important piece of furniture in your home because it represents you. A bed aligned with the door is one of those bedroom Feng shui mistakes that can affect your energy flow.

This mistake may cause illness, bad luck, or even relationship problems. Therefore, your bed placement affects you in your conscious and unconscious states. This article will give you some tips on how to handle a bed aligned with the door based on good Feng Shui principles so that your bedroom would be a more peaceful and healthier place to stay in every day.

Commanding Position

In Feng Shui, you need to place the bed using the principle of commanding position. Your bed should be located where you can see the door to the bedroom when lying. Your bed shouldn’t be directly in line with the door. According to the command position principle, place your bed diagonal from the door.


Image credit: https://redlotusletter.com/

If you can’t be in the commanding position, don’t worry. You can correct the bed by using a mirror. Place the mirror in a place where you can see the reflection of the door when you’re in bed.

Place the Bed in Relationship to Doors and Windows

A door and a window facing each other in a bedroom can drain its energy. Avoid sleeping with your bed located between two doors or windows. If your room size is limited, make sure the windows are towards the side of the building rather than front or back, where you get more sun exposure, especially sunrise and sunset rays. The best position for your bed is facing the door.

Place the Bed in Relationship to Doors and Windows
Image credit: https://cf.ltkcdn.net/feng-shui

Avoid having your feet pointing straight out the door. This is known as coffin position. You can also call it the bed-facing door superstition. If the only place for your bed is in line with your door, that is the coffin position, you can still correct it. You can hang a faceted Feng Shui crystal ball halfway between the door and the bed.

Place Headboard Against a Solid Wall

Make sure the headboard of your bed is against a solid wall rather than an open space. This means that you should be supported from the back. Avoid placing your bed with the headboard in the middle of the room. Do not also let the whole bed float in the middle of the room. A headboard facing away from the main door can create a placement problem with different consequences of chi.

The wall behind you is very important because you’ll need it to support yourself. Additionally, avoid windows behind the head of the bed, especially if you’re on the ground floor or have eye issues. Make sure you have a solid bed behind you and not a window.

Consider Beams, Soffits and Sloped Ceilings

For the best bed placement, make sure your roof beams are above you or do not block them. If there are beams, they should be short and fluffy so as not to cause a problem. It is best if they’re just below the ceiling because it can still be a distraction when lying down.

The area above your bed should be free of beams, soffits, and sloped ceilings. These architectural features above your bed can create unnecessary pressure. If you can’t avoid these features, use the drape fabric to conceal the ceiling feature. If it is not a large beam and soffit, blend the feature into the ceiling by painting it the same color. This will make the dropped ceiling areas less oppressive.

Locate Your Bed Away from the Toilet Wall

Toilet walls are not usually the best place to sit on your bed. The vibration and flow of chi energy are much too powerful. This can cause lots of problems with sleeping if you have your head against the toilet wall, so be sure to position your bed away from this area.

Locate Your Bed Away from the Toilet Wall
Image credit: https://fengshuinexus.com/

Consider the Space on Both Sides of the Bed

If it’s an adult bedroom, you should have open space on the left and right sides of the bed. A good chi recommends not to place your bed with one side up against the wall.

Bed and Bathroom Door Placement

The main bedroom door is a primary concern when placing your bed in the room but don’t overlook other doors. The placement of your bed and the location of your master bedroom’s bathroom door can create very uncomfortable chi problems. Generally, it is not good to place a bed in such a way that the headboard is next to or placed directly in front of the doorway unless you plan on doing some yoga stretching exercises every morning upon waking.

In Feng Shui, bathrooms are a place from which energy leaves the house. If your bed must face the bathroom door, make you close both the bathroom door and bedroom door. You can hang a mirror on the inside of the door facing the bathroom. The mirror will reflect any negative energy leaving the bathroom back into it.

void Electromagnetics in Your Bedroom

Avoid placing your bed next to any electrical sockets or cables, especially those connected directly to the wall. If you tend to watch television in bed, it is best not to have an electrical socket located behind the television. Also, keep electronic devices such as alarm clocks, wireless phones, and printers at least one foot away from where your head will lie every night.

If you must have that TV set in your room, cover it before you sleep. The same goes for laptops and phones. For you to have a good night’s sleep, these electronic devices should not emit radiation near your body.

The congested electrical wires all over the house is also another bad feng shui in the bedroom. Try to put them away or at least cover them up. You shouldn’t also have a desk in your bedroom to optimize the space for good chi.

Choose Restful Art

The artwork in your bedroom will speak a lot about your private life. If you’re looking to attract your partner and still keep things in line with your taste, the artwork you place in your room shouldn’t depict solo persons or objects.

When practicing Feng Shui with artwork in your room, there should be an element of a pair of pieces. Save family photos for other rooms and not your bedroom. Keep the artwork up at eye level. You can also take it higher to increase life force energy. Also, consider perfect colors that match your feng shui bedroom. You can choose the perfect feng shui front door color and make sure you don’t go wrong with anything.

Detoxify and Declutter Your Bedroom Feng Shui

Detoxifying your bedroom is very important because it will help get rid of chemicals and toxic elements from your bedroom and replace them with organic ones. A good start is to use green products and non-toxic cleaning products. Infusing your room with some sweet orange oil can bring good energy and make the room smell a little bit nicer.

Detoxify and Declutter Your Bedroom Feng Shui
Image credit: https://www.thespruce.com/

Start with the clutter under the bed because it may affect you while sleeping by causing subconscious blocks in your life. A good Feng Shui is to clear the space under the bed so that the energy can flow freely.

FAQs on Feng Shui Tips for Handling a Bed Aligned with the Door

How can you protect yourself if the bed faces the door?

If you find yourself sleeping directly opposite the bedroom door, you can use a floatboard. If you feel trapped by the floatboard, you can create a shield by placing your chest at the end of your bed filled with heavy blankets or a low screen between the bed and the door.

Which way should your bed face Feng Shui?

According to Feng Shui, you can position your bed in different positions and still enjoy it. Your bed can face East, South East, West, North West, and South West. If your bed faces west, you can create the best condition for a good night’s sleep.

Final Thought on Feng Shui Tips for Handling a Bed Aligned with the Door

As you can see, Feng Shui is an ancient practice designed to enhance your well-being and life based on the alignment of particular arrangements and objects around your house or workplace. Try to implement Feng Shui to manage your room’s energy and transform your well-being and life for the better.


The post Feng Shui Tips for a Bed Aligned with the Door appeared first on Kitchen Infinity.

Did you miss our previous article…
https://www.centrecountyfood.org/?p=438

post

14 Bad Cleaning Habits You Need to Break

Cleaning is a never-ending task. It’s something everyone has to do, and no one wants to do, especially when we think about the time it takes and how much effort it requires. We all have bad habits when it comes to cleaning our homes, but these mistakes can cause damage not only to your home but also to your health. 

You need proper tools and methods to get the job done right. With this guide, you will learn about bad cleaning habits to stop doing to live in a cleaner environment.

1. Using Dirty Cleaning Tools

When it comes to bad cleaning habits, cleaning tools are the first culprit. How can you expect the best results when using dirty cleaning tools to clean your home? If your washing machine has some odor from built-up bacteria from some detergent residue, it will make your clothes stink. 

If your vacuum bag is filled with dust, it won’t do a good job sucking up anymore. A dirty mop and a dirty sponge will push around more soil and bacteria. So, take your time to thoroughly clean tools by emptying completely and washing them in hot water after every use. Also, use enough disinfectant to kill the germs. Replacing new tools is also a good idea.

2. Leaving Wet Towels and Shower Curtains Bunched Up

If you’re tired of spending too much time in your laundry room scrubbing mold and mildew on your bathroom surfaces, don’t worry. You can easily break these bad habits and have more time to focus on other tasks. Avoid leaving wet shower curtains bunched up and wet tower curtains in a heap on the floor.


Image credit: https://www.enchantehome.com/

Always hang up your non-slip shower mat after each use. By hanging the shower curtain, it will dry more quickly and discourage mold and mildew growth. By hanging wet towels to dry, you’ll be able to re-use them without having to wash out the mildew smell.

3. Leaving Dirty Dishes on the Sink

Your dirty dishes are a breeding ground for bacteria and germs that you don’t want in your kitchen. Leaving dirty dishes in the sink is a jackpot for hungry insects. Rinse off your plates before stacking them in the sink. Load the dishwasher every time it’s full, so you won’t have to worry about leaving food scraps from last night’s dinner sitting out on the counter overnight. 

You can also break this bad cleaning habit by training everyone in your household to either put the dishes in the dishwasher or wash them immediately. After washing your dishes, wash out your sink with hot soapy water, spray with Vital Oxide, and let it dry.

4. Using Disinfectant Wipes

Don’t use disinfectant wipes on surfaces that food touches. This includes countertops and cutting boards. Wipes are less harsh, but they don’t do a great job of killing bacteria. 

Using Disinfectant Wipes
Image credit: https://www.lysol.com/

If you want to keep your kitchen clean with disinfecting wipes, it’s important to understand that you can’t swipe on everything and expect your home to be germ-free. Make sure you buy wipes that can kill viruses and bacteria. Also, ensure that you’re using these disinfectant wipes the right way; otherwise, you risk cross-contamination. For better hygiene learn how to make disinfectant wipes for home use.

5. Allowing Paper Clutter to Accumulate

Even with the emerging technology, including online billing and banking, there’s still a mountain of papers that ends up in our homes. These include magazines, newspapers, flyers, school papers, and projects. These papers tend to pile up. However, this is one of the easiest bad cleaning habits to break.

Instead of letting the paper pile up, designate a place in your kitchen for all this paper clutter. Also, keep a shredder and recycling bin nearby and sort it at least once a week. For children’s school papers and projects, opt for a designated storage bin, select a few to save space, frame a few, and hang them up. Learn how to declutter your room properly and you’ll never have trouble with cleaning.

6. Ignoring Product Directions

This is especially true for general cleaning supplies like dishwashing soap, general cleaners, and fabric softeners. Product directions are there for a reason. Ignoring it is a surefire way to make cleaning fail. Also, not following product directions might render the product useless if the solution is wrong. 

The manufacturers will have recommendations on using the product, how much you need, and where it should be used. Application methods are also different, so it’s always important to read the label. This also applies to cleaning tools; follow the manufacturer’s instructions to prevent injuries.

7. Wearing Outside Shoes in the House

This is especially important when you have wooden flooring because this can cause scratches on the surface. It’s highly recommended to remove your footwear before entering the house. This way, you can keep your floors looking new longer. 

If needed, apply an environmentally friendly wood polish to clean and protect the wood from damage caused by extreme weather elements. Whether your entryway is through the mudroom or the front door, make this cleaning habit simple by providing a bench and a chair for shoe removal. Get a shoe tray closed for wet or muddy shoes. Plus, provide a bin to collect each family member’s footwear.

8. Using Harsh Cleaners

Using too much cleaner can be a bad cleaning habit; using a harsh cleaner can damage your floors. Using harsh chemicals can strip the finish of wood floors, leaving them dull looking and requiring you to refinish them. For example, chlorine bleach is good in disinfecting, but that doesn’t mean it’s good on all surfaces.

Using Harsh Cleaners
Image credit: https://4.bp.blogspot.com/

Chlorine bleach is not a good dirt and grime remover, and the fumes can be toxic. It’s important to use gentle cleaning products to produce the best results. One of the safest and widely used home cleaning products is cleaning vinegar

9. Not Completing Tasks

Yes, we all get distracted while cleaning, but always try to finish a task once you’ve started it. For example, if you’re dusting the living room, don’t stop for a social media break until you’ve dusted the entire room.

If you have a few minutes to clean, start by removing the clutter and putting items in their proper place. Then if you’re interrupted, you can come back later to do the deeper cleaning.

10. Waiting Until the Cleaning Task is Overwhelming

If you have a huge cleanup job ahead of you, don’t try to bite off more than you can chew. Break the task into small pieces that are easier to manage. Don’t wait for the task to become overwhelming. Putting off cleaning and waiting until the task becomes overwhelming is one of the worst cleaning habits to break.

But if you do a bit of cleaning each day, like load, empty the dishwasher before the dishes pile, vacuum one or two rooms, and complete your load of laundry, then cleaning the entire house will not be as overwhelming.

11. Relying too Much on Bleach

Of course, bleach has been a household staple long cleaning and disinfecting agent. But it turns out that bleach isn’t as good a cleaner as once thought. Bleach is intensely harsh and can irritate the eyes, lungs, and skin. 

Relying too Much on Bleach
Image credit: https://cominguprosestheblog.com/

The fumes are also toxic. A better alternative is baking soda or vinegar. If you still doubt how harmful bleach is, these reasons should motivate you to skip the bleach next time you begin your spring clean.

12. Leaving Your Bed Unmade

This might not be a big deal in the colder months when you’re bundling up under your covers and keeping your home well heated. But in the summertime, leaving bed linen unwashed can pose a real threat to your health. Experts recommend changing sheets every two weeks for best cleaning results.

Even if the rest of your bedroom looks neat and clean, the unmade bed can make it look messy. Making your bed each morning will keep the rest of the room and the entire house organized. You can as well make this task simple by selecting bedding that is easy to spread up neatly.

13. Storing Cleaning Products Incorrectly

Do you spend a lot of time trying to find your cleaners and tools? Well, this bad cleaning habit is quite easy to break. Gather all the cleaning supplies you’ll need for each area of your home and store them close to that area. Place them in a plastic carryall for bathroom cleaners and stash them on a shelf or under the sink. 

You can also create two baskets of supplies if you have upstairs and downstairs bathrooms. Keep your dusting and furniture cleaning products in the kitchen. And all your laundry products should be kept in the laundry room. Make it easy to get started, and this will likely lead you to clean more often.

14. Hoarding Food in the Refrigerator

It’s a common bad habit to keep too much food in the fridge. Resist this temptation as your refrigerator does not have an infinite capacity and cannot store half-empty containers of milk, cream cheese, cottage cheese, or yogurt that will not be used up within a few days.

Hoarding Food in the Refrigerator
Image credit: https://lh5.googleusercontent.com/

If you and your family hate leftovers, then don’t stash them in the refrigerator. Go ahead and toss it instead of storing it because improperly stored food promotes mold and bacteria growth, making cleaning the refrigerator daunting. 

FAQs on Bad Cleaning Habits You Need to Break

Can cleaning make you sick?

Yes and no. Cleaning will not make you sick, but it can make you sick if you use improper cleaning methods. Plus, using harsh chemicals that can cause mild irritation and affect your health negatively.

Is it ok to clean regularly?

If you maintain a cleaning routine, it will be easier to break these bad habits. Cleaning should not harm your health or make you feel worse.

Final Thought on Bad Cleaning Habits You Need to Break

Whether it’s the cleaning and our lives in general, we all have these bad habits. We like cutting corners when cleaning. Everyone wants to make their chores easier and get them done faster. However, taking these shortcuts can have a lot of negative impacts on your life. 

That’s why it’s important to break bad cleaning habits. They might be tolerable or even bring some benefits, but they shouldn’t be part of your life if you want to live a healthy and cleaner lifestyle.


The post 14 Bad Cleaning Habits You Need to Break appeared first on Kitchen Infinity.

Did you miss our previous article…
https://www.centrecountyfood.org/?p=432

post

How to Remove 6 Different Kinds of Drain Stoppers

The tub stopper is a small part of your bathroom, but it can cause a lot of stress when it’s not functioning correctly. The drain pipe can be blocked by a build-up of hair and grime, meaning that you have to remove and drain it. Removing a bathtub stopper is easy to do, but first, you need to find out what kind of stopper is installed in your tub. 

This guide will show you exactly how to remove six different bathtub drains with step-by-step instructions and pictures for each type. You’ll also find out what tools you’ll need, how long it takes to complete this task.

What You’ll Need

ScrewdriverPliersReplacement drain stopperBathroom cleaner

How to Remove a Lift and Turn Drain Stopper

You can easily identify the lift and tub turn drain stopper by its small, threaded knob on top of the stopper. It’s similar to a push and pull stopper except for the knob of push and pull, which is fixed for the user to push the stopper down and pull it up.


Image credit: https://i.ytimg.com/

Remove the Drain Stopper Knob

To remove the lift and turn the drain stopper, ensure the water is off to prevent getting wet. Find the round knob on top of the drain stopper, which should be either at the side or center of the drain. Turn the stopper counter clockwise until it comes loose.

Pull up on the knob while turning it counterclockwise to remove it. To remove the metal insert drain stopper, there will be a screw directly in the center underneath the water. Turn counterclockwise to unscrew the screw and pull up on it. Normally there is another plate or cover underneath, so make sure you don’t scratch your sink when removing it.

Unscrew the Drain Stopper Bolt

To do this, you will need a flathead screwdriver and Allan wrench to unscrew the drain stopper bolt from the threaded hole. It may take a bit of force to get it off. Use the flathead screwdriver and Allen wrench to remove the screw from the center, and don’t remove the entire screw to remove the stopper. The stopper can fall down the drain if you use the entire screw.

Inspect, Clean, and Replace the Drain Stopper

After successfully removing the drain stopper and slowly rotating it counterclockwise, it is time to inspect what might need replacing or cleaning. If there are any cracks, corrosion, scratches, or other damage on the metal pieces of your drain stopper, make sure to replace them with new metal parts.

How to Remove Push Pull Stopper

Push pull stoppers are easy to identify because they have a simple operating mechanism. Push the plug down to close the drain and pull the knob up to open the drain.

How to Remove Push Pull Stopper
Image credit: https://i.pinimg.com/

Unscrew the Drain Stopper Knob

The first step on how to remove the bathtub drain stopper is to unscrew the knob. To do this, twist the slip nut counterclockwise as you hold it tightly with one hand. Make sure you grip the drain stopper knob tightly and turn it to the right to unthread the stopper lid and reveal the fastening bolt.

Remove the Drain Stopper Bolt

The second step is to remove the drain stopper bolt. To do this, you should place a standard flathead screwdriver on the lip of the washer and twist it off counter-clockwise with your hand. You can also use set pliers to unthread the bolt from the drain crossbar and lift the stopper out of the drain.

Inspect, Clean, and Replace the Drain Stopper

Once the stopper is removed, inspect it for silt or mineral deposits. Check closely around the center hole where the drain tube makes an L-shaped bend. Remove any debris with a damp rag and give it a gentle brush before replacing it in the same position. Apply some liquid detergent in the hole to make sure it’s clean.

How to Remove Toe Touch Tub Stopper

Toe touch stopper opens and closes with the touch of your toe. It’s circular at the top with no tabs and knobs. Here’s how to replace a toe touch tub stopper:

How to Remove Toe Touch Tub Stopper
Image credit: https://i.stack.imgur.com/

Open the Drain Stopper

Turn the stopper counterclockwise with a pair of pliers to open it if it’s not in an open position. If you don’t have any pliers, wrap the jaws in electrical or duct tape for better grip. You can also use channel locks or slip joint pliers for this job, but always make sure they are covered with tape so they won’t scratch them.

Twist the Drain Stopper Lid

For some toe, touch stoppers holding the shaft cylinder and turning the top cap will allow you to unscrew the top finished cap portion of the stopper. If this is the case, twist it to the right and apply a small vertical force to unthread the lid to access the fastening screw.

Unscrew the Fastening Screw

With the stopper in this state, you can now use a set of pliers to unscrew the fastening screw. Keep track of where and how it’s placed so that when you’re finished with the job, you’ll know how they go back together.

Inspect, Clean, and Replace

With the stopper in the “open” state, remove any debris or build-up from within with a lint-free cloth or cotton swab. If your sink isn’t draining properly, this would be a good time to clean it out and ensure that there’s nothing blocking your drain lines.

How to Remove a Trip Lever or Plunger Style Stopper

This drain stopper may look easy to remove, but that’s the opposite. It’s one of the types of bathtub drain stoppers that proves to be difficult to remove. Trip lever drain stoppers have levers located on the overflow faceplate. If you trip the lever, the plunger will move up and down. 

How to Remove a Trip Lever or Plunger Style Stopper
Image credit: https://diy.sndimg.com/

When the plunger is up, water will flow into the drainage system, but when the plunger is down, it will form a seal inside the drainpipe to stop the water flow. These drain stoppers are prone to clogging and can be troublesome to remove and replace because of their compact assembly. Here’s how to remove a trip lever drain stopper:

Open the Drain

If the lever is not in an open position, water will not flow through the system. To turn off the water valve, look for a stem in and around the overflow faceplate and twist it clockwise until it stops. If you cannot locate the shutoff, open up your wall until you find the source of water to prevent flooding. Removing the trip-lever drain stopper while in the closed position can cause the bathtub drain stopper to get stuck.

Remove the Overflow Grate

Remove the screws holding down your overflow grate with a screwdriver and remove it from the overflow faceplate. Ensure you put the screws in a safe location for reinstallation.

Pull Out Trip-Lever Drain Stopper Assembly

If your overflow faceplate has a trip-lever to show the water level, you must first remove this assembly. Turn off the water supply at either the main shutoff for all appliances or the individual faucet. You may need to flush out your drain lines to completely stop any residual water flow. 

Use an adjustable wrench to remove the nut holding this assembly. Without breaking any pieces, pull out the entire assembly, including the trip lever, rods, and the plunger. You can as well spray the assembly with a lubricant to free a stuck plunger.

Inspect, Clean, and Replace the Trip Lever

If you note a loose trip lever or corroded in place, replace or tighten it. Make sure that the rubber gasket is undamaged and in good condition before replacing it. A worn-out gasket will allow water to leak through the overflow faceplate. Wipe off any corrosion on the rods with a piece of steel wool, and spray the rods with rust preventative.

How to Remove a Flip-It Stopper

This bathtub drain stopper uses a flip lever to expand and contract a gasket that sits inside the drain. The gasket contracts when the flip lever is open, allowing water to flow into the drain. But when you close the flip lever, the gasket will expand to create a seal in the tub and sink. These drain stoppers are only secured by an O ring and suction cup that sits inside the drain at the device’s base.

How to Remove a Flip-It Stopper
Image credit: http://behindtheshower.com/

Open and Remove the Stopper

Remove the ring from beneath the flip-it stopper by sliding it up and off the drain. Wipe away any corrosion on the rods with steel wool, and spray them down with rust preventative.

Inspect, Clean, and Replace the Check Ring

Remove the check ring by finding a spot where you can pry underneath it with a screwdriver. Lift on this edge, then pull out any dirt or corrosion that may be inside it. Once clean, reinstall the ring into its original position. Inspect the O-ring for cracks or hardening, and replace it if necessary.

How to Remove a Pop-Up Drain Stopper

Pop up stopper drain also has a lever on the overflow faceplate connected to the rod assembly and drop-down vertically through the overflow pipe. The rod assembly doesn’t connect to the plunger but connects to the spring on top of a horizontal rocker arm. 

How to Remove a Pop-Up Drain Stopper
Image credit: https://docs.landmarkhw.com/

When the lever is in an open position, the spring is compressed, pushing down on the rocker arm and popping up the plug. While in a closed position, allowing the rocker arm to pivot up, causing the plug to be pulled down, and hence sealing the drain. Here’s how to remove a pop-up tub stopper:

Open the Drain and Remove the Pop-Up Drain Rod

First, make sure that you have turned off the water to the sink and have drained it completely. Next, remove your strainer, usually a round piece with a removable handle attached directly to the bottom of the drain opening in your sink. Then open up the pop-up drain rod.

Remove the Drain Stopper Plug and Rocker Arm

Open the drain stopper by removing the round rubber piece at the bottom of the stopper plug. Then you’ll be able to remove it from your drain. Once you’ve removed that, you will be able to see a plastic rocker arm attached to one side of the pop-up rod. Turn it around so that it’s facing upward, and then pull it straight up. This will remove your pop-up drain, but you still need to remove the stopper plug.

Unscrew the Overflow Plate Screws

Once you remove the rocker arm from the drain, you’ll be able to see two screws that are holding the overflow plate onto your sink. Use a screwdriver to get these out and then set them aside for later.

Remove the Rod Assembly

Now, the last thing that you need to remove is the stopper rod. You can do this by removing the screws that are holding it into place underneath the sink lip. Use a wrench for this if possible, but be careful when removing them because they’ll come out with some force and could do damage if they hit your hand or face.

Inspect, Clean, and Replace

Once you’ve removed all of the parts from under your sink, you should clean them with water and air pressure to ensure they’re ready for installation. Put them back in place to make sure everything fits correctly.

If not, take a file or a grinder and shave off very small amounts until the rod fits into its hole properly. Once the rod fits in, add some plumber’s grease to its end and slide it back into its proper position under the sink.

FAQs on How to Remove Six Different Types Bathtub Drain Stoppers

re bathtub drain stoppers removable?

Yes, drain stoppers are removable using different techniques depending on the type of stopper. For instance, a drain plug is removable by turning it with an adjustable wrench or channel lock pliers, while a compression ring is removed easily by pulling it out.

Final Thought on How to Remove Six Different Types of Bathtub Drain Stoppers

Bathroom drain stoppers are very important elements to have in your bathroom space because they can help prevent messy floors. Just ensure you choose a model that fits the diameter of your drain opening. Removing these stoppers can also be a daunting task, but having simple tools and basic skills is enough to remove bathtub drain stoppers.


The post How to Remove 6 Different Kinds of Drain Stoppers appeared first on Kitchen Infinity.

Did you miss our previous article…
https://www.centrecountyfood.org/?p=425