post

How to Use Core Aeration

Maintaining a healthy lawn is hard, but there are a number of steps you can take to achieve this. You need to fertilize your grass, mow it at the right height, and water it regularly. But if nutrients don’t reach the soil underneath your turf, you’re going to have problems with thatch build-up and nutrient loss.

Lawn aeration helps improve drainage by removing plugs from the top layer of soil, allowing air and water in a while, helping reduce soil compaction below ground level. It also brings up minerals that were trapped beneath the soil surface into contact with roots for better absorption.

If you’re looking for ways to achieve and maintain a beautiful lawn, then this article will help you learn more about using core aeration. We’ll discuss why it’s needed and what it involves. Read on!

What is Core Aeration?

Core aeration is one of the best practices for lawn care because it improves overall health and appearance while reducing weed growth potential. The process involves using an aerator machine or core aerating tool which removes plugs from two inches deep or more depending on how long you run the machine over your lawn’s surface. This will help loosen compacted soil and allow water and air to reach the lawn’s roots better.


Image credit: https://www.fairwaygreeninc.com/

What is the Best Time for Core Aeration?

For cool season grasses, core aeration should be performed in early fall or early spring. For the warm season grasses, core aeration should be done in late spring to early summer. When aeration combines with growth, grasses recover quickly and fill in areas where aerator equipment exposes soil.

When Do Lawns Need Aeration?

All lawns can benefit from core aeration, especially when the soil is compacted. Lawns in heavy shade or with thatch build up are great candidates for core aeration. Any time grass has difficulty growing or staying healthy due to compaction or poor drainage, this indicates that core aeration might be needed. Soils high in clay also benefit from core aeration.

Also, note that dethatching and aerating are two different things, although they work in handy. Thatch is the layer of decomposing organic matter that forms at the lawn surface between soil and grass. The thatch works like compaction to block the passage of air, water, and fertilizer to the roots.

Dethatching removes some grass blades while aerating opens up channels in the soil to allow air, water, and nutrients to reach grasses’ root systems. Aggressive spreading grasses like Kentucky bluegrass in northern lawns and Bermuda grass down south form more than any other grass type.

If your grass looks stressed and your soil is hard to the touch, you may have compaction problems. You can confirm that by using a simple screwdriver test. Take your regular screwdriver and stick it into your lawn’s soil by hand.

Why Core Aeration Helps Lawn

Lawns get heavy use, such as acting as neighborhood playgrounds and racetracks. Kids and pets running around the yard can also lead to soil compaction. That said, your grass roots need air, water, and nutrients to grow thick, deep, and strong. When the soil becomes compacted, it will inhibit the flow of essentials that supports thicker, healthier tuff growth.

Excess lawn thatch and heavy organic matter buried under the grass surface can also starve the grass of essential elements. Therefore, the hollow tine core aeration will help alleviate additional compaction so air, water, and nutrients can reach grass roots.

If lawn grasses are deprived of their basic needs by compacted soil, they’ll struggle, especially in stressful situations such as heat and low rainfall, thus losing their healthy, rich color. The grasses will gradually thin and die out completely. If there’s no oxygen, water and nutrients will be inches away.

Other Methods of Aerating Your Lawn

Apart from plug aerators or core aeration, there are other methods of aerating available equipment. They include:

Spike Aeration

Spike aerators have hollow tines that penetrate the soil and remove small cores of soil. Spike aeration is quick, easy to install, and can be used on lawns with little maintenance. The spikes create holes for water and nutrients by pushing soil aside.

Spike Aeration
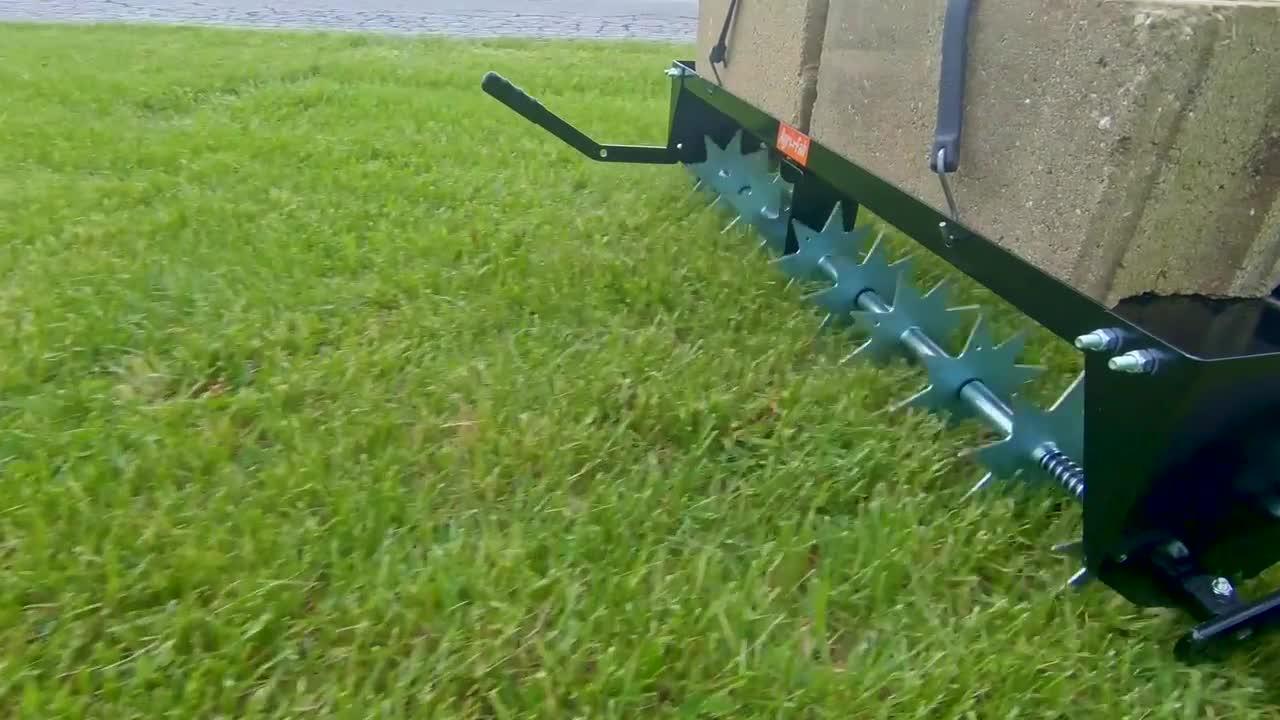
Image credit: https://cf-images.us-east-1.prod.boltdns.net/

Slicing Aerators

These are blades attached to a wheel, which slice through the lawn’s surface. This method is similar to the spike aerators in that it also removes cores of soil from your lawn. The slices will give rise to new shoots and roots, giving rise to thicker turf.

How to Aerate Your Yard

You can find lawn aerators, power rakes, and other power equipment at your local store, hardware stores, and some big-box retailers. You can also hire lawn service from equipment rental companies and lawn and garden stores. Here’s how to aerate your lawn:

Flag Utilities

Flag utilities or other pipes loosen the soil around those with a shovel. Remove plugs from holes, then drag the aerator behind you across your lawn. With space between each pass, turn over all of the soil that was brought to the surface. Replant grass seed or transplant seedlings as desired

Time Your Aeration Right

For best results, time your aeration to coincide with your lawn’s physiological stage of development. Late summer is the best time for quick relief from compacted soil, while late spring or early fall are ideal times for lawn restoration and strengthening. Aerate when the soil is soft, like after an irrigation cycle or a recent rainfall. 

This will allow the hollow tines to penetrate the soil easily, making it easier to do their job. Hollow and solid-core aerator tines will struggle to penetrate hard, dry soil, making the process less effective.

Be Thorough

Cover your entire lawn at least once and the second time at a cross angle. Pay attention to lawn surfaces with heavy foot traffic, driveways, and sidewalks because these sections will be more compacted. If your lawn is smaller, you may only need to do it once.

Forget the myth that if you apply a pre emergent herbicide on your lawn in the spring, it will destroy your herbicide barrier. This is not always true because aeration won’t affect crabgrass control or weed prevention.

What to Do After Aerating

After aerating, if possible, combine lawn aeration with other lawn care maintenance such as fertilizing, adding soil amendments, and overseeding. Water, fertilizer, and grass seed needs to get through the lawn surface into the soil where they can start growing grass roots. After aerating your lawn, let soil plugs or extra soil dry where they fall.

What to Do After Aerating
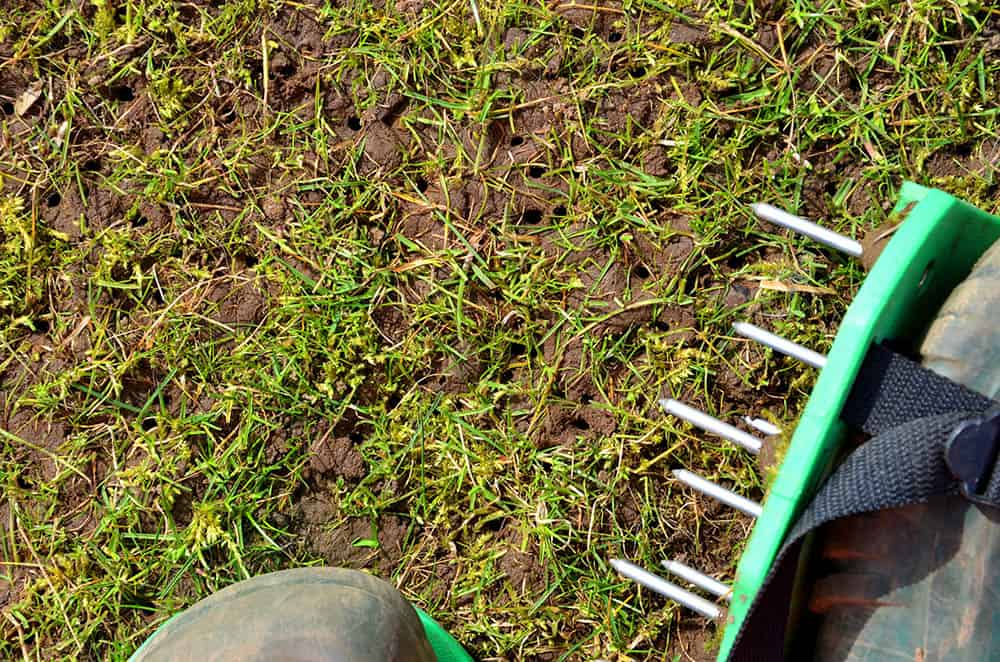
Image credit: https://peppershomeandgarden.com/

Core aerating will open the soil to allow water, fertilizer, and seed to move down in the soil for faster root growth. You can also help restore your lawn by application of fertilizer immediately after core aeration. Better yet, make your compost for this purpose.

FAQs on How to Use Core Aeration

When should you core aeration?

Core aeration can happen anytime, but the best time is usually in the spring and early summer or fall. It’s recommended to core aerate when there’s the most root growth.

Should you water before core aeration?

Yes, you should water one to three days before aerating. This is because the soils must be moist to help the machine penetrate through to remove soil plugs. Do not aerate overly soaked and completely dry soil because the aerator will pull out small soil cores from the lawn, which should be left to break down.

Final Thought on How to Use Core Aeration

As you can see, adding aeration to your annual task list will help you maintain your lawn and make it look more beautiful. Plus, you save money in the long run by having a healthy lawn.


The post How to Use Core Aeration appeared first on Kitchen Infinity.

Did you miss our previous article…
https://www.centrecountyfood.org/?p=465

post

Types of Leaf Arrangements

We all know that the arrangement of leaves in a stem is called phyllotaxy, but most people have no idea what this means. Most basic flowering plants have three basic types of arrangements which include alternate, opposite and whorled when it comes to leaf arrangements, but there are also other leaf arrangement types you should know about, but these are the basic ones.

Leaf arrangement is a key characteristic on which plant taxa are classified. Monocots, dicots and gymnosperms have different types of arrangements. This guide is an easy-to-understand explanation of the different types of leaf arrangements and how those affect plant taxonomy.

Structure of a Typical Leaf

Each leaf has a leaf blade called the lamina, which is also the widest part of the leaf. Some leaves are attached to the stem by petiole, while others do not have petiole and are directly attached to the plant are called the sessile leaves. Leaves also have stipules, which are small green appendages found at the base of the petiole. 


Image credit: https://cnx.org/

Most leaves also have a midrib that travels the leaf’s length and branches to each to produce veins of vascular tissue. The vascular tissue forms veins within each leaf. And the edge of the leaf is called the margin. The arrangement of veins in a leaf is called a venation pattern. Monocots and dicots differ in their venation pattern.

Monocots have parallel venation in which veins run in straight lines across the length of the leaf without converging. While the veins in dicots have a net-like appearance, forming a pattern called reticulate venation. One example of a plant with dichotomous venation is the ginkgo biloba tree.

lternate Leaf Arrangement

Alternately arranged leaves produce one leaf per node. The leaves alternate from side to side. For example, your houseplant may have two or three leaves in one spot on the stem, and then in another spot, there are two or three leaves, but they’re opposite each other. 

Alternate Leaf Arrangement
Image credit: https://www.thespruce.com/

In alternate leaf arrangement, there is one leaf per plant node. Examples of trees and plants with this leaf arrangement include blackberry, black walnut, sweetgum, smoke bush, ninebark, and Japanese zelkova. Note that plants with alternate and spiral leaf arrangements have only one leaf per node.

Opposite Leaf Arrangement

The opposite leaf arrangement is when a plant has two leaves growing out of the same node. The two leaves are on either side of each other, and there is no space in between the leaves. For example, your houseplant may have three or four leaves growing out of one spot on the stem and then another group of three or four leaves a little further down the stem. 

The leaves in this example would be opposite each other. Examples of plants with opposite leaf arrangements include maple leaves, Olive trees, fringe trees, ash trees, and viburnums.

Whorled Leaf Arrangement

A whorled or verticillate arrangement is a plant with three or more leaves growing out of each node. In this pattern, there are several leaves coming from one spot on the plant stem. In some cases, it may look like a circle of leaves growing from a single spot on the stem.

Whorled Leaf Arrangement
Image credit: https://qph.fs.quoracdn.net/

Examples of plants with whorled leaves include mountain laurel, Japanese clethra, blackboard trees, redvein enkianthus, panicle hydrangea, and lemonwood. Some can have both opposite and whorled leaves throughout the plant.

Rosette Leaf Arrangement

Rosettes are often referred to as basal rosettes because they are found at the base of the plant, around the stem. The basal leaf arrangement occurs when one central leaf emerges from the ground to form a circular shape. Examples of rosettes occur in acaulescent plants, such as common dandelions in the sunflower or aster family. 

These acaulescent plants have a stem, but the internodes are greatly contracted with spiral alternate arrangement leaves. Biennial plants such as carrots and poison hemlock in the carrot family produce a basal rosette in the first year of growth. It’s then followed by the production of the flowering stem with alternate leaves in the second year.

Other examples of rosette leaf arrangements include liverwort and hens and chicks. Rosette leaf arrangement is the most common type of leaf arrangement in monocots, with grasses being a prime example. This type of arrangement occurs when leaves are produced around the stem at the same point, thus creating what appears to be a single circular leaf structure below ground level.

Perfoliate Leaf Arrangement

In this arrangement, the stem is completely wrapped or buried around its support. Leaves of this type are arranged in a circle with their bases adhering to the petiole and the blade expanding away from the plant center. A good example of perfoliate leaf arrangement is found in Trillium grandiflorum, commonly known as white wake-robin. 

Silphium perfoliatum is also a good example of the basal connate fusion of leaves to achieve perfoliate condition. The upper cauline leaves of henbit in the mint family are called sessile leaves.

Distichous Leaf Arrangement

In this type, the leaves are arranged in two opposite rows on either side of a stem. In other words, they grow along two opposite sides of the shoot axis at right angles to each other. Distichous leaf arrangement is common in monocotyledons, especially grasses and sedges groups. 

The lower side is called adaxial, and the upper side is called abaxial. The adaxial surface of a leaf is the surface closest to the axis, and the abaxial surface of a leaf is furthest from it. This arrangement can also be seen in species such as Agave sisalana, where all leaves grow around the stem in vertical rows.

Basal Leaf Arrangement

All the leaves arise from the base of the plant. Perennial plants are trimmed back to new basal foliage once in a while, which leads them to grow new leaves that can be located at the base. Perennials with basal leaf arrangement include harebell, whorled stonecrop, yarrow, and oxeye daisy.

Coniferous Leaf Arrangement

Coniferous leaves thrive in cold environments. Their leaves are reduced in size and needle-like in appearance. The needle-like leaves have sunken stomata and a smaller surface area to conserve water. 

There are only two major types of coniferous leaf arrangements: Monocephalus (single head) leaves are arranged in spirals around the plant stem, while Flabella (leaf structure) leaves grow in spiral patterns with more than one head. Conifers that follow the monocephalous pattern include white pine, European larch, and Canadian hemlock.

Conifers that follow the flabella pattern include blue spruce, Norway pine, and Japanese red pine. Aquatic plants also have coniferous leaves with wide lamina that can float on the water surface, plus a thick waxy cuticle on the leaf surface to repel water.

FAQs on Types of Leaf Arrangements

What is the leaf arrangement?

This is the arrangement of leaves on an axis.

What are palmate leaves?

A palmately leaf compound has its leaflets radiating outwards from the end of the petiole like fingers off the palm of a hand. Examples of plants with palmately compound leaves include poison ivy, familiar house plant, and umbrella plant.

Final Thought on Types of Leaf Arrangements

As you can see, there are so many types of leaf species, and each species has a characteristic leaf arrangement. The leaf arrangements also vary from one plant to another of the same species. It is important for you to know the common types of leaf arrangements to easily identify and differentiate them without hassles.


The post Types of Leaf Arrangements appeared first on Kitchen Infinity.

Did you miss our previous article…
https://www.centrecountyfood.org/?p=461

post

Reasons Why Orchids Won’t Bloom and How to Fix Them

Orchids are beautiful and exotic, but they can also be frustrating if you’re trying to grow them.  One of the most common problems people have with orchid growing is that their plants won’t bloom. It’s very disappointing when your plant doesn’t produce flowers because it’s such a rare event.

If you love orchids, this guide will help you get the most out of your investment in these stunning plants.  Even if it hasn’t flowered for years, there are still things that can be done to encourage blooming. Orchids are one of those flowers that require very specific care, so they don’t wilt and die on you before they even get a chance to bloom. Below are reasons orchids won’t bloom.

Insufficient Light

If you want your orchid to rebloom, try moving it near a brighter location. Orchids need at least 12 hours of bright light so they can survive and grow. You should learn how to care for your orchids indoors so they can grow well and bloom.


Image credit: https://i1.wp.com/

To ensure they get enough sun, there are different places to put them in the house, but the ideal place is by a window to get good sunlight exposure. It will also help if you rotate them once in a while so that all sides get enough light. Move your orchid to a place where it gets a few hours of direct morning and afternoon sun.

This will ensure the plant gets enough energy to make a spike with lots of flower buds. Dendrobium orchids and cymbidium orchids are also orchid varieties that require bright light and not direct sun. Lack of sufficient light is one of the reasons why orchids fail to bloom, so if you plant indoor orchids, you may try to grow light to achieve flowers.

Getting Too Much Light

If you’re trying to grow your orchid in direct sunlight, it may die. However, too much shade can also be a cause of failure orchid bloom. Indirect light or morning sun is best for most orchids, and if the light is bright where you live, go ahead and put your plant in direct sunlight. Avoid excess sunlight for the best-blooming orchids.

If you also place your orchid in full sun, you’ll see severe symptoms such as sunburned leaves, and an overabundance of artificial light can also suppress blooming. In addition to cooler nighttime temperatures, the shortening days of autumn can signal an orchid to form buds.

If you’re keeping an orchid indoors, in a room where the light stays 24 hours a day, then your orchid is missing an important natural cue. If you’re using artificial light, then use a timer to simulate the cycle of natural daylight and darkness.

Overwatering

Overwatering is most often the cause of orchids’ failure to bloom. Just like humans, orchids need oxygen to survive. Excess water displaces oxygen in the potting media, starving roots and suppressing blooms. Most orchids need to dry out between watering, and you should allow them to have wet feet by allowing water to saturate in the root zone.

Overwatering
Image credit: https://imagesvc.meredithcorp.io/

Orchids growing in the right kind of potting mix will rarely suffer from overwatering. Signs of overwatering include roots turning brown, while wrinkled leaves can be a sign of too little water or too much water. Don’t wait to see a pot of muddy mix and a dying orchid; instead, give your orchid adequate care while it’s in bloom and out of orchid bloom.

Varying Temperature

Orchids like to be warm and relatively dry during the day, but they require a drop in temperature at night. Orchid flowers need bud building overnight temperatures (under 10 degrees Celsius). For example, Paphiopedilum orchids need temperatures of 70 to 80 degrees during the day and 50 to 60 degrees at night. Warm temperatures between 20 and 25 degrees Celsius will encourage buds to form on your orchid flower spikes.

Cooler conditions can prevent your plant from forming buds. It is possible to have too much of a good thing if the temperature stays above 25 degrees Celsius during the day and night, as your plant will stop flowering. Try to expose your orchids to nighttime temperatures 10 degrees cooler than daytime temperatures for two weeks at the start of the orchid’s growing season.

Orchids Need Proper Nutrition

If you fertilize your plant too much, the excess nutrients can build up in the potting media and cause your orchid to bloom. You also need to feed your orchid well during its flowering season. Give it a regular fertilizer that has trace elements, which will help promote bud formation. But also be careful because too much fertilizer can stop your plant from blooming.

Of course, orchids are not heavy feeders, but an orchid living in the sterile inorganic potting mix may need a nutrient boost for its best performance. The best fertilizer to use is a urea-free fertilizer that provides nitrogen even in the absence of microorganism activity common in rich garden soils.

Moth orchids, in particular, initiate blooming spikes in response to a month and cool nighttime temperatures. At home, you have two options to encourage blooming. These options include keeping your orchid near a bright window at night in the early fall, keeping air-conditioning low during the day, and turning it up at night.

Roots Need Attention

Most orchid growers find it tricky when it comes to repotting orchids. When your orchid media begins to break down, the orchid roots can suffocate from lack of oxygen. In addition, some orchids will resent having their root zone disturbed, and they’ll refuse to bloom for six months to a year after repotting.

Roots Need Attention
Image credit: https://i2.wp.com/

In order to determine whether your orchid needs to be repotted, evaluate the root system and not foliage. If you see the orchid roots turning brown and the planting material resembling garden soil in its density.

Also, if you see more than two roots creeping over the edge of the pot, it may be time to repot. You can also divide your orchid plant to maintain blooming vigor.

Know Each Season of Your Orchid Variety

Each orchid type has a time of the year when it will naturally bloom. It may not be the same season that the orchid was blooming when purchased since nurseries can force orchids to bloom off-cycle. Many orchids bloom in the fall, winter, and spring.

Knowing the season that your orchid bloom will save you the frustrations of waiting for it to bloom. For example, Phalaenopsis orchid grows new leaves in the summer and early fall and sets a bloom spike in the late fall. Most Phalaenopsis orchids are known for blooming off-season for many reasons, but many will follow this pattern.

After you’ve identified your orchid, make sure you learn about its blooming cycle. Vanda orchids, for example, bloom two to three times a year, with each bloom cycle lasting up to six weeks. On the other hand, popular cattleya and cymbidium orchids only bloom once a year, but they’re very easy to maintain, making them popular choices for novice growers.

Underwatering

Underwatering is one of the most common reasons orchid plants won’t bloom. The best way to avoid this problem is to water your orchid regularly, but don’t over-water it. Water generously during spring and summer season but taper off as fall starts to set in. Stop watering altogether when winter begins because this will help your orchid properly rest.

You can test the moisture of your orchid’s medium by pushing your finger into it. If you feel any moisture, hold off on watering until the surface is dry. Remember not to water again until the top layer is dry because this will cause overwatering and root rot.

To prevent underwatering, mix water with some water-soluble fertilizer at the same strength you’d normally use when feeding your orchid. Water generously, but ensure that excess water drains away from the plant’s roots before drying up.

Cut Spent Flower Spikes for a Stronger lant

After your moth orchid has finished blooming, snip off the flower spike. An orchid needs to rest after flowering to build up its energy, so don’t fertilize your orchid for at least a month after it blooms.

Cut Spent Flower Spikes for a Stronger plant
Image credit: https://images.saymedia-content.com/

After this waiting period, you can feed your orchid with a balanced 20-20-20 fertilizer once every three weeks to keep it happy and healthy. Note that some orchid species and hybrids rebloom on old spikes. You can also contact the American orchid society or contact your seller to get a replacement or refund.

FAQS on Reasons Why Orchids Won’t Bloom and How to Fix Them

How long does it take an orchid to rebloom?

Phalaenopsis orchids take a month or several months to rebloom, while most varieties bloom annually.

Why is the orchid not flowering?

If your orchid is not flowering, improper light exposure, incorrect potting media, and overwatering are the most common reasons.

Why did my Phalaenopsis stop blooming?

Phalaenopsis stopped blooming because of root rot which can be caused by too much water or cold conditions.

Final Thought on Reasons on Why Orchids Won’t Bloom and How to Fix Them

If you perform all these steps religiously, your orchid might begin blooming again in no time and you’ll love your gardening skills. Orchids are blooming plants, and as such, they require a lot of attention. However, by following the basic care tips above, you should have no trouble keeping your orchid blooming.


The post Reasons Why Orchids Won’t Bloom and How to Fix Them appeared first on Kitchen Infinity.

Did you miss our previous article…
https://www.centrecountyfood.org/?p=456

post

What Are Safflower Seeds?

Birds are essential to the natural ecosystem, but they need food and water. They’re also a great addition to any garden, as they help in pollination and seed dispersal. However, it can be hard to attract specific birds to your farm if you don’t know their dietary needs. 

There’s no need for you to worry anymore. Safflower seeds have everything that birds need. Often confused with sunflower seed, safflower is more unique and is a rarer type of bird food offered at bird feeders.

Thanks to their great nutrition, they’re a useful and uncommon type of bird seed that birds eat, making them popular among backyard birders. If you want to ensure that your garden is filled with beautiful songbirds every season of the year, why not try using safflower seeds?

What is Safflower Seed?

Safflower seed is the seed of the annual safflower plant known as Carthamus tinctorius. This herbaceous annual is in the same family as sunflowers and thistles—safflower seed blooms in red, orange, and yellow with some scruffy foliage.


Image credit: https://www.thespruce.com/

Safflower seeds prefer arid climates with seasonal rainfall, and the safflower crops are mostly grown for the oil of the seeds and the dyes of the plant. With its growing cultivation, backyard birders are discovering the value and usefulness of this seed.

These seeds are slightly smaller than sunflower seeds as birdseed, but they’re similar in their tapered shape. It has white seeds and is high in protein, fat, and fiber. These nutritional properties make safflower seed a great addition to any bird feeding station.

Birds that Eat Safflower Seeds

Many of the smaller-eating birds feed on safflower. Also, birds with stronger bills familiar with black oil sunflower seed will happily eat safflower seed. They include:

Blue jaysDowny woodpeckersIndigo buntingsNorthern cardinalsCarolina chickadeesMourning dovesBlack-headed grosbeaksHouse finchesEvening grosbeaksPurple finchesBlack-capped chickadees

Some birds may break open the hulls immediately to enjoy the seed meat, while others may cache safflower seeds. Safflower seeds have a bitter taste and different shape than any other birdseed. Birds such as grackles, European starlings, and blackbirds will not eat safflower seed.

This bitter flavor makes them an ideal addition to feeding stations where the bully birds might dominate. It discourages these birds from emptying the tray feeders. Many squirrels will also leave these bird feeders alone. Baffles and other squirrel-proof bird feeders are still wise precautions as fast-footed squirrels may leap onto the tray feeder and scarf down the safflower seed.

How to Feed Safflower Seeds

It can be challenging to offer safflower seeds to backyard birds. At first, the bird may be hesitant to take the seeds, especially if sunflowers are available. Alternatively, you can offer safflower seeds in the larger hopper, tube, and platform feeders. Tossing seed on the ground near shrubby, sheltered areas is also a good way to provide it to the ground feeding birds such as doves and quail.

How to Feed Safflower Seeds
Image credit: https://www.thespruce.com/

Mixing two seeds is also a good way to offer safflower, such as mixing it with black oil sunflower and gradually increasing the ratio of safflower to sunflower seeds. This way, some birds will not notice that they are receiving a new type of seed.

How to Introduce a New Feeder to Backyard Birds

As with most other bird seed types, there are many ways you can offer safflower to birds. These include a finch feeder, squirrel-proof bird feeders, or other hanging tube feeders. Since safflower comes in a clear shell, birds can see the seed from above, which will entice them to take it from the feeder. 

When purchasing safflower seeds, purchase a larger amount of seed than what you usually give to the birds, as they will take some time to get used to it. Introducing safflower gradually is the key to success.

Where to Purchase Seeds

Safflower is available in most garden centers, but it is also available online. These seeds are not often available in the bird feeding sections in grocery stores and large retailers, but you can also get them in pet and wild bird stores.

How to Plant the Perfect Birdseed Garden

It’s possible to grow safflowers as part of a birdseed garden and allow these seed-bearing flowers to go to seed before harvesting them. Plant safflower seeds in sunny, well-drained areas and use minimal water since they perform best in arid climates and dry conditions. These are great alternatives to backyard feeders, especially if bully birds often overrun your feeders.

How to Plant the Perfect Birdseed Garden
Image credit: https://www.asiafarming.com/

How to Store Safflower Seeds

Safflower seeds can be stored for up to five years if kept in a cool, dry place. The best storage container is one that’s airtight and able to keep moisture out. Airtight bags or jars work well for this, as does an old coffee can with a sealed lid. Safflower seeds also freeze well, so you can double bag the seeds and keep them in your freezer for later.

dvantages of Offering Safflower Seeds at Your Bird Feeder

They offer a good level of fat and protein These seed types are relatively cheap and are sold cheaply in bulkYou can easily grow them in your gardenThey’re ideal to use when you want to eliminate those bully birds from your gardenIt can be bought in several ways, including the entire safflower seed bags, in a bird’s seed mix bag, and a safflower seed cylinder

Disadvantages of Safflower Seeds

They can leave behind some when the white shells are crackedNot all birds will appreciate these seeds, so you may need to offer other seed types besides safflower seeds

FAQs on Safflower Seeds

What is the importance of safflower seed?

Safflower seed oil can be used to prevent heart diseases, including hardening of arteries and stroke. It can treat various conditions such as fever, tumor, cough, breathing problems, chest pain, and traumatic injuries.

Final Thought on Safflower Seeds

As nutritional as these seeds are, it is important that you shop for the best safflower seeds. And the more you understand this seed, the more easily you’ll help your birds adapt to new food while minimizing the seed lost to over-aggressive species and feeder pests. While you feed the precious birds with safflower seeds, also remember to learn how to care for the baby birds so they can grow healthy and happy.


The post What Are Safflower Seeds? appeared first on Kitchen Infinity.

Did you miss our previous article…
https://www.centrecountyfood.org/?p=450