post

Sewer Cleanout Where To Find It

Sewer cleanouts are an important part of your property’s plumbing system. Without them, you would have to constantly deal with problems that crop up in the sewer pipes such as clogs and cracks. The good news is that sewer cleanouts are easy to find.

In this article, we’re going to show you what your sewer clean-out is and how to find it. We’ll also speak about how to check if it’s blocked and in such cases, how to clear the blockages. Let’s dive deep into this topic.

What is a sewer clean-out?

A sewer clean-out is a pipe that goes from your house to the city sewer system. It’s usually located in the basement, but it could be anywhere on your property. You can find a clean-out by looking for a water meter or inspection cover near the street.

Image Credit: http://mrrooter.com

If you don’t know where to find one, call a plumber and they’ll help you locate it.

Once you’ve found it, use a garden hose with an attachment to clear any blockages inside. This will fix most of the problems caused by tree roots growing into pipes or cracks in joints or seals.

If the blockage is too severe, you might need to call in a professional plumber to clear it for you. If it’s not too serious, you can also do a cleanup yourself. Let’s discuss how to do this.

How do I clear a blockage?

To deal with tree roots growing into pipes or cracks in joints or seals, use a garden hose with an attachment to clear any blockages inside the sewer clean-out. Here are some tips for clearing the blockage:

1) Connect the hose to your septic or city mainline at least 2 – 3 feet from the street

2) Place one end of the hose as far as possible inside your clean-out

3) Slowly turn on the water supply until you see that all debris has been cleared away

4) For stubborn blockages, turn the hose end to end as you try to clear it out

5) Once your clean-out is free of any debris, disconnect the hose and cap the end. Do not use harsh chemicals because they can damage your house’s plumbing system. 

Let’s now move on and look at what causes these sewer cleanout problems in the first place.

What causes a blockage?

Tree roots: When tree roots grow into pipes or cracks in joints or seals, they cause blockages that lead to trouble such as clogged sewers and water seepage. To avoid this type of problem, take care of your trees and keep them trimmed.

Clogs: Hair, grease and other debris can clog up your sewer pipes over time, which will cause a blockage. To avoid this, install a mesh drain cover to catch any large pieces of debris before they enter the sewer pipes.

Sumps: If your house is located on a sloping property, there is a danger that rainwater might accumulate in your septic tank or sewer line and cause a blockage. You can prevent this by installing proper drainage around your house.

Dented or broken pipes: When a pipe is damaged, it can cause a blockage as well. If you suspect that a pipe is damaged, call a plumber to have it repaired.

Remember to take care of your trees, keep your drains clear and install proper drainage around your house to avoid any current and future problems.

Other factors to consider

Remember that your sewer clean-out is just one part of your plumbing system. If you have any other problems such as clogged drains, call a plumber for help. They will be able to clear the blockage and fix the problem.

Also, remember to keep an eye on your water bills. If they start to increase unexpectedly, it might mean that you have a plumbing leak somewhere in your house. Get a plumber to check it out and fix the problem before it gets worse.

Municipal sewer lines are sometimes the cause of a blockage. If you find out that your problem is caused by the city sewer, contact your city council and they will send someone to fix it.

Also, don’t automatically assume that your house’s plumbing system is at fault if you have problems such as an overflowing toilet or low water pressure. Sometimes the problem may be due to another section of the city’s sewage lines instead. Here, it’s also best to get in touch with your local authority for further information about your specific case.

Next, ensure that your waste disposal system is working properly. If it grinds poorly, your drains may get clogged up more easily because there will be a build-up of food waste in them.

Keep an eye on your water meter when you have plumbing problems such as a blocked sewer cleanout. This helps find leaks and pin down any problems to specific times or areas of the house.

Finally, consider having a pipe wrench on hand to loosen any tight fittings that you may come across while clearing a blockage. Being handy will save you the time and money that you would have spent on finding a plumber.

Sewer Clean Out Where To Find It – FAQ

Where is the sewer clean-out located on my property?

The sewer clean-out is typically located in the yard near the house, close to where the sewer line leaves your property. It is a vertical pipe that sticks up out of the ground and has a cover or cap on top. You may also see a small metal box (called a manhole) near the clean-out.

How do I know if my sewer clean-out is clogged?

If water starts backing up into your drains or toilet when you are flushing or running water, then there is likely a blockage somewhere in the sewer line. The easiest way to tell if the blockage is at the clean-out is to pour a bucket of water into it. If it backs up into your sewer drain or toilet, then you have a problem.

The line may be clogged because there is too much water pressure coming into the house or perhaps someone mistakenly dropped something down into the drain that shouldn’t have been there. Dogs are also known to dig holes by the clean-out and cause blockages.

Unclogging your toilet can be done at home with the right tools, but you should really get a professional to look at your sewer cleanout if it is not working properly.

What do I do if my sewer line is blocked?

If you know there is something stuck in your line, use a plunger to try and dislodge it. The best tool for this job, however, is a plumbing snake, which can rid your lines of most clogs with relative ease. 

You will need to insert the cable into the clean-out, then feed it down through your line until you feel it drop into the main drain. Then crank the handle to send the cable further down. When it gets near where you know there’s a clog, turn the handle clockwise again to back up any debris that is loose in your line. You should be able to pull out some nasty stuff this way.

What are Sewer Cleanouts and How to Locate Them? - Auger Pros Plumbing and  Drain

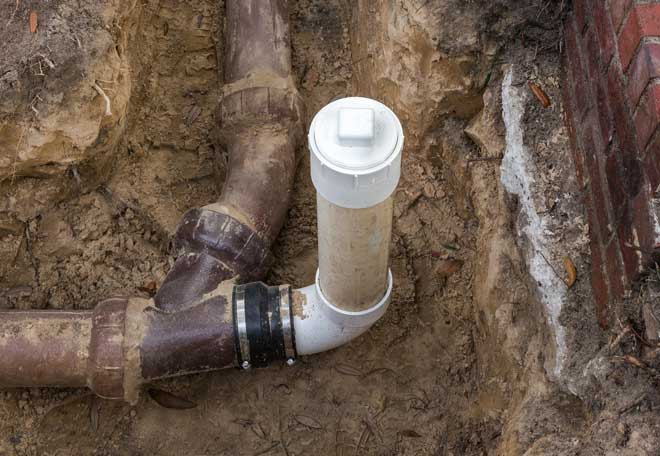
Image Credit: http://augerpros.com

Why does my kitchen sink smell like sewage?

If yourkitchen sink smells like sewage, you may have some sewage stuck in there. In those cases, find your clean-out and remove the plug. Then you can try using an air compressor to push air into it while someone flushes the toilet to rid the sink of its terrible smell.

Final thoughts on sewer cleanout where to find it

While the inconvenience of having a blocked sewer clean-out is an ordeal, it’s better than getting your entire plumbing system damaged by water leaking through clogged pipes. 

Remember to keep trees at bay, keep your drain clear and install proper drainage around your house to avoid problems in the future. If there are any other problems with your plumbing system (such as pipe breaks) never attempt to fix them on your own.

By doing so, you may end up causing more damage to your home and spending much more than you would have if you called the professionals in the first place.

The post Sewer Cleanout Where To Find It appeared first on Kitchen Infinity.

Did you miss our previous article…
https://www.centrecountyfood.org/?p=645

post

How Types Of Air Conditioning Systems Work

What kind of AC unit should you get? What are your options, and how do they work?

With so many types of air conditioners on the market, it can be hard to decide which one is right for you.

This article will tell you everything about them so that you can decide which one is best for your needs. We’ll also give tips on how to maintain it efficiently and maximize its lifespan.

Keep reading to find out more. 

Types of Air Conditioners

Choosing a type of air conditioning system can be daunting because there are so many options. Here is a list of the four major types and their advantages and disadvantages. 

Window units

These units have an exterior compressor unit that mounts on the outside wall, with an interior split component that sits in the window opening.

dvantages

They are the least expensive type of AC unit and they can cool a single room very well.

Disadvantages

They don’t work well when the temperature outside is over 100 degrees and they can be quite loud.

Central air conditioning

Central AC units are installed in the attic or basement of your home and distribute cooled air through the air ducts you already have.

dvantages

They are very effective at cooling your entire home, so if you live in a large house or have multiple rooms that need AC, this is the way to go.

Disadvantages

Central AC units are the most expensive type of unit and require professional installation. Also, they can be a nuisance to install and may require additional ductwork.

Ductless mini-split

Mini-split systems consist of an outdoor compressor, a remote inside unit placed where you need it, and a series of small tubes that distribute the cooled air throughout your home.

dvantages

They don’t take up any floor space in your home, they are very efficient, and they cool individual rooms very well.

Disadvantages

They can be more expensive than other types of AC units, and they require professional installation.

Portable air conditioners

Portable AC units have an exterior compressor unit that sits on the ground outside your home and a hose that leads inside to the unit that sits on the floor.

dvantages

They are very affordable, they can be moved from room to room, and they are very efficient.

Disadvantages

They can be quite noisy, they require regular drainage, and they only cool a single room at a time.

How AC Units Work

Choosing thebest air conditioners is easier when you understand how they work. Air conditioners use a refrigerant to cool the air and a compressor to circulate it. The refrigerant is a fluid that changes state from liquid to gas as it absorbs heat. This change of state allows the refrigerant to absorb heat from the surrounding air and then release it outside, cooling the air in your home in the process.

Image Credit: http://servicechampions.net

The compressor is a pump that circulates the refrigerant through the system. It pressurizes the refrigerant and causes it to change state from gas to liquid, which allows it to absorb more heat. The compressor then sends the refrigerant to the condenser, which is a coil of metal tubing that releases the heat outside.

From the condenser, the refrigerant goes to the evaporator which absorbs the heat from the surrounding air and changes the refrigerant back to a liquid. This liquid is then circulated back to the compressor, where it starts the cycle all over again.

This process continues until the unit reaches the temperature you set on the thermostat. At that point, it turns off until the temperature rises or falls again, at which point it kicks back on and repeats the process.

How to Maintain Your AC Unit

Like any otherhome appliance, your AC unit needs regular maintenance to keep it running smoothly. Here are a few tips to keep your AC unit in good condition:

Clean the filters regularly.

This will help keep the air flowing freely and prevent the unit from overworking. Your filters should be cleaned every 1-3 months, depending on the type you have. Washing them with soap and water or vacuuming them is usually enough to keep them clean.

If you’re using electronic filters, it’s important to check them at least once a month to see if they need replacing. If your filter stops working properly, the unit will overwork itself trying to circulate air through the clogged filter.

This can cause major problems that require an expensive repair bill, so be sure to check your filters regularly.

Keep vegetation away from the outdoor unit.

The evaporator coils inside your AC unit are very sensitive and often freeze up when exposed to excess humidity in the air. This can lead to costly repairs or even system failure if the coils are damaged.

To avoid this, be sure to keep all vegetation, debris, and other obstructions away from the outdoor unit. A few feet of clearance is usually enough, but check your owner’s manual for specific instructions.

Have the unit serviced at least once a year.

A professional technician can clean and lubricate the parts of your AC unit to help it run more efficiently. They can also troubleshoot any problems you may be having and suggest solutions.

It’s important to have your AC unit serviced at least once a year to keep it running smoothly and prevent expensive repairs down the road. Contact your local HVAC technician for more information.

Make sure the compressor is free of debris and dirt.

The compressor is the most important part of your AC unit, so it’s important to keep it in good condition.

If you see any debris or dirt build-up on the compressor, be sure to clean it off using a soft brush or vacuum cleaner. Do not use water or any other liquids, as this can damage the unit.

Check the refrigerant level regularly.

If the level is too low, the unit won’t be able to cool effectively. This can cause expensive problems down the road as the parts wear out faster.

If you remove your AC unit’s access panel, you should be able to see a copper or silver cylinder near the compressor. This is usually marked with a red line or dot that indicates when it needs to be recharged. Keep in mind that this may vary depending on your unit, so check your manual for specific instructions.

Have an approved repair company make any repairs necessary.

Hiring an AC repair company is the best way to maintain your AC unit and avoid extensive repairs in the future. Any licensed HVAC technician will have plenty of experience with cooling systems and will know exactly what they’re doing when it comes to fixing them.

5 Different Types of Air Conditioning Units

Image Credit: http://ductworksmn.com

An experienced technician will know how to keep your system running properly and what type of maintenance is needed to keep it in top shape. They’ll also be able to troubleshoot any problems you might have, which can prevent major repairs down the road.

How Types Of Air Conditioning Systems Work – FAQ

What are the most common types of air conditioning systems?

The most common types of air conditioning systems are the following:

1) Central air conditioning

2) Room air conditioning

3) Portable air conditioning

How do central air conditioning systems work?

Central air conditioning systems work by cooling and dehumidifying the air in a single room or an entire house. They do this by drawing in warm, moist air from outside, cooling it down, and then releasing it back into the environment. Central air conditioners also have filters that remove dust and other particles from the air, which helps to improve indoor air quality.

Final Thoughts On How Types Of Air Conditioning Systems Work

In conclusion, we can see that there are several different types of air conditioning systems, and each has its unique properties.

Understanding the various properties of each type is important to choose the right system for your home, and this article should help you make that decision.

Once you have an air conditing system in place, taking the time to do proper maintenance is important to ensure that your system is running at its best.

The post How Types Of Air Conditioning Systems Work appeared first on Kitchen Infinity.

Did you miss our previous article…
https://www.centrecountyfood.org/?p=641

post

The Easiest Fastest Way To Paint A House

Beautiful, fresh paint is the quickest way to make your house look new. But before you can enjoy that feeling of satisfaction, there are some steps you must take first.

In this article, we will discuss the easiest and fastest way to paint your house.

Get all the supplies you need

When learninghow to paint a house, one of the most important things to remember is to gather all of the supplies you will need before beginning. This includes items like primer, paint, a roller, a brush, and painter’s tape.

By having all of your supplies ready to go, you can minimize the time spent running back and forth between your house and the store.

Cover furniture and other items

If you have any furniture or other items in the way, be sure to cover them up with newspapers, tarps, or old sheets. This will protect them from paint splatters and drips.

Furthermore, it’s a good idea to cover your floors with either drop cloths, tarps, or old sheets as well. This will help keep your floors clean and protected from paint drips.

Image Credit: http://houselogic.com

pply primer

Before painting your house, it’s important to apply a primer to the surface. Primer helps the paint stick to the surface of the house better and it also helps to prevent the paint from chipping and peeling over time.

Make sure to read the instructions on the primer canister carefully so that you know how to apply it correctly.

Use painter’s tape

If there are any areas of your house that you don’t want to be painted, use painter’s tape to mask them off. This will help prevent paint from getting on those areas.

Be sure to use plenty of painter’s tape and make sure that it is securely attached to the surface.

Paint one section at a time

When painting your house, it’s important to paint one section at a time and then let it dry for at least 24 hours before moving on to the next section. This will help ensure that the paint dries properly and doesn’t chip or peel.

If you try to paint too many sections at once, the paint might not have ample time to dry and this could lead to it chipping or peeling more easily.

Remove the tape carefully

After you’re finished painting, be sure to remove all of the painter’s tape as carefully as possible so as not to damage any of the paint underneath.

The last thing you want is for your paint job to look worse than before. By taking your time and removing the tape slowly, you can make sure that this doesn’t happen.

If there are areas of paint that got damaged by the tape, use a small brush and some extra paint to touch them up. Touching up areas like these will help ensure that your whole house looks great after painting it. With these steps in mind, you should be well on your way to painting your house.

Choosing your paint color

Wonderinghow to choose your paint color? The truth is that when it comes to choosing a paint color, there’s no one-size-fits-all answer. It all depends on your personal preference and the look you’re going for.

That being said, some tips can help make the process a little bit easier. The steps will help you narrow down the options and make a decision that you’ll be happy with.

1. Choose a light or dark color

When it comes to painting colors, one of the easiest ways to decide is to choose between light or dark shades. Light colors will make a room feel brighter and more spacious, while dark colors can give a room a more cozy and intimate feeling.

2. Consider your surroundings

Another thing to consider when choosing a paint color is your surroundings. If your walls are already colored a certain way, you’ll want to choose a complementary color so that they don’t clash.

3. Think about the mood you want to create

Think about the mood you want to create in the room. Do you want it to be calming and relaxing, or more energetic and fun? This can help you decide on the right paint color.

4. Decide between cool or warm colors

Cool colors are blues, greens, and purples, while warm colors are reds, oranges, and yellows. Cool colors are often seen as more calming, while warm colors can give a room a more energizing feeling.

5. Experiment with different shades

Once you’ve narrowed down your options, it’s always a good idea to experiment with different shades of the color you’ve chosen. This will help you find the perfect one for your space.

By following these simple steps, you’ll be able to choose the perfect paint color for your home.

Painting an exterior or interior house

Painting your house can make it look better and increase its value. However, choosing the right paint color is only half the battle. The other half is obviously the painting of the house.

If you’re painting your exterior house, there are a few things to keep in mind. First, you’ll need to make sure that the surface is clean and dry before you start painting. You’ll also need to use a primer to help the paint stick to the surface better.

7 Ways to Paint a House Fast | Ricciardi Brothers

Image Credit: http://ricciardibrothers.com

Once you’ve done that, it’s time to start painting. Be sure to use long, even strokes and avoid painting over the same area more than once. This will help prevent paint from dripping and create a smooth, even finish.

Once you’re finished, allow the paint to dry for at least 48 hours before moving on to the next section.

If you’re painting your interior house, the process is a bit simpler. You’ll still need to make sure that the surface is clean and dry before you start painting, but you won’t need to use a primer.

Painting your interior house is a lot like painting your exterior house – you’ll want to use long, even strokes and avoid painting over the same area more than once.

Easiest Fastest Way To Paint A House – FAQ

What is the easiest way to paint a house?

The quickest and easiest way to paint a house is by using a sprayer. A sprayer will allow you to quickly and evenly cover the surface with paint.

Which is better, painting by brush or spraying?

Painting by brush will give you a more even finish than spraying; however, it will be much slower. Spraying will give you a less even finish than brushing, but it will be much faster.

Do I need any special equipment to use a sprayer?

No special equipment is needed to use a sprayer. You will, however, need to purchase a sprayer that is compatible with the type of paint you are using.

Can I use a sprayer to paint the inside of my house?

Yes, you can use a sprayer to paint the inside of your house. However, you will need to take precautions to avoid getting paint on surfaces that you do not want to be painted. For example, you will need to cover furniture and floors with plastic sheeting.

How long will it take me to paint my house using a sprayer?

It will usually take between two and four days to paint a house using a sprayer. The time required will vary depending on the size of the house and the type of paint being used.

Can I use a sprayer to paint trim or cabinets?

Yes, you can use a sprayer to paint trim or cabinets. However, you will need to take precautions to avoid getting paint on surfaces that you do not want to be painted. For example, you will need to cover furniture and floors with plastic sheeting.

What are the dangers of using a sprayer?

The main danger of using a sprayer is the possibility of getting paint in your eyes. You should always wear safety goggles when using a sprayer. You should also make sure to keep the area where you are spraying clear of people and pets.

Final Thoughts On The Easiest Fastest Way To Paint A House

In conclusion, there are a few things to keep in mind when painting your house. First, using a professional painter can save you time and hassle. Second, choosing the right paint color can make your house look great. Finally, using the right tools and techniques can make the job easier and faster. By following these tips, you can pain your house quickly and easily.

The post The Easiest Fastest Way To Paint A House appeared first on Kitchen Infinity.

Did you miss our previous article…
https://www.centrecountyfood.org/?p=637