post

14 Best Home Renovation Apps

Home improvement projects can be a tedious process, with much planning and execution required. Besides being time-consuming, these projects can drain your energy if you decide to do it yourself. Fortunately, home renovation apps can help make the process a lot smoother.

Whether you’re a DIYer or a construction professional, these apps can make your project easier. From finding inspiration to getting expert advice, here are the best home renovation apps for every stage of your project.

1. Houzz Home Design and Remodel Ideas

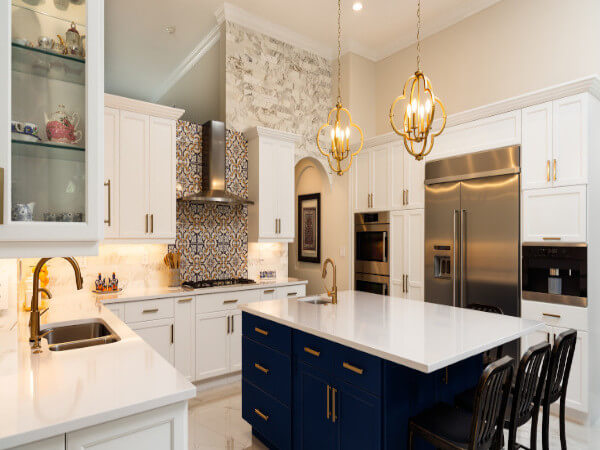
If you’re a homeowner looking for a renovation idea, the best way to find inspiration is through photos of real homes. With its collection of more than 40 million images from 1,200 home design professionals and collectors worldwide, Houzz is your go-to place to search for the latest trends in interior design. Consider it your one-stop shop for all your home remodeling and interior design.


Image credit: https://i.insider.com/

The Houzz Home Design and Remodel app is one of the most versatile home renovation apps on the market. The app also offers a wealth of other features, including articles on home design trends, discussion forums, and the ability to contact professionals directly. It’s highly rated, free to use, is supported by all major operating systems, and has tens of millions of downloads.

Pros

It’s free to useAvailable in App Store, Google Play, and Amazon App StorePresence of 3D visualization feature4.8-star rating in the App Store and 4.6-star rating in Google Play

2. IKEA Place Home Renovation App

IKEA Place Home Renovation App is another free home renovation app worth checking out. This app offers 3D previews of furniture items, and it also allows the user to virtually place them within their homes. It’s very easy to use, supports all major operating systems, and has garnered excellent reviews on Google Play Store and Amazon App Store.

IKEA Place Home Renovation App
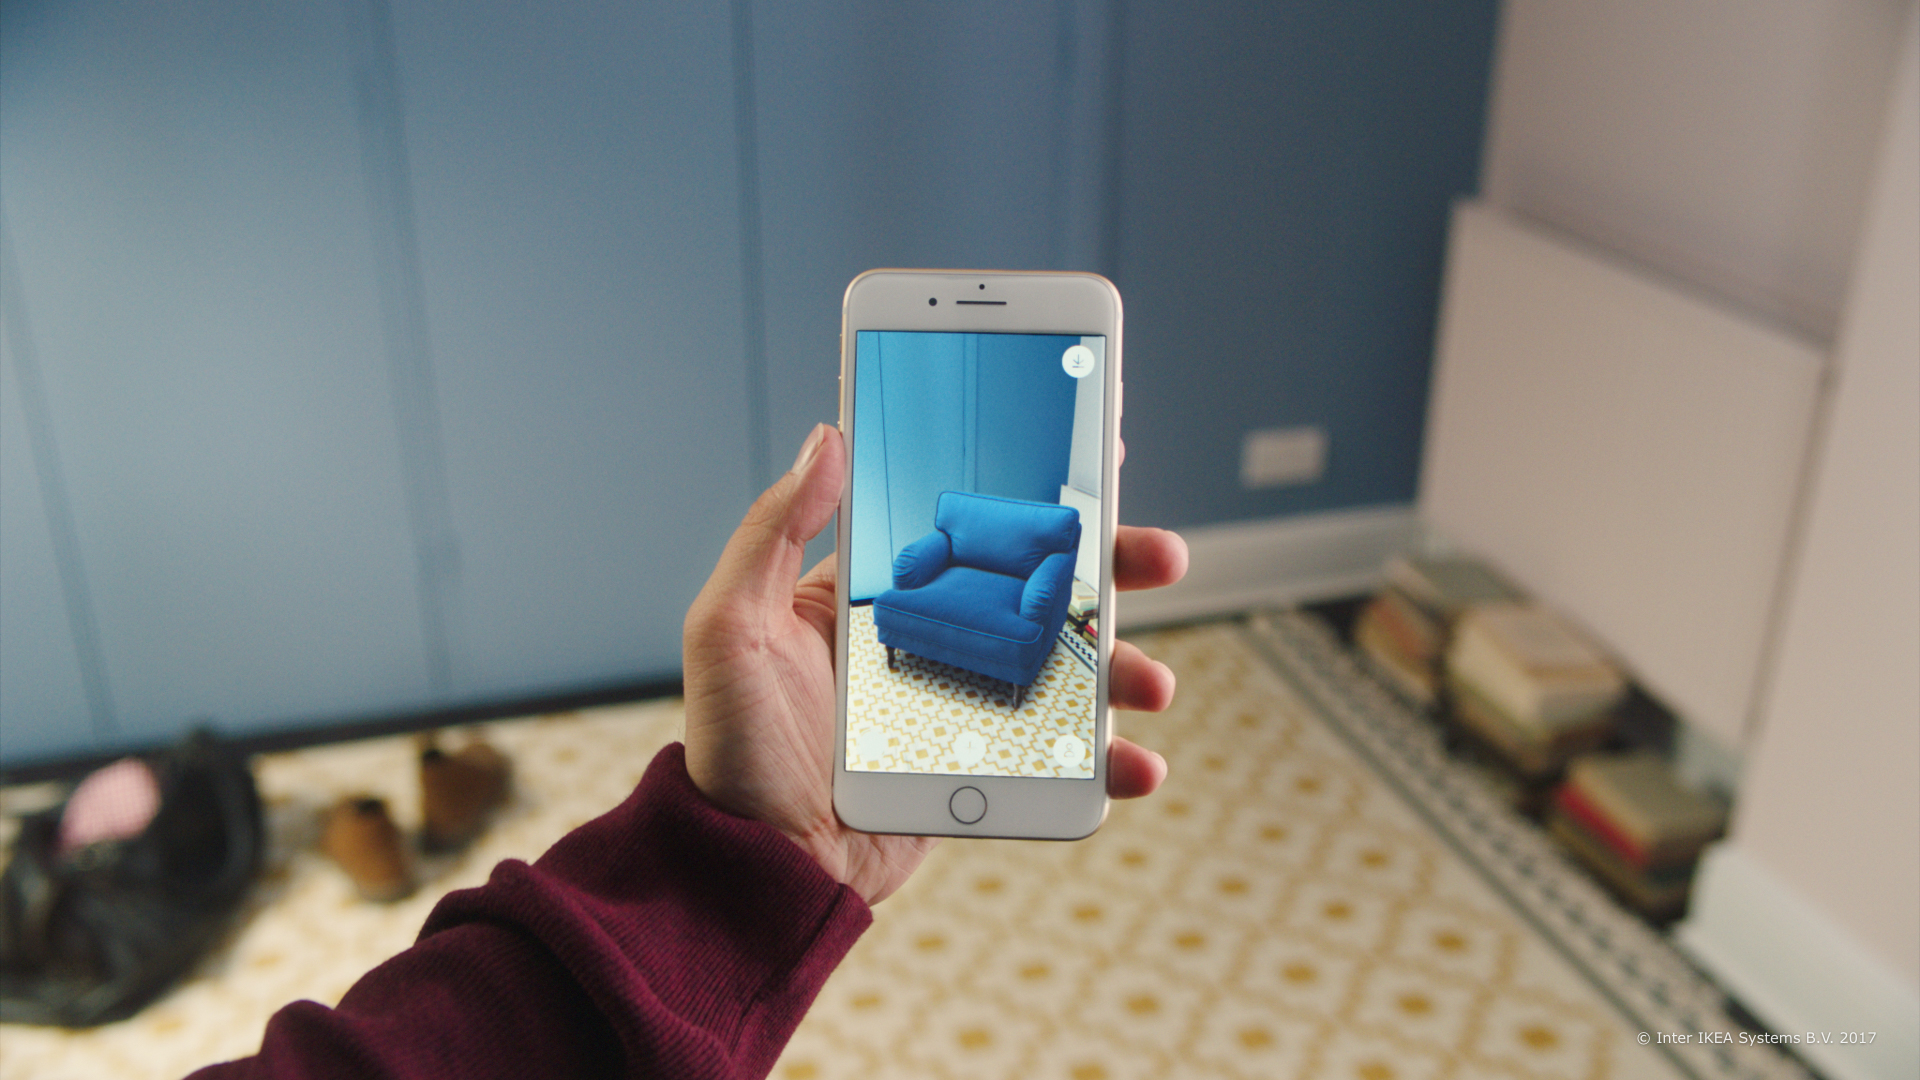
Image credit: https://techcrunch.com/

App users with IKEA Place can shop for IKEA furniture and use augmented reality technology to drop images of IKEA furniture into pictures of the home. Once you find something that you love, you can purchase it directly through the app or find a nearby store that has it in stock.

Pros

3D visualization featureEasy to usePresence of augmented reality technology

3. Photo Measures

It can be annoying to get to the hardware store only to find out that you’ve forgotten the notebook at home where you’re writing all your materials for your home renovation project. Not only is that, but even your measurements in that book. You’ll feel frustrated and drained.

However, if you’ve downloaded the Photo Measures app, you would have had all that information in the palm of your hand. All you need to do with this home renovation app is to take photos of your space, draw in your measurements and never worry about forgetting your supplies again.

4. The Home Design 3D App

This is a free home renovation app that has gained popularity. The 3D home design software shows you in real-time what it would look like if you added or removed certain objects from your space. This is also the perfect tool to help you design your entire home and is compatible with mobile phones, tablets, Macs, and PCs.

The Home Design 3D App
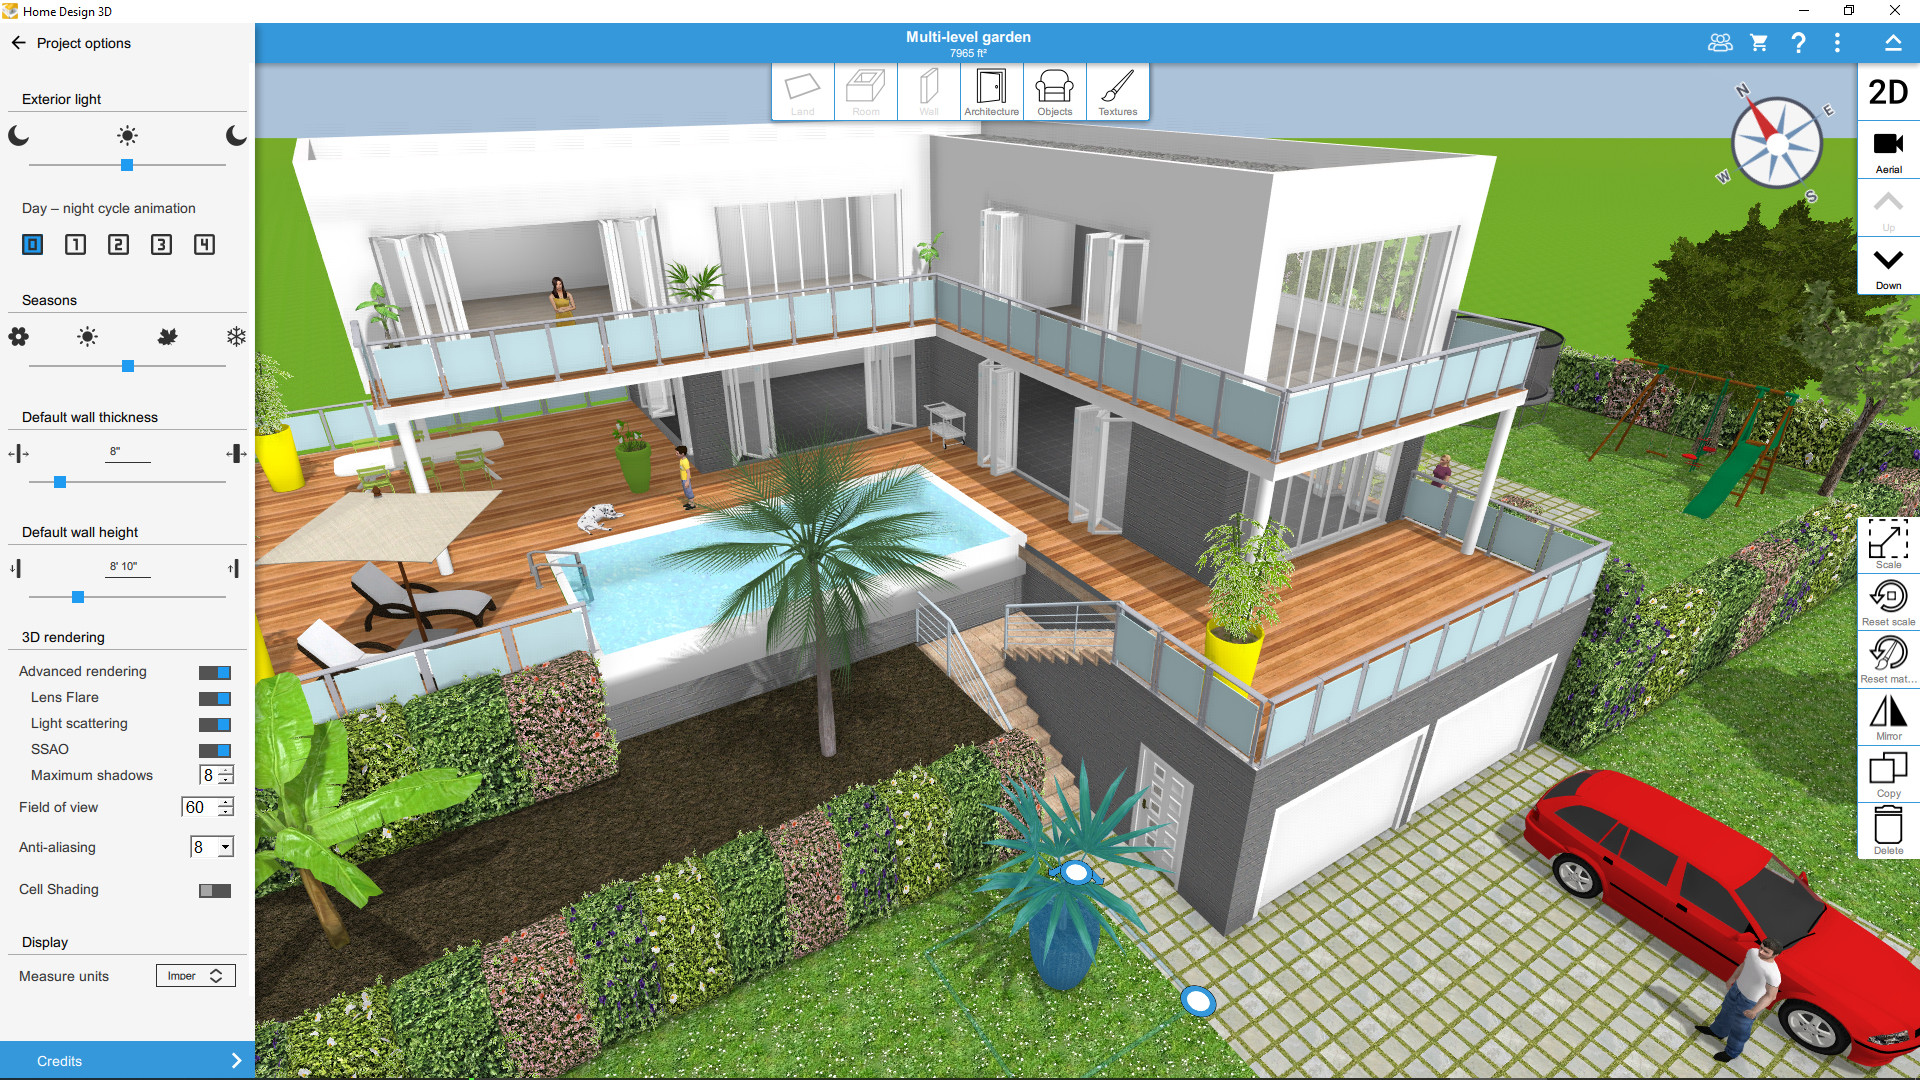
Image credit: https://cdn.cloudflare.steamstatic.com/

Designed by Anuman Interactive, this home renovation app was released to the public in 2011 with the company’s first iOS version. Today, this app is available in most app stores and is compatible with all mobile apps and laptops. You can design any part of your home using this app as it allows the user to create multiple floor plans in 2D and 3D, add furniture and decorative items of their designs.

You can also experience your home design using the 3D real-time visualizer. There are also features that allow you to share your design outside the app. This home remodeling app is free to download, and you can use a few basic features at no cost.

Pros

It doesn’t require an internet connectionSupports all devicesAvailable in App Store, Google Play, and Microsoft Store

Cons

No free version for PCsWorks best with iOS devices

5. iScape Home Remodeling App

This app has a very clean and simple user interface that is easy to use. Animations of all changes while designing are smooth and fast, making it enjoyable while building your dream home. The application also supports 3D rendering for outputting images and videos of the design.

If you don’t want to plan a new house but remodel an existing one, this app got you covered with a library of objects and materials to work with. Home renovation projects also don’t need to stay within the confines of your home. Instead, take your space to the next level by tackling a landscaping project, courtesy of the iScape app.

Pros

You can design your landscapeGreat for DYers and landscaping businessesSharing capabilitiesIt comes with a 4.6-star rating in the App Store

Cons

Only available for iOs devices

6. ProjectColor by the Home Depot

ProjectColor is an app by Home Depot that can select paint colors and coordinate them with other design elements in your home. The app has a library of more than 1,500 colors and allows you to save your favorites for future reference. You can also take pictures of rooms in your house to get a better idea of what different colors will look like.

You can also check which paint colors are popular and trending. You can also visualize how the paint will look in any part of your home and save your favorite paints or buy them. If you’re not ready to commit to a full can of paint, paint samples are available for purchase within the app. This app is free and is compatible with iOs and android services. But when it comes to painting, learn how to choose paint colors first before you proceed.

Pros

It’s free to useIn-home color visualizerAvailable for iOs and android services4.5-star rating in the App Store

Cons

2.7-star rating in Google Play

7. Palette Cam Home Renovation App Review

This app helps you visualize what you’re going to paint and allows you to share your photos with friends and family. The home renovation app also provides a way for you to share the images on social media and save or print them, which is useful if you want to show off your painting skills. This app is free but does contain ads.

The Palette Cam app will pull all the colors in any photo to create gorgeous color palettes you can use to inspire your next design project. Whether you’re looking to bring the beauty of the beach into your bathroom or the warm colors of a sunset into your hallway, the Palette Cam app is the right choice.

8. Vivid Home Wall Color Selection App

Updating your wall color can be a big project, but it doesn’t have to be with this app. With the Vivid Home Wall Color Selection App, you can take pictures of your home’s walls and experiment with different colors to see what will look best. This app is free to download and use.

However, choosing between Intense White and Benjamin Moore or Essential Gray by Sherwin William can be a daunting task. But thanks to vivid paint colors, you no longer need to go to the hardware store and pick up bundles of paint swatches. You can search by color or inspiration for paints by top brands like Benjamin Moore, Sherwin Williams, and Glidden.

9. Roomle 3D and AR Room Planner

Roomle 3D and AR Room Planner is another great app for home renovations. If you’re unsure where to start or want to see what your finished product could look like, this app is for you. Roomle 3D and AR Room Planner offer a virtual reality view of your rooms as you renovate them.

This comprehensive home remodeling app helps homeowners design floor plans and use augmented reality to populate existing floor plans with furniture. This app allows you to measure and draw rooms and create your scanned room floor plan.

10. Wayfair App

Wayfair App is a home improvement app for homeowners or renters looking to improve their space on a budget. The app offers interactive 3D models of furniture by room, so you can get the feel of what it would look like in your living room before you buy it. With new products being added daily, this is an awesome app for anyone who wants to remodel on a budget.

This is a great tool when you’re furniture shopping for your home renovation. And if you want to design the complete area of the house with brand new furniture, then you can use a room planner tool to create a 3D design of your place with the products you want until you find the perfect setup.

11. Angi Home Remodeling App

This app is perfect for homeowners looking to do a little remodeling on their own. It includes tips, videos, and how-to guides for various home improvement projects. You can also find local contractors through the app, which is super handy if you’re not comfortable doing the work yourself.

Get your home renovation dreams completed in a snap by downloading this Angi app, formerly known as Angie’s List, to hire contractors in your area.

12. iHandy Carpenter App

This is the perfect app for homeowners who want to improve their homes without hiring a contractor. This app has five tools, including a spirit leveler, stud finder, a plumb bob, and even a protractor. You can use the surface level and bubble level to flat surfaces and plumb bob to access vertical walls. The app can also give you an estimate on how much a job will cost and how long it may take.

13. Morpholio Board

Any interior designer using this app would instantly understand that interior designers designed it. This is a total industry game-changer. This glossy app lets interior designers layout mood boards, design ideas, and collages.

Morpholio Board
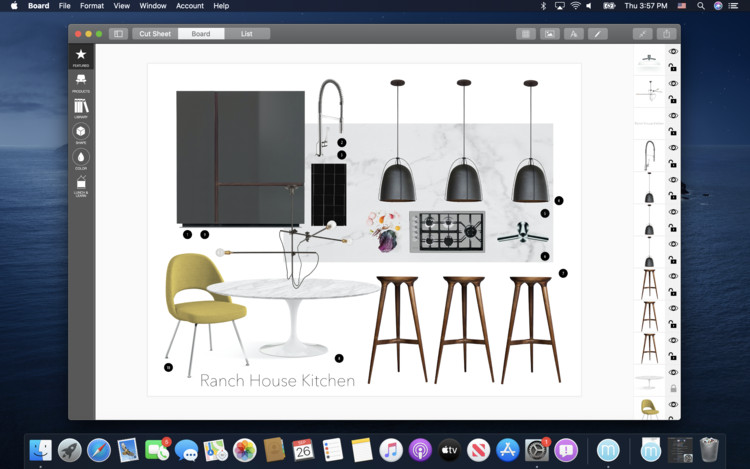
Image credit: https://images.adsttc.com/

This app offers you a chance to let your imagination run wild. It is so easy to use, so much fun, and will help you develop ideas when you are in the shower.

14. MagicPlan Home Floor Plan App

This app is a must-have if you’re in the home renovation business. It will help you with everything from creating floor plans to estimating the cost of your project and getting real-time feedback from contractors.

This app is perfect for anyone who wants to undertake a home renovation project but isn’t sure where to start. It takes all the guesswork out of the process and makes renovating your home a breeze. It comes with an estimated feature, meaning no manual calculations.

The magic app also comes with augmented reality and LiDAR scanning features that make visualization and measurements easier. It’s free to download, and you’ll get full access to all of its features for your first two projects at no cost.

FAQs about Best Home Renovation Apps

What are some of the functions of a home renovation app?

Home renovation apps offer a lot of functions. They can help you stay organized, create and design projects, shop for products, and even hire contractors.

Final Thought about the Best Home Renovation App

Home remodeling can make your head spin. It can be overwhelming to stay on top of everything, from choosing wall art to how to level wall hangings, to how to arrange furniture and which color palette to choose. So, why not make these renovation apps simplify your design life in a major way.


The post 14 Best Home Renovation Apps appeared first on Kitchen Infinity.

Did you miss our previous article…
https://www.centrecountyfood.org/?p=681

post

How to Fix a Toilet Leaking Around the Base

Is your toilet leaking at the base? Are you spotting water on your bathroom floor without knowing where it’s coming from? This can be an alarming experience. However, toilet leaks aren’t something to panic about as long as you know how to fix the problem quickly and easily.

Luckily, fixing a leaky toilet is often easy and inexpensive. Toilet leaks around the base are generally easy and inexpensive to fix. In this article, we’ll talk about the reasons for your toilet leaks, the tools you’ll need to repair them, what to do about the leak, and tips to prevent future leaks. Let’s get started!

Why Toilets Leak at the Base

Loose Tee Bolts

The bolts that connect the toilet tank to the bowl are called tee bolts. These bolts can become loose over time, which will cause the tank to leak. To fix this problem, you’ll need to tighten the bolts.

Improperly Seated Wax Ring

A wax ring is a seal that sits between the toilet and the floor. When the toilet is installed, the wax ring should be properly seated to create a watertight seal. If the wax ring isn’t seated properly, it will cause the toilet to leak.

Loose Water Supply Line

A water supply line is a hose that supplies water to the toilet. If this hose becomes loose, it will cause the toilet to leak. You can fix this problem by tightening the hose connection.

Water is Condensing on the Toilet and Dropping Down

When the weather is cold, water can condense on the outside of the toilet tank. This water can then drip down and cause the toilet to leak. You can fix this problem by installing a tank heater.

Tank Lid

If you notice a toilet leaking at the base, remove the tank lid and check if the leaks are coming from inside there. Look for cracks and if water is getting too high.

If you’re having problems with your toilet leaking around the base, there are a few things that you can do to fix the problem. The most common causes of a toilet leaking are a loose water supply line or water condensing on the toilet and dripping down. By following the tips in this article, you can fix these problems and stop your toilet from leaking.

What You’ll Need

Adjustable wrenchPutty knifeBucketClean towelsLatex glovesBathroom cleanerToilet wax ringPlastic toilet bolts and nutsGasketsWashersScrewdriverHacksawCaulkCordless drill

How to Stop Your Toilet from Leaking Around the Base

Check for Condensation

The first thing you should do is check for condensation. If the toilet is leaking because of water condensing on the bowl, you can fix the problem by adding a coat of wax to the bowl. To do this, put on some gloves and clean the bowl with a bathroom cleaner.


Image credit: https://www.expresssewer.com/

Once it’s clean, apply a coat of wax to the bowl using a putty knife. Let the wax dry, then apply another coat. After that, install a tray and insulate your water tank. Also, make sure your flapper is not faulty, take short, cooler showers, and turn the fan on.

Shut Off Water Supply

The easiest way to stop your toilet from leaking around the base is to turn off the water supply. You can usually find a shutoff valve behind your toilet, but it may be underneath the sink or at a water heater in a closet. There is a supply tube connecting the valve to the tank. If you cannot find a shutoff valve quickly, take your tank lid off and remove the water supply line from the tank.

Flush the Toilet Water Out

You can also stop the leak by flushing out the water in the tank. This will lower the water level and might stop the leakage. Once you have stopped the leak, you can turn the water back on and continue to fix your toilet. Make sure no new water enters through the fill valve in the corner of the tank.

If water continues to enter the tank through the fill valve, then the supply valve to the tank is not providing a complete water stop. Try to locate the main water meter in the home and valve off all the water. Disconnect the supply line from the bottom of the tank using a pair of slip joints or channel lock pliers. Twist the supply line nut counterclockwise to disconnect it from the tank completely.

Tighten the T Bolts

Remove the plastic covers from the base of your toilet on both sides. Tighten the tee bolts using adjustable pliers or a wrench. If the bolts are too tight to turn, spray them with WD-40 and wait a few minutes for the lubricant to work. Reconnect the supply line to the tank and turn on the water at the main valve. Test your toilet by flushing it.

If the t bolts are already tight and can’t be tightened, you may remove and reinstall the toilet to install a new wax ring and new bolts.

Disconnect and Remove the Toilet

Carefully lift the toilet off the floor or ground and sit it on a pair of sawhorses. Separate the tank from the bowl by unscrewing the nuts on top of both. Disconnect all water supply lines from both tank and bowl. Shut off the water to your toilet before disconnecting.

Disconnect and Remove the Toilet
Image credit: https://www.sunrisespecialty.com/

The shutoff valve is located on the left side of the toilet near the water supply tube and the water valve tailpiece. Flush your toilet to drain all water from your toilet and the tank. You can use a sponge or cloth to get rid of excess water in the toilet tank and bowl.

Then, use a screwdriver to unscrew the nut that mounts the supply tube to the fill valve tailpiece. Use a wrench to remove the nuts for the t bolts at the base of your toilet. You can also use a hacksaw to sever each bolt if the t bolts are corroded and won’t turn.

Remove the toilet by lifting it up and away from the floor drain. You may need someone to help you with this or take your time to learn how to remove a toilet before you proceed. Make sure you set the toilet on its side to prevent damage. Also, protect your flooring using a cardboard sheet and place your toilet bowl in this cardboard sheet after removing it.

Remove the Wax Ring and Install a New One

You will need to remove the old wax ring from under your toilet. However, you do not want to use this wax ring again. Use a putty knife to pry up any sections of the old wax ring that are still stuck in place around the drain opening.

Take your new wax ring and place it on top of the floor drain opening. Make sure that it goes beyond the edges to prevent any leaks. Place the ring with the plastic cone facing down toward the drain. Make sure the tee bolts are positioned correctly in the key openings on each side of the flange.

Get everything as clean as possible by using a rag to wipe the underside of the toilet base and the floor flange.

Slide New Bolts into Flange and Place Toilet

When installing a new toilet, it’s important to replace the toilet bolts. Ensure you clean the slots for the bolts in the flange and the bolt holes in the toilet.

Slide the bolts into the slots and place the toilet over the flange. If it doesn’t fit snugly, wiggle it around until it does. Slip the plastic washer over the bolts to compress them to the floor flange and hold them in a vertical position.

Reinstall the Toilet Seat and Tank

If the tank is still attached, carefully lift it and set it aside. Place the new toilet seat on the bowl and line up the bolts with the holes. Push them through until they protrude from the other side. Press the toilet down onto the wax ring, rocking it gently, so the toilet compresses the wax to create a tight seal.

Reinstall the Toilet Seat and Tank
Image credit: https://www.sunrisespecialty.com/

Removing the toilet can be difficult, but placing it back can be more difficult because lining it up correctly over the hole in the floor. That’s why it’s important to call a professional plumber when the need to remove arises. Use a wrench to tighten tee bolts while ensuring they’re not over-tightened, which may cause the porcelain to crack.

When you decide to replace your old toilet with an old chrome plated copper supply tube, think of replacing it with a flexible one made of stainless steel enmeshed polymer.

Reset the Toilet

Turn the water supply back on. Flush the toilet to check for leaks. Sit or kneel on the toilet bowl rim or seat lid, applying your body weight gently, compress the new seal and drive the toilet base down, so it sits flush on the floor surface. Do not wiggle or rotate; apply straight downward pressure.

Reconnect the Water Supply Line

After the toilet has been reset and is not leaking, reattach the water supply line to the tank. If you have a flexible hose connection, make sure the hose is kink-free and no slack in the line. Reconnect the water supply tube to the fill valve and turn the water on.

Reconnect the Water Supply Line
Image credit: https://diy.sndimg.com/

After returning the supply valve, allow the tank to fill until the tank fill valve shuts off. Then, use a hacksaw to carefully cut the brass toilet bolts to the height of 1/2 inch above the tops of the nut. Snap on the decorative plastic caps and apply a bead of bath caulk around the toilet base and floor to provide a sanitary seal.

Flush the toilet after the toilet tank fills up, then inspect for leaks. Once you don’t see any leaks, apply caulk to the floor around the base of the toilet. Be sure to wipe down surrounding tiles or wood floors, then allow the caulk to dry before using the bathroom again.

FAQs on How to Fix a Leaking Toilet Around the Base

Which is better between wax and rubber seal?

Most people prefer the rubber seal because it is easier to install and lasts longer. However, some people say that the rubber seal doesn’t create a tight enough seal and causes the toilet to run. Ultimately, it is up to the individual to decide which seal they want to use.

Final Thought about How to Fix a Leaking Toilet Around the Base

As you can see, dealing with toilet leaks at the base is a very simple task. Toilet leaks can be attributed to the toilet being loose, so tighten everything up, and it should stop having problems. If it is not the problem, go over your checklist about what you think might be causing the issue and fix it accordingly.

If you have a severe problem that’s beyond your knowledge, don’t hesitate to seek help from a professional plumber to help you with your toilet leaks. Also, make sure you properly set your toilet to prevent leaks


The post How to Fix a Toilet Leaking Around the Base appeared first on Kitchen Infinity.

Did you miss our previous article…
https://www.centrecountyfood.org/?p=676

post

Basement Subfloor Options

The basement is one of the most versatile areas in a home. Therefore, think of this versatile space when carrying out your home renovation. The flooring options you choose for your basement will depend on what you plan to use the space for. Basements come with their own set of challenges that need to be addressed before functioning optimally in any room within the house. 

Selecting the flooring option for this place proves to be a daunting task because of the many considerations that come into play. The flooring must withstand moisture, humidity and must be resistant to mold and mildew. Basements are also prone to seepage and flooding during rainy seasons, so it is important that the flooring you choose can handle these conditions as well.

Here are some of the basement flooring options you should consider when renovating this part of your home:

What is the Basement Subfloor?

A basement subfloor is a layer built below the floor covering, and it is responsible for transferring weight to the load-bearing walls. It also serves as an insulation layer between the ground and inside your house.


Image credit: https://vwbblog.com/

Basement subflooring provides support for underlayment, carpet, tile, or hardwood flooring, and they are typically constructed of plywood or OSB (oriented strand board) subfloor panels with waterproof glue or asphalt felt paper.

Factors to Consider Before Installing a Basement Subfloor

Moisture Entering the Basement

Is the basement exposed to water coming from outside? If it is, make sure that there are no cracks in the foundation. It’s also advisable to install a waterproof membrane over the walls before starting construction. Moisture can invade your basement in many ways, even if you don’t expect catastrophic events such as flooding.

 Basements are holes in the ground lined with concrete, and moisture from the soil seeps up over time. If you have a basement, there is always some moisture in the air, and if this air reaches the subfloor, it can cause damage. If your basement has a dirt floor, water will come through cracks and pores in the concrete.

If your basement has a concrete floor, water will come in through the seams between the floor and wall and cracks in the concrete. In either case, water will eventually find its way to the subfloor and cause damage.

Height of Basement Ceiling

Basement ceilings are low, and you can’t even walk on them without crouching. This is normal for a basement, but it creates another problem with insulating. If you put stud or joist insulation on the ceiling, you will be wasting a lot of insulation. The insulation has to be at least 16 inches deep to have any real effect, and it’s difficult to get that much insulation in a basement ceiling.

Types of Basement Subflooring

Vinyl Tile or Planks

Vinyl tile is a waterproof option that can hold all manner of spills and be put directly over concrete floors. It can handle foot traffic, and some higher-end emulates the appearance of wood and stone, which can give your basement floor a luxury look at a low cost. 

Vinyl Tile or Planks
Image credit: https://www.thespruce.com/

This basement subflooring option can offer great value for your money. Installation of vinyl plank flooring and vinyl tile is very easy thanks to the interlocking joints. And any damage to the concrete floor can be repaired easily by replacing a tile or two.

Laminate Flooring

Laminate flooring is made to look like wood planks but is made out of fiberboard. This basement subflooring option is resistant to water damage and can resist spills that warp wood. To install laminate flooring, you’ll need to glue down or float it into place.

Laminate Flooring
Image credit: https://media.istockphoto.com/

Carpeting

The carpet gives the basement a cozy feel, and it helps with soundproofing. Carpeting can hide many flaws in a concrete floor and is relatively easy to install. It’s important to choose a type of carpet that can withstand moisture, as basements often have high humidity levels.

Concrete

If you want a subfloor that will never warp or rot, concrete is the way to go. However, it can be quite a challenge to install concrete on your own, which can be expensive. You’ll also need to seal the concrete to prevent moisture damage.

Engineered Wood Flooring

Many people choose engineered wood flooring for their basements. This material is easy to install, affordable and looks great. Engineered wood flooring captures moisture, so you don’t have to worry about warping or rotting boards. 

Engineered Wood Flooring
Image credit: https://empire-s3-production.bobvila.com/

Basements are prone to moisture, so opt for engineered wood flooring instead of installing hardwood flooring that will become warped or damaged if exposed. Engineered wood boards are made of layers of composite wood sealed with adhesives, making them less prone to swelling and can be glued into place or installed as a floating floor.

Plywood Subflooring Options

If you are looking for a more affordable option, plywood subflooring is a good choice. It is less expensive than engineered wood and can be installed over concrete or a wooden floor. Plywood subflooring should be at least 1 ½ inches thick and treated with a moisture-resistant sealant or paint.

Plywood Subflooring Options
Image credit: https://www.impressiveinteriordesign.com/

Plywood flooring is constructed of 5/8 plywood, exterior grade. It’s also made of rigid foam insulation, two times four sleepers, and a water vapor barrier made of either paper or composite materials. Plywood subflooring is extremely efficient, cheap, and easy to assemble. You can easily do it yourself if you have the right flooring materials.

Tongue and Groove Subflooring

If you’re looking to replace an old subfloor and create a solid and strong foundation for new subflooring, tongue and groove subflooring is a great option. It’s made of kiln-dried lumber and is designed to provide a level surface for new flooring. Tongue and groove flooring is also resistant to moisture and thus makes it a good choice for basements and other wet areas.

Another benefit of tongue and groove flooring is that it’s easy to install. You can do it yourself with a few simple tools. You can find tongue and groove in cut pieces of wood at your local hardware store and home centers. They are set nicely under the floor as a solid foundation that will never wear or tear.

OSB Subflooring

If you’re looking for an affordable and efficient subflooring option, OSB is a good choice. It’s made of Oriented Strand Board, a type of engineered wood. Because it’s engineered, OBS is more stable and less likely to warp than traditional lumber. It’s also resistant to moisture, making it a good choice for basements or other wet areas. Like tongue and groove flooring, OSB is easy to install. You can do it yourself with just a few simple tools.

Ceramic Tile Subflooring

If you’re looking to create a beautiful and durable floor, ceramic tile is a great option. Not only does it look great, but it’s also incredibly tough and can withstand heavy foot traffic. It’s also affordable and timeless and can be installed directly over a concrete slab as long as the subfloor is fairly level. This tile is also unaffected by water and humidity, making it a great choice for basement floors.

Ceramic Tile Subflooring
Image credit: https://www.thespruce.com/

Rigid Foam Insulation Subflooring

We’ve all seen this type of subfloor in our basements. Rigid foam insulation is the most basic of basement flooring options. It’s cheap, easy to install, and poses very little risk to installation mistakes. It can also be used on any underlayment, making it a widely popular option. This is an excellent basement subfloor option because it provides a thermal break between concrete and flooring.

FAQs about Basement Subfloor Options

Can you replace a damaged subfloor?

Yes, you can replace a damaged subfloor. You will need to remove the damaged section and replace it with new material. Make sure that the replacement material is level with the existing floor.

Final Thought about Basement Subfloor Options

As a versatile space at your home where you can turn to a spare room, living space, and kids’ playroom, make sure your basement looks warm, inviting, and cozy by doing some finishing touches.  


The post Basement Subfloor Options appeared first on Kitchen Infinity.

Did you miss our previous article…
https://www.centrecountyfood.org/?p=669