post

How to Prepare a Vinyl Floor for Ceramic Tile

If you’re looking to make upgrades in your home, the kitchen or bathroom floor is a great change to consider. Many older homes and rental units come with kitchen and bathroom flooring made from linoleum. Installing ceramic tiles in your kitchen or bathroom flooring is a great way to improve the look of your home.

If you’re looking for an easy and cost-effective way to redo the floors in your kitchen or bathroom without breaking the bank, then installing ceramic tiles is a great place to start.

The best part about installing ceramic tile flooring on linoleum floors is that no special tools are required for installation. You just need some basic household items like tape measures and tiling knives. You will also want access to plenty of water during installation because ceramic tiles can get hot when they dry out.

Before You Begin

When planning to install a ceramic tile in your kitchen or bathroom, you should always make sure that you test the flooring first by pressing the tiles firmly against it. Ensure there are no bumps or ridges under your tile; if there are, try sanding them down before installing the tiles. Make sure the subfloor and joists making up the floor structure are in good condition and have minimal flexing and deflection.

Soft, thin, and damaged subflooring or undersized joists can flex too much, leading to cracked tile and grout joints. If your cement subfloor is thin and lacks stiffness, install a layer of new plywood over the resilient flooring, followed by a layer of thin cement board.

If removing the vinyl or linoleum before tiling appears to be an easy task, it’s better to do this instead of tiling it. There are several reasons why it might be a bad idea to tile directly over resilient flooring. These reasons include:

The Floor Maybe Too High

An additional layer of flooring applied directly over the old vinyl flooring will make it thicker and raise the overall height of the flooring. Since vinyl flooring is thin, it’s less of an issue than laminate, engineered wood, or solid hardwood flooring. But, even with vinyl flooring, the extra floor thickness can still cause problems along with the baseboard trim or at door frames.

The Resilient Flooring May Not Be Suitable

While standard sheet vinyl flooring that’s well bonded usually makes an acceptable base for the ceramic tile, that’s not true of all forms of resilient flooring. Loose lay sheet vinyl can shift beneath the new flooring, making it unsuitable for a base for a ceramic tile. Vinyl tiles can also show the possibility of shifting.

Also, no resilient flooring with cushioned construction will work beneath the ceramic tile. Most luxury vinyl planks are also not suitable for tiling over because this flooring is laid as a floating floor with no adhesives. This means that the flooring can easily shift beneath the tile, causing damage to grout joints.

Here’s How to Prepare Vinyl Floor for Ceramic Tile

Tools and Materials

You’ll need the following tools and materials to make this project work:

Bucket and mopHearing protectionSandpaperTSP cleanerEye protectionThin-set adhesiveNotched trowelUtility knifeOscillating sanderCement board seam tapeDrywall knife or smooth-edged trowel1/4 inch thick cement board panels11/4 inch cement board screwsBreathing protection

Prepare Your Floor

Follow the manufacturer’s recommendations for cleaning your vinyl floor. Ensure the subfloor and cement underlayment have a combined thickness of at least 11/4 inches. A Cement board, tile, and grout will add significant dead weight to your flooring system, meaning you’ll need a hefty substrate with minimum deflection.


Image credit: https://cdn.shopify.com/

Thoroughly clean your vinyl with plain water and a scrub brush and let it dry. It must be free of dust, dirt, and any oily residue. After that, lightly sand the vinyl flooring with an oscillating sander while wearing a breathing project and eye protection. This will create some texture for the thinset adhesive to bond. Finish by wiping down the vinyl with plain water again to remove all sanding dust.

If your room is small enough and you don’t mind going down on your knees, then you don’t need to rent a floor sander. Instead, use any power hand sander such as random orbit sander to get the job done. 

Clean and Repair the Floor

Clean your vinyl flooring with a TSP to remove dirt, soap, and oil residue. Check for protrusions such as nails and pound them back to place. If any of the parts of vinyl or linoleum flooring bulges out, use a utility knife to slice out the bulge. Your floor needs to be smooth as possible to accept the thinset adhesive and cement underlayment.

Skim Coat the Fabric with Mortar

Mix enough mortar to cover the floor with a skim coat. Apply it evenly over the surface of the vinyl with a notched trowel, then use a float to smooth it out. Let the mortar dry overnight. The mortar should be about the consistency of ketchup.

The skim coat needs to be very thin and only thick enough to bond with the fabric. After drying for about 30 minutes, you’ll have created a smooth masonry surface ready to install your tile.

Test-Fit Cement Board Panels

Lay down a 1/4 inch thick cement board panel over the entire floor. Wear breathing, hearing, and eye protection if you’re cutting the panels using a circular saw. You can also score the panels with a utility knife and snap them along the score lines.

Make sure you leave a 1/4 inch gap along the walls and between all cement board panels. Once you have test-fit the entire floor, remove the panels and set them aside. In most flooring installations, 1/2 inch cement board panels are always recommended as the underlayment for ceramic and stone tile. But when laying tile floor over an existing flooring material, it’s best to use 1/4 inch panels, given the thickness of the floor.

Set the Tile

Now it’s time to set the tile. Start in one corner and work your way out, using a level to ensure each row is straight. Lay ceramic tile so that the grout joints are staggered and use spacers if needed. Be sure to create even ridges over the entire surface to prevent air gaps. Air gaps can lead to cracked tiles down the line.

Set the Tile
Image credit: https://www.builddirect.com/

Set the tiles into the mortar, ensuring to wiggle each tile into position to ensure uniform coverage of the mortar onto the back of each tile. The edges will be cleaner if you place the edge of the tiles to edge and slide them apart to create the correct spacing.

You’ll also want to make sure you leave a 1/8-inch gap between the tile and the wall. After laying all the flooring material, remove any excess mortar from between the tiles using a grout float. Once your tile is in place, cut it to size using a wet saw.

Install Cement Board Panels

Lay cement board panels into position, starting at the wall and working your way to the center of the room. This will prevent creating a gap between two panels next to each other if you ever decide it’s necessary to remove one.

Tape the Joints

Use self-adhesive cement board joint tape to cover the joints, working from one side of the room to the other. The seams are where all your tiles will connect, so make sure they’re tight. Use a drywall knife or a smooth trowel to apply a layer of thin-set adhesive over the taped joints, filling in the gaps between panels. Allow the thin-set adhesive to dry completely before laying the ceramic tile.

Install the Grout

After setting all the tiles, carefully spread the grout across their surfaces using a rubber trowel. Use enough grout to fill in all the little nooks and crannies, but be careful not to use too much, or it will start to ooze out from between the tiles. 

Install the Grout
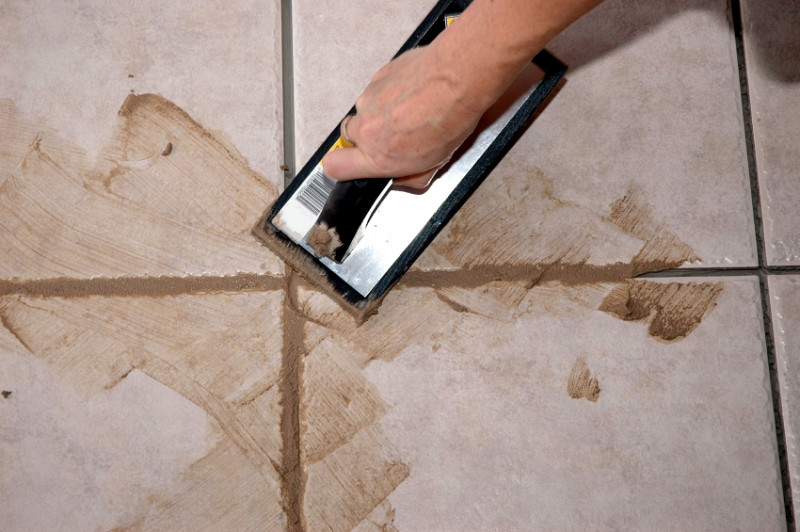
Image credit: https://networx.global.ssl.fastly.net/

Wipe away any excess grout with a damp cloth, then allow the grout to dry completely. Polish the tiles once the grout has dried, use a soft cloth to polish the tiles until they shine.

FAQs on Preparing a Vinyl Floor for Ceramic Tile

What should you use when installing ceramic tile over an existing vinyl floor?

In most flooring installations, 1/2 inch thick cement board panels are used to ensure a stable base for the tile.

Final Thought on How to Prepare a Vinyl Floor for Ceramic Tile

Installing ceramic tile over linoleum flooring requires a significant change to the existing floor. However, you can still create a beautiful finished product by choosing the right tile and completing the installation process correctly over the existing floor.


The post How to Prepare a Vinyl Floor for Ceramic Tile appeared first on Kitchen Infinity.

Did you miss our previous article…
https://www.centrecountyfood.org/?p=808

post

How to Troubleshoot Your Clothes Dryer

Your clothes dryer is a very important appliance in your home. It helps you save money by drying the laundry at home instead of going to the Laundromat. However, there are times when it breaks down and stops working properly. 

Since most people don’t know how to fix their broken clothes dryers, they will buy a new one or take their laundry elsewhere for drying. You don’t have to do that as fixing the clothes dryer is as easy as how to do laundry itself. Below is how to troubleshoot your clothes dryer without calling the repairman or buying a new one. Let’s get started.

Tools and Materials

Voltage meterLong-handled bristle brushRigid dryer ventNew dryer fuseNew dryer power cordCotton swabRubbing alcoholNew dryer belt

Instructions

1. Check if the Dryer is Plugged In

Dryer problems happen because of power interruptions. Before you do any troubleshooting, make sure your dryer is plugged in. Check the voltage meter if there is electricity running through it.

If not, check the circuit breaker or fuse that provides energy to your dryer. Make sure that all electrical connections are tight and secure to avoid loose wiring. If you have an electric dryer, it runs on two circuits, including one for heating the element and one for the rest of the dryer.

So, if your dryer is getting hot but not drying, it could be that one of the two circuits is tripped. In this case, check the circuit breaker and reset the circuit as necessary. Also, learn how to install a dryer electric cord to avoid any electrical issues.

2. Make Sure Your Dryer is Not Overloaded

If you’re trying to dry a lot of clothes at once, your dryer might be too overloaded to function properly. In this case, try drying fewer items or use a larger dryer. Overloading the dryer can cause drying performance and noise issues when too much weight is inside the dryer.

When you squeeze too many clothes into your dryer, you decrease the airflow needed to dry clothes properly. Overloading also makes your dryer work harder, use more energy and increase drying time. Avoid filling your dryer drum more than three-quarters full.

3. Check the Breaker or Fuse

If your dryer is plugged in but won’t turn on, the power source is the first thing you want to check. It’s possible that the breaker has been tripped or the fuse needs to be replaced. Check the Breaker Box If you have an electric dryer, turn off the circuit with a tripped breaker switch and reset. 

If you have a blown thermal fuse, replace it with the same amperage and rating. Also, check the voltage in the outlet using a voltage meter and make sure your outlet is functioning properly. If it’s not functioning, call the electrician immediately.

If you have a gas dryer, make sure the pilot light is lit and that you have an adequate supply of gas if the dryer is fueled with liquid propane. Both electric and gas dryers require 240 volts to operate. And if the dryer power cords fail, check the voltage and replace it if needed.

4. Inspect the Fuse, Switch, and Belt

If you have a power outage or surge in your home, it’s possible that the thermal fuse in the dryer control panel is damaged. Dryers also require a door switch to engage for the appliance to work. However, these switches can break.


Image credit: https://upgradedhome.com/

You can get them coated with lint or use a cotton swab and a bit of rubbing alcohol to clean the contact areas. Check the rubber belt that connects the motor to the drum if your dryer heats up, but the drum doesn’t turn. If it’s loose or broken, replace it. It’s a good idea to inspect the fuse, switch, and belt before a service call.

The fuse is located on the dryer wall and is usually a small, round glass tube. If it’s blown, replace it with one of the same amperage and rating. The switch is located near the dryer door and is either a toggle or rocker switch. If it’s not working, replace it. 

The belt is located around the dryer’s drum, and if it’s broken, worn, or loose, it will need to be replaced. After getting the new belt, place it on the drum where the old belt had been and wind it onto the idler pulley and the motor pulley. 

5. Check and Clean the Temperature Sensor

If the sensor is dirty, it will not read the correct temperature, and your clothes will not dry properly. To clean it, unplug the dryer and remove the screws that hold the sensor in place. Clean it with a soft brush and replace it.

Check and Clean the Temperature Sensor
Image credit: https://fleetappliance.com/

Test the dryer to see if it’s working properly. If your dryer turns on and shuts off very quickly, the problem could be either the thermostat or thermal resistor. The thermal fuse blows and turns off the dryer to prevent overheating. 

Use a voltage meter to check the temperature sensor to determine if it’s working properly. Also, check the heating element and timer to be sure they’re receiving power. Check the user or repair manual.

6. Clean the Lint Trap

Clean the lint trap after every load of laundry to ensure your dryer is running properly and efficiently. A clogged lint trap can cause your clothes to take too long to dry. Hard lint buildup in the trap can cause your clothes to dry slowly, if not at all.

Clean the Lint Trap
Image credit: https://images2.minutemediacdn.com/

If your lint filter is full, the air is not flowing freely, and your machine is forced to work longer than necessary. After emptying your lint filter, wash with warm soapy water and let dry completely to remove any residue from the dryer sheets. Use a bit of rubbing alcohol to clean the electronic moisture sensors. This will leave your dryer working more efficiently and prevent a possible fire.

7. Check the Air Vent and Ducts

The air vent and exhaust duct play a key role in the drying process. Make sure they are clear of any debris or obstructions. If you have pets, their hair can clog up the vents and ducts, resulting in a clothes dryer that does not work properly.

If your dryer vent system is kinked, clogged, or disconnected, use a long-handled bristle brush to clean out the dryer vent. The vent should be as short as possible between the machine and the outside exhaust vent to prevent clogs. If your venting system is long and you can’t reach the entire length with a brush, use a leaf blower to clean the system or hire a professional.

If you still have a flexible white plastic dryer hose, replace it because this is a fire trap waiting for a disaster. And that’s why new building codes require a rigid dryer vent. Make sure you check the outside vent as well.

Most of them are designed with a trap door that only opens when dryer air and lint are blown out. The trap door won’t open if the vent hood gets coated with lint, especially in high humid climates.

8. Make Sure the Dryer is in a Ventilated Space

Your dryer needs to be in a well-ventilated space so the hot air can escape. If the dryer is too close to a wall, the air won’t circulate, and your clothes will take longer to dry. In fact, if the back of the dryer is against a solid surface, it can cause the motor to overheat.

If you’re installing your dryer in a closet, make closet doors have ventilation openings at the top and the bottom of the door. The front of your clothes dryer requires a minimum of three inches of airspace, one inch on the sides. 

9. Check for the Heat Problem

If your clothes take too long to dry, first check the heat problem. The most common reason for clothes not drying is that the dryer isn’t getting hot enough. Hold your hand under the outside exhaust hood to check air movement. If the air movement is less than a hair dryer at high speed, clean the lint from the entire length of the system and exhaust hood.

The dryer isn’t heating if you can’t feel any air coming out. One way to test if the dryer is getting hot is to use a thermometer. Put the thermometer in the exhaust pipe and ensure it reads at least 130 degrees Fahrenheit. If it’s not reading that high, you need to troubleshoot your heat problem.

10. Check the Dryer Blower Wheel

Another common reason for the lack of heat is a blocked dryer blower wheel. This can happen if the lint screen isn’t cleaned often enough. To check if the blower wheel is blocked, open the dryer’s back panel and look at the blower wheel.

If it’s dirty, clean it with a vacuum cleaner. With the back panel open, check the blower wheel for cracks or obstructions that may be preventing it from spinning. To remove the blower wheel, open up the dryer by separating the top and front panels away from the main dryer cabinet. Pull the drum off the drum bearing to have full access to the motor and then unscrew the blower wheel from the motor.

11. Replace the Control Panel

If the dryer isn’t getting any power, you’ll need to replace the control panel. Before doing this, unplug the dryer and remove the back cover. During this step, you will find your thermal fuse, and its location will be dependent on where it is in your particular model of appliance. Read your owner’s manual for information about control panel components to order the correct replacement.

Replace the Control Panel
Image credit: https://i.ytimg.com/

FAQs on Troubleshooting Your Clothes Dryer

What is the common problem with dryers?

Excessive noise is the most common problem with dryers. A new drum belt can help eliminate some of the noise during operation, but there could be other problems if it doesn’t work.

How do I know my dryer isn’t working?

If you have no power, your dryer isn’t working. Begin troubleshooting by unplugging it and checking the power at your electrical outlet to be sure.

Does my dryer need an electrical reset?

If your dryer is making some noise but isn’t tumbling, you can check to see if the drum needs to be reset by pulling the lint out of the back of the machine where you would normally clean it. There’s a small red button on the motor that you can push with a paperclip or something similar to reset it.

Final Thought on How to Troubleshoot Your Clothes Dryer

As you can see, troubleshooting your clothes dryer can be easy if you know what to look for. If you don’t, it can be difficult and time-consuming to learn while trying different things that may or may not work.

Before getting a new dryer, make sure you try these troubleshooting methods, and if you have no clue where the problem might be coming from, don’t hesitate to call a professional.


The post How to Troubleshoot Your Clothes Dryer appeared first on Kitchen Infinity.

Did you miss our previous article…
https://www.centrecountyfood.org/?p=802