post

Types of Under-Sink Shutoff Valves

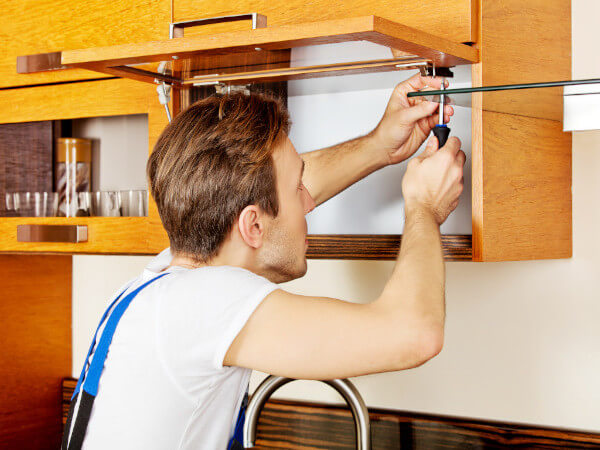
Also known as fixture shut offs or stop valves, under-sink valves allow you to turn off the water to the sink without shutting it off to the whole house. The number and type of fixture shutoffs you choose will depend on how many fixtures there are and where they’re located.

The following guide will take you through different types of shut off valves that can help you identify what you have under your sink.

What is Shut off Valve?

Shut off valve is a valve that stops the flow of fluid in a plumbing system. This valve cuts off the water supply to a pipe once activated. However, shut off valves are not exclusive to plumbing systems.

They’re also used to regulate the flow of gasses. 

ngle Stop Valve

The Angle stop valve is the most popular of shut off valves, being used in over 75% of homes. The valve can be rotated around its main axis to cut-off water flow. The design of the angle stop valve allows it to rotate easily, but it also makes them prone to wear and more likely to leak.


Image credit: https://images.saymedia-content.com/

Also known as a compression valve, an angle stop valve is found on the pipe which exits the wall. It allows you to turn the water off to the specific toilet or faucet when replacing it without shutting all water off to the entire house. Angle stop valves are very durable and can last many years without issues. In addition, angle stop valves are generally found in either brass or chrome-plated finishes.

Straight Shut Off Valve

Straight stop valves are typically found when the water supply pipe comes out below the flow or cabinet. A straight stop valve keeps the water from traveling in the same direction where it came from before entering the valve.

Straight Shut Off Valve
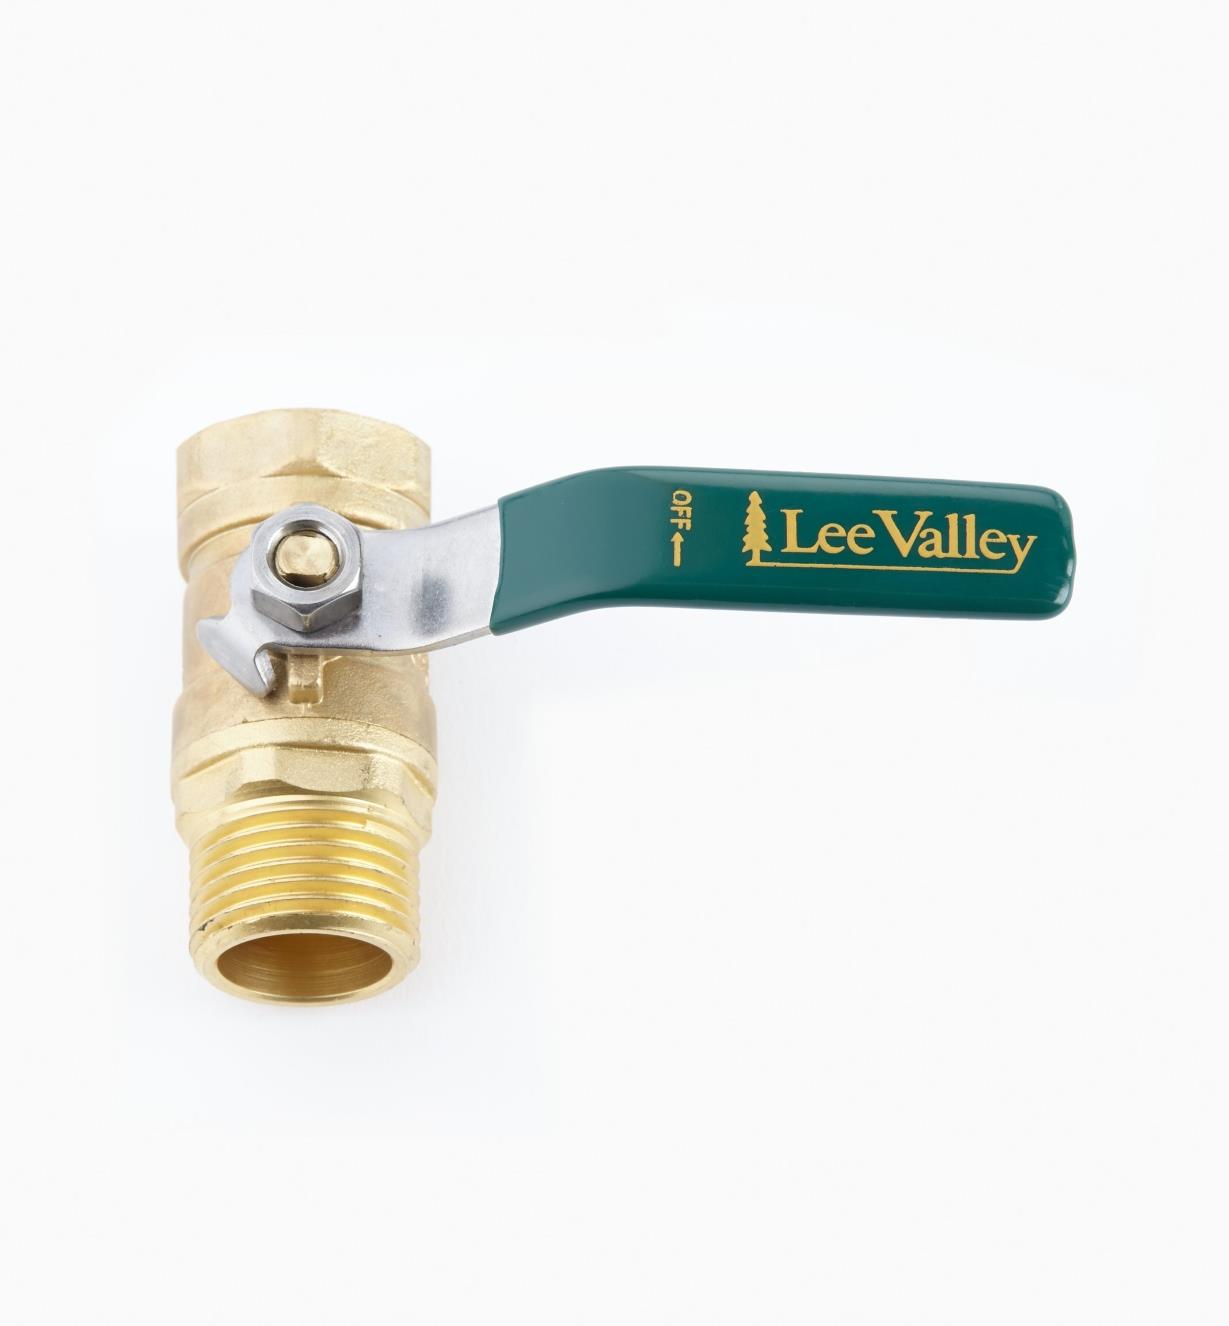
Image credit: https://assets.leevalley.com/

Straight stop valves have handles that point in the same direction as the valve, and handles are located in the middle of the valve body between the inlet and outlet ports. Similar to angle stop valves, a straight stop valve also allows you to turn off the water supply to one specific area. Also, you can do the replacements and maintenance on these appliances without shutting the water supply in the entire house.

Iron Pipe Stop Valve

Iron pipe stop valves are fitted with iron-pipe sized threads to thread a female inlet port. This type of under sink shut off valve can also be adapted to other pipes by using a male iron pipe adapter that can be fitted into plastic pipes or copper pipes.

Iron Pipe Stop Valve
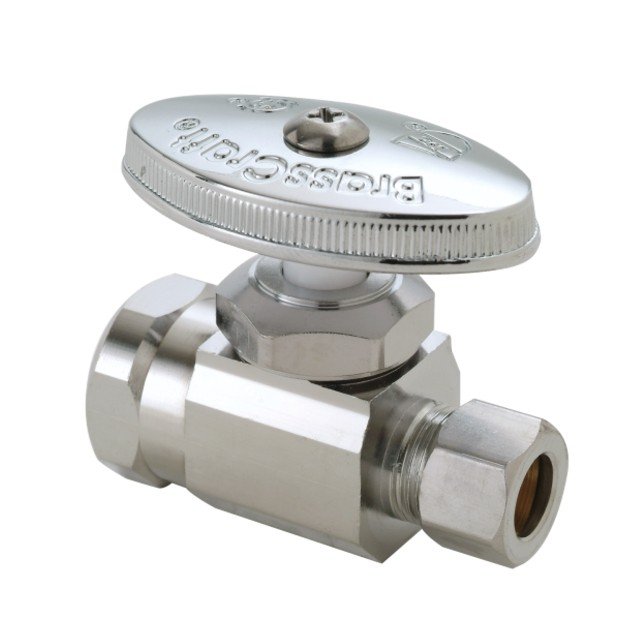
Image credit: https://www.pvcfittingsonline.com/

This shut off valve can be screwed or unscrewed from the end of the water pipe. You’ll only need two pliers. One to hold the water line in place and the other to tighten the valve.

Copper Sweat Shut Off Valve

A copper sweat valve is usually at the end of copper pipe sections. They are threaded to screw into the end of the pipes. Sweat is a term used by plumbers for soldering. This type of shut off valve is known as copper sweat valve because it needs soldering to copper pipe, and it’s made of copper.

Copper Sweat Shut Off Valve
Image credit: https://m.media-amazon.com/

To install these copper pipes, you’ll need common household tools like emery cloth, solder, flux, and torch. The copper pipes are installed at the time of building construction. Professional plumbers prefer this permanent and low-cost solution because they last longer.

Push Fit Stop Valves

Push fit stop valves use a collet to grip the pipe. Also known as push on stop valves, these valves are inserted into the end of the pipe, and the pipe is pushed home so that the collet grips the pipe tightly. They consist of a rubber o ring and stainless steel locking teeth.

Push fit stop valves are easy to install and can be used with copper, PEX, and CPVC pipe. The valve grips onto the pipe with metal teeth and creates a watertight seal with a plastic o ring. The small CPVC is inserted inside its intake port, and cement used with CPVC often works with PVC.

However, the adhesive used on PVC doesn’t bond with CPVC. It’s kind of overwhelming learning about this at first, but once you grasp the idea, you can fit a CPVC stop valve to a pipe by yourself.

PEX Shutoff Valve

PEX Shutoff valves are an innovation to help with fitting a pipe. The one-way valve does not let anything in or out of the line. It’s great for reducing water backflow into your home, but it can’t reduce pressure or prevent scaling on the inside of the pipe.

PEX Shutoff Valve
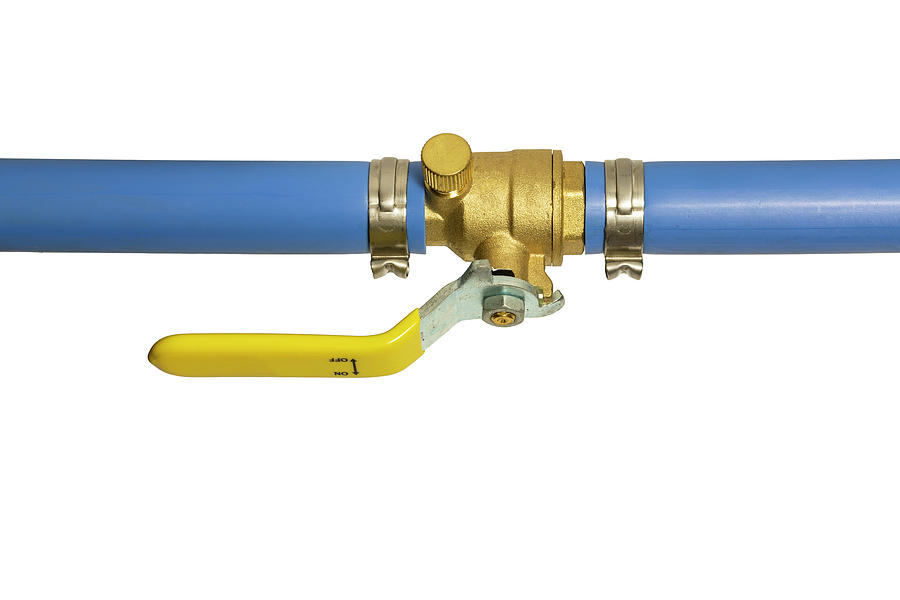
Image credit: https://images.fineartamerica.com/

PEX shutoff valves are more expensive than copper or brass shutoff valves. This stop valve is often attached to pipes with crimp rings or clamp rings. A ring compression tool compresses the crimp ring against the outside of the pipe while a clamp ring tool squeezes a tab on one side of the ring.

The PEX stop valves can be removed, but you have to cut off the ring, which can cause damage to the pipe. This means that the pipe needs to be shorted to get a fresh section of pipe for the new valve.

CPVC Stop Valve

CPVC stop valves are one of the more expensive types of stop valves. CPVC stop valves are used in CPVC piping systems. CPVC stands for chlorinated polyvinyl chloride. They use a specific type of cement known as glue when installed. In addition, a CPVC valve can be used on PVC pipes. But PVC adhesive doesn’t bond well with CPVC material.

CPVC Stop Valve
Image credit: https://images.thdstatic.com/

Compression Shutoff Valve

A compression stop valve is used on copper pipes. It consists of a compression nut that squeezes a brass ring into the space between a water pipe and its body. Buildings with copper water pipes use compression stop valves with a compression intake port. This allows for more compression power and reduces the need for repairs.

Ball Valve

A ball valve is a type of stop valve that uses a ball to control water flow. The valve has a threaded body and nut that screws into the water pipe. This valve is quite large and features a lever handle. It’s commonly used in places where a quick turn-on is necessary, such as the main pipe.

You can open and close it fully with a simple quarter-turn of the lever. The internal ball will align with the pipe when the valve is open, allowing water to gush. The ball will rotate 90 degrees and completely block the hole when closed.

FAQs on Types of Under-Sink Shutoff Valves

Where is the shutoff valve located at home?

The main shutoff valve for the home is generally found on the perimeter of the house. A good place to look is where the water first enters your home. The smaller valves can also be found close to appliances and fixtures such as toilets or faucets.

Final Thought on Types of Under-Sink Shutoff Valves

Shutoff valves are an essential part of any plumbing system. They allow you to turn off the water supply to a particular area, which can come in handy when you need to make repairs or in an emergency. Also, if you’re experiencing low water pressure in your kitchen sink, the first place to check is the shut off valve. Installing these stop valves is an easy task if you know where they are and which type to use.


The post Types of Under-Sink Shutoff Valves appeared first on Kitchen Infinity.

Did you miss our previous article…
https://www.centrecountyfood.org/?p=791

post

How to Grow Scallions

Scallions are fresh, fast, and fabulous in salads, stir-fries, and savory tarts. Also known as green onions or salad onions, scallions are harvested before they reach maturity and can be grown year-round indoors.

Fast-growing plants like lettuce that you plant directly in the ground get tall quickly but have a short harvest window of just a few weeks. Indoor onion plants grow slowly over several months with an even longer harvest window than outdoor varieties.

Scallions are also one of those crops that can be sown in late summer to give one of the earliest harvests next spring. Here’s how to grow scallions from seeds indoors, so you always have these tasty vegetables on hand for cooking or snacking.

What are Scallions?

Allium fistulosum, also known as green onions, is called bunching onions or scallions.  Scallions are produced from specific cultivars of the bulbing onion and have a mild flavor.


Image credit: https://s3.amazonaws.com/

Green onions look similar to the traditional onion known as Allium cepa. They have tall, green stalks that are usually 1 to 2 feet tall. Scallions have slender white bulbs at their base that do not get large enough to form an onion.

Scallion Varieties to Try

There are several scallion varieties. These include:

Guardsman

Guardsman scallions are known for their slow bolting. They grow to about 20 inches tall and have green leaves that are blue-green at the base. The white bulb is slender, cylindrical, and has a mild flavor. This variety takes 50 days to grow, and it straddles the line between a spring onion and scallion for taste.

Evergreen White Bunching

Evergreen White Bunching is a green onion that grows best in the spring and fall. It has thick, blue-green leaves with white bulbs at its base. The plant grows up to 12 inches tall and keeps growing every 45 days until frost. This scallion takes around 60 days to grow from start to finish.

Nabechan

Nabechan is an oriental green onion that grows about 8 inches tall with white stalks and blue/green leaves. It takes around 60 days for these scallions to grow. It’s a Japanese variety prized for its flavor.

Nabechan
Image credit: https://www.activevista.com.au/

Tokyo Long White Bunching

Tokyo Long White Bunching is a white scallion that grows to about 12 inches tall. The leaves are long and slender, with a white bulb at the base. It takes around 90 days for these scallions to grow. This variety is also known as Welsh Onion or Scallion.

Red Beard

Red Beard is a red scallion that grows to about 12 inches tall. The leaves are long and slender, with a white bulb at the base. It takes around 90 days for these scallions to grow.

Red Beard
Image credit: https://www.australianseed.com/

How to Grow Scallions from Seed

You can plant seeds indoors about 8 to 10 weeks before your projected last frost date. You can also direct sow in the garden once the threat of frost has passed. Sow your seed about 1/4 inches deep. Other onions may have slow and poor germination. So, the most important element scallion seeds need is constant moisture, making starting them indoors a good choice.

How to Grow Scallions from Seed
Image credit: https://images.saymedia-content.com/

Seedlings emerge in one to two weeks. Once you have grown, thin the seedlings to about 2 inches apart. For a continual harvest, plant new crops every four weeks.

Potting and Repotting Scallions

Scallions can be grown in pots or containers on a sunny windowsill. Use well draining soil and organic potting mix when growing scallions in containers. Cover the seeds with a loose layer of soil and water them thoroughly. Make sure you keep the soil moist and not soaked.

Potting and Repotting Scallions
Image credit: https://imagesvc.meredithcorp.io/

If you want more instant gratification, then scraps and starts are two methods that are too quick for growing green onions. You’ll have scraps left over when you buy and use scallions from the grocery store. Get your container and rich potting soil. You can make your own compost to add some nutrients to the soil.

The scallions leave between three and four inches of the white bulb intact. Make 1/2 inch deep holes an inch apart in your container and drop the scrap in. Keep the soil moist and not soaked.

The final method of growing green onions is to get the starts from your local nursery. Take your starts off from the soil and gently shake off excess dirt so you can see the roots. Get a container and fill it with rich potting soil. Trim your roots back until they’re two or three inches long.

Your pot should be narrow and at least six inches deep. Make sure your container is in an area that will get direct sunlight. Keep the soil slightly moist and don’t overwater because this allows for decay and diseases. This way, you should be able to harvest and plant more scallions after every three weeks.

Scallions Care

Sun Exposure

Give your scallion plants at least six hours of direct sunlight per day. If you’re planting indoors, put them by a south-facing window. When planting outside, put them in an area that gets the most sunlight. Plant them in a partial shade if you don’t have that area.

Soil Requirement

Scallion plants prefer rich, sandy soil with sharp drainage and a slightly acidic to neutral soil pH. Amend your soil with organic matter to ensure good drainage. If you live in heavy clay soils, add sand or gravel to the mix. Consider doing some DIY soil tests to get the best for your scallions.

Fertilizing Green Onion

Fertilize green onions with a balanced fertilizer like 10-10-10 when you first plant them and again every four to six weeks. Fertilizer rich in nitrogen such as fish emulsion is ideal for green onions because it will provide the plants with a steady stream of nutrients over an extended period and keep them green and growing.

For a longer-term solution, use granular fertilizers released slowly into the soil. You can also top-dress with rich compost.

Watering Scallions

Scallion plants have a shallow root system, so regular watering is important. Keep the soil moist and do not let it dry out. While this may seem difficult in areas with long periods of hot, dry weather, you can greatly reduce the amount of time between watering by mulching with straw or pine bark nuggets. You can also try planting scallions in a raised bed to improve drainage and provide better access to water.

If you’re growing scallions in a container, make sure the pot has drainage holes and keep it evenly moist; they will likely need more frequent watering than they would get in your garden. A well drained soil also protects foliage from excess moisture, which can cause rot.

Temperature and Humidity

Allium cepa grows best when the air temperature is between 68°-78°F. If you’re growing scallions from seed, place a heat mat over your flats to ensure even soil temperatures around 45°F.

Ensure your flats get at least 6 hours of light each day for optimal germination rates and shoot growth. Scallion seeds do not mind humid conditions as long as they have good drainage to prevent rot and other diseases.

Pruning Scallion Plant

Most of the time, pruning is done by removing wilted leaves, which should be left until it’s time to pick them. If your green onion bolts to seed and you want to prevent seed drop, trim off the flower stalk. You may also experience leaf wilt during flowering.

Pruning Scallion Plant
Image credit: https://i.ytimg.com/

Once you notice that the flowers are fading, cut the stalk once it begins to droop and set it somewhere to allow the head to dry out and the seeds to drop out of the flower.

Propagating Scallion

One method of propagation is bulbs or sets. The best way to use sets is by planting them in late fall and overwintering them in the garden. In the spring, they’ll start pushing up new growth. You can also use nursery starts of Allium cepa and plant them to achieve the green onion stalks.

Remember that only Allium fistulosum will produce green tree onions without onion bulbs. True scallion has a milder flavor than A. cepa, which has a stronger onion flavor.

Harvesting and Storing Scallions

Harvesting

Start picking your spring onions once they reach a usable size. The best time to do this is when the bulbs are white and have a diameter about the size of the pencil, but even smaller sizes can be harvested.

You can dig up the whole plant if you plant to eat the mild white bulb or snip the stem off just above the soil level and allow it to continue growing. When growing traditional bulb onions as green onions, harvest the green leaves earlier and use them like scallion plants. 

Storing

Store your green onions in a partially filled jar in your fridge with enough moisture to keep the leaves from wilting. If you harvest stalks without bulbs, store the stalks wrapped in a paper towel in a plastic storage bag. You can also slice and refrigerate them in a plastic bag.

To freeze your onions, rinse them off and thoroughly pat or air dry them before freezing. Their texture will be a bit mushy when they thaw out, so it’s best to use them in cooked food rather than as a garnish. Dehydrating the stalks and grinding them into a powder is a great option for long-term storage if you have a dehydrator.

Common Pests and Plant Diseases

Pests

Thrips and aphids are common pests in onion crops and can be remedied by using a strong stream of water from a hose. If they persist, use insecticidal soap or neem oil or treat severe infestations with pyrethrin. Cutworms, onion maggots, onion nematodes, slugs, and allium leaf miners are also potential pests but can be dealt with by using prevention methods such as crop rotation or organic mulches.

You can also use a beer trap to trap slugs and snails. As long as the trap is deep as a pie pan, snails and slugs will be attracted to the beer’s aroma, which will be deep enough to drown them.

Diseases

Botrytis neck rot, purple blotch, and Fusarium basal rot are the most common onion diseases. They can be controlled by planting disease-resistant varieties and spacing plants properly. You can also remove infected plants and leaves, and use a fungicide.

White rot can also cause mold or rot at the base of the plant and yellowed, wilted leaves. If you notice the diseased plants, remove and dispose of them. Avoid planting Allium in that location for a couple of years. Practice crop rotation for the benefit of your plant’s health.

FAQs on How to Grow Scallions

Do green onions grow back every year?

These spring onions are biennial and can live for several seasons. They’ll come back after being cut down but won’t regrow if the bulbs die or are frozen.

Final Thought on How to Grow Scallions

As you can see, growing scallions is easy and can be done in almost any climate. With a little bit of care, you’ll have plenty of these delicious onions to enjoy all season long. So, what are you waiting for? Get started on your scallion garden today.


The post How to Grow Scallions appeared first on Kitchen Infinity.

Did you miss our previous article…
https://www.centrecountyfood.org/?p=784

post

10 Elegant, Traditional Living Rooms

Thanks to their comfort, the traditional living room style has stood the test of time. However, decorating a traditional style living room can sometimes be hard. There are so many rules and regulations that you have to follow.

Many people don’t know what they should do with the furniture or how to decorate living rooms to achieve the perfect look. We created this guide for those who want to create an elegant, traditional living room but don’t know where to start. Here are 10 elegant traditional living rooms you can copy.

Go Gray in a Traditional Living Room- The Lighter Shade, the Better

When you think about elegant traditional living room colors, dark shades like maroon should be the last thing on your mind. Keep in mind that a lighter color is a sign of sophistication and wealth, so try to paint your walls in a shade of gray or white. You can also opt for some light blue or beige tones.


Image credit: https://st.hzcdn.com/

These colors will create a sense of openness and airiness in your living room. Gray is one of the most popular colors in any living room, but it can blend well in traditional living rooms. Pick some lighter hue with some grays and charcoals in your cushions and rugs for the floor.

Choose the Best Paint for Your Traditional Living Room

To choose paint colors for your room, opt for darker but muted paint colors like Benjamin Moore’s HC-146 Coventry Gray or Sherwin Williams SW6103 Spanish Cloth for an elegant, traditional look. These colors will give your room a rich and classic feel. If you want to add a pop of color, try painting an accent wall in a bolder hue. 

Choose the Best Paint for Your Traditional Living Room
Image credit: https://hips.hearstapps.com/

This can be a great way to show your personality in your traditional living space. A warm color scheme would also be perfect for your traditional living design, especially if you’re sticking religiously to the style.

So, opt for warm neutrals, purples, reds, and forest greens. In addition, bright white and cool gray tones can create a simple, clean backdrop for your more traditional furniture.

Breezy Plains and Prints, Lafayette Residence, San Francisco

This is one of the great examples of traditional living room ideas. The dark-walled living room is softened with large white windows, high ceilings, and a fireplace. The pairing solids in the comfortable sofas, armchairs, and rugs give the room a curated, comfortable feel.

Choose Striped Upholstery for Timeless Feel

Whether you choose chic, wide stripes, or rustic french ticking linens, striped fabrics are a brilliant choice when it comes to upholstery and window treatments in traditional rooms. They are inoffensive and easy to live with because they can stand the test of time and come in all manner of weaves, weights, and different colors to match your scheme.

Consider Contemporary Features

The key to a traditional living room that doesn’t feel stuffy is to add contemporary features. This could be a sleek fireplace, a minimalist coffee table, or even pops of color. The contemporary sofa and armchair contrast beautifully with the more traditional features like the rug and fireplace in this living room. 

Contemporary interiors feature sleek furniture and smooth lines. With these contemporary interiors, you won’t see a lot of tufting, piping, and patterns with contemporary pieces. The favored shape is rounded. You’ll see lots of coffee tables, lamps, and end tables in contemporary spaces.

You can use accessories such as candle holders, figurines, and other tabletop accents to keep it at a minimum. Other than traditional interiors, you can bring in wall art to bring that traditional feel.

Blue and White Glamor in a Living Room

For a more traditional living room, you can use dark paint colors and add dark accents such as chandeliers and even rugs. Use lighter colors like whites, grays, and yellows for contemporary spaces. You can add lots of light fixtures, such as track lights, to give off that contemporary vibe.

Blue and White Glamor in a Living Room
Image credit: https://i.pinimg.com/

You’ll also see hardwood floors in contemporary spaces, whereas traditional living rooms will have carpeting or rugs. Although you’ll see delicate armchairs in traditional living rooms, the emphasis when it comes to seating is on comfortable, sit-back, and relaxed pieces. Traditional roll arm or birch sofas are right at home more often when loaded with throw pillows to increase comfort.

High Ceiling Living Room

In traditional living rooms, you’ll often find more ornate details like crown molding and detailed woodworking. You’ll also see a lot of wallpaper, which can be used to create a luxurious or formal look. Rugs will usually be oriental or Persian, and flooring will be hardwood.

When it comes to furniture, a traditional living room will have a lot of dark wood pieces with upholstery in a neutral color. Traditional seating is made from leather, velvet, or tweed. There may be some tufting on the arms and back of sofas and chairs, as well as nailhead trim. Apart from tightly upholstered furniture, there will also be an iron lantern and architectural details to make the room look current.

Exposed Beams in a Living Room

Traditional living rooms will often have a large fireplace. You should avoid wallpaper with a busy pattern and choose something solid in color. If your furniture isn’t upholstered in a neutral color, you can add it yourself using slipcovers. 

Lighting has to be traditional or even antique in these kinds of living rooms. Chandeliers and sconces are perfect, and you can also use floor lamps with shades that match the walls. Area rugs are a must in traditional living rooms, and you should choose something with a very traditional pattern like oriental or Persian. Leave the modern patterns for other parts of your home.

When it comes to accessories, keep them simple and elegant. Traditional living rooms don’t need a lot of clutter, so choose a few select pieces and display them carefully. Think vases, figurines, paintings, ornaments, and even plants. If you want to create a cottage-style charm in your living room, consider a botanical theme.

The rustic wooden beam and spare furnishings of the cottage work well with botanical prints and indoor flowering plants. You can also create a timeless vintage-inspired appeal by including shabby chic. Shabby chic takes the antique pieces from the traditional to vintage-inspired appeal.

Hang Curtains in Archive Fabric Prints

There are all sorts of window treatments to choose from but nothing says traditional style like classic floor to ceiling drapes. In that case, inject luxurious patterns and history into your living space using a rich archive of velvets, weaves, and embroideries. Traditional homes are often roomy with high ceilings and large windows, making it important to scale up.

Hang Curtains in Archive Fabric Prints
Image credit: https://www.freshideas.co.uk/

Choose large-scale patterns to get the proportion right, and don’t be afraid to match the same pattern on the walls and the curtains. Make sure your decoration pays respect to the past and lives today to enable them to work well with both traditional and contemporary furniture.

Furnish with Antique Pieces

One of the easiest ways to add traditional elegance to your home is by including antique furniture in your design scheme. Not only will you have unique pieces that are sure to impress guests, but you’ll also get the benefit of their classic style and craftsmanship. 

Fine crafted using traditional methods and boasting a quality of manufacture inimitable by many modern designs. Antique furniture makes a great choice for furnishing a traditional living room, whether you have a period property or looking to create a traditional look. 

When choosing antique furniture, consider the era it comes from so that you don’t accidentally choose too mismatched pieces or from different periods. A dated color scheme may also complement the look you’re going for. For example, a rich gold finish with dark wood tones may work well with a traditional style, while a gilded mirror will shine against a neutral-colored wall in an entryway. Also, go for items that will sit on open shelves without taking much space.

Fit Floor to Ceiling Bookshelves

No traditional living room is complete without floor-to-ceiling built-in bookshelves. Not only do they provide functional storage for all of your books, but they also add architectural interest to the room.

Consider having your carpenter build a custom design that perfectly fits your space. Or go for a vintage look by choosing wooden shelves and painting them a dark, contrasting color.

Decorate with Mirrors and Art

Mirrors and artwork make for great focal points in any room – but this is especially true in a traditional living room. Fill your walls with large-scale wall art either grouped or spread apart to create visual interest and conversation pieces. Plus, mirrors will bounce light around the room and make it feel larger.

Go All-Cream for a Luxurious Look

A traditional living space so sumptuous that it feels like a bedroom is not always a good idea, especially when you have kids and pets around. But if you want a living room with lots of luxury, then consider piling in the cream color. You can’t go wrong with the warmth that this color brings to a room. Plus, all cream-schemes will bring out all the different textures of your soft furnishings.

FAQS on Elegant, Traditional Living Room Ideas

What makes a room traditional?

Elegant shapes, refined textures are hallmarks of a traditional living room. Plus, a charmingly predictable sense of order makes traditional style one that’s always warm and charming. While decorating may change the trend, traditional living rooms will always be style.

What is the difference between a traditional and a classic living room?

The classic living room is more formal and elegant than the traditional style, meaning that modern pieces will elevate a space and give it a more formal, elegant vibe, while the traditional style will be a lot more relaxed and approachable.

Final Thought on Elegant, Traditional Living Rooms

As you can see, there’s no style that lends itself to elegance and sophistication better than the traditional style. In fact, traditional interior design has paved the way for several modern design styles you see today. If you want to give your home a classic and elegant look, traditional design is the way to go. You can even mix and match styles if you choose to. 


The post 10 Elegant, Traditional Living Rooms appeared first on Kitchen Infinity.

Did you miss our previous article…
https://www.centrecountyfood.org/?p=778

post

Reasons Why Mowing Wet Grass is a Bad Idea

Is your lawn looking a little shaggy? Are you thinking about mowing it, but the weather doesn’t seem to be cooperating? Then don’t do it. It’s better to wait until the grass has dried out than risk damaging it or your lawnmower by cutting when it’s too wet. 

If you’re considering mowing your lawn, then make sure that the ground is dry before doing so. Otherwise, you’ll end up having to deal with clumpy grass and damaged equipment. And if you want to keep your yard healthy and green, don’t cut grass while wet. This will help prevent soil compaction, which can lead to erosion and runoff into local waterways like lakes and rivers. 

This article takes a deeper dive into mowing wet grass and why you should avoid it. Read on.

Why You Should Not Mow a Wet Lawn

Cutting Wet Grass Can Hurt Your Lawnmower

The first reason you shouldn’t cut wet grass is that it can damage your lawnmower. It’s not worth breaking out the mower if the grass has just been watered or if there are puddles on the ground. If you cut wet grass, you’ll likely end up with clumps of grass stuck to the underside of the mower deck.


Image credit: https://www.homelization.com/

The clumps will end up blending into your lawn, but they’ll also eventually dry and look like dirt until you run over them again with the mower. Moisture is problematic for the gasoline in the mower’s fuel tank, its metal, and indirectly its engine. Intruding moisture can cause corrosion if you don’t mix a stabilizer into the fuel tank.

Moist grass clippings that cake on the metal underside can cause rust. Even in the short term, the caked substance can stress the engine, impeding the motion of the mower blade and making your engine work harder to make up for it.

Cutting Wet Grass Can Affect Your Lawn’s Health

Mowing wet grass doesn’t just affect your mower only; it can also have an impact on your lawn. Wet grass blades are more susceptible to disease and fungus infections, which can lead to problems with your lawn’s health down the road. For an ideal cut, your grass blades should be standing up off the ground.

Wet blades are heavier than dry ones, making such blades hug the ground. As your wet turf starts to dry after rain, some of your blades will resume their upright position and get chopped off when you mow. The resulting uneven look would be bad enough, but the result will be tears instead of a clean cut when you try to cut damp grass.

The wet clippings will mat down, preventing healthy airflow. If you allow wet grass clippings sticking to the underside of your mower deck to remain, you’re inviting mold that can spread to your turf. Also, making passes up and down a wet lawn with your machine can hurt your lawn.

The large wheels will sink into a moist surface in a way that they won’t in dry grass. The wheels will form ruts on the surface, directly damaging the grass. This will cause the soil to become compacted, causing damage over time. You can learn how to use core aeration to heal your grass and beautify your lawn.

You Cannot Cut Wet Grass with an Electric Mower

Water and electricity don’t mix, so using an electric lawn mower on wet grass is out of the question. If your mower has a mulching attachment on it, then the clippings will stick to the underside of the mower deck and create an incredible mess.

electric lawnmower
Image credit: https://empire-s3-production.bobvila.com/

You’re also at a greater risk of injury when mowing wet grass than dry grass with electric mowers, especially when an extension cord runs the risk of being wet and becoming a safety hazard. When this extension cord gets wet, it can damage your mower and even electrocute you while mowing.

Alternatively, opt for a cordless electric mower which provides a safer option since there are no exposed wires. However, these cordless don’t have enough power to cut through serious wet grass. So, it’s best to stick with a gas mower for wet grass because it’s the safest, effective, and least frustrating option.

Uneven Cutting

When your mower’s blades hit hidden rocks or other debris while cutting through wet grass, it can cause the mower to jerk and unevenly cut the grass. This creates an unattractive look to your lawn and can also lead to scalping or slicing off too much of the grass blade, exposing the soil beneath.

Wet grass bends and lies closer to the ground compared to dry turf. This is because the dew on the grass blades makes them heavy, forcing them to bend down instead of standing upright. Your blades need to stand upright to cut the grass properly.

Otherwise, your mower will miss most of the grass, producing uneven cuts across your lawn. Once rainwater starts to drain away, and the grass blades dry up, sections of your lawn will appear as if you didn’t mow them. This uneven cut will make you go over the lawn and mow it afresh to get that even cut.

Clippings Clump on the Lawn and Sticks to the Mower

If your lawn is too long and wet, clippings will not just lie on the grass as usual after you mow it. Rather, they cling to blades of grass or form clumps resulting from heavy dew. The clippings won’t be as easy to collect and discharge from the mower’s bag if clumps and grass are stuck to it. This will require you to stop and clear your lawnmower blade before restarting the machine.

Clippings Clump on the Lawn
Image credit: https://www.thespruce.com/

It’s a good idea to mow wet grass, especially regularly, because the mower will produce wet clippings that easily clump together and lay over your grass. When wet clippings stay on your grass for some time, they’ll keep a lot of moisture over an extended period, exposing your lawn to fungus diseases.

So, it’s best to cut dry grass because the clippings will easily fall off your blade and can be collected in the bag. If you still prefer to mow your lawn after it rains, then consider getting a drag unit to help you clear the soaked clippings off the grass. Furthermore, check the deck frequently when mowing turf grass after the rain to ensure the clippings are not clumping it, which can be a problem for air tapered decks.

Cutting Wet Grass Can Easily Spread Diseases

Mowing wet grass can easily spread diseases because the clippings will be wet and covered in mud. If you mow over a disease-infested area, you’ll just be spreading the disease all over your lawn. When the clumps of damp, matted clippings are left on the lawn without sufficient airflow to dry out, the grass becomes more susceptible to fungal diseases.

Cutting Wet Grass Can Easily Spread Diseases
Image credit: https://cdn.vox-cdn.com/

The wet grass clippings that stick to the underside of the mower deck can grow mold which can spread to your lawn next time you mow. So, before you start cutting, make sure to walk around your yard and identify any infections such as the brown patch disease

Mowing a Wet Lawn Gives You Extra Work

Mowing a wet lawn is also more difficult because the grass is wet and heavy. This means you’ll have to spend more time mowing, and you’ll probably end up with a tired arm at the end of the day. In addition, wet grass stains your clothes, shoes, and every surface your shoe touches, making cleaning an uphill task.

If you must mow wet grass, make sure you take all the safety precautions. Start by testing your soil’s saturation. When you stand on your lawn, you shouldn’t sink into it or see water rising around the edges of your shoes. Therefore, mowing too much is a bad idea.

Without the presence of standing water, you could tame your yard to some degree using a stabilized gas powered mower with sharp blades. If possible, set your mower to side discharge mode. Though this leaves rows of cut grass on your lawn for manual bagging later, it will save you the mess of dealing with a mower bag with a wet interior.

FAQs about Mowing Wet Grass

How long should you wait to mow the grass after it rains?

When dealing with mild morning dew or after light rain showers, you may need to wait between two and five hours for the lawn to dry before mowing. With heavier rainstorms, you should wait for at least one day to mow safely.

Can you cut grass after it rains?

While mowing a wet lawn can damage your mower or grass, there’re still tricks that you can use to minimize the problems if you don’t have time to wait. Such tricks include using a sharp blade to keep your lawn healthier when the ground is still damp.

Does mowing wet grass result in a dull blade?

While wet grass alone cannot dull a mower blade, its slick surface doesn’t make the cutting process easier. And if you leave the lawn to sit on the blade, the saturated clippings can cause rust and an early demise to metal parts of your mower, such as the blade.

Final Thought on the Reasons Why Mowing Wet Grass is a Bad Idea

While it may be tempting to mow your grass after it rains, it’s important to wait until the ground is bone dry. If you can’t, make sure you sharpen your blade first to avoid a nasty accident, soil damage, and fungal infections, which are preventable with a little patience.


The post Reasons Why Mowing Wet Grass is a Bad Idea appeared first on Kitchen Infinity.

Did you miss our previous article…
https://www.centrecountyfood.org/?p=772

post

12 Best Plants for Your Bedroom

You spend a lot of time in your bedroom. That’s why it’s important to make this space as peaceful and relaxing as possible. Apart from decorating your bedroom to look beautiful, you also need to improve the air quality and the best way to do so is to bring plants into the picture. 

But which are the best plants for bedrooms? There is no one-size-fits-all answer here because there are so many different types of plants out there that could work well for you. This depends on where you live and other factors like how much sunlight they need and if they require special care or not.

Here are some air purifying plants that are all great for bedrooms:

1. Corn Plant

The Corn Plant is a great option for people who live in areas with low humidity. It’s a hardy plant that doesn’t need much sunlight and thrives in cooler temperatures. This makes it perfect for bedrooms.


Image credit: https://cdn.shopify.com/

With its long, glossy top stout trunks, a substantial corn plant can serve as a handsome anchor in the bedroom corner. It produces white flowers when located in a sunny spot. The corn plant is also poisonous and shouldn’t be around nibbling pets and curious children.

2. Snake Plant

Also known as mother-in-law’s tongue, the Snake Plant is one of the best options for bedroom plants because it thrives in low light. It’s ideal for people who don’t have time to give their plants a lot of attention. This is the best air purifying plant for any other houseplant.

Snake Plant
Image credit: https://5.imimg.com/

The leather, strappy leaves of the snake plant have adapted to harsh conditions of West Africa where the soil is poor, and rain is irregular. This low maintenance plant is an optimal choice for the bedroom because not only does it claim a top spot in the best ten air purifying plants, but it’s also one of few plants that convert carbon dioxide to produce oxygen.

Snake plants filter indoor air during day and night. It prefers bright indirect sunlight but water it occasionally to avoid messy dropped leaves.

3. Peace Lily

This elegant flowering plant is a great choice for the bedroom because it’s one of the best air purifiers, and it’s easy to care for. Peace lilies thrive in shady areas, so it’s perfect for bedrooms with little light. It removes harmful gasses such as benzene, formaldehyde, and trichloroethylene from the air.

Peace Lily
Image credit: https://images.bunches.co.uk/

The peace lily is poisonous, so make sure to place it somewhere out of reach for children and pets. To care for a peace lily, keep the soil moist and place it in an area of your home that gets moderate to bright indirect sunlight. This plant purifies indoor air and also helps in emitting water vapor.

4. Spider Plant

Spider plants have made a huge comeback in recent years after being commonplace in bedrooms. Most people are familiar with the spider plant, also known as the airplane plant, from its ability to produce multiple pups on stems that dangle from the mother plant.

You can leave the baby plants in place or clip them and re-pot them for gifts or use other rooms. Spider plants absorb odors and fumes to help keep the oxygen level high, making you fall asleep faster. These plants produce baby spider plants, so you can grow and propagate new plants for your bedroom.

This hardy plant is easy to maintain and can naturally filter air pollutants by removing pollutants such as cigarette smoke, ammonia, benzene, and Spider plants that do well in moderate to bright light with average moisture. If leaf tips turn brown, collect rainwater to irrigate your spider plants since they’re sensitive to the fluoride in tap water.

5. Monstera deliciosa

If you’re looking for a versatile plant that can thrive in low light, then the Swiss cheese plant is perfect for you. They can cleanse the interior spaces of your home without taking up much space or requiring much care.

The Swiss cheese plant is native to South America and thrives in indirect light, so it is ideal if your bedroom lacks direct sunlight. Also, keep it out of reach for cats, dogs, and other small animals because its foliage may irritate them.

6. Aloe Vera

Aloe Vera is a great air-purifying plant and is easy to care for. It helps you sleep better because it emits oxygen at night, nourishing your body and mind. These succulent plants produce offsets that you can remove to start new plants.

Aloe Vera
Image credit: https://static.standard.co.uk/

The new plants can serve as replacements if you remove leaves to harvest their healing gel for cuts and sunburns, making it good medicine.

7. Lady Palm

Lady Palm, commonly known as the Bamboo palm, is a great plant for filtering out formaldehyde, xylene, and toluene from the air. Bamboo palm is also good at humidifying the air, so it’s perfect for your bedroom if you have dry skin or suffer from allergies.

Lady Palm
Image credit: https://www.thespruce.com/

Lady palm plant does best in bright, indirect light near a window or skylight commonly found in sleeping quarters but can also tolerate low light conditions. It doesn’t need much water, so it’s the perfect plant for people who forget to care for their plants.

8. English Ivy

English ivy can filter out benzene, trichloroethylene, and formaldehyde. It also is capable of reducing carbon dioxide levels up to 60 percent at night, though most experts recommend keeping your bedroom at 8-12 percent CO2. It requires a low level of light, so consider including it near a window or skylight in your bedroom.

English Ivy
Image credit: https://indoorhomegarden.com/

Thriving in all light conditions, the trailing vines of English ivy look attractive in hanging baskets or draped over a bedside table. Not only does English Ivy help remove toxins, but the research shows that it may be able to clear air of mold and animal feces and improve allergy symptoms.

9. Areca Palm

Areca palm is one of the most efficient air cleaners on the list. It removes harmful toxins like formaldehyde, benzene, and toluene from the air. It does not require much light, so that it can be placed near your window or even in low light areas.

Areca Palm
Image credit: https://www.sendflowersbarcelona.es/

Areca palm is also one of the best plants for removing carbon dioxide from the air. This palm absorbs air pollutants, hence purifying indoor air. These palms grow best in bright indirect light when their soil is kept evenly moist.

10. Chinese Evergreen

Also known as Aglaonema, this plant is very easy to maintain. It helps clean the air removing up to 12 toxins, including benzene, carbon monoxide, and formaldehyde. Chinese evergreen grows best between 65°F-75°F, so it’s an excellent bedroom plant since your bedroom temperature tends to be lower at night.

Chinese Evergreen
Image credit: https://www.whiteflowerfarm.com/

This plant grows slowly, so it’s usually small enough to keep on your nightstand. It’s toxic to pets, so better steer clear and choose different bedroom plants if your animals sleep with you.

11. Golden Pothos

This plant is also known as Devil’s Ivy and is a great choice for beginners. It grows well in low light and high humidity, perfect for the bedroom. The Golden Pothos helps remove Formaldehyde, Xylene, and Toluene from the air.

This plant has a similar aesthetic to the heartleaf philodendron, which you can place with heart-shaped leaves on top of your dresser or nightstand to help purify indoor air and eliminate odors.

12. Rubber Plant

The rubber plant is another good choice for the bedroom. It tolerates lower light levels well and will help with better air quality by releasing oxygen at night. The abundant leaves of this plant draw in a large amount of contaminants, making it excellent at cleaning indoor air. It improves indoor air quality by absorbing airborne chemicals.

Rubber Plant
Image credit: https://cdn.hortzone.com/

FAQs on Best Plants for Your Bedroom

Is it important to have plants in the bedroom?

Yes, it is important to have plants in the bedroom. Not only do they add a touch of nature and beauty to the room, but they also help improve air quality. Indoor plants can help purify the air by removing harmful toxins and pollutants. However, remember not to have houseplants that can be harmful to cats and dogs if you have these pets around.

Final Thought on Best Plants for Your Bedroom

There are many varieties of indoor plants that you can bring to your bedroom to help with a good night’s sleep. These plants not only look great, but they also help improve air quality. So, if you are looking for ways to improve your health and get a better night’s sleep, bring in some plants.


The post 12 Best Plants for Your Bedroom appeared first on Kitchen Infinity.

Did you miss our previous article…
https://www.centrecountyfood.org/?p=761

post

A Picture Gallery of Ducks

Ducks are so beautiful, but it can be hard to get a good look at them. They move around quickly and dive underwater when you try to take their picture. We all know that ducks make great pets, but they’re also wild animals. You might not have the time or space for a pet duck in your home.

Even if you did, there’s no guarantee that your neighbors will approve of one. This is where this picture gallery comes in handy. It’s easy to browse through hundreds of pictures of different kinds of ducks without ever leaving your house or getting wet feet.

In the following gallery pictures, you’ll discover markings, information, and trivia about various types of ducks around the world. Keep reading.

merican Wigeon

The American Wigeon is a beautiful dabbling duck that you might see swimming in ponds and lakes across North America. Its scientific name is called Anas Americana. It has a heavily speckled head, and the males have a white forehead and wide green stripe behind the eye while females are generally plainer.


Image credit: https://nas-national-prod.s3.amazonaws.com/

Both genders have a distinctive light blue bill with a black tip. While they are widespread, these ducks can be wary, though they can mingle in mixed flocks with mallards and duck species.

Northern Shoveler

The Northern Shoveler is a beautiful North American dabbling duck. It has a pinkish bill and white specks all over its body, giving it the appearance of being wearing makeup. The scientific name for this duck is Anas clypeata. 

Northern Shoveler
Image credit: https://cdn.britannica.com/

This duck isn’t only recognizable for its bold, colorful plumage and for having the biggest bill of any North American duck species. They use this bill to feed along the surface of the water. This duck will also tip its backside up to feed on aquatic plants along the bottom of shallow ponds and lakes.

Mallard

The mallard is one of the most common and recognizable ducks in the world. It’s also a popular game bird. Mallards frequently crossbred with other duck species, making it a challenge to identify some of their offspring. Its scientific name is called Anas platyrhynchos. 

Mallard
Image credit: https://www.thespruce.com/

Males have the more colorful plumage, including the iridescent blue, green head, and distinctive tail curl, while females are mottled brown. As a dabbling duck, mallards feed in shallow rivers, ponds, and lakes and become quite tame near human habitation.

Ruddy Duck

Ruddy ducks got their name from their characteristic chestnut head and neck. They are also one of the most widespread ducks in North America. You can find these ducks in every U.S. state as well as much of Canada. Males are a rich chestnut brown, while females are more camouflaged dingy brown.

Ruddy Duck
Image credit: https://cdn.download.ams.birds.cornell.edu/

Winter males resemble females, and they’re relatively sluggish ducks on the surface and frequently dive to avoid predators and feed. Its scientific name is Oxyura jamaicensis.

Mandarin Duck

The mandarin duck is a strikingly colorful duck endemic to Asia, Russia, and Japan, with an isolated feral population in the United Kingdom. These bold birds are perching ducks closely related to the North American wood duck. They’re very popular in Asian artwork, thanks to their distinctive beauty. 

Mandarin Duck
Image credit: https://putakputak.com/

The Chinese lores also use the mandarin duck as a symbol of wedded bliss and marital fidelity. Its scientific name is called Aix galericulata.

Smew Duck

The smew duck is a small diving duck found in Europe, Asia, and North America. This bird is easily identified by its striking white crest and black body. The male smew has a bright orange beak, which it uses to find fish underwater.

Females lack white coloration and are mostly gray and brown with a white cheek patch. Its scientific name is called Mergellus albellus.

Harlequin Duck

This medium-sized diving duck is found in Western Canada and throughout Alaska, especially on rocky coasts. The harlequin duck has bold plumage both in terms of color and patterns.

Male ducks have red, white, and blue-gray plumage with white crescents, spots, and lines, while females are plainer brown with distinctive white markings on the head. Its scientific name is called Histrionicus histrionicus.

Canvasback Duck

This is North America’s largest duck. It has a large rounded head with white underparts, neck, and upper back. The male ducks are entirely black, while the female ducks are brown with pale patches on their face and neck. 

The sloping head shape and long, black tapered bill are distinctive field marks for this species and help distinguish it from the redhead. Its scientific name is called Aythya valisineria.

Common Goldeneye

This is a small diving duck found in most parts of the United States and Canada. The male has a distinctive white cheek patch on its iridescent black head and a bright yellow eye, while the female is mostly brown with some light barring on the breast. 

The common goldeneye has a shorter bill than most diving ducks and can often be seen swimming on the surface of the water, looking for small mollusks and aquatic insects to eat. Its scientific name is called Bucephala Clangula.

Ring-Necked Duck

This medium-sized diving duck is found in most of Europe, Asia, and North Africa. The male has a distinctive ring around his neck, while the female’s breast is finely spotted with brown markings. 

The ring-necked duck dives for food on the bottom of lakes or ponds, and its diet consists mainly of aquatic plants. Its scientific name is called Aythya collaris.

Northern Pintail

The male northern pintail is the most strikingly handsome of all the ducks with his long, slender neck and tail. He can be found in open countries across North America, Europe, and Asia. While many duck species have blunt, stubby tails, the northern pintail has a distinctive long, thin tail that’s often held at a sharp upward angle.

Northern Pintail
Image credit: https://www.marylandzoo.org/

As a dabbling duck, northern pintails feed by tipping forward into the water to forage on aquatic plants, and one-third of their diet consists of fish and small animals. The northern pintails are susceptible to lead poisoning from short pellets that sink into ponds where they feed. Its scientific name is called Anas acuta.

FAQs on Picture Gallery of Ducks

What is interesting about ducks?

Ducks are also called waterfowl because they’re found in places where there is water, such as ponds, streams, and rivers. They can live up to 20 years depending on the species and if cared for. Their egg production is affected by daylight as if they’ll lay more eggs when there is more daylight.

Final Thought on Picture Gallery of Ducks

As you can see, there are various types of ducks, and each species has a different value. Some lay eggs while others are bred for their meat. Ducks have provided humans with more than they need to survive. But just like how to care for baby birds, ducks also need to be cared for whether they’re at home or in the wild.


The post A Picture Gallery of Ducks appeared first on Kitchen Infinity.

Did you miss our previous article…
https://www.centrecountyfood.org/?p=754

post

How to Repair Orange Peel Texture

Orange peel texture is a common issue in the home improvement industry. This problem can happen for many reasons, but most commonly it happens because of improper installation or removal of roofing materials. The good news is that there are some things you can do to fix it.

This article will outline how to repair orange peel texture and prevent future occurrences. Let’s get started.

What is orange peel texture?

Orange peel texture is a term used to describe the appearance of a surface that has been covered in a thin layer of paint or another coating. The surface appears bumpy and textured, similar to the skin of an orange. This can be caused by many factors, including improper installation or removal of roofing materials, using the wrong type of paint or sealant, or excessive weathering. 

Image Credit: http://eegrestore.com

Alternatively, it may be caused by using paint or sealant that is too thick. In this case, the paint or sealant may have been applied with a sprayer instead of a roller and not properly brushed out to smooth the surface. When this happens, it can be difficult to tell which part of the roof has been painted and which parts haven’t; therefore it appears as though the entire roof is orange peel textured.

Main causes of orange peel texture

If shingles are not installed correctly, they can pull away from the roof over time, causing the underlying roofing material to appear bumpy and textured. Also, if the shingles are removed too quickly, they can tear away from the roofing underlayment, causing them to appear bumpy and textured as well.

Alternatively, orange peel texture may be caused by using paint or sealant that is too thick. In this case, the paint or sealant may have been applied with a sprayer instead of a roller and not properly brushed out to smooth the surface. When this happens, it can be difficult to tell which part of the roof has been painted and which parts haven’t; therefore it appears as though the entire roof is orange peel textured.

Finally, if your home is in a sunny or hot location, the sun may cause the paint to blister and peel, also resulting in an orange peel texture.

How to fix orange peel texture

There are several ways that you can fix orange peel texture.

In this first place choosing thebest ceiling materials to buy should be done before getting started.

If the problem is caused by using paint or sealant that is too thick, then the solution is to use a roller instead of a sprayer to apply the paint or sealant. Use a medium nap and go over it about three times with the roller, brushing out any visible lines left behind by the roller.

If your home is in a hot location and has been exposed to too much sun, you can install reflective roof shingles to reduce heat absorption and lower your cooling bills. If you applied a primer that was too thick, apply a professional grade primer at half strength so that it doesn’t dry orange peel texture.

Finally, if the problem is caused by improper installation or removal of roofing materials, then the best solution is to hire a professional to come and fix it. They will be able to properly install or remove the roofing materials so that it doesn’t pull away from the roof over time.

Tips for avoiding orange peel texture in the future

There are several things you can do to prevent orange peel texture from cropping up on your roof again.

First, if you are going to be roofing your home yourself, make sure that you do a good job. Read the instructions thoroughly before getting started and use quality materials. You’ll also want to make sure that if you’re getting someone to do the job for you, they aren’t making any mistakes as they work. This could be anything such as not adding enough shingle adhesive or tearing off shingles too quickly.

Once the roof is finished, don’t walk on it for at least 48 hours so that it can be properly dry up. This will help prevent orange peel texture from forming by giving the coating time to dry completely before it has any chance of peeling away.        

If you are having any other problems with your roof, be sure to contact a professional right away. They will be able to assess the situation and recommend the best course of action. Remember, it’s always better to be safe than sorry, especially when it comes to your home.

Roof texture is not always an easy thing to fix yourself. If you are not sure how to go about repairing the texture on your roof, or if you think the problem may be more serious, it is always best to call in a professional. They will be able to take a look at the situation and let you know what steps need to be taken to fix it. By taking care of the problem as soon as possible, you can avoid further damage and keep your home looking its best.

How to Repair a Wall with an Orange Peel Texture - See Jane Drill

Image Credit: http://seejanedrill.com

How To Repair Orange Peel Texture – FAQ

What is orange peel texture?

Orange peel texture is a type of finish that is often seen on walls and ceilings. It is characterised by its bumpy, uneven surface.

What causes orange peel texture?

In addition to the types ofroof material chosen, there are several factors that can contribute to the development of orange peel texture:

Porous materials: If the surface material is porous, such as drywall or plaster, it will absorb the paint or primer unevenly. This will create a bumpy surface when the material dries.Poor surface preparation: If the surface isn’t properly prepared before painting, it will also be more likely to develop orange peel texture. The surface should be clean and free of dust, dirt, and grime.Incorrect application: If the wrong type of paint or primer is used, it can affect how well it adheres to the surface and may create an uneven texture when dried. It may also be hard for the finish coat to adhere to a rough surface produced by a poor-quality primer or paint.Drying time: Generally speaking, finishes with long drying times are more likely to develop orange peel texture than those with short drying times. This is because in some cases, the paint will begin to dry in certain areas before you have finished applying it. While this isn’t always avoidable, proper ventilation and working in small sections at a time can help minimize this risk.Environmental factors: Sometimes exterior painting jobs produce orange peel texture because of environmental factors such as humidity, temperature, and wind. Exterior painting jobs are especially affected by these factors as they can affect the drying time and how well the paint cures.

How do I fix the texture of the orange peel texture?

The process will depend on what’s causing it, but in general, you should start by eliminating any environmental influences that may be a factor. For example, if there is too much moisture in the air or if it’s very cold or hot outside, this may affect how your finish coat dries and contributes to the orange peel texture. You may have better results painting when conditions are more favorable for finishing work.

Final thoughts on how to repair orange peel texture

In conclusion, orange peel texture is very ugly and bad for resale. You should try your best to properly maintain and repair your roof to avoid this.

If you have any other questions or concerns about orange peel texture or any other roofing issues, be sure to contact a professional right away. They will be able to help you get the problem taken care of quickly and efficiently.

The post How to Repair Orange Peel Texture appeared first on Kitchen Infinity.

Did you miss our previous article…
https://www.centrecountyfood.org/?p=751

post

8 Best Furniture Rental Companies

Moving into a new home can be an exciting time, but it can also be stressful. You may not know where to start furnishing your new place, and you probably don’t have the money to buy furniture. Renting furniture is a great way to get what you need without spending too much money. 

Furniture rental companies offer everything from living room sets, bedroom suites, and dining tables so that you’ll always have what you need at an affordable price. The best part about renting furniture is that if something breaks or gets damaged, it’s no big deal because all of the furniture in question will be replaced with new pieces by your local rent-to-own company. 

So, if you’re looking to rent furniture for your apartment, here are the best furniture rental companies available:

1. Brook Furniture Rental

Brook furniture rental is the best furniture rental company out there because they offer everything you could need for home furnishings. With so many choices available in one place, it’s easy to see why Brook Furniture Rental is the top choice for so many people. Brook furniture rental consists of free professional design services, white glove delivery, and super-fast turnaround time. 

Customers can rent by item, room, or fast path to furnish an entire room. You can also choose from one, two, three, six, and twelve-month leases with significant discounts with a six and twelve-month agreement. Select the number of bedrooms, the level of furnishings you’re looking for, and choose from three pictures and three-color palettes to indicate what most closely matches your taste.

From there, the Brook will show you a sample package with items for the living, dining, and bedrooms with the option to swap out or add needed items before purchasing. Once you’ve signed a lease, Brook can deliver your furniture in as few as one or two business days, and if you’re unsatisfied with what you’ve chosen, the company also offers free returns or exchange within the first week.

2. Feather Furniture Rental Company

Feather is an excellent choice for big-city residents because it’s geared toward apartment living and small spaces. It’s available in all major metropolitan areas, such as New York City, Los Angeles, San Francisco, Houston, Dallas, Austin, Virginia, Maryland, and Washington DC. It also caters to those living in small spaces.


Image credit: https://content.fortune.com/

It’s the only rental company on this list that makes its rental furniture, and furniture is made from sustainable materials like FSC-certified wood and glues and stains with low VOCs. Feather’s plan includes one month, three-month leases, and annual membership. Rentals without membership are more expensive, making them smarter for staging and selling homes than for long-term use.

Feather furniture rental membership requires a high monthly minimum, making this service best for people who want to rent an entire apartment’s worth of furniture and not a few items. An annual membership might be a good option for roommates looking to split the furniture cost and don’t want the hassle of moving furniture when they find a new place to live.

Once the subscription period ends, customers can renew, swap out furniture or buy the items outright minus the rental fees already paid. Feather also offers discounted packages for bedrooms, living rooms, dining rooms, and home offices with the monthly cost of approximately $26 for dining room sets or full bedroom spreads, including a brand new mattress.

Opting for feather, you can renew your lease and swap your furniture for something else. Individual furniture pieces from well-known brands like West Elm are also available.

3. Cort Furniture Rental Company

Cort is a good example of companies that specializes in flexible leasing deals. The company offers furniture rental services for every room in the apartment with no hidden fees or additional charges. Besides, Cort allows customers to keep the items they rent even when their arrangement is over, which means you can save thousands of dollars on new furniture when moving out. 

Cort Furniture Rental Company
Image credit: https://onhavanastreet.com/

Cort has a wide variety of furniture and electronics offerings, making it the most accessible of the many furniture rental companies out there. Like many companies that offer this service, the longer the rental contract, the lower an item’s monthly rent. It allows renters to buy out items when their rental term is up.

Plus, the rental payment made on the item doesn’t necessarily go towards that payment, although Cort will sell the item at a discounted price. Cort furniture outlets are also an option for aspiring buyers, where they offer gently used pieces at steep discounts. This company also gives renters one week to decide if an item will work in their space once delivered.

If not, they’ll pick it up and replace it free of cost. The minimum rental term is one month, and the brand also has monthly minimums for rentals. If you’re using a debit card for payment, Cort requires a credit check and may also require a security deposit. Their services work well for students and military members who can choose from whole apartment decor packages.

4. CasaOne Furniture Rental Company

With over 4,000 items, CasaOne rents home, office, patio furniture, gym equipment, and holiday decor. In addition to mid-century style bedroom, kitchen, office, dining, and living room furniture, CasaOne also offers interior design services, home staging, gym equipment, and patio furnishing rentals. 

CasaOne Furniture Rental Company
Image credit: https://miro.medium.com/

They have one of the largest collections for furniture, thanks to the 4,000 items in their inventory. The company also provides rental options for seasonal decor, bedding, rugs, wall art, and picture frames. CasaOne also features brand name furniture rentals from West Elm and Article alongside offerings from brands with less name recognition that still deliver on style.

CasaOne services several metropolitan areas across the country. The price of items varies depending on the rental term, varying anywhere from 12 months. There is also a rent-to-own option. It also offers the opportunity to purchase the rental furniture by charging the retail amount minus the already paid rental fees.

The company also charges extra for early rental contract termination and furniture insurance. Still, it will deliver and assemble any rented items for no additional charge within three business days and also pick your rentals when you’re ready to move out.

5. Fernish Furniture Rental Company

Drawing its inspiration from mid-century and Scandinavian furniture design, Fernish provides premium and trendy rental options. Although Fernish is only available for customers in Los Angeles, Southern and Coastal Ventura County and Orange County, CA, Seattle, WA, and Dallas, Fort Worth, TX. This brand shows promise as a rental purveyor of on-trend furniture from the likes of CB2 and Floyd.

Fernish Furniture Rental Company
Image credit: https://www.treehugger.com/

About a week or two after placing an order, a team will deliver, assemble and arrange the furniture. If an item isn’t the customer’s preference, they’ll let Fernish know within three days, and the customer can swap it out at no additional cost. At the end of the rental term, a renter can renew, swap out items for free, or buy7 a piece of furniture by paying the difference between the total value and the rental amount that’s already paid. 

If you live near the Fernish service area and swap out their furniture every few years, this rental might be the right one for you. This brand offers durable furnishings that can be used repeatedly by replacing parts and uses an 11-step refurbishment and sanitization procedure that utilizes sustainably sourced materials.

6. Rent-A-Center

Rent-A-Center is one of the largest furniture rental companies in the United States. It offers furniture, appliances, and electronics for rent with no long-term contracts required. Customers can choose to pay weekly, biweekly or monthly installments, and all major credit cards are accepted.

Rent-A-Center
Image credit: https://images.barrons.com/

Rent-A-Center also offers a free delivery and set-up service. There are no long-term contracts, and it also offers the option to upgrade rental items at any time. It offers electronics, furniture, appliances, computers, smartphones, and home decor with locations nationwide. Renters can order online or visit local stores to pick out items, finalize details, set up payment plans, and arrange same-day delivery. 

The company also offers repairs and services for no additional cost during the lease term and includes upgrading products for free. If you want to buy items, they’ll offer a discount for paying off your balance early, and there are no long-term contracts, meaning that you can cancel or upgrade at any time.

7. Oliver

Oliver’s use-friendly website and interior design style quiz help get you started on finding the perfect pieces that fit your style. They have an extensive product range, including everything from bedding to lighting, with all prices indicated so you’ll know exactly what you’re spending.

The brand’s signature design quiz gives new furniture renters a jumping-off point with pre-designed rooms that can be tweaked to their liking. Once finished, the results are displayed with pieces that fit your style, rent price range, and more once finished. The site also offers access to complimentary design consultants who can help craft that perfect look. 

The brand offers three plans suitable to short and long-term renters, plus those looking to rent one. Pricing is set up so that the longer the rental term, the lower the monthly cost. There are no delivery, assembly, and set up fees for the beginning of a rental term, and subscribers to the brand’s long-term plans are allotted one free furniture swap. 

Subscribers to Oliver’s one-year upfront plan in which renters commit to a year’s worth of Oliver get a 10 percent discount on their rentals. Oliver is available in the Dallas Fort Worth metro area, Los Angeles, San Diego, and San Francisco.

8. Aaron’s

Aaron’s offers furniture, appliances, and electronics leasing through its Aaron’s Plus plan. Customers can choose to lease single items or an entire room of furniture. Delivery and set-up are free, with the exception of in-home entertainment installations. Customer service is available seven days a week. 

There is no early termination fee; however, customers must return the merchandise in good condition. This company also encourages you to shop by style, from casual to contemporary, so choosing what you like is simple. Offering packages, special deals, and sales, this national brand is a rent-owned chain. Not only can you own items once you complete your payment, but you can pay off your balance early.

The Everest brand rents furniture, appliances, electronics, computers, and more to consumers looking for cheap rentals with no credit check required. Everest is a great option if you are on a budget but still want quality products. Many vendors are partnered with the best furniture rental companies, so you have brand names you can trust at affordable prices.

Customers can also choose to purchase the items they rent through the company if they fall in love with them. If you’re looking for a more vintage vibe, then Everest offers interesting pieces for bedrooms, living rooms, and dining rooms that are new but look like you picked them at a hip second-hand store. This service is only offered in the New York City Area.

FAQS about Best Furniture Rental Companies

How do you choose the best furniture rental companies?

Opt for the one that showcases a variety of furniture styles and features additional offerings like home decor, electronics, and service in different country areas. For instance, CasaOne is chosen because it offers a wide range of items, including workout equipment. Feather is also a good choice because it’s tailor-made for city dwellers.

Who is furniture rental good for?

Furniture rental is good for individuals who might not want to coordinate moving their furniture. And it’s not ideal for individuals who may risk falling behind on payments.

Final Thought about Best Furniture Rental Companies

Best furniture rental companies often have amazing deals and discounts to help you save money on your decorating project. Be sure to check online and in-store for special offers before making your final decision. Furniture rental companies make it easy and affordable to get high-quality furniture for your home. 


The post 8 Best Furniture Rental Companies appeared first on Kitchen Infinity.

Did you miss our previous article…
https://www.centrecountyfood.org/?p=739

post

Outdoor Treasure Hunt for Kids

Kids love games, and they also love to be challenged. But sometimes, it is difficult to come up with ideas on how you can keep their interest in a game that might have become boring after playing it for the umpteenth time. An outdoor treasure hunt for kids allows them to explore nature while having fun.

It will also help them develop critical thinking skills and enhance their observation skills, which are important when looking for treasures around your home or community. And what’s more? They will get some exercise too. 

This guide has printable outdoor scavenger hunt clues so that you can set these treasure hunt riddles in minutes:

What is a Scavenger Hunt?

A scavenger hunt for a treasure hunt is a fun game where you follow clues or riddles and collect small prizes or a large prize at the end of the hunt. For an Easter scavenger hunt, you can even use plastic eggs to hold the clues in. Both individuals and teams can play scavenger hunts. The game is adaptable and has greater activity for smaller and larger groups alike.

Scavenger Hunt Clue Ideas

Nature Scavenger Hunts

A nature scavenger hunt can be a fun way to get your kids excited about being outside and learning about the environment. You can make a nature scavenger hunt as easy or hard as you want by including different items in the list. It can take place in your backyard, a park, or a nature preserve.


Image credit: https://childhood101.com/

It involves searching for items or following clues to find hidden items outdoors. These scavenger hunts are great for every age group, including very young kids. An outdoor scavenger hunt is a great way to engage the senses. So, consider a search that asks players to identify things they can watch, smell and hear.

A nature hunt can also be fun to teach kids about environmental stewardship. You can help beautify a trail by picking up trash you find on your walk. Collecting trash can feel like a menial task, but it can be fun when it’s considered a game. Pass out gloves and plastic bags and offer prizes for whoever collects the most trash and finds the strangest object.

Ensure each group of the kids has adult supervision for safety if they’re collecting trash. Nature scavenger hunt ideas include collecting sticks, pinecones, and leaves in a nature craft. Spot and photograph nature items from a list, and lastly, identify and photograph a variety of bugs, leaves, plants, and flowers.

Neighborhood Scavenger Hunts

A neighborhood scavenger hunt is another type of treasure hunt where players are given a list of items to find in their surroundings. This can be a fun activity for kids who live in urban neighborhoods. Items on the list might include a rubber band, toothpick, a canceled stamp, a cookie, a drinking straw, and a paper cup.

Neighborhood Scavenger Hunts
Image credit: https://columbiasc.momcollective.com/

There are a couple of variations on neighborhood hunt. The first variation is to have teams go door to door where players tell the neighbor who answers the door that they’re on a scavenger hunt. They then ask them for the items on their list. The next variation is holding an outdoor scavenger hunt in the neighborhood like you would have a nature hunt. 

This is also a great way of keeping kids occupied during a neighborhood block party. Use discretion with a door-to-door variation of this game, as knocking on someone’s door more than once could quickly become irritating for neighbors.

If you have two teams, each team might go to odd-numbered or even-numbered houses, or one team could go to the north side of the street and the other to the south side. Neighborhood scavenger hunt ideas include finding hidden items in the neighborhood, finding specific landmarks and locations, following hidden clues to find a prize, and going door to door to request items from a list.

Color Scavenger Hunt

This hunt is perfect for younger kids learning the names of colors. Write down the names of commonly known colors and post them in a visible spot. Split kids up into teams and give each team a different color crayon or marker. 

Color Scavenger Hunt
Image credit: https://cdn.naturalbeachliving.com/

The goal is for the kids to find all of the items listed on the sheet in that particular color. Let your child find the colors and label them with the appropriate names on the hunt sheet.

Photo Scavenger Hunt

This hunt is perfect for older kids. Give them a digital camera and take pictures of items listed on the sheet. The items can be anything from a specific color to something found in nature. The best part about this hunt is that you can tailor it to your child’s interests.

Photo Scavenger Hunt
Image credit: https://teambuilding.com/

If they love animals, make a list of items that includes pictures of different animals. If they love nature, make a list of items, including plants and flowers. You can also make the hunt harder by including specific details in the photos, such as something in motion or a picture taken from a distance.

Photo scavenger hunt ideas include items of a particular color or shape, local landmarks, players doing certain activities, and things that start with a specific letter.

Stay at Home Scavenger Hunts

Scavenger hunts can be great at-home activities too. They’re a fun way of breaking up a boring weekend. Sleepovers and birthday party scavenger hunt ideas are especially popular. 

Stay at home scavenger hunt ideas include favorite things like favorite foods, favorite colors, and favorite toys. Others include household items and something that starts with A, B, C, D, and more.

Scavenger Hunt Clues for Treasure Map

After creating a list of items or clues, tally up the total number of items and assign a point value to each item. For example, if there are ten items on the list, assigning a point value of five each would make the total points 50. 

Now create a simple treasure map with a starting point and an ending point. The path between the two should have several circles or X’s drawn, each representing a clue.

Field Trip Scavenger Hunts

Field trip scavenger hunts can be a great way to keep your kids engaged at museums, zoos, or amusement parks. Scavenger hunts at public places involve finding specific items and clues. This is a fun way to explore new places and learn about unique objects.

Field trip scavenger hunt ideas include certain colors or shapes, items in an exhibit at the museum, items with the logo, and specific rides at a carnival or amusement park. Others include animals at the zoo and vendors that sell specific food items such as cotton candy and popcorn.

When having a scavenger hunt in public spaces, talk to kids about proper etiquette and safety. For example, if your hunt is in a museum, ensure your kids understand that they should talk quietly and walk.

If it’s a noisy outdoor venue, make sure your kids know to stay in designated groups and not wander off on their own. For safety, let an adult or teenager stay with each group if younger children are participating and make a plan of what you’ll do if someone gets lost.

How to Make a Riddle Scavenger Hunt

If you want to make your own outdoor scavenger hunt clues for scavenger hunt games, it’s pretty and easy to do. Even if you don’t consider yourself a creative person, you can come up with dozens of clues and ideas for riddles or games. You can try keeping one child busy and occupied or throwing a larger themed birthday party or traditional Easter egg hunt.

You can turn all these scavenger hunt riddles into whatever theme you like or use on a family camping trip. If you’re looking for a quick way to occupy your child once they’re on a school break, you can raid the dressing up box and toys for some props or age treasure clues with a wet tea bag and use some pennies as a real treasure. 

Kids Scavenger Hunt Ideas and Theming

There are plenty of scavenger hunt ideas that you can use to theme your game. Whether it’s finding things around the house or in the garden, there’s something for everyone. You could even go on a treasure hunt and set up a series of clues that will lead players to different items hidden in your backyard or neighborhood.

Traditional Easter Egg Hunt

Alternatively, you could set up a traditional Easter egg hunt with wrapped candy or plastic eggs that contain some prize. You can even get your child’s friends involved and play along too.

Traditional Easter Egg Hunt
Image credit: https://www.organizedmom.net/

Try our treasure hunts if you’re looking for something truly inspirational and creative to do with the kids. When it’s clear what your theme is and whether you’re holding an outdoor or indoor treasure hunt, you can decide on the treasure hunt clue.

How to Make Your Own Find Things Treasure Hunt

If you don’t want to buy treasure hunt cards or cards with scavenger hunt items like the brilliant find it a game, you can make your scavenger hunt clues for kids or visual treasure hunt questions. 

You can cut out magazine or newspaper pictures and stick them to a sheet, then your kids can run around hunting for the treasure hunt items on the list. This also works well for scavenger hunt clues around the house. 

If your kids can read, then scavenger hunt clue ideas can include a simple list of the items or write down a subject. For older kids, you can make more elaborate riddles or rhyming riddles for them to solve.

Scavenger Hunt Supplies List

Here’s a list of universal treasure hunt ideas and can be used for an outdoor or indoor scavenger hunt game. You can also add rules like don’t bring anything back that’s alive like worms, a pet, a growing plant, or a flower.

Themed treasured gifts and prizesDecorationsTimerBags or baskets for the itemsPen or pencil to cross off the list itemsPre-printed list or paper and magazine pictures bought treasure hunt cards.

FAQs on Outdoor Scavenger Hunts for Kids

How can you do an online scavenger hunt?

You can use a virtual scavenger hunt to connect with friends and family who live far away. Virtual scavenger hunts are played the same way as in-person scavenger hunts, except that you’ll connect with fellow players over video conferencing.

What are some of the benefits of outdoor scavenger hunts for kids?

Scavenger hunts for kids have many benefits, ranging from inflicting team building to kids, improved outdoor time which helps in getting Vitamin D, which is crucial for the development of kids. Scavenger hunts are one of the best ways to bring kids into the present moment.

Final Thought on Outdoor Treasure Hunts for Kids

As you can see, these scavenger treasure hunts do not require special skills, materials, or investment. They’re also inexpensive and accessible games for people of all ages. So, if you’re thinking of a scavenger hunt, you can make it as simple and elaborate as you want with things you can find around the house and some items on the checklist you find.


The post Outdoor Treasure Hunt for Kids appeared first on Kitchen Infinity.

Did you miss our previous article…
https://www.centrecountyfood.org/?p=732

post

16 Vegetables and Herbs to Plant in July

July is not too late to plant garden vegetables and herbs despite the wrong perception. Many edibles, including vegetables and herbs, can be planted even up to late in the month. It’s a great time for planting since temperatures are more moderate and rainfall is still abundant.

Here are some of the garden vegetables and herbs you may want to plant in your vegetable garden during July:

1. Green Beans

Green beans are a common fixture in many gardeners’ summertime tables. Because they grow quickly, they can be planted in warm weather, unlike their counterparts pole beans. Many bush beans have a maturity date of only 60 to 70 days, meaning that planting early in July will be ready to go no later than mid-September. If you have a late first frost date, then planting at the end of July will give you a great harvest.


Image credit: https://cdn.apartmenttherapy.info/

2. Beets

Beets are a great vegetable to plant in July. They have a long growing season and can be harvested until the first frost. Beet seeds are small and should be planted 1/2 inch deep and 1 inch apart in rows 18 inches apart. You have lots of time for planting beet plants in early to mid July in zone 4. These root vegetables are cold hardy and taste even better after the cool weather starts in the fall.

3. Summer Squash

Plant summer squash seeds in well-drained fertile soil that has been amended with compost or other organic matter. This is a hot weather loving plant that you can start in your garden in zones 9 and 10.  Plant the seedlings 12 inches apart and water regularly. The flowers should pollinate themselves, so you don’t have to worry about bees.

Summer Squash
Image credit: https://cdn.harvesttotable.com/

There are different types of squash that are beginner-friendly. You can plant zucchini, pattypan, and crookneck squash in July and still get a good harvest in late summer and fall. Zucchini planted in early July will start producing in early September until frost kills off the plants. You will have a smaller harvest than spring plantings but you’ll have fewer problems with garden pests.

4. Cucumbers

Cucumbers like rich, well-drained soil and do best when the pH level is between 6.0 and 7.0. Space the plants 24 to 36 inches apart in rows 6 feet apart. You can plant cucumber seeds in July, but you’ll get an earlier harvest if you transplant seedlings that have been started indoors or purchase plants from a garden center. A second planting at this time of the year will yield a small early fall crop.

Cucumbers
Image credit: https://images.medicinenet.com/

Water the plants regularly, but don’t over-water them, especially when the fruit is developing. Cucumbers are very sensitive to an uneven water supply. Look for varieties that produce early, and make sure you plant them in full sun. You may also provide frost protection in the early fall.

5. Green Onions

Green onions are a cool-weather crop that can be planted in early July. You can plant the seeds in rows or clusters, and they don’t need to be spaced very far apart. The plants will grow best if you keep the soil moist but not wet. They can tolerate light frosts and continue to grow until the temperature drops too low.

Green Onions
Image credit: https://parkseed.com/

While it’s too late to plant bulb onions, you still have a lot of time for growing green onions. These onions are ready to harvest in only 60 days, but you can harvest them sooner. You can also use the cut and come again to cut off the greens and let the plant regrow. This is a bit faster than starting new onions by seed.

6. Kale and Swiss Chard

These two vegetables are similar; they can be used interchangeably in most recipes. Both plants grow well during the summer and provide you with small green leaves to eat through September and October. The plants can surprise you by producing delicious yellow flowers and later red berries.

Plant it by seed or transplant in July, and it will be ready to start harvesting baby greens in just a few weeks. But if you want the sweetest leaves, wait until the fall after a few light frosts have touched it. This makes the leaves taste super sweet.

7. Carrots

It’s never too late to plant carrots in your garden. These vegetables will mature in about 70-80 days and can be stored in the ground over winter to be harvested as needed. They are a great source of beta carotene, vitamin A, and fiber. 

Carrots
Image credit: https://www.almanac.com/

Plant them by seed or transplant in early July, and they will be ready to start harvesting. Keep the soil good and moist as it can dry out quickly in the summer heat. Choose carrot varieties that mature in 60 days so you can have late summer and early fall harvest. Carrot seed will germinate faster in warm soil but mature in cool fall temperatures, providing you with super sweet carrots to enjoy.

8. Sweet Corn

July is the time to plant sweet corn in your fall garden. These vegetables will mature in about 60 days and can be stored in the ground over winter to be harvested as needed. They are a great source of dietary fiber, thiamin, and vitamin B6. Sweet corn loves heat, so a crop planted in early July will quickly start if you keep it well-watered. Early harvest goes with a 60-day variety, and you’ll have sweet corn starting in early September.

9. Peppermint Swiss Chard

Swiss chard is a veggie garden superstar that thrives in the spring, summer, fall garden, and even longer with a cold frame or tunnel protection. It’s perfect for pots, gardens, and electric pink and white striped stems topped with deep green, ruffly foliage. Plant a fresh crop in mid summer for loads of baby leaves in early autumn to late some plants mature for a late-season harvest.

Peppermint Swiss Chard
Image credit: https://www.gardeningknowhow.com/

10. Market Express Baby Turnip

This fast-maturing turnip is bred for high yields of uniform, golf ball size roots. The skin is thin, and the flesh is creamy white and well textured. They are delicious when eaten raw and fresh from the garden or used in salads, slaws, and stir-fries. They thrive in late summer and early fall gardens.

11. Radishes

There are several types of radishes: spring, summer, daikon, black, and China rose. The most common type is the spring radish, a small, round, red root that can be eaten raw or cooked. Summer radishes are larger than spring radishes and have white or pale green skin with a crisp, white flesh.

They are perfect for eating raw or added to salads. Daikon radishes are large, white, and tapered with a mild flavor. They are often used in stir-fries, soups, and pickles. Black radishes are small, round, and black with a peppery flavor.

12. Sweet Potatoes

Sweet potatoes are a yam that can grow up to two feet. They have a dark green exterior and creamy white flesh inside. Sweet potatoes can tolerate light shade, but sunny areas produce the best yields. You can also grow sweet potato plants in pots if you want better yields during this season.

13. Imperial Green Spinach

Imperial Green spinach is one of the best leafy greens that grow best in the heat of summer. It has thick, dark green leaves for salad greens or cooking. It’s an excellent choice for late summer sowing as the plants are both heat tolerant and bolt resistant. They are also resistant to common spinach diseases like downy mildew. The deep green, arrowed shaped leaves are held upright on sturdy stems, making picking a snap.

14. Bulldog Collard Greens

Bulldog collard greens are a very flavorful variety of collard greens. The plants grow 2 to 3 feet tall and have many large, strong leaves. They are resistant to heat, shade, insects, and disease, making them extremely easy to grow. 

They can tolerate almost any condition; they even tolerate some flooding. Direct seed in the garden or give plants a head start indoors under grow lights, moving them to the garden about 50 days before the first fall frost.

15. Lettuce

In late July, lettuce is a cool-weather crop that can be directly seeded in the garden. Sow lettuce seeds thinly in rows and then thin to 8-12 inches apart. Lettuce varieties include romaine, butterhead, iceberg, and looseleaf.

16. Peas

Peas are a great choice to start in July for a fall harvest in zone 3. Opt for snow peas because they can be harvested any size and sooner than shell peas. Peas planted in the summer will yield half of what you normally get from spring-planted pea if you have shortfalls. So keep that in mind when planting and double the amount for larger yields.

FAQs about Vegetables and Herbs to Plant in July

Is July too late to plant vegetables and herbs?

No, July is a great time to plant vegetables and herbs. Many cool-weather crops can be planted in July, including lettuce, broccoli, and cabbage.

How late can you grow cucumbers?

You can grow cucumbers from late spring to late fall, depending on your climate. They need plenty of room in the garden, so if you’re lacking space, plant them on raised beds, trellis or try compact bush varieties.

Final Thought about Vegetables and Herbs to Plant in July

As you can see, there are many vegetables and herbs that you can still plant in July. You’ll enjoy fresh vegetables during the fall months with time to harvest.


The post 16 Vegetables and Herbs to Plant in July appeared first on Kitchen Infinity.

Did you miss our previous article…
https://www.centrecountyfood.org/?p=726