post

Why Window Air Conditioners Freeze-Up

Window air conditioners are not designed to be in super cold climates, which means that if you live in a climate that gets below freezing, your window AC will freeze up. This can happen when the unit is running or not being used correctly – it’s just part of how they work.

In this article, we’ll explain how to prevent your window AC from freezing up, as well as give you some tips on how to keep your energy bills down. Keep reading to find out more. 

Solutions To Try When Your Window Air Conditioners Freeze-Up

To keep this from happening, you should either turn off the unit when it’s not being used or install an insulation kit to help protect it from the cold. If you do have any problems with frozen windows, it’s best to call in a professional to help you out. 

Insulation kits are fairly inexpensive and easy to install, so this is a great solution for anyone who wants to make sure their window AC stays functional all winter long. For more information about the kits, contact your HVAC contractor for advice. They’ll be able to help you find a good insulation kit that will keep your room as cold as possible without having to worry about it freezing up.

Another solution is to shut off the AC entirely when it’s not being used. You can do this by removing the front grille and locating the switch, then moving it into the off position. This will stop it from recirculating warm air back into your room, which should help prevent freezing up while also saving energy costs.

Image Credit: http://storables.com

Even if your window AC does freeze over, you shouldn’t let that stop you from using it – just remove some of the ice before turning on the power again (never use hot water or open flames like hair dryers for this). You should be safe to run it normally again, but keep an eye on the ice levels to make sure they don’t get too high.

Other Solutions To Try

While there are manytypes of air conditioning systems, all with their own ways of working, the following solutions might also be worthwhile trying if the above tips do not work.

If you’re not comfortable installing an insulation kit or turning your AC completely off when it’s not in use, there are a few other things you can do to try and prevent freezing.

One is to keep your windows open while the AC is running; this will help to circulate the cold air and keep it from building up. You can also try using a space heater to keep the room warm while the AC is on, as this will help to prevent the unit from freezing over. While it may not be the best idea to use a space heater if you have small children or pets, it can help a great deal.

Most importantly, it’s a good idea to make sure that any air bubbles in the window seal are eliminated before turning on your window AC. These can build up from condensation and cause issues, so poke each one with a long needle until you don’t see them leaking out anymore. If they’re blown out completely, there will be no pressure buildup to cause ice problems – just make sure your windows are as tight as possible before using the unit again.

Window AC’s should not be left running while unattended for safety concerns and also since doing this could prevent the unit from working properly due to over freezing. Shutting the window AC unit off when not in use is a good way to prevent this. The insulation kit is also an easy and effective solution to try. If these solutions do not work, then freezing may be unavoidable in colder climates. 

In this case, just monitor the ice levels and remove any ice before turning the unit back on. Following these instructions should keep your room cool all winter long without having to worry about your window AC freezing up.

The Importance Of Not Having Dirty Filters

Make sure that you’re cleaning the filter regularly. This will help improve airflow and stop the unit from working harder than it needs to, which can also lead to freezing.

When the filter becomes clogged with dust, debris, and pet dander, it is not able to do its job properly. This can cause your window AC unit to work much harder than it needs to by making it run longer for the room to become cool again after shutting it off (this is known as short-cycling).

If you notice that your filters are dirty or clogged up regularly then you will want to replace them more frequently if possible.

Why Window Air Conditioners Freeze Up – FAQ

Can an AC electronic board be responsible for freezing units?

When window air conditioners freeze up, many people wonder if they need to replace the entire unit. In some cases, the electronic board may be at fault and need to be replaced. However, several other factors can cause an air conditioner to freeze up as well.

How do I know if the electronic board is bad?

The best way to determine if the electronic board is bad is to have it tested by a professional. If you are experienced in electrical work, you may be able to test the board yourself. The most common symptom of a bad electronic board is that the AC will not turn on at all. 

You can usually test the board by checking for power at the connector. There should be power at all of the connectors, each connector should have 12 volts. The voltage may not be exact depending on your model, so you may need to check the manual for the correct reading.

How do I test an electronic board?

You can test an electronic board by removing it from the unit and testing it with a multimeter for a continuity test. If you are not comfortable removing wiring or working with electricity, then you should take your AC to a licensed repair shop to have this done for you. If there is no power at any of the connections when attempting to start up the window air conditioner, then the board is likely bad.

What causes my AC to freeze up during use?

A window air conditioner freezes up for a variety of reasons. The most common reason is a temperature that the unit can’t deal with. However, there are several other possible causes. One common cause is a dirty filter. When the filter is clogged with dirt and dust, it can prevent air from flowing through the unit properly. 

Another common cause is a blockage in the condenser coil. If the coil becomes clogged with debris or lint, it will prevent the unit from cooling properly and can cause it to freeze up. Finally, if the refrigerant levels become too low, it can also cause the AC to freeze up.

How do I fix my window air conditioner that has frozen?

There are several other possible causes, so it is important to determine the root of the problem before attempting to fix it. If the filter is dirty, you can clean or replace it. If the coil is clogged, you can clean it with a vacuum cleaner. If the refrigerant levels are low, you can add more refrigerants. However, if none of these solutions work, then you may need to replace the entire unit.

Final Thoughts On Why Window Air Conditioners Freeze-Up

4 Reasons Your Air Conditioner Is Frozen & How to Fix It | Blair's Air

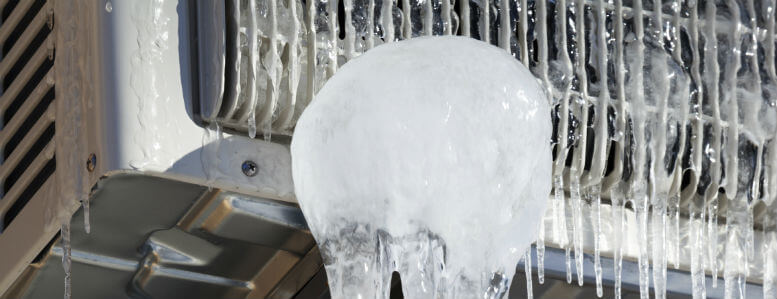
Image Credit: http://blairsair.com

In conclusion, there are several reasons why a window air conditioner may freeze up. By knowing the most common causes, you can usually fix the issue yourself. If you are not comfortable working with electricity, then it may be wise to seek professional help if your AC freezes up.

Finally, if you want to know what the best air conditioners are, ones that function correctly in different types of weather, you can check out our best air conditioners buying guide


The post Why Window Air Conditioners Freeze-Up appeared first on Kitchen Infinity.

Did you miss our previous article…
https://www.centrecountyfood.org/?p=969

post

Peat Moss: What It Is and How To Use It

Peat moss is a natural growing medium with many applications, but it can be hard to know how to use it in your garden. But what exactly is peat moss? How does it differ from other types of soil or mulch?

This guide covers everything from the types of peat moss available to how much water each type holds. We’ll cover everything from planting trees and shrubs with peat moss as a potting medium or using it as alternative mulch material in vegetable gardens. You’ll also find out which kinds of plants grow best when grown directly in peat moss without any additional soil mixed into the mix. Let’s get started!

What Is Peat Moss?

Peat moss is a soil amendment that is harvested from peat bogs. Many of these peat bogs are found in wet areas of Canada. Peat bogs are formed over a long period as organic materials partially decompose.


Image credit: https://www.gardeningknowhow.com/

Although sometimes referred to as peat, peat moss and peat are not the same things. Peat moss is one of the products harvested from peat bogs. Other types of peat moss come from the partial decomposition of other organic materials. If you know how to make compost then you must know this type of peat moss. The moss in peat moss refers to sphagnum moss.

Where Does Peat Moss Come From?

Peat moss comes from your flower pot or garden from wetlands or bogs. It’s not decomposed material because the surface of the blogs doesn’t allow oxygen and air to filter underground. This makes the fibers of the sphagnum moss remain intact.

Types of Peat Moss

Sphagnum Peat Moss

The most commonly used type of peat moss is sphagnum peat moss. Sphagnum peat moss has a high ability to absorb moisture and holds ten times its dry weight in water. After it’s harvested and dried, sphagnum peat moss is light in color, making it retain 10-12 times its weight in water.

Sphagnum Peat Moss
Image credit: https://www.gardeningknowhow.com/

Don’t confuse sphagnum peat moss with sphagnum moss, even if their names are similar. Sphagnum moss refers to the plant material harvested when still alive and growing above water. The end product is the light, fibrous material often used to decorate line wire baskets.

Black Peat Moss

This is an important type of peat because it has high nutrient content, making it useful in growing orchids because orchids like organic material in their soil. It’s also used for potted flowering plants and nurseries that produce bedding plants. It’s a little more acidic than sphagnum peat moss and holds more water.

Black peat is harvested differently than sphagnum peat moss in a way that preserves the living plant. It’s cut from Sphagnum bogs in Canada and is probably black because of its high carbon content. It requires more processing before it’s sold but has less dust and fewer contaminants than brown peat moss.

History of Peat Moss

Peat was dried and used as a source of fuel in some countries for centuries. This is because it’s rich in carbon dioxide, just like other fossil fuels. It was until the 1940s that peat had a place in horticulture. Today, it’s used as a soil amendment, soilless mix, seed starting, and mushroom casting.

vailability of Peat Moss

Peat mosses are commonly found in bogs and wetlands of the earth’s northern hemisphere. It’s sold in gardening stores, online, hardware stores, and even supermarkets.

Mining Peat Moss

Before peat moss becomes a useful gardening product, it must be harvested by digging the ground and recomposing the bog’s ecosystem. When it comes to mining peat moss, the process is as follows:

Dig a network of ditches along the peatland to drain the water. Second, remove the native vegetation to get the peat exposed. Third, level the harvest to prevent drainage of the surface runoff. Fourth, harrow the top layer to speed up the drying process of peats. Fifth, suck up the dry peat layer using a large vacuum harvester.

Lastly, the harvested peats will be transported to a processing firm for cleaning, drying, and screening into different labels and packaging.

Pros of Peat Moss

Sterile

Peat moss has a natural ability to kill weed seeds and insects. When peat moss is added to the soil, it leaves no chance for mosquitoes and larvae to grow in your garden. This attribute can be very important if you want to avoid diseases such as malaria.

Cleanliness

Most of the growing materials are not clean. However, that’s not the case with peat moss. If you drop some wet moss, pick it up, get it dried or sweep it up.

Moisture Retention

Peat moss is believed to retain water for longer than other composts. This means that you will need less watering of your plants during dry seasons.

Peat Moss Has Slightly Acidic pH

Peat moss has a pH of 4.9 to 6.5, slightly acidic. This makes it better for soil mix because the acidity helps break down other compounds in the soil. This also makes it a good corrector, especially with plants that cannot stand alkaline soil.

It’s Fully Organic

If you are looking for an organic material to improve the content of your soil, using peat moss is a good option. It comes from bogs and is fully natural. The best part is that it’s now harvested at its optimal stage, further adding that this is an organic ingredient. Also, quarrying and transportation do burn a lot of fossil fuels, so if it’s produced organically, it’s not harvested and delivered organically.

Peat Moss Doesn’t Compact

Even though peat moss absorbs water well, it doesn’t compact, unlike soil. Compaction makes it hard to create space for the water and air to pass through. But if you add peat moss to any compact material, you’ll have solved the compaction problem and made the growing mix drain better.

The Drawbacks of Peat Moss

Poor in Nutrients

Some growers consider peat moss to be nutrient-poor. It doesn’t contain much nitrogen, potassium, or phosphorus, but it does have calcium and magnesium, which are essential nutrients for the growth of cannabis plants. Unlike other organic materials such as manure compost, peat moss is very poor in nutrients.

Dryness Issue

Since peat moss is very dry, it’s not 100% suitable for soil. It can be combined with other organic materials to improve the water retention capacity of your growing medium. When starting seeds with peat moss alone, ensure they get enough moisture. It’s also good to mix it with soils and some other soilless media.

Non-Renewable Resource

Peat bogs are made up of wetland plants accumulating for thousands of years. They are only found in areas where the average annual temperature is lower than 64 degrees F (18C). Peat moss from North America or Canada comes from old-growth forests. In other words, it’s a non-renewable resource that has to be harvested. This is not the case for peat moss harvested in Ireland or Scotland. Their bogs are managed wetland areas that grow peat moss yearly, so they can be harvested without causing permanent damage.

Peat Moss is Expensive

Peat moss exceeds the price of comparable mediums such as coconut coir. If you use it in bulk and the price is an issue, a better alternative is compost.

How to Use Peat Moss in the Garden

Soil Amendment

Peat moss is available in several grades, with different particle sizes. The larger the particles are, the more expensive it is. Use peat moss as a soil amendment to lighten heavy soils and increase water retention. For clay and heavy soils that get compact easily, it softens the soil structure and improves the drainage.

Peat moss helps retain moisture and nutrients for plant roots for sandy soil. If you intend to use it as a soil amendment, you should know that it changes soil pH levels. Ensure you measure and watch out if the pH level drifts too much by testing the soil pH

Hydroponic Growing

Peat moss is used in hydroponic systems because it creates a soil and nutrient solution barrier. This layer increases the stability of the system, keeping the plant roots away from harmful products that are designed to kill them.

People using it use it with other growing media like perlite and vermiculite to balance the moisture and aeration. When using peat moss for pure hydroponic growing, you should know some facts about it’s not appropriate.

Because it’s an organic matter, if provided with plenty of oxygen and nitrogen, it will start to decompose, making the material compress around plant roots and choke off your plants. So, better mix it with other materials.

Seed Starting

Peat moss is often used as a base layer to germinate and grow plants like vegetables and flowers. It provides aeration to the root zone, and it’s very easy to use for newcomers in hydroponics. When using peat moss for seed starting, you also need special trays with drain holes on the bottom because if you don’t, the peat moss will expand and block the water flow out of your seedling flat.

For this purpose, use the peat moss alone or in a mixture with some soils. You can also remove the hassle by getting the peat pellets sold on the market. Many people also prefer a soilless mix of peat moss, perlite, coconut coir, and others in different amounts. This prevents diseases, fungi, bacteria, weed seeds, and other bad things commonly found in the soil.

Peat Moss for Plant Transplants

Using peat moss granules is also the best way to transplant young trees and big plants. It can be easily handled since it is lightweight; you can use it with other components like the potting mix but make sure not to include any fertilizers or pesticides.

Peat Moss for Plant Transplants
Image credit: https://www.gardeningknowhow.com/

It provides nooks and crannies where new, tender roots can grow. Peat moss also keeps humidity high, essential when plants have a new home. It also corrects the acidity of the soil and breaks down the consistency and texture of the soil, especially if it’s clay soil.

Growing Acid-Loving Plants

Peat moss is also used to grow plants that prefer soil with low pHs, such as rhododendrons, gardenias, heathers, tomatoes, Pieris, azaleas, and camellias. These plants need a peat moss mixture for their acidic soil. When combined with the correct potting mix, these plants enjoy having an environment where they can take up essential nutrients from the soil and conserve water.

Peat Moss Alternatives

Compost

Compost can be used as peat moss alternatives. These are usually less expensive but do not have the pH balancing effects of peat moss, therefore it should be used in conjunction with other ingredients to create the correct balance for acid-loving plants.

Compost is made from decayed organic materials like rotted plants, leaves, vegetable scraps, and animal manures. It has a lot of commonalities with compost peat, like excellent water holding capacity and great material for soil amendment.

Compost is cheaper than peat moss and fully sustainable in that you can easily make your own. On the other hand, compost won’t last long like peat moss, and you’ll have to add compost regularly. And lastly, compost will compact faster and easier than peat moss, but to have a comparable effect, you can add sand, shells, and eggshells to the soil to improve its texture.

Perlite

Perlite is a volcanic rock heated and expanded with steam to produce a fine white, shiny-type growing medium, which lets good drainage and aeration of the roots. It is also widely used as an additive for potting soil or seed starting mixes as it helps increase the porosity of the root environment.

It provides an excellent oxygen supply to plant roots and will not compact under heavyweight. Perlite is a good natural drainage layer for the bottom of your containers, and it will also help prevent any root rot problems that can occur from sitting water in the bottom of the container.

Coco Coir or Coco Fiber

Coco coir is the partially processed fiber of the coconut husk. It’s sold compressed into bricks or blocks or in a loose form that can be expanded by adding water. Coco produces excellent drainage and aeration qualities with good retention properties.

Coco provides an ideal air to water ratio – twice as much air space compared to water-holding capacity. Coco coir is a sustainable resource that has been used for centuries to protect the health of natural shorelines and reefs. It’s highly resistant to insect, microbial, and mold attacks, making it perfect as a growing medium for both hydroponics and soil applications.

Vermiculite

Vermiculite is a naturally occurring mineral heated to expand it into wormlike particles that absorb moisture and provide aeration. Vermiculite provides the nutritional requirements of plants while allowing for excellent drainage and aeration qualities.

Organic Matter

Organic matter is what makes the nutrients in your soil available to plants. It increases the number of good, healthy microorganisms in your soil by providing them with food and habitat. Organic matter also absorbs water during irrigation, reducing runoff.

What’s more, organic matter improves porosity in your soil by opening tiny spaces between soil particles for air and water, giving your plants room to grow.

Sand as Peat Moss Alternative

Sand has very coarse particles that do not release nutrients to plants easily. It does not change the pH of your soil, but it also doesn’t hold nutrients well, so adding sand on top of a peat moss/vermiculite mix is not ideal. Sand may be preferable if you are planting trees or other plants that don’t need consistent nutrients.

FAQs on Peat Moss

What is wrong with using peat moss?

Peat moss is not a natural substance. It is the partially decayed remains of plants that have been harvested from peat bogs and mires, an ecosystem formed by the incomplete decomposition of organic matter in wetlands. Peat bogs are fragile habitats that take thousands of years to form.

When should you use peat moss in your garden?

You should use peat moss as a soil amendment or potting mix, especially when growing fruits and vegetables such as tomatoes, blueberries, and camellias which are acid-loving plants.

Final Thought on Peat Moss

There you have it. Peat moss is harvested from bogs or mires and is used in planting or potting soil mixes for acid-loving plants. Peat moss is not a natural garden soil ingredient, but it will help your garden grow lovely flowers and delicious foods.


The post Peat Moss: What It Is and How To Use It appeared first on Kitchen Infinity.

post

How To Grow Black Lace Elderberry

If you are looking for a beautiful and unique ornamental plant, black lace elderberry is an excellent choice. It has dark purple foliage and blackberries, making for a dramatic landscape focal point during the growing season. This beautiful shrub goes by many names, including black lace, elderberry, common elderberry, black elder, European elderberry, Judas tree, and blue or black elderberry.

This versatile plant provides year-round beauty without much effort on your part. Whether you’re looking for a new ornamental shrub or simply want fresh fruit at your fingertips, this variety of Sambucus canadensis is sure to please. In this article, we’ll talk about everything you need to know about growing black lace elderberry.

Uses of Black Elderberry

Elderberry plants have gained popularity thanks to their lovely appearance and important uses in traditional industries, culture, and medicine. They fall under early spring flowers since they bloom creamy pink flowers in the spring. These are followed by blackish-red fall berries, which can be harvested for making elderberry wine and jam. You can also leave the elderberry wine on the plant to attract birds and other wildlife.


Image credit: https://www.thespruceeats.com/

Black lace berries are also edible and high in vitamin C. If you want to plant them for food and drink, then the American elderberry, also known as Sambucus canadensis, is the better choice than the European type known as Sambucus nigra.

The intense purple black foliage is finely cut, giving it an effect similar to Japanese Maple, also known as Acer palmatum. Some designers are even using it in the more tender maple varieties since black lace is extremely durable and adaptable.

It can also be used as a dramatic accent plant, planted en masse for a troublesome high hedge, or incorporated into the mix or perennial border. Black lace is also suitable for use in woodland gardens, rain gardens, and attracting birds and butterflies to the yard. You can also plant a black lace next to a shrub with brightly colored leaves to create contrast and interest.

This is a very cold hardy, and easy-to-grow plant adaptable to most sites. In addition, this plant is deer resistant, drought tolerant, fall heat tolerant, and a landscape plant. It can also be used as a potted shrub on the patio. It’s good in groupings or masses or perennial and shrub borders.

Common elderberry plants are deciduous plants or small trees that can reach up to 20 feet in height and width. Some specimens have grown as tall as 33 feet in their natural habitat.

Planting Black Lace Elderberry (Sambucus racemosa ssp. melanocarpa)

Black lace elderberry can grow in USDA plant hardiness zones 4-7 but is susceptible to winter damage. It is best planted in fertile, loamy soil with excellent drainage and receives full sun or partial shade. If planting specimens near homes or other structures, it is a good idea to place a barrier of mulch or fencing around the plants to protect them from being damaged by lawnmowers, mower debris, and deer.

Planting Black Lace Elderberry
Image credit: https://www.gardeningknowhow.com/

They are relatively easy to grow. They can be propagated from seeds, softwood cuttings, or semi-hardwood cuttings. Seeds need cold stratification. Seeds should be sown in the autumn and kept moist for 60 days before planting. A thin layer of vermiculite on top of the soil helps retain moisture. It also does well in wet soils.

These plants also do well in acidic to alkaline soils, but it’s also important to look for slightly acidic soil. Before planting this shrub, amend the soil with compost to ensure healthy growth. You can easily make your compost to use for the purpose. After that, it will benefit from regular fertilizing with compost once every year in the spring.

Due to their sporadic growth, elderberry plants tend to form a lot of suckers. So prune it regularly if you want to maintain size and shape for your shrubs. Pruning involves removing unhealthy, damaged, old, or dead branches in early spring.

Black Lace Elderberry Care

Black lace elderberry is self-pollinating, but if you wish to have as many berries as possible, you can plant another cultivar near your black lace elderberry for increased pollination.

Black Lace Elderberry Care
Image credit: https://i.pinimg.com/

Light Requirement

In the North, while black lace elderberry will tolerate partial shade, it will produce more flowers and a more attractive foliage color if grown in full sun. At the southern end of its range, it will benefit from afternoon shade.

Soil Requirements

Black lace elderberry grows best in slightly acidic, loamy soil that is moist but well-drained. The black lace elderberry bush also tolerates clay soil types better than many shrubs, but it performs better over time if planted in soil that drains well. Black lace does best in moist soil, although it will tolerate dry soils. It thrives under acid or alkaline soils.

Watering Common Elderberry

Black lace elderberry is a drought-resistant shrub and does not require large amounts of water to thrive. However, it benefits from supplemental watering during dry periods and in hot summer climates. The plant prefers evenly moist soil. And since elderberry shrubs often grow near wetlands, it tolerates wet soil better than many other plant species.

Fertilizer and Transplanting

This deciduous shrub needs to be fertilized in early spring by applying a slow-release fertilizer specialized for trees and shrubs. If you wish to transplant an existing plant, do so in spring or early summer while the soil is moist and warm. Elderberry shrubs do not recover well from root disturbance, so take care when moving them. You may harm or kill the plant with poor planning or execution.

When growing elderberry bushes in the home garden, plant them near a water source such as a drip irrigation system or pond, especially if rainfall is infrequent. Ensure that the roots get at least 1 inch of water weekly and keep an eye on soil moisture levels so you can provide supplemental watering during dry spells.

Pruning Elderberry

Best if pruned immediately after blooming. The correct time for pruning this plant is late winter or early spring. Pruning will keep it attractive, vigorous and check its spread. As the woody stems become older, they become weaker and less attractive. So, remove the older stems to direct more energy into the newer, more attractive ones.

Pruning Elderberry
Image credit: https://www.gardeningknowhow.com/

Propagating Common Elderberry

Cutting the branches of the elderberry bush back to four inches gives you a convenient place to collect cuttings.

To propagate common elderberry, remove the smaller tip shoots from grown branches’ end and dip them into rooting hormone. The best time for this operation is fall or early winter. Remove all leaves on the cutting except the top two pairs. This makes it easier to dip into rooting hormone and reduces the chances of disease spores falling into any open cuts.

Shorten all side branches by half their length to direct energy into the main stem. Root the cuttings in a pot filled with sand, peat moss, and perlite at a ratio of 1:1:1. Water sparingly until roots form.

After three weeks, the cuttings should be ready to plant in your garden or for overwintering. Select a location that gets at least six hours of sun per day and has well-drained soil.

Common Pests and Diseases

Prone to a number of diseases, including canker, leaf spot, and powdery mildew. Apply Neem oil once pollination begins for best results. Also, make sure there is proper spacing to promote good air circulation, irrigate at soil level, and keep mulch six inches away from the main stems of the bush.

FAQs on How to Grow Black Lace Elderberry

What plants are compatible with black lace elderberry?

White pine trees and quaking aspen are good elderberry companion plants, especially if you’re looking for something taller than the shrubs.

Final Thought on How to Grow Black Lace Elderberry

Elderberry plants are very popular plants that you can never miss. Not only do these shrubs look splendid and very familiar, but they’re also low maintenance in almost any environment and growing conditions.


The post How To Grow Black Lace Elderberry appeared first on Kitchen Infinity.

Did you miss our previous article…
https://www.centrecountyfood.org/?p=962

post

Sewage Ejector Pump

Sewage ejector pumps are an essential and often overlooked part of a septic system. If your sewage ejector pump is not working properly it can lead to major issues that could cost thousands of dollars in repairs or replacement.

In this article, we will discuss what a sewage ejector pump is, when you should replace it, how to install a new one, and how to maintain and troubleshoot your current pump. We will also answer some of the most common questions about sewage ejector pumps. Keep reading to find out more. 

What is a sewage ejector pump?

A sewage ejector pump is a centrifugal pump that is generally used in septic systems but can also be found in household waste disposals.

Image Credit: http://rooterman.com

It works by drawing water out of the septic tank and forcing it through the building drain system where it eventually leaves your home. Because of this, these pipes are usually located near or in the basement.

There are two main types of sewage ejector pumps – rotary vane pumps and diaphragm pumps. Rotary vane pumps are more common, but diaphragm pumps are quieter and can handle more solids.

When should you replace your sewage ejector pump?

The general rule of thumb is that you should replace your sewage ejector pump every 5-7 years. However, this may vary depending on the type of pump you have, how often it is used, and the condition of the septic system.

If you are not sure whether or not it is time for a replacement, there are a few telltale signs that can help you decide:

If the pump is making strange noises, vibrating, or leakingIf the pump smells bad or is creating an excessive amount of noiseIf the pump is not working properly or is constantly clogging

If you are experiencing any of these problems, it is time for a replacement. All of these issues can cause extensive damage to your septic system and can be very costly to repair.

How to install a new sewage ejector pump

Replacing a sewage ejector pump is not a difficult task, but you must take your time and follow the proper steps.

The first step is to shut off the power to the pump. You can do this by flipping the breaker switch or by unplugging the pump.

Next, remove the cover plate from the pump and disconnect any hoses or wires that are attached.

Then, use a screwdriver or wrench to loosen the bolts that hold the pump in place. Be careful not to damage them as they will need to be reused later.

After you have loosened the bolts, lift the pump out of its cradle and attach it to your new sewage ejector pump. Make sure that the wires are also facing the correct way before you tighten any nuts or bolts.

Once everything is secure, reattach all hoses and wires and replace your cover plate.

Finally, turn on your power supply and test out your new sewage ejector pump. If everything works properly, then you’re done. If not, don’t worry- there are plenty of troubleshooting tips for this later in the article. 

You can also check out this article onhow to install sump pumps if you’d like to know more about similar installation processes.

Sump Pump Cost: Average Prices, Installation – Forbes Advisor

Image Credit: http://forbes.com

How to maintain and troubleshoot a sewage ejector pump

While replacing an old sewage ejector pump can be relatively simple, maintaining it over its lifetime can be a bit more difficult.

There are a few things that you can do to help keep your pump running smoothly:

Clean the pump regularly and remove any debris or build-up that may have accumulated.Make sure that the seals and gaskets are in good condition and properly lubricated.Check the hoses for leaks or damage and replace them if necessary.If the pump starts to vibrate excessively, try adding additional insulation or baffles to quiet it down.

Troubleshooting tips 

If you are having problems with your sewage ejector pump, there are a few troubleshooting tips that you can try:

If the pump won’t turn on at all make sure that you have turned off and unplugged the pump and then check your circuit breaker.If the breaker is fine, try turning it on for 5-10 seconds before turning it back off again. Plug in the pump and see if it works properly.If this doesn’t work, there may be an issue with one of your wires or hoses. Check them out to make sure that they are connected properly or replace them accordingly. If they seem to be working fine, then there may be a problem with your electrical connections. Try tightening any loose wires/connections before calling a professional for help. If water is leaking from the pump check to see if the bolts are tight on the base of the pump. If they are, then there may be a problem with one of your hoses or wires.If these don’t seem to be the issue, try applying Teflon tape or pipe dopes to any threaded connections on your hoses and pipes. This will help seal any leaks that may have developed over time. If you can hear bubbles in your tank but you’re not getting any water out, the first thing that you should do is make sure that both valves are completely closed. Once this has been done, check for cracks or holes in any hoses or pumps leading into/out of the area around the tank.If everything seems to be in order, you may need to add more water to your tank. You can do this by opening up the valve and letting the water run until it is at the desired level. If this still doesn’t work, then you may have a blockage in your line and will need to call a professional for help. 

Hopefully, these tips will help you keep your sewage ejector pump running smoothly for years to come.

Sewage Ejector Pump – FAQ

What is a sewage ejector pump?

A sewage ejector pump is a pump used to remove wastewater from a building. The wastewater is typically removed from the lowest level of the building, such as a basement or crawlspace.

What are the benefits of using a sewage ejector pump?

The main benefit of using a sewage ejector pump is that it can help to prevent flooding. A sewage ejector pump can help to keep the wastewater in the building’splumbing system and out of the basement or crawlspace.

How do I know if I need a sewage ejector pump?

The best way to determine if you need a sewage ejector pump is to contact a professional plumber. They will be able to assess your building and determine if a sewage ejector pump is necessary.

How much does a sewage ejector pump cost?

The cost of a sewage ejector pump will vary depending on the size and type of pump you need. You can expect to pay anywhere from several hundred dollars to several thousand dollars for a quality sewage ejector pump.

How do I install a sewage ejector pump?

Installing a sewage ejector pump typically requires the help of a professional plumber. They will be able to help you install the pump and ensure that it is working properly.

Final thoughts on a sewage ejector pump

In conclusion, sewage ejector pumps are found in many different types of commercial and residential appliances. Though they may vary in size, the pump itself is relatively easy to maintain and repair when needed. 

These devices tend to last a very long time so you will probably not have to worry about replacing one for quite some time. If problems do arise, sewage ejector pump replacement can be done by most people with little technical experience.

The post Sewage Ejector Pump appeared first on Kitchen Infinity.

Did you miss our previous article…
https://www.centrecountyfood.org/?p=958

post

Brown Patch Lawn Disease

Brown patch lawn disease is a common problem that affects many gardens.

Brown patches on your grass are not always caused by the same type of fungus or bacteria, so it’s important to have a professional identify the problem before you try to fix it yourself.

In this article,  we will discuss what brown patch lawn disease is, the signs of brown patch lawn disease, how to prevent and treat brown patch lawn disease, and where you can find more information about diagnosing and treating brown spot diseases in your yard. Keep reading to find out more. 

What Is Brown Patch Lawn Disease?

Brown patch lawn disease is a fungus that affects grasses. It can cause patches of your lawn to turn brown, and in severe cases, it can kill the grass. The fungus thrives in hot, humid weather, and so the best way to prevent brown patch lawn disease is to make sure your lawn is healthy and well-maintained.

Image Credit: http://scotts.com

By watering your lawn properly and mowing it regularly, you can help to keep the grass healthy and reduce the chances of brown patch lawn disease. If you do notice signs of brown patch lawn disease, it’s important to take action right away to prevent the fungus from spreading.

Alternatively, you can also treat brown patch lawn disease with fungicides. There are many different types of fungicides available, so it’s important to talk to a professional about which one is best for your situation.

Signs Of Brown Patch Lawn Disease

The most common sign of brown patch lawn disease is a large, circular patch of brown grass. The edges of the patch will be well-defined, and the centre will be relatively dry. In some cases, you may also see small patches of pink or purple fungus growing on the edge of the brown patch. If you see any of these signs, particularly if you live in an area where the fungus is common, it’s important to have your grass tested.

Another common sign of brown patch lawn disease is the appearance of lesions on the leaves of the grass. These lesions will be dark green or brown, and they will often have a yellow halo around them. If you see any lesions on your grass, it’s important to contact a professional right away.

How To Prevent And Treat Brown Patch Lawn Disease

Brown patch lawn disease is difficult to eliminate, but there are some things you can do to ensure that it doesn’t spread or get worse. The best way to prevent brown patches is to keep your grass healthy by regularly mowing, fertilizing, watering, and aerating it. If you have prolonged periods of hot weather every year, consider installing shade trees so that your yard is cooler. If possible, choose two different kinds of grasses for your yard so they don’t all die at once if one type gets sick.

Moreover, you can also treat brown patch lawn disease with fungicides. There are many different types of fungicides available, so it’s important to talk to a professional about which one is best for your situation.

If you do see signs of a brown patch, it’s important to take action right away to prevent the fungus from spreading. You can treat the fungus with fungicides, or you can try to remove the affected areas of grass and replace them with new sod. It’s important to remember that brown patch lawn disease can be difficult to get rid of, so you may need to take these steps more than once to get rid of the fungus completely. Speaking of fungus, here’show to get rid of mold

Finally, it’s important to remember that not all patches of brown grass are caused by brown patch lawn disease. Many other things can cause your grass to turn brown, such as drought, pests, and poor soil quality. If you’re not sure what’s causing the problem, it’s best to contact a professional so they can diagnose the issue and recommend a course of treatment.

Other Important Considerations

If you hire a company to diagnose and treat your lawn, make sure that they use environmentally-friendly fungicides. Some types of fungicide can be harmful to the environment and even pets and children. It’s also important to water your lawn after treating it with fungicide because too much moisture will encourage the fungus to grow again.

You should also remember that brown patch disease is more likely to attack the cool-season grasses in your yard. Tall fescue, Kentucky bluegrass, and ryegrass are all very susceptible to brown patch disease. This means that some parts of your yard may die while other parts thrive depending on what type of grass grows there naturally.

Bermuda grass is less susceptible to brown patches, so if you have this type of grass in your yard, you’re less likely to see signs of fungus.

In short, brown patch lawn disease is a difficult fungus to get rid of, but there are some things you can do to prevent it from spreading or getting worse. If you see any signs of the disease, contact a professional right away so they can recommend a course of treatment. 

Remember that not all patches of brown grass are caused by brown patches, so it’s important to diagnose the problem before taking any action.

The weather conditions

Humid weather combined with cloddy soils can cause a fungal brown patch. The fungus that causes the disease proliferates in moist conditions. To prevent brown patch lawn disease, strive to keep your grass as dry as possible. Watergrass deeply and infrequently to encourage deep root growth.

How to Identify, Control and Prevent Brown Patch - Lawnstarter

Image Credit: http://lawnstarter.com

Brown patch lawn disease – FAQ

When does brown patch lawn disease show up?

Brown patch lawn disease often appears in late summer or early fall.

What are the symptoms of brown patch lawn disease?

The most common symptoms of brown patch lawn disease are circular patches of dead, brown grass. These patches can often be several feet across and can spread rapidly.

What causes brown patch lawn disease?

Brown patch lawn disease is caused by a fungus that thrives in moist conditions. The fungus feeds on the grass’s leaves, causing them to die and turn brown.

How can I treat brown patch lawn disease?

There is no cure for brown patch lawn disease, but you can take steps to prevent it from spreading. You can start by mowing your lawn at the proper height and removing dead or dying patches of grass as soon as you notice them. 

Finally, try to keep your lawn as dry as possible; don’t let water stand on it for long periods, and make sure that you’re not over-watering your lawn.

What do dark rings around the patches mean?

If you see dark rings around the patches of brown grass, it means that the fungus is also attacking the roots of the grass. This can kill the grass and cause it to turn black.

What should I do if my lawn is severely affected by brown patch disease?

If your lawn is severely affected by brown patch disease, you may need to replace it with new grass. You can start by removing all of the dead or dying grass and then tilling the soil to loosen it up. Next, spread a layer of topsoil over the soil and then sow the new grass seeds. Finally, water the area well and keep it moist until the seeds germinate.

Final thoughts on brown patch lawn disease

In conclusion, brown patch lawn disease is a serious problem that can cause a lot of damage to your lawn. Early detection and treatment are essential for preventing any long-term damage. Be sure to keep an eye on your lawn and contact a professional if you suspect that your garden may have this disease.

For further reading, check out this post onhow to test soil ph. This will ensure that your soil isn’t too acidic and won’t end up having trouble absorbing the right nutrients.

The post Brown Patch Lawn Disease appeared first on Kitchen Infinity.

Did you miss our previous article…
https://www.centrecountyfood.org/?p=954

post

DIY All-Purpose Vinegar Spray

Vinegar is a miracle cleaner and disinfectant. It can be used to clean many surfaces in the home, including kitchen counters and sinks, toilets, bathtubs and showers , windows and mirrors, as well as floors.

In this article, I’ll tell you how to easily make vinegar spray so you can start using it to clean your home. Let’s get right into it.

Making DIY All-Purpose Vinegar Spray

Making and using vinegar and water spray is so easy and cheap, you can almost do it with your eyes closed.

Image Credit: http://livesimply.me

All you need is:

A spray bottle (if it’s plastic go for the 1-litre size if it’s glass get one of 0.5 litres). The small 0.25 litre plastic bottles are also great because they are small enough for storage purposes yet large enough to use when cleaning larger areas.Vinegar. Plain, white distilled or apple cider vinegar will do fine here. You can also make your fruit-flavored vinegar by adding some juice from oranges, lemons, or apples to regular white distilled vinegar in a ratio of about 1 part fruit juice to 3 parts white wine vinegar. For each cup of fruit juice you use, add 1 tablespoon of sugar to the vinegar.

To make the spray:

Fill your spray bottle with white distilled or apple cider vinegar. If you’re using fruit-flavored vinegar, fill it halfway with that and halfway with white distilled vinegar.Fill the rest of the bottle with water.Shake well before each use.

That’s it. How easy was that? Now you’re ready to start cleaning your home with this powerful natural cleaner.

Important Tips To Keep In Mind

There are a few things to keep in mind when using your DIY all-purpose vinegar spray:

Using A Paper Towel 

Using a paper towel will help to avoid streaks on surfaces like mirrors and windows. Just spray the vinegar mixture on the surface, wait a few minutes for it to work its magic, then wipe off with a paper towel.

Safety First.

Vinegar is a powerful cleaner, so always take precautions when using it. Never mix it with other cleaners (such as bleach) or use it near an open flame. Keep it away from children and pets, and never drink it.

Do Not Use On Marble Surfaces 

Vinegar is very hard on marble surfaces so don’t use this cleaner if you have marble floors. This is especially true with marble kitchen countertops. Marble can be damaged by vinegar, so use this spray sparingly if you have marble surfaces in your home.

Using Lemon Juice In Place Of Vinegar

Lemon juice is a great replacement for vinegar in most cases when making DIY all-purpose cleaners. It has the same disinfecting properties as vinegar, but I find it’s less harsh on my hands and smells better too. 

A good way to get rid of bad odors is to mix some lemon juice (room temperature) with baking soda until it forms a paste-like substance, then spread it over the areas that smell bad (such as fridge shelves or garbage bins). Let sit for 15-30 minutes before wiping with paper towels. This will help to remove the bad odor and also disinfect the surface.

Don’t Spray It Directly On Your Skin

If you do happen to get a bit of vinegar spray on your hands or skin, make sure to wash it off quickly with water. If you have sensitive skin, you may want to wear gloves while cleaning with this spray.

Using Baking Soda Along With A Vinegar Spray

While there are manyincredible uses for white vinegar, one of my favorites is using it in combination with baking soda. These two ingredients, when used together, can form an amazing all-purpose cleaner that’s great for tackling tough messes. Here are a few ways you can use them together:

To clean your oven, mix 1/2 cup vinegar with 1/4 cup baking soda. Spray the mixture on all surfaces of the oven and let sit for 30 minutes before wiping off.To clean countertops and kitchen surfaces, mix 1/2 cup vinegar with 1/4 cup baking soda in a spray bottle. Shake well before each use and spray on the surface. Let sit for a few minutes before wiping off with a paper towel or sponge.To remove water stains and mineral deposits, spray some vinegar and baking soda mixture on the surface and let it sit for a few minutes.Cleaning your painted cabinets properly with baking soda is a great way to remove stubborn dirt and grime. Just mix equal parts of vinegar and baking soda in a bowl, dip your brush in, and start scrubbing. Rinse off the brush when you’re done and give it a good shake to get rid of any excess water.

Using Essential Oils In Your Diy All-Purpose Spray

If you like to use natural cleaning products that not only disinfect but also leave behind a lovely scent, adding 5-10 drops of lavender or tea tree oil is an easy way to do this. Adding the essential oils will help mask any unpleasant odours from the vinegar while also ensuring that your home smells fresh and clean. 

DIY Disinfecting Spray Cleaner - Clean Mama

Image Credit: http://helloglow.co

As I mentioned earlier, lemon juice is another great replacement for vinegar (in most cases) when making DIY all-purpose cleaners because of its disinfecting properties and pleasant citrus smell. But feel free to experiment with different essential oils to find the scent that you like best. Just make sure that the oil is labelled as “pure” or “undiluted” so that it doesn’t contain any harmful chemicals.

Final Thoughts On DIY All-Purpose Vinegar Spray

In conclusion, this DIY all-purpose vinegar spray is a huge money saver and works just as well as most off-the-shelf cleaners. It doesn’t matter if it’s vodka or vinegar, if you can clean something with vodka then you can do the same with vinegar since they both have antiseptic properties.

Vinegar and vodka contain about 80% water so unless you want to spend $30 on a bottle of stuff with 60% alcohol content, I’d go for good old-fashioned distilled white vinegar that costs around $3-4 per gallon.

The best part about this whole procedure is also that after doing it once you no longer need to buy any cleaning products anymore because you now have an endless supply at your disposal every day for a very cheap price.

The post DIY All-Purpose Vinegar Spray appeared first on Kitchen Infinity.

Did you miss our previous article…
https://www.centrecountyfood.org/?p=950

post

What is the KonMari Method?

Many people live in cluttered homes which end up complicating their life as well. It’s not that they don’t know how to declutter your room but the process itself is very complicated. 

Well, if you could focus on the things in your home that give you joy, then everything else would fall into place. Marie Kondo has developed a method that makes this easy and simple, so you can get rid of clutter fast without having to sort through every item in your house one by one. It’s called the KonMari Method because she says we should only keep items that spark joy.

Here’s everything you need to know about the KonMari method.

What is the Konmari Method?

KonMari, also known as KonMarie or Marie Kondo, is a tidying expert in Japan. She has written several bestselling books on the process she uses to transform individuals and families. Created by Marie Kondo, professional home organizer and author of the bestselling book, The Life-Changing Magic of Tidying Up, the Konmari method emphasizes removing clutter from your home and surrounding yourself with things that spark joy.


Image credit: https://tidycasa.com/

In other words, the konmari method is a simple but effective tidying method that ensures you’ll never relapse to clutter again. It uses unique selection criteria by choosing what sparks joy. Through this tidying process, you can reset your life and spend the rest of your life surrounded by the people and things you love most.

After the release of the Netflix TV show Tidying Up with Marie Kondo in 2019, many people globally have been using Marie Kondo’s tips to declutter their homes and stay organized.

How Does the KonMari Method Work?

KonMari has six basic rules that can help you declutter, get organized and create a home filled with items that make you happy. Here’s how the KonMari method rules work:

Commit Yourself to Tidy Up

The KonMari method is not a quick fix for a messy room. Instead, it’s a chance to reset your entire life, but only if you commit to following its principles. The first rule of tidying is setting your intention to seriously tidy up and resolving to put in the time and effort required. 

When approaching your tidying festival with a clear vision and a can-do attitude, you’ll find the energy and motivation you need to tidy all your belongings in one go. The effort will be worth it in the end, and you’ll not only experience the joy of living with objects that you love, but you’ll also be on the path of establishing your ideal lifestyle.

Marie Kondo’s theory is the more you can get rid of, the easier it will be to tidy up and remain organized. So, don’t get discouraged if the process takes longer than a day.

Imagine Your Ideal Lifestyle

Before you start, imagine your ideal lifestyle and identify the objects that make it a reality. If this is your first time tidying up, you might not be able to picture what your perfect life looks like. But it’s never too late to change and improve after all.

Marie Kondo’s tidying process isn’t about decluttering your house or making it look neat on the spur of the moment for visitors. It’s all about tidying up in a way that will spark joy in your life and change it forever. 

Consider what kind of a house you want to live in and how you want to live in it. Make sure you describe your ideal lifestyle. You can draw and sketch out what it looks like if you like. You can also describe in a notebook or cut out photos from magazines.

When you imagine your ideal lifestyle, you’re clarifying why you want to tidy and envision your best life. The tidying process represents a turning point, so make sure you consider the ideal lifestyle you inspire.

Finish Discarding First

Once you know what your ideal lifestyle is, you’ll be able to decide which items have value in your home and fill a purpose for that lifestyle. Considering each item and sorting them to keep and discard piles allows you to create more space for the organization and storage solutions that come later in the Konmari method.

Discarding items is not the point of the Konmari method, but it’s important because it provides the opportunity to determine the items that will help you live your life as you envision it as well as those items that no longer fit into your lifestyle. After you’ve discarded, you can turn your full energy and attention to what sparks joy.

Sort by Category, Not Location

The Konmari method advises sorting by category rather than the room. This allows you to work on one type of item at a time and ensures that each category is treated with equal importance. In other words, you’ll have a hard time getting motivated to finish if all of your clothes are in one room and the books are in another.

If you’re cleaning your home room by room, you’re most likely rearranging items and tossing out only a few things since it doesn’t feel like a ton of clutter for that room. Tidy by categories such as clothes, books, papers, miscellaneous items and sentimental items. 

This way, you’ll be on the right track to success. If you find yourself doing this, try to give each category its own dedicated space and do your best not to keep related items together. The Konmari method prefers that you spread out categories throughout your entire home.

Follow the Right Order of Tidy

This is probably the most important aspect of Konmari. You want to tidy up in the correct order to meet your tidying needs by starting with what’s most necessary first.

The right order for this method includes clothes, books, papers (all documents and manuals), miscellaneous items like small electronics and accessories, and mementoes.

sk Yourself if it Sparks Joy

Deciding if something sparks joy is the criteria for keeping and discarding items when decluttering. In the Konmari method, your feelings are the standard for decision making, especially knowing what sparks joy. To determine this when tidying, you need to pick up each object at a time and ask yourself quietly if it does spark joy.

Pay attention to how your body responds. Joy is personal, so that everyone will experience it differently. By selecting only those things that inspire joy, you can precisely identify what you love and what you need.

How to Use The Konmari Method at Home

Clothes

The first category you need to tackle for a tidy house is clothing. While you might be used to cleaning out clothes in your closet and then your drawers, the Konmari method suggests gathering clothes and accessories from all over your home, including your bedroom closets, coat closets, drawers and under the bed and put them all in one pile.

This will allow you how much you have and help you realize how much you don’t wear. If an item sparks joy, keep it and if not, give it to gratitude and donate your clothing. You can then learn how to iron the clothes remaining ones correctly and arrange them the right way.

Books

After clothes, the next category on the Konmari method checklist books, gather every book in your home and put them in a pile to decide which ones spark joy and which ones don’t. If your ideal lifestyle means that your space is filled with books, keep them.

Books
Image credit: https://www.shortform.com/

Papers

Every paper in your home, including documents, letters, bills and receipts, should be sorted using the Konmari method. Keep only what you need or use daily, plus one copy of everything else.

Miscellaneous Items

Any other items that don’t fit into the above categories should be put in a pile to determine what sparks joy and what doesn’t. Sort through everything carefully. Create groups like electronics, beauty supplies, home decor, canned goods and writing utensils.

Miscellaneous Items
Image credit: https://storage.googleapis.com/

It might be tempting to go room by room for an extensive category; make sure you gather items from all over your home and put them in one pile. That way, you’ll be able to store similar items together to easily find them and not have anything to spread out.

Sentimental Items

Sentimental items hold deep meaning and can be tough to part with. If you’ve ever seen the episode of ‘Hoarders’ where the woman won’t get rid of her deceased mother’s old suitcase, this method isn’t for you.

Sentimental Items
Image credit: https://justagirlandherblog.com/

Keep only those sentimental objects that truly bring you joy and store them in a designated area. That way, you’ll have them but won’t be reminded of them at every turn.

How to Store Items that Spark Joy

After deciding what to keep in your home, good storage solutions will help you keep everything organized. Here are some of the best Konmari organization and storage tips:

Try Konmari Folding

The Konmari folding method is perfect for organizing your clothes. Marie Kondo didn’t only create her method of decluttering and organizing, but she has also shared a unique folding technique for clothes and linens. The Konmari method of folding helps keep drawers, baskets and bins neat and tidy.

Use Boxes in Drawers

Don’t toss them out if you have gift boxes, shoe boxes, and jewelry boxes. These are great DIY home storage solutions for keeping small things like jewelry, beauty supplies, phone chargers and other miscellaneous things organized in drawers and cabinets.

Store Papers in File Organizers

The paper file organizer is perfect for storing mails, bills and other papers. It protects your documents from getting lost in the clutter of the drawer.

Invest in Wicker Baskets

Wicker baskets are great for keeping your cupboard free from clutter. Use them to store foodstuffs, dry fruits, snacks and other kitchen essentials.

FAQs on What is the KonMari Method

Is the Konmari method effective?

The Konmari method is a highly efficient and effective organizing strategy that has helped many people declutter their homes. The beauty of this method is that it doesn’t follow any specific order in tidying up – you can start from anywhere and go on to the next activity.

What are the benefits of the Konmari method?

The Konmari method advises people to get rid of useless, unnecessary belongings. If applied correctly, this will help you find more relaxation and peace in your life. It also teaches you not to keep hold of things that do not bring joy into your life.

Final Thought on What is the Konmari Method

Do you have items that spark joy that you can’t fit in your home? Well, get organized with these temporary storage solutions with extra space storage to keep items that fit your ideal lifestyle, even if you don’t have room for them now.


The post What is the KonMari Method? appeared first on Kitchen Infinity.

Did you miss our previous article…
https://www.centrecountyfood.org/?p=944

post

The Best Small Sleeper Sofas of 2021

Whether you’re living in a studio apartment or a four-bedroom house, if you like hosting overnight guests, then they’ll need a place to sleep. Without thinking too much or wasting money on buying another bed, think of a small sleeper sofa.

Sleeper sofas take up very little space, but they can be converted into a comfortable bed in seconds. They come in a wide variety of styles and shapes, so the style that’s best for you depends on which will fit best in your space and your personal preference.

Sure, there are plenty of sleeper sofas on the market, but which one is the best for you? Here are some of the most common types of sleeper sofas of 2021:

Frontgate Wendover Sleeper Sofa

This comfortable sleeper sofa is topped with layers of high-quality foam and memory foam mattresses. You can fold the sofa bed couch to create a queen bed that’s 76 inches long, making it ideal for overnight guests. The microfiber cover is easy to clean, unlike natural leather, but looks just as chic.


Image credit: https://i.pinimg.com/

It’s also made of a kiln-dried hardwood base to ensure that it’s sturdy and won’t warp, even with regular use. It is available in two upholstery options, including natural linen and dove gray that are available for quick ship.

West Elm Henry Sleeper Sofa

This comfortable sleeper sofa is perfect for small apartments or guest rooms. The Henry Sleeper Sofa is 84-1/2 inches long and can be folded out into a queen bed. It also includes two matching bolster pillows that can act as twins or king-sized pillows, depending on your needs.

West elm is also made of kiln-dried hardwood and comes with plush loose cushions for the back and side. When you need an extra sleep surface, the sofa pulls out into a queen-size bed and its mattress is made from a combination of high-density foam and gel-infused memory foam for maximum comfort. This shelter sofa is also available in a wide variety of upholstery materials, allowing you to find the ideal fabric to suit your style.

Wade Logan 85 Square Arm Reclining Sleeper

If you’re looking for the best leather sleeper sofa, the Wade Logan 85 Square Arm Reclining Sleeper is a great option. This sofa is made of top-grain leather, ensuring that it will last for years to come, and features a reclining design that makes it perfect for watching movies or taking a nap.

The button tufting and square arms will blend right in with your mid-century modern living room decor. When your guest arrives, just fold down the back and you have a twin size bed ready to go. Note that it will only sleep, one guest.

Catalina Reversible Chaise Sleeper Sofa

If you’re looking for the best chaise sleeper sofa, then you need to check out the Catalina Reversible Chaise Sleeper Sofa. This sleeper sofa has a classic design with clean lines and is made with top-grain leather, ensuring that it will last for years to come.

This chaise sleeper sofa comes in 61 different fabric colors, two leg finishes, and two queen mattress types, which can be a standard innerspring or 4.5-inch memory foam. You can also position the chaise lounge on either side of the couch to allow you to work around your space.

Wayfair Custom Upholstery Carli Recessed Arm Sofa Bed

With the Wayfair Custom Upholstery Carli Recessed Arm Sofa Bed, you can turn any room in your house into a guest room. This sofa bed features an easy-to-use pull-out queen size mattress that’s just as comfortable as it is practical. If your overnight guests are couples, then you don’t have to worry if you have this sleeper sofa.

Wayfair Custom Upholstery Carli Recessed Arm Sofa Bed
Image credit: https://www.thespruce.com/

It has a queen size innerspring mattress hidden inside and a foam back with double-picked blown fiber that helps to maintain its size. There are almost 500 upholstery options to choose from and you can upgrade to gel seat cushions for additional comfort.

Sarah Shakfin Sleeper Sofa Bed

This is one of the most popular sleeper sofas available on the market right now. Not only does it come with a generous upholstery allowance but you can also add pillows, throw pillows, and bolster pillows to personalize your look. It’s crafted from a mix of solid and manufactured wood.

Sarah Shakfin Sleeper Sofa Bed
Image credit: https://cdn.shopify.com/

It’s sturdy enough to support two sleepers on the queen size mattress. This sofa chair has a timeless, sophisticated look with piped detailing and neutral hues that make it a seamless addition to any7 aesthetic. You can make it your own by choosing from more than two dozen fabrics. So, if you’re looking for a sofa bed made from a mixture of solid and manufactured, then this is the right option.

Sectional Sleeper Sofa

This sleeper sofa will appeal to those who need just a little extra space in their living room or guest bedroom. At first glance, the piece looks like an average loveseat with two attached ottomans. But one of them can turn into another bed for overnight guests.

Sectional Sleeper Sofa
Image credit: http://cdn.home-designing.com/

If the regular sofa isn’t large enough for your needs, add in a sectional sleeper with a pull-out queen size mattress. This sectional sofa has a kiln dried hardwood frame and is covered in a light gray velvet upholstery that will match most decor styles.

It has a classic clean-lined silhouette and comes with three complimentary throw pillows. When you have overnight visitors, pull out the 5-inch thick, comfortable memory foam mattress.

Pottery Barn Buchanan Square Arm Upholstered Deluxe Sleeper Sofa

Pottery barn sofa will make your guests feel like they’re staying at a hotel, thanks to its extra-long plush mattress. This is a splurge-worthy mattress and its 79-inch frame is made of kiln dried hardwood for exceptional durability.

Sleeper Sofa
Image credit: https://assets.pbimgs.com/

Its back and seat cushions feature polyester-wrapped foam for a firmer feel and you have a wide selection of upholstery options to choose from, including family-friendly performance fabrics. Instead of a traditional pull-out mattress mechanism, this sofa features a Tiffany Convertible Mechanism without uncomfortable metal bars or springs.

It’s also 2 inches longer than a standard sleeper mattress. The plush mattress features premium high resiliency foam, ensuring a comfortable night’s sleep every time.

Wayfair Custom Upholstery Jennifer Leather Sofa Bed

This Wayfair Custom Upholstery Jennifer Leather Sofa Bed is perfect for small spaces. Made with a kiln-dried hardwood frame and Sinuous Springs construction, it’s sturdy and built to last. It features high resiliency foam in the seat and back cushions, as well as a comfortable mattress that’s made from genuine leather.

It’s 81 inches long and it has a classic design with rolled arms and short wooden legs. Besides its stately appearance, it’s incredibly versatile, featuring a queen size mattress inside its base. The pull out mechanism is easy to operate and the innerspring mattress is 6.5 inches thick, providing a more comfortable sleep surface for your guests.

Emily Futon Sofa Bed

If you’re looking for the best affordable sleeper sofa out there, the Emily Futon Sofa Bed is a great option. It’s one of the most comfortable sleeper sofas on the market. The Emily Futon Sofa Bed has a simple design with a microfiber fabric cover and a plush-down pillow top. It

It features a full-size mattress that’s comfortable and available in a variety of colors, so you can find the perfect one to match your decor. Other than offering great value, it is easy to transport and is also available as a convertible futon. There’s an armrest option for a more sofa-like appearance. This affordable sleeper sofa is also easy to set up and use.

Mia Klik Klak

Are you looking for a small sleeper sofa? The Mia Klik Klak is a good choice. It’s an efficient sleeper sofa that transforms from a modern reclining armchair into a bed in seconds. The seating has a stylish tufted look, and it features a push-button mechanism with slots on the bottom of the seat for easy conversion to a full-size bed.

This small sleeper sofa also includes an ottoman with storage space for keeping linen. The construction is solid, and the mattress provides a comfortable sleeping experience. Mia Klik Klak converts into a full-size bed.

Joybird Hopson Sleeper Sofa

The Joybird Hopson sleeper sofa is a great choice for small spaces. It’s an attractive, comfortable piece that can be used as both a sofa and a bed. The sofa is made of high-quality materials, including hardwood frame construction and metal frame for longevity and its cushions are filled with high-density polyurethane foam.

The inner mattress is made from layers of high-density foam and cushy memory foam and it’s as wide as a traditional queen size mattress, so it can comfortably accommodate two people.

Crate and Barrel Barret 3-Seat Queen Reversible Sleeper Sectional

This Crate and Barrel sleeper sectional is a great option for small spaces. It’s a three-seater that can be quickly and easily converted into a queen-sized bed. The sectional is made of high-quality materials, including a kiln-dried frame for longevity. It also features a bi-fold 5-1/2 inch innerspring mattress and a locking tilt-up headrest that’s ideal for reading and watching TV.

FAQs about the Best Small Sleeper Sofas of 2021

What should you look for when buying a sleeper sofa?

When buying furniture of this type, you should look for comfortability. A sleeper sofa should fit as a sofa and bed and you shouldn’t have to sacrifice one for the other. Also, consider the height of the armrest, the profile of the backrest, the depth of the seat, and the firmness of the cushions.

Do sofa beds break easily?

Not really because they come with sturdy mechanisms. The one thing you should be careful of is that the sofa bed doesn’t wobble or rock when you’re sleeping in it.

What if I don’t have a lot of space?

There are smaller sleeper sofas that might fit your needs. You can also look for a sectional sleeper sofa, which will give you more options as you can separate the sofa and sleeper as needed.

Spring-based sofa beds are the most common because they provide great support for when it functions as both a bed and couch.

Final Thought about the Best Small Sleeper Sofas of 2021

There you go! Sleeper sofas can be a great addition to your home, and they come in all shapes and sizes. Make sure you choose one that is the best fit for your budget, needs, and space.


The post The Best Small Sleeper Sofas of 2021 appeared first on Kitchen Infinity.

Did you miss our previous article…
https://www.centrecountyfood.org/?p=937

post

20 DIY Couch Cover Ideas

You have a couch that’s past its prime time, and you’re on a tight budget. There are plenty of ways to update your couch, but most of them require spending money or taking up too much time. When you turn to these DIY couch cover ideas, then you won’t have to buy new furniture for your house.

Whether you want a new couch and chair or you want to redo your bedroom, there’s always a slipcover for your headboard. These slipcovers are easy to do and will instantly transform your home. Plus, you can give your old couch and chair a new look by spending only a fraction of what it would cost to replace them. 

Here are DIY couch cover ideas for making your custom slipcovers in no time at all.

DIY Sofa Slipcover

This sofa slipcover is perfect for those who want to update their furniture on a budget. You’ll need some basic supplies, including a sewing machine and fabric. You’ll also have individual covers for the frame and cushions. This way, you won’t have to worry about constantly adjusting your cover every time someone sits on it.

DIY Drop Cloth Slipcovers

Repurpose old drop cloths to make your slipcovers. Depending on the look you want to achieve, you can make them patchwork-style or one solid piece. If you plan on painting your walls, this style is great because you can remove it at any time without damaging the underlying fabric.


Image credit: https://i.pinimg.com/

You can find drop cloths at almost any departmental or home improvement store at a relatively low cost. The covers will extend the life of your couch by a number of years and give your home a look you’ve always wanted.

Easy Sectional Cover

Do you have a sectional sofa but no cover for it? This easy DIY project is perfect for you. All you need is a piece of fabric that’s at least two feet wider and four feet longer than your sectionals. 

Easy Sectional Cover
Image credit: https://m.media-amazon.com/

This is a great way of covering your sectionals and ensuring you get the slipcover that fits perfectly. You can get a brand new look and create any pattern and design you like. These DIY slipcovers are very important.

Patio Furniture Covers

If you have patio furniture, it’s important to keep it covered when not in use. Not only will this protect the furniture from the elements, but it will also help to keep it looking new for years to come. 

Patio Furniture Covers
Image credit: https://www.patioproductions.com/

A simple patio furniture cover can be made out of a fabric that’s at least six feet wide and ten feet long. These DIY outdoor cushion covers can help transform your outdoor space.

No Sew Bench Cushion

If you have an old bench that could use a little bit of TLC, why not try this no-sew bench cushion? This project is easy and only takes a few supplies. You’ll need some batting, fabric, scissors, and a needle and thread but no sewing machine. Bench seats always make any area feel cozy and relaxing. So, you can DIY your bench cushion and customize it to your liking. 

Easy Sofa Slipcover

If your sofa looks a little worse for wear, don’t worry. With this easy DIY slipcover, you can easily give it a new lease on life. This project will take you just a few hours to complete and only requires a few supplies.

All you need is some fabric, scissors, and a sewing machine if you have sewing skills. This simple and quick fix is a great-looking temporary fix that will transform your couch from a drab to fab.

IKEA Couch Makeover

Don’t worry if you have an old IKEA couch that you’re not quite sure what to do with. With this easy DIY makeover, you can easily give it a new lease on life. This project will take you just a few hours to complete and only requires a few supplies.

All you need is some fabric, scissors, and a sewing machine. You’ll sew through the buttons and add extra stuffing to your couch cushions. This DIY slipcover is budget-friendly, and the results will look amazing.

Dyed Sofa Slipcover

This is a great way to renew your old furniture in your living room. All you’ll need for this project is fabric dye and rubber gloves. You can also use a stencil if you prefer the look of that instead. The results will not only look fantastic but will cost you next to nothing.

If you’re looking to give your living room a bold new look, you’re going to want to take a look at this project. Plus, dying your couch cover can help cover up any old stains and signs of wear.

DIY Outdoor Cushion Covers

If you’re like most people, you probably spend a lot of time on your deck or patio during the summer. One way to make these spaces even more comfortable is to add some new cushions. But, buying new cushions can be expensive. Instead, why not try making your own? 

This project is easy and can be completed in a few hours. Plus, the results will be fantastic. You’ll need cushion covers, Paint or fabric dye, Paintbrush or sponge, Masking tape, and Scissors.

DIY Tufted Cushions

Tufted cushions are chic, but they’re also very expensive. Luckily, you can make them yourself without spending too much money or time. For this project, you’ll need cushion covers, Scissors, Measuring tape or ruler, a Pencil or pen, and Thread. 

This easy-to-follow tutorial will allow you to transform a budget-friendly sofa into a stylish anchor piece for your living room. In just 20 minutes, you can transform this couch’s entire look.

DIY Slipcovers with Piping

Piping can add a nice touch to any home décor project, and these slipcovers are no exception. For this lovely design, you’ll need cushion covers (fabric or foam), Scissors, Pencil/Pen, Measuring tape or ruler, and a Piping foot if your sewing machine doesn’t come with one already.

Whether you make your piping or purchase it at the store, this DIY couch cover keeps costs low without compromising on looks.

DIY Armchair Slipcover

Why not include your favorite armchair for fun as you’re making over your living room or sitting area? Here, learn how to make a DIY slipcover for an armchair.

This project is a little more complicated than others, but it’s still doable for almost anyone with basic sewing skills. To make it even cheaper, use drop cloths because they’re cheap, but that doesn’t mean they’re uncomfortable.

Couch Pet Protector DIY

Simplicity is key when working with slipcovers, and this DIY couch cover follows that rule. Use an old blanket or even a foam cushion to create a removable accent for your sofa that looks great but provides the perfect place for pets to snuggle up too. 

These pets can cause havoc on couches, especially if they have sharp nails. They love to climb all over sofas, causing some serious damage. Thankfully, this DIY tutorial can provide you with a durable couch cover that will run along the back and arm of your sofa to protect it from pets.

Easy DIY Ruffled Sofa Slipcover

This easy DIY sofa slipcover doesn’t require much sewing, and it’s the perfect way to refresh your room without spending a lot of time or money. Plus, this is a great option for those who don’t have the necessary sewing skills to pull off something more complicated. 

This idea couldn’t be simpler: measure your couch and head to the fabric store to pick up some coordinating fabric. You’ll also need a few basic supplies, like a sewing machine, needle, thread, pins, and scissors. The ruffles give your sofa and chair a comfortable and welcoming look.

This makes it go along with your DIY farmhouse furniture. These are much easier to make than they look, and you can cover your entire living with ruffles in just a couple of days.

DIY Ottoman Slipcover

You can cover those ottomans and make them look new again. If you’re making slipcovers from your couch and chairs, why not make one for your ottomans, so your entire living room set looks new? This DIY slipcover is easy to make, and you don’t even have to sew it. 

You can also opt for one with pom-poms that can be easily removed so you can wash the DIY slipcover. If you don’t like poms, you can add a pleated skirt to your ottoman slipcover instead.

DIY Sheet Sofa Slipcover

You don’t have to buy expensive slipcovers from department stores to get that new furniture look. Instead, try to repurpose old sheets and make your DIY slipcover. 

DIY Sheet Sofa Slipcover
Image credit: https://photos.demandstudios.com/

You can buy inexpensive sheets if you don’t have a set that you can use, and they’ll look like a real thing. You can use them to cover the entire sofa, even the cushions. You can also remove and wash them regularly.

DIY Reclining Couch Slipcovers

Are you looking to give your old couch a new look? You can always use a slipcover to cover it. You have to buy the slipcovers that fit your reclining couches, and they should perfectly match your sofas’ size and shape.

After that, make modifications to your regular couch slipcover to make it fit over the reclining sections and cover those sections so that they stay put when the couch is reclined.

Striped Slipcover for Kid’s Sofa

If you have kids, they might want to have a couch of their own. You can surely buy them one, but it’s also possible to upcycle an old sofa into something that both adults and kids can use. Just remove the back cushions and cut out pockets for toy storage.

Striped Slipcover for Kid’s Sofa
Image credit: https://cdn.decoratorist.com/

Then you can remove the seat cushions and sew some thick fabric or batting onto the bottom to make it a bit more comfortable. Finally, add a striped slipcover for an extra touch of fun.

Slipcover for Sofas with Attached Cushions

If your couch has attached cushions, you can still add a slipcover by measuring the width of the couch and adding an inch or two for seam allowances. Cut out a piece of fabric that’s at least two inches longer than the width of the couch, and sew the edges together. 

Whether your cushions are attached to the back or the arms, you can customize a slipcover pattern to fit perfectly. Make sure your measurements are accurate and leave enough room to tuck the slipcover around your cushions when you put it on.

DIY Settee Slipcover

Measure the width and depth of your settee. Draw these measurements on paper, adding about two inches at each end for seam allowances. Cut out the pattern you’ve drawn and use it to cut a piece of fabric that’s wider than the settee but not so wide that it will hang over onto the floor. The settee tutorial will instantly brighten up any room, and it’s so simple to make.

FAQs about DIY Couch Cover Ideas

re slipcovers worth it?

Yes, they’re worth it because they can change up the look of your house in minutes. Plus, they’re easy to wash and can protect your furniture from spills and dirt.

Do I need a pattern?

No, you don’t need a pattern. You can measure the width and depth of your couch and then cut out a piece of fabric that’s the right size.

Final Thought about DIY Couch Cover Ideas

As you can see, these couch cover ideas are super easy to make. Just pick the one that you like best and get started. These DIY couch cover ideas can instantly change the look of your home.


The post 20 DIY Couch Cover Ideas appeared first on Kitchen Infinity.

post

How High Should Grass Be Cut?

Keeping your grass healthy and at the right height is important if you want to enjoy it. If you don’t know how high the grass should be cut, you will have difficulty keeping your landscape looking great. This can lead to many problems down the road that are very difficult to solve.

There are different factors that decide how high grass should be cut. So, you need to do some research before deciding how much of an adjustment needs to be made with regard to cutting the lawn.

Our guide below can help answer this question for you and teach you more about cutting lawns in general.

The Rule of Thumb

How high should you cut the grass when you mow? The general rule of thumb for determining how high the grass should be cut is only to cut off no more than one-third of the height of your lawn. Each mowing should only remove about the top third of the grass blade.

It’s recommended that you stick to this rule of thumb and a lesser degree in spring. If you can’t remember the measurements in summer, consider mowing at a greater height. It’s also a good idea to choose one of the higher settings of your lawnmower wheels when the weather is hot or dry and mow at that height until you approach the fall season and the weather starts to cool off a bit.

Factors to Consider on the Rule of Thumb

Types of Grass

The first thing that you will have to think about is the type of grass lawn you have. Some people don’t realize it, but there are different types of grass, and they all grow at different speeds and heights. Every grass type has its mowing height.

Keeping the Weeds Away

The next factor to think about is weed control. Weeds love growing in tall grass, and it’s important that you keep theirs under control. If you leave your grass too long, the weeds will take hold and ruin your lawn and use up a lot of water and nutrients from the soil.

Keep the Bugs Away

That’s not the only reason to keep your grass short. Bugs also like heat, and just like humans, they spend their time in shadier, cooler places. If you have a very tall lawn, it will grow over these areas and make them hotter because there won’t be any shade for the bugs to escape the heat.

In addition, too long grass is difficult to mow, and long grass clippings have to be removed and cannot be left on the lawn.

Laziness Doesn’t Pay

Keeping your grass cut short is also better for you. It’s far easier to maintain a shorter lawn because it requires less mowing, meaning that you can advance the cutting height more often. The mowing frequency depends on your grass type, its optimal height, and the grass growth speed, depending on the weather conditions.

For instance, cool grass such as Kentucky bluegrass and fine fescue grows faster during the cool spring and fall weather. While the exact heights vary depending on the grass type, the range of cool-season turf is between 1 and 5 inches.

Different Grasses Require Different Mowing Heights

All lawns are not the same. For instance, cut the grass too short, it becomes stressed, thin and you’ll be left with a shallower root system. Cutting the grass crowns will also make the turf vulnerable to weed pressure and require pesticide applications to prevent weeds and discourage pests.

Warm season grasses such as zoysia grass and Bermuda will tolerate a shorter, tighter cut, while cool season grasses like fescue and bluegrass need to be mowed taller to help shade the root system and keep heat stress away.

Mowing Too Low Damages Grass

Mowing your lawn too low will have a detrimental effect on your grass. When you cut the grass too low, it causes damage to the plant’s crown and results in a weaker root system, making your lawn more vulnerable to weeds, disease, and pests.

Mowing Too Low Damages Grass

Mowing too low reduces the density of the grass, making the lawn susceptible to invasive summer weed pressures. By mowing your grass too low, you may unknowingly be promoting crabgrass to grow because shade provided by higher cut grass blades shields the crabgrass seeds from much-needed sunlight.

Mowing too low also makes the turf vulnerable to summer heat. Without taller grass blades to shade the summer sun, low mowing can lead to stress damage quickly during long periods of summer drought.

How Short To Cut Grass in Spring?

At a minimum, it is best to cut turf no shorter than 3 inches during the early spring. If you have been postponing trimming your lawn because there was snow on the ground and cold weather, do not be tempted to mow just yet. Wait until grass blades begin hardening off on their own as summer approaches.

Mow cool season grass to a height of 3 inches tall and cut warm season grasses as low as half an inch up to 1.5 inches.

What Height Should Grass be Cut in Summer?

As temperature rises, your lawn height also goes up in summer. So, as the summer arrives, raise your mower height for cool season grasses and keep it closer to four inches. A taller plant shades the soil and keeps the root zone cooler during high heat periods. If you allow your lawn to grow too tall, it can result in broader leaf blades, lower plant density, and more susceptibility to turf diseases.

The Best Height to Cut Grass in the Fall

When inching into the fall, mid-length grass is the preference. Tall grass can get matted and become diseased in winter, but lawn roots can get exposed to extremely damagingly cold temperatures when you cut too short. So, focus on striking a balance in fall to prepare your lawn for winter.

Cut your cool season grass to about 2.5 inches before the first frost in winter and mow warm season grasses to two inches in fall.

How Often Should You Mow Your Grass?

Having a routine mowing schedule for your lawn is key. Grass will grow at different rates depending on fertilization, season, and weather conditions. Grass that is too long will not only make your lawn look shaggy, but it can also lead to problems with the health of your grass.


Image credit: https://www.arbor-nomics.com/

Long grass can prevent water, sunlight, and nutrients from getting to the soil, which can cause your grass to turn yellow or brown. It can also increase weed growth and create an environment where insects and diseases can thrive.

What is the One-Third Rule?

Regardless of your grass species, you shouldn’t remove more than one third of the grass height when mowing. This is important because the grass is a living plant, and they all undergo some stress when cut.

What is the One-Third Rule?
Image credit: https://res.cloudinary.com/

FAQs on How High Should Grass be Cut

Can you mow your lawn when it’s wet?

No, avoid mowing your lawn when it’s wet because other than jamming the lawn mower blades and clogging the discharge chute, wet grass can also leave clumps of grass on the lawn. Grass collecting on the mower blades also aids in tearing the grass much like a dull blade. Keeping your lawn mower blade sharp shouldn’t be overstated.

How often should the mower blade get sharpened?

Keep your mower blade sharpened as a cleaner cutting blade results in less stress on the turf. A dull mower blade rips and shreds the grass leaf, making the plant susceptible to disease. A good rule of thumb is to sharpen your blade every ten mower hours.

Final Thought on How High Should Grass be Cut

As you can see, keeping your lawn about two and a half inches tall and leaving the grass slightly taller about three inches in the shady areas will maintain a healthy lawn. It is also important to keep your mower blade sharpened and collect the grass clippings. Follow these tips, and you will be on your way to a lush, green lawn.


The post How High Should Grass Be Cut? appeared first on Kitchen Infinity.

Did you miss our previous article…
https://www.centrecountyfood.org/?p=926