You want to add some Christmas spirit to your table, but you don’t know-how. The best way to get into the holiday mood is by adding a variety of colors and decorations that will make everyone feel merry and bright at dinner time.
Adding color can be as easy as changing up your tableware and adding seasonal patterns or textures. There are so many things you can change around on your table, from napkin rings, placemats, glassware, candles.
Having a colorful place setting with beautiful details will help set the tone for an enjoyable evening with friends and family. To help you out, we have put together this quick guide with everything you need to know about decorating your Christmas table.
1. Wreath Christmas Table Runner & Napkin Rings
For a simple yet elegant table setting, you can place a green wreath with red berries at the center of your plate. This is one of the easiest ways to incorporate festive details into your decor while combining textures and varying levels for an exciting tabletop.
The naturalness of the materials used makes this table runner very easy to match with most decor styles. Using mini wreaths as napkin rings is one of the best Christmas decorations you can bring to the table setting.
2. DIY Mason Jar Centerpiece
If looking for a festive centerpiece idea, look no further than the classic Mason jar. If you like this idea but are not really into DIY projects, we found some easy and affordable premade mason jars that we think are perfect for your holiday table.
Image credit: https://masonjarbreakfast.com/
3. Add Dimension and Height to Your Decor
Bring your Christmas table decor to life by adding dimension and height. This is very easy with flowers, garlands, and candles on your table. These items can be easily found at your local craft store or big-box retailer.
4. Bring Mercury Glass Candles
Create a Christmas tablescape design using mercury glass holders. The mercury-looking finish is a big trend right now, so you’ll be able to find this kind of table decor in different shapes and sizes. It will add an interesting detail that catches the eye.
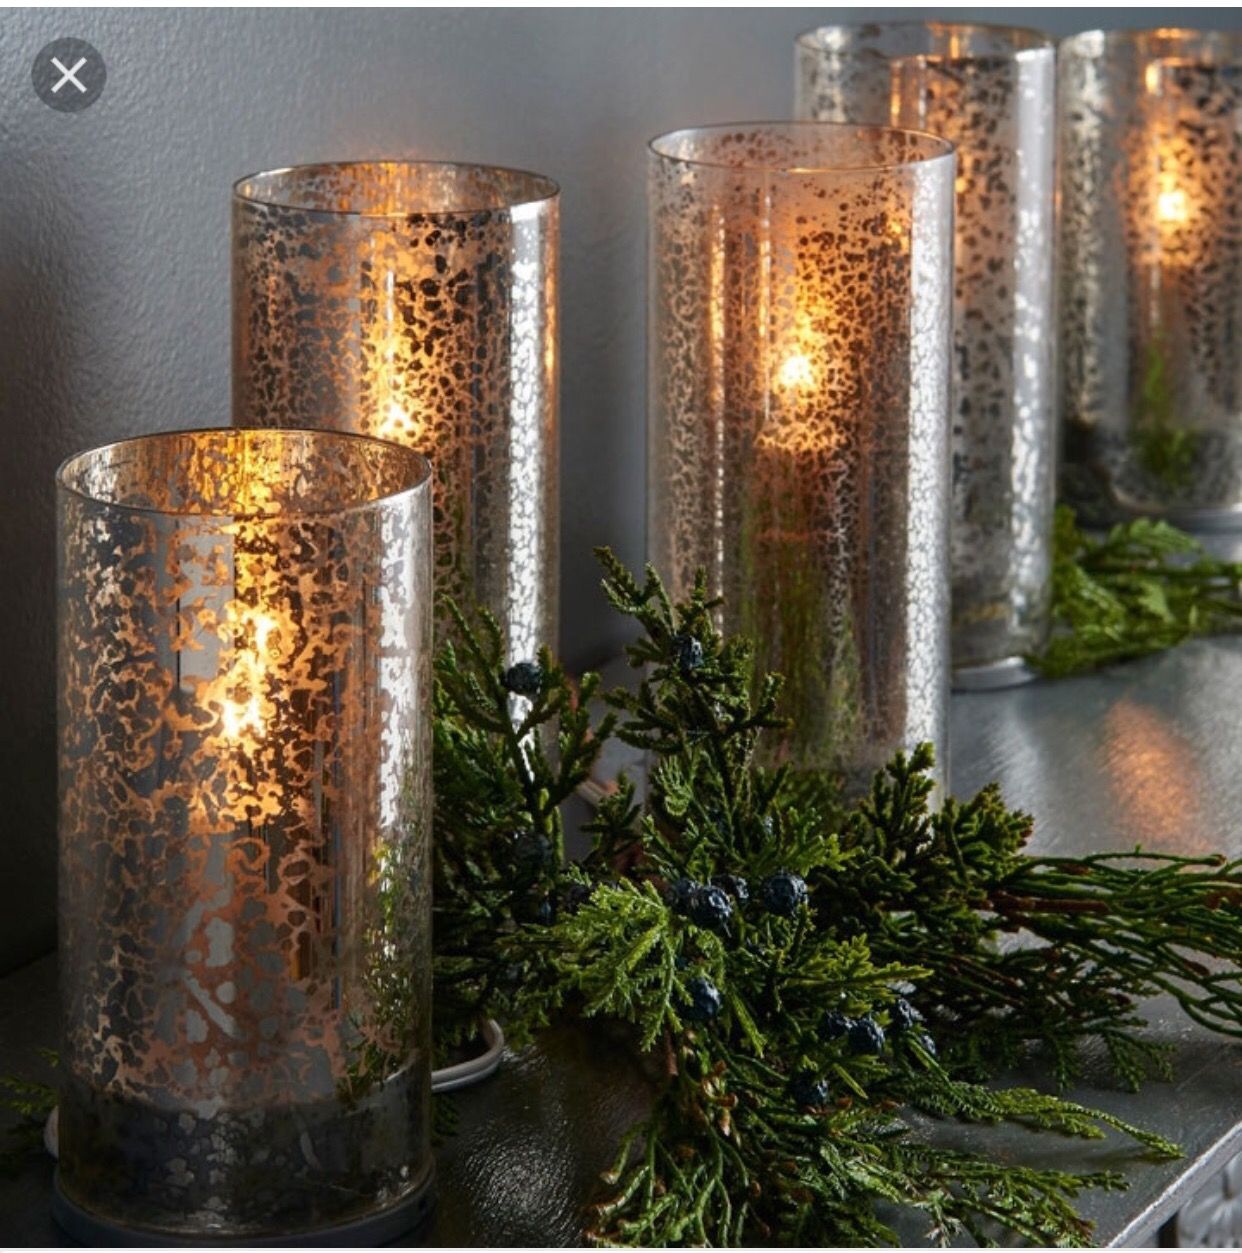
Image credit: https://i.pinimg.com/
5. DIY Garland Runner
Keeping your Christmas tablescape nice and simple is a great way to uncomplicate holiday decorating. Incorporating a no-fuss garland runner with white candles combined with cinnamon sticks and a holly place setting is the perfect way to decorate your Christmas table without spending too much time or money.
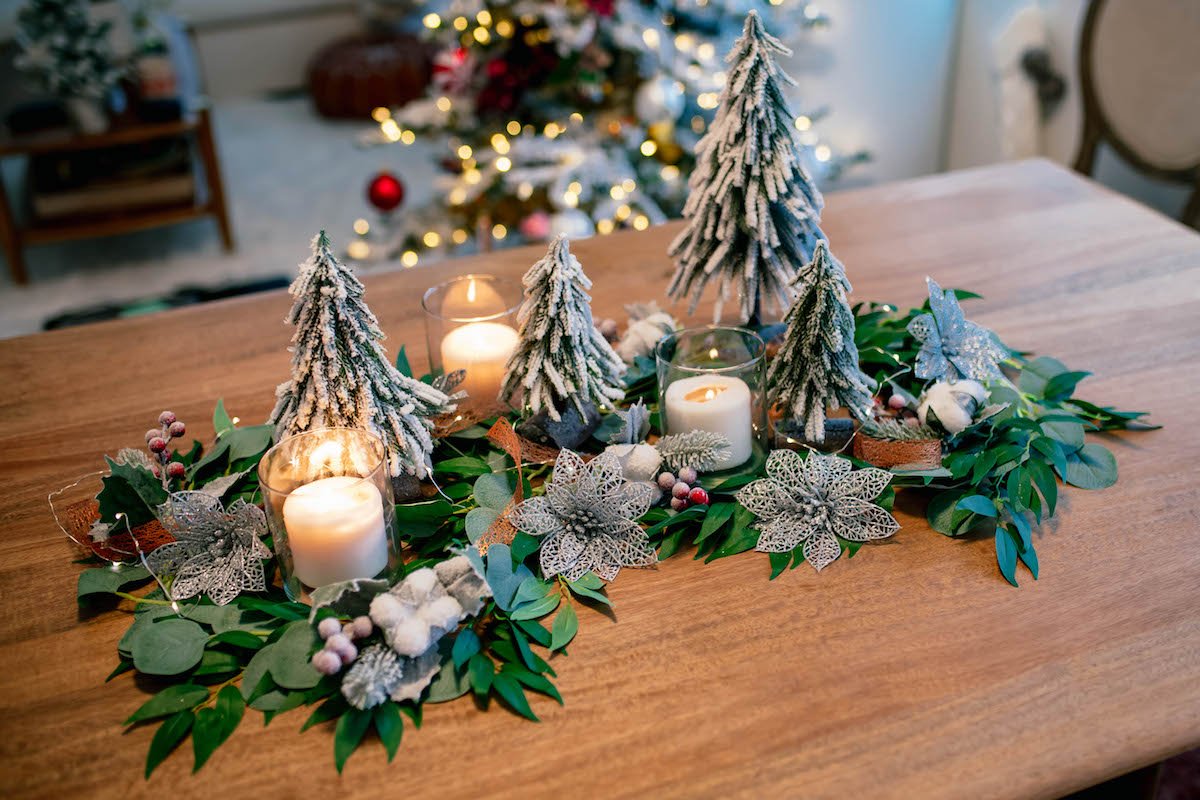
Image credit: https://www.guidepatterns.com/
6. Farmhouse Style Christmas Table Decor
This is a perfect example of how to use rustic Christmas decor. Farmhouse style is all about shabby chic and handmade details, so your Christmas table will look warm and inviting in no time.
7. Vertical Garland Ideas for Christmas Tables
Vertical garlands are the new trend in Christmas decor, and this modern take on a traditional wreath is stunning. You can add it to any empty wall space in your home; the staircase, behind the front door, or above your mantelpiece, for example. The garland feels festive but not overly Christmassy, creating a conversation piece to anchor the holiday dining area that you won’t feel pressured to take down too soon. Use dramatic green and white garland hung on the wall behind the dinner table.
8. Woodsy Christmas Table Decorations
This chic rustic motif is all about keeping it real. These holiday centerpieces are made with natural elements that you probably already have on hand at home or can acquire easily enough. This is a great theme if you want to mix modern and traditional, using fresh flowers for height and fallen tree branches to display your lovely vintage ornaments.
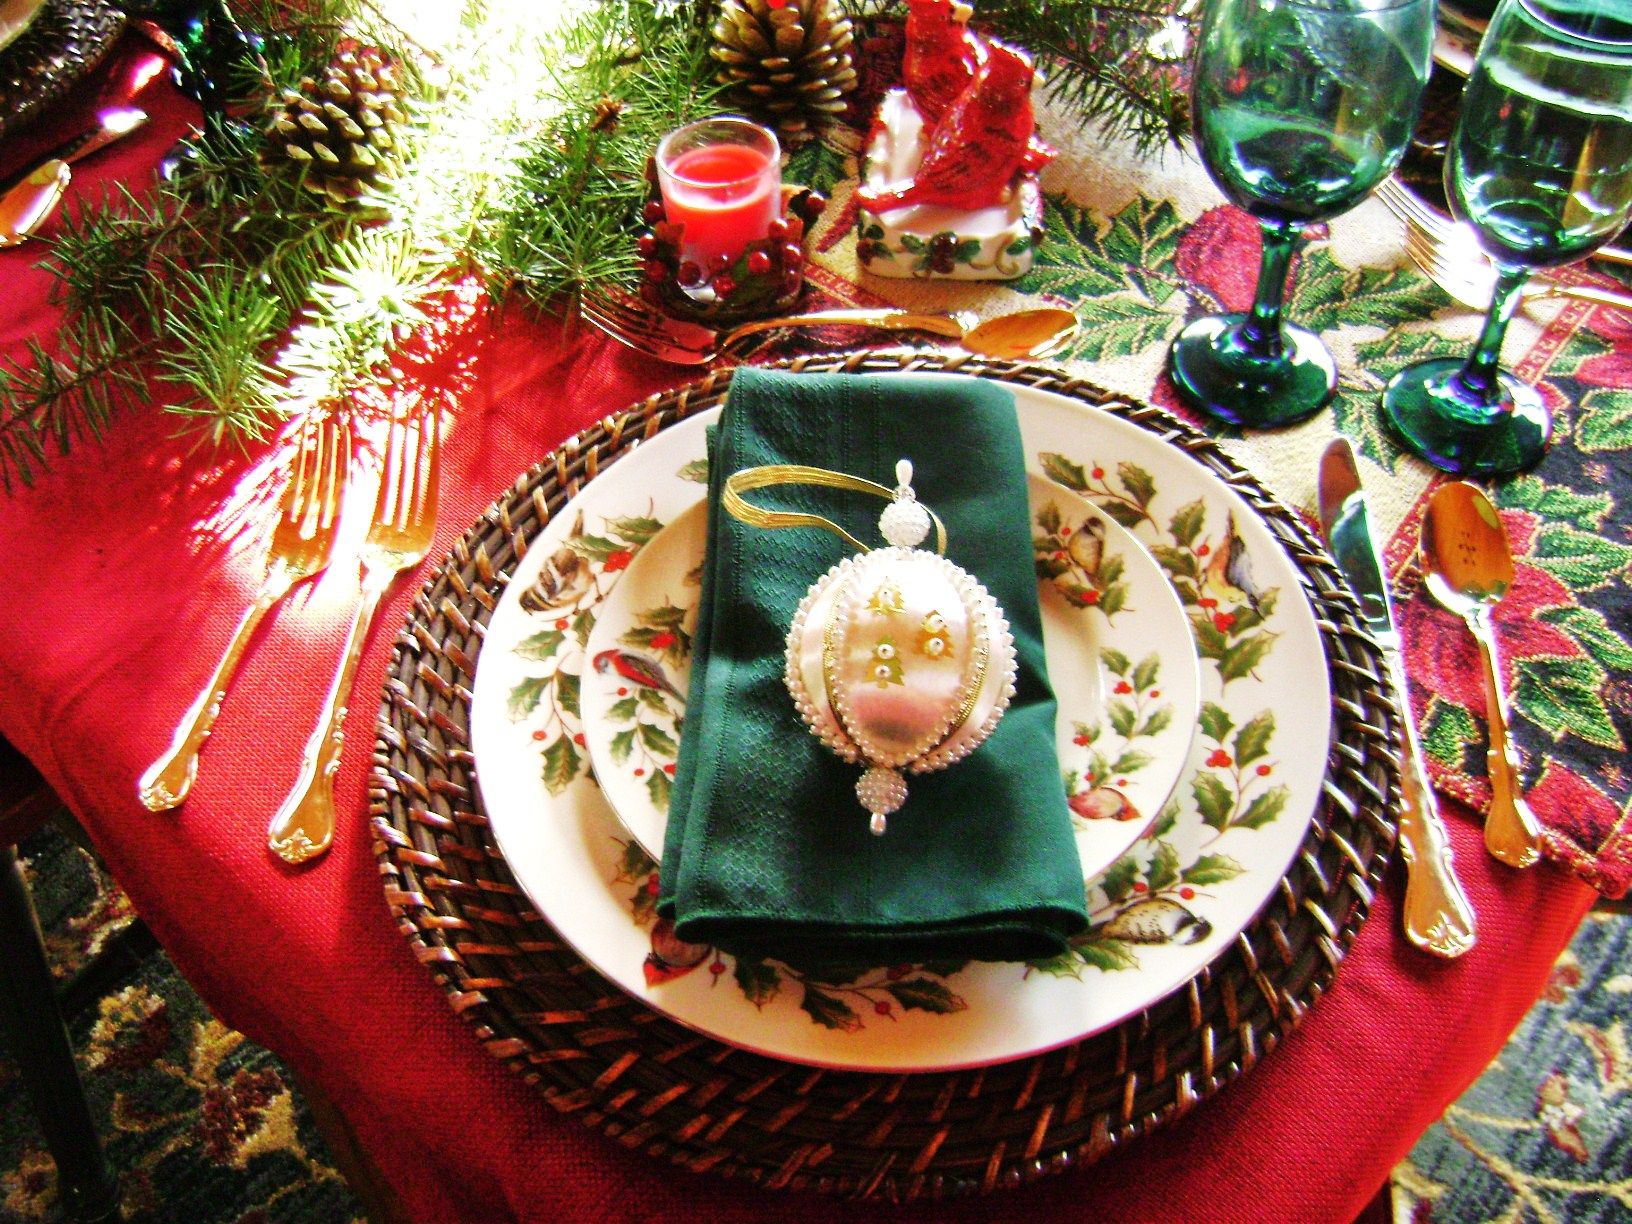
Image credit: https://i.pinimg.com/
Details like forest green candles and napkins, a striped linen table runner, a vase full of white flowers and seasonal greenery, olive wood napkin holders, and chargers will add a homey look to your Christmas table.
9. Mint and Gold Holiday Table Decorations
A touch of mint gives this table a fresh feel, but the pure white flowers and soft gold cutlery decorations keep it from looking too cool and contemporary. The result is a pretty backdrop that feels romantic and elegant mixed without being stuffy or overbearing.
10. DIY Mini Cranberry Wreaths
These mini wreaths are quick and easy to whip up, but they pack a major visual punch. Make them in minutes with simple craft supplies like ribbon, twigs, berries, and glue. Decorating your Christmas table doesn’t have to be an elaborate affair to make a big impact.
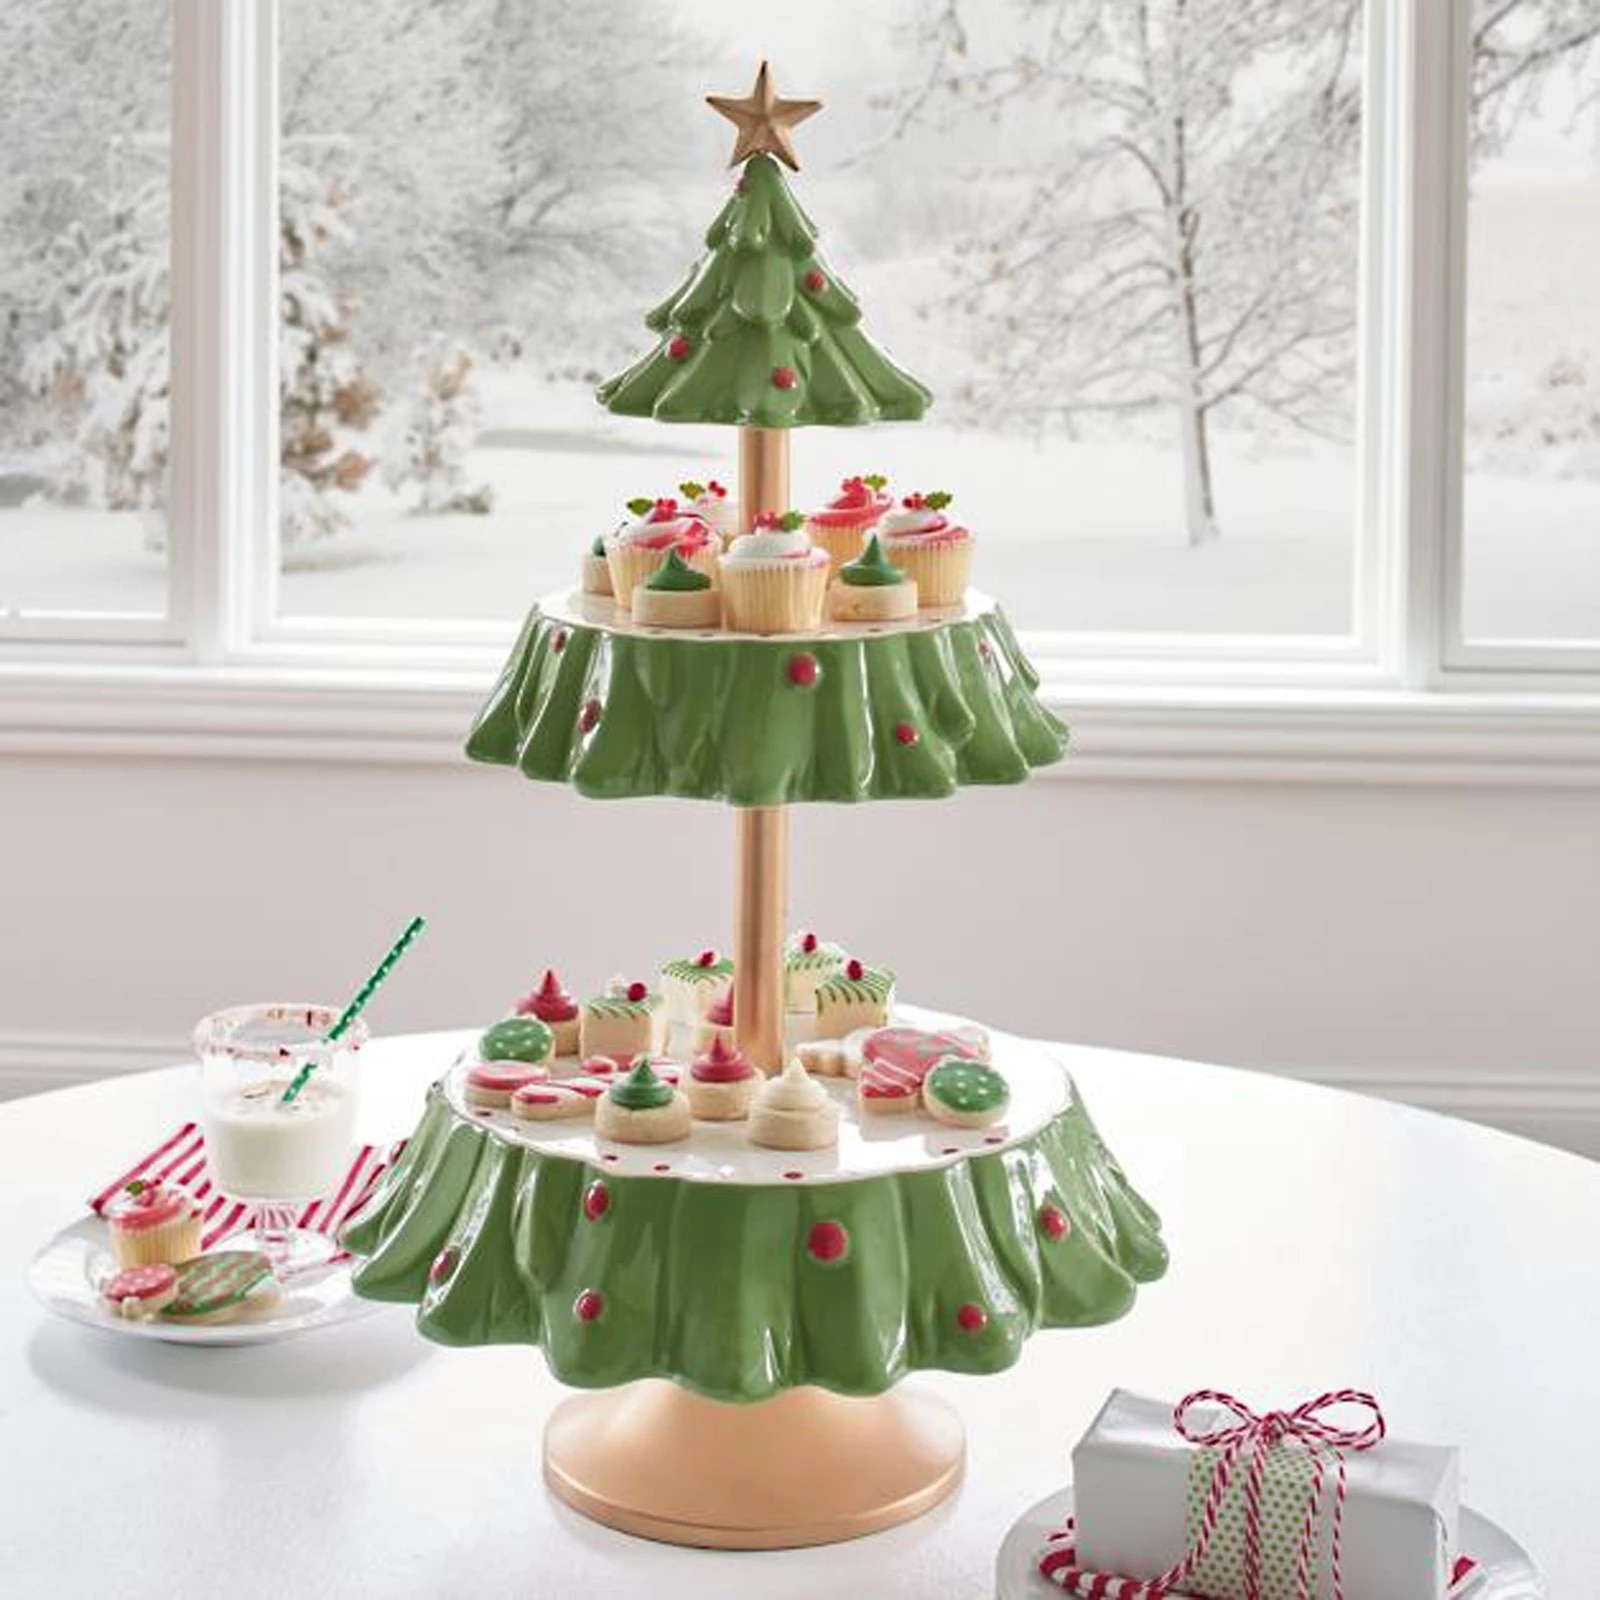
Image credit: https://ae01.alicdn.com/
Bring in cranberries, tree trimmings, and stamped brown Kraft paper name tags to create a festive Christmas brunch place setting that will make your guest feel welcome and special.
11. Mini Birch Branch Trees as Christmas Table Decoration
Add a rustic and natural element to your Christmas table setting with these simple yet elegant DIY mini trees. These easy Christmas centerpiece ideas can be finished in just minutes, and they add a natural touch of elegance to any holiday season.
Brighten up the season by mixing red, green, blue, and silver when decorating your Christmas table! A great way to do this is by using a favorite Christmas ornament as the centerpiece and filling your table with red, green, and silver plates, glasses, and chargers.
12. Cake Stand Centerpiece
Using a cake stand as the base of a table centerpiece is one of the ways of decorating your table while hosting a Christmas dinner. Bring group candles and sprigs of greenery atop a cake stand for an easy Christmas table.
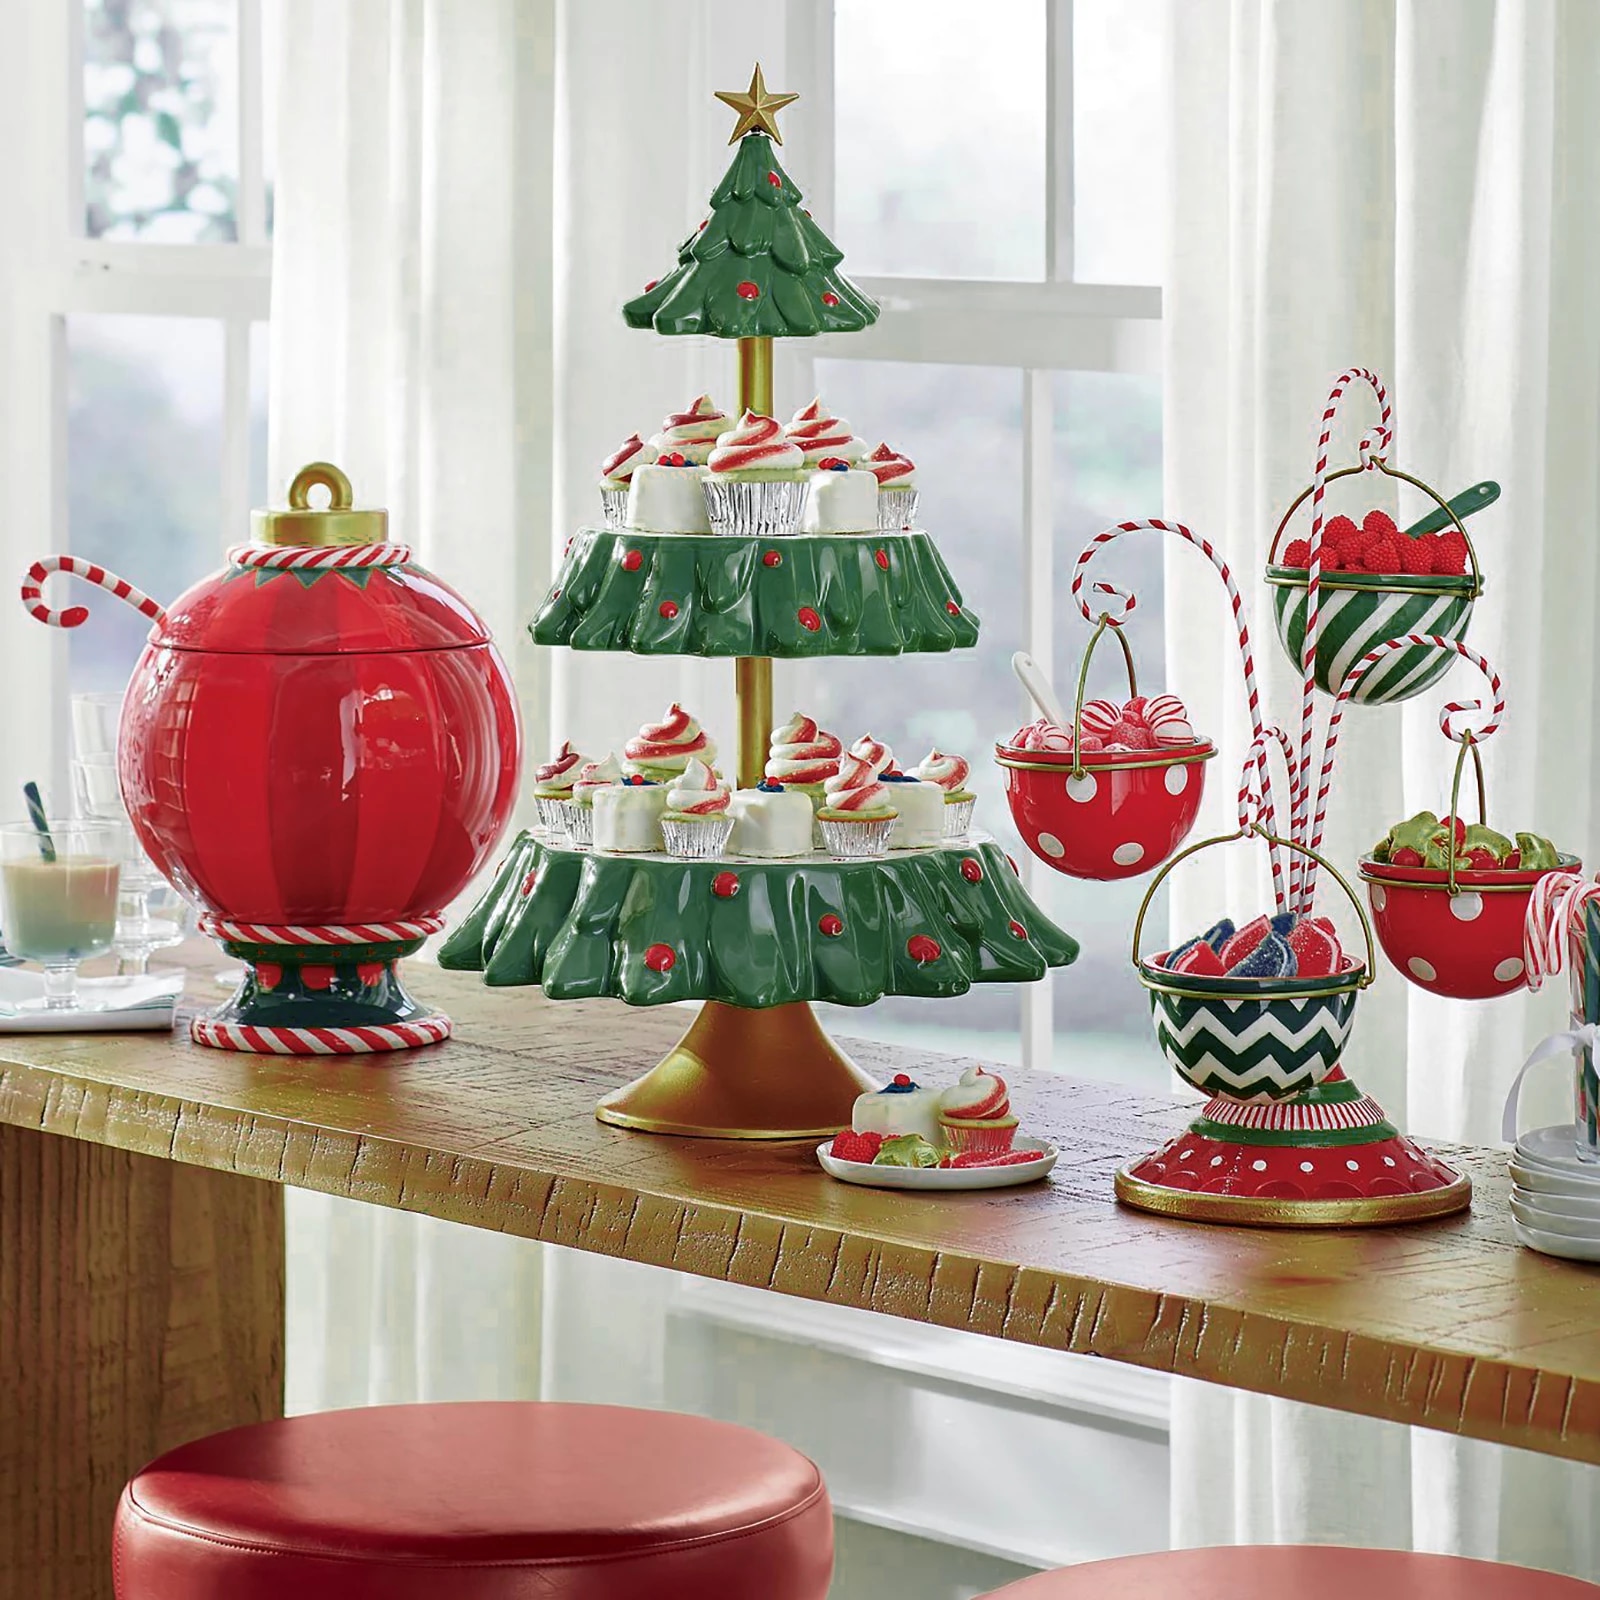
Image credit: https://ae01.alicdn.com/
13. Outdoor Christmas Table Decorations
Add a touch of whimsy to your holiday dinner table with these festive ideas for outdoor Christmas table decorations. Outdoor-friendly centerpieces, place settings, and more. You can mix vintage candlesticks, wood plates, and a natural centerpiece of leaves and flowers to create a non-traditional, laid-back festive vibe.
14. Chandelier Hanging Christmas Centerpiece
Think way outside the box with these unique Christmas table decorations. Hang a chandelier over your dining room table and attach candles to it for a sparkly gold atmosphere.
15. Table Runner
A table runner is another great idea for adding warmth to your Christmas decor. Pick one that features holly or bows, or go for a classic red-and-green color scheme. The table runner should be a few inches wider than your table to leave room for plates and other items.
16. Consider Royal Purple
Mixing a pale green and natural red centerpiece with unexpected royal purple accents can be an eye-catching and modern approach to your holiday dining table decor. Plus, the unexpected royal purple napkins can create unexpected twists on holiday table decorating.
17. Natural Gold
Try to play with pale golden wood tones in your modern dining room table by creating a gold and white Christmas brunch table with gold flatware, white and gold dishes, white napkins, faux snow, and a fuzzy white table runner. You can also line it up with gold and white vases filled with flocked greens.
18. Consider Candy Cane Centerpiece
Grab the mini candy canes that didn’t make it onto your Christmas tree and put them to use as Christmas centerpieces.
19. Consider Icy Blue
Blue and silver is a wintery color combination, which can be used to create an elegant feel on your festive table. Keep the rest of the decoration simple by adding white candles, silver cutlery, and white flowers. Bring in vases holding bright pinkish flowers to add a more traditional Christmas note.
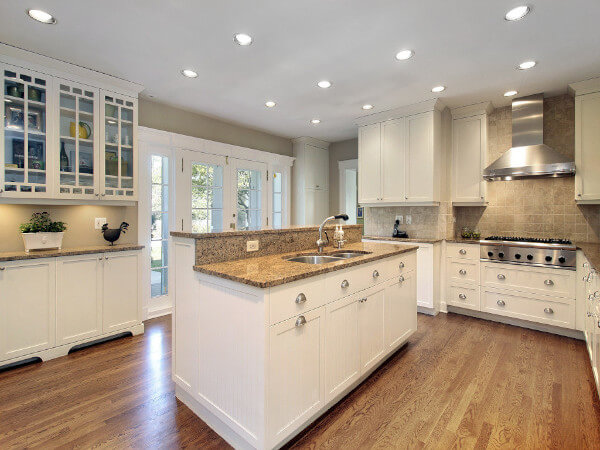
20. Kitchen Island Ideas
If you love to cook, you can create a rustic atmosphere for your holiday table by adding pinecones, fresh cranberries and even tiny LED lights on the tablecloth. While some people prefer simple looks for their Christmas tables, you can use wooden spoons as decor. Set them on top of napkins folded like Christmas trees.
21. Pretty Peninsula
If you are looking for a more modern approach, visit glamorous homes on the web to find out how they decorate their Christmas tables. Decorate your table with all white flowers in elaborate vases. If you love trinkets, this is the best time of the year to bring them out. The kitchen peninsula can also stay up all season, making even small meals or coffee breaks feel festive, and the kitchen comes alive with holiday spirit.
22. Oranges, Cedar, and Walnuts
Another modern table runner is to light your table with candlesticks instead of vases. Set an orange on the center of each plate, and lay dried cedar springs or bay leaves all around it. Finish this arrangement by adding walnuts, apples, or napkin rings
23. Consider Starlight Season
The night is not only the best time to view stars but also a wonderful time to deck your table with them. You can hang small white lights from the bottom of tall silver vases and fill each one up with water. Next, add starlight garlands from these tall vases to the tabletop. Finish by placing votive candles around the table.
24. Create Extra Comfort by Using Ribbon Tied Chairs
Chair ties are always a great option for table decorating ideas. If you have chairs that do not feature these, use ribbon wrapped around them to create bows at the back or front of each chair.
25. Use Taupe
Use a chic and understated color palette of taupe, black and white to complement your decor while creating a holiday theme. Add some nicoly leaves and grasses from your garden to add a festive look and a subtle scent. Finish it off with a mix of votive candles and candlesticks for a candlelit glow.
Image credit: https://loveincorporated.blob.core.windows.net/
26. Add Christmas Vibe with Stripes and Checks
Opt for stripes and check-in contrasting colors if you do not want to go with a solid and chic color like taupe. Match them with your tablecloth or runners to create a unified theme. Try red and green, black and white, or even blue and beige; the choice is yours.
27. Create Dazzling Christmas Centerpiece with Twisted Ribbon
Why not try a ribbon centerpiece if you want something striking and exceptional? It is easy to make too. Just take some colorful ribbons of different sizes and wrap them together in a loose twist before securing them around the base of your candlesticks or votive candle holders. You can add some pine cones for extra appeal.
28. White and Silver is Always in Style
Just bring in the metallic theme if you prefer a more glamorous look. White evokes crisp cleanliness, while silver gives an opulent appeal. Just add some pine cones or berries to break the monotony of the color scheme. This might seem too simple, but it can create a huge impact when you consider that minimal effort is needed to create this look.
29. Christmas Tree Table Decorating Ideas
If you want a more dramatic effect, go for a Christmas centerpiece. It can make a huge difference and be a conversation piece. Just get your artificial tree and dress it up with some colorful ornaments in silver or white colors. You can leave it as it is or add some pine cones or berries.
If you are into miniatures, this might be your thing for table decorating ideas. Of course, there’s a lot of preparation involved, so if you have the budget and time, go ahead and do this. Different themes are available, but you can choose your favorite or mix and match. You can either focus on the human-sized miniatures or go for the tiny trees.
FAQs on Christmas Table Decorating Ideas
Why is tableware important in table setup?
The right tableware helps to set the mood by complementing both the food’s visual aspects and the general theme of the dinner.
Final Thought on Decorating Christmas Table
There you have it. While decorating your Christmas table, you have to pick one or two that you like and then go ahead with it. This will help in making the dinner more memorable for years to come.
The post 29 Christmas Table Decorating Ideas appeared first on Kitchen Infinity.
Did you miss our previous article…
https://www.centrecountyfood.org/?p=917