post

How To Control Aphids On Indoor House Plants

Growing flowers and shrubs indoors has a lot of benefits, ranging from fresh air to improved home decor. However, the benefits can dwindle quickly when these houseplants are under attack by pests such as aphids. Aphids are small, sap-sucking insects that can cause a great deal of damage to plants.

They typically congregate on the undersides of leaves, feeding on plant sap. This can lead to reduced growth, wilting, and even leaf drop. Fortunately, there are several ways of controlling aphids on indoor plants. Keep reading.

What are Aphids?

These are small, soft-bodied insects that feed by sucking juices from plants. They are usually green or black and can be found on the undersides of leaves. Aphids can cause a great deal of damage to plants, leading to stunted growth and leaf drop. However, these insects move rather slowly, making indoor plants relatively easy aphid control.


Image credit: https://bdn-ss-hh.s3.amazonaws.com/

Identifying Aphids

Aphids are tiny insects that are nearly invisible to the naked eye. For instance, adult aphids are under ¼ inch and can be about any color from brown, red, and blue. Most aphid species can appear white, black, brown, grey, yellow, light green, and even pink.

Some may have a waxy or woolly coating. Adults are also wingless, but most species develop a winged form when populations become crowded to allow them to travel to other plants when food quality suffers.

What Do Aphids Do to Plants

Like most indoor plant pests, aphids feed on a houseplant by sucking the leaves, buds, and flowers sap. They like to cluster and feed on a plant’s new growth and flower buds, which can cause stunted growth, deformed leaves or flowers, yellow leaves, and leaf or bud drops. As aphids feed, they release a sticky substance, so you may notice the area around your plant is sticky before you even see tiny bugs on your plants.

What Do Aphids Do to Plants
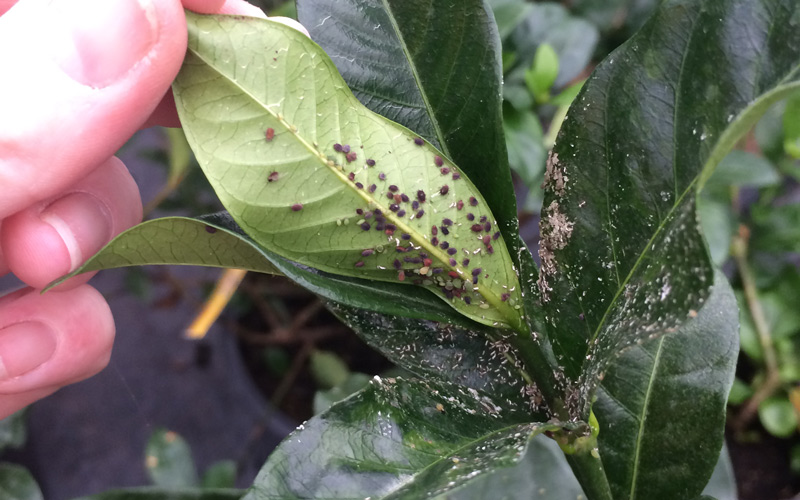
Image credit: https://plantdoctor.co.nz/

phids Life Cycle

The life cycle of aphids is a bit different depending on the species. Some females give birth to live nymphs while others lay eggs. They multiply quickly, and the full life cycle can be as short as one week. The aphid eggs are super small, so you’ll never see them. 

Outside, their eggs survive the winter by attaching to woody growth. And in the spring, the eggs hatch into females. The females then give birth to a nymph without mating. Males are born in the fall and begin to mate with females to produce eggs in preparation for the long winter. 

There’s no winter indoors which can slow their reproduction, and female aphids can continue producing nymphs all year round without stopping. Thus, making the aphid population get out of hand in indoor plants.

Methods of Control

Tools and Materials

Small spray bottleSticky trapsCotton swabInsecticidal soapScissors or small pruning shearsNeem oilRubbing alcoholDish detergent and waterHomemade insect spray

Get Rid of Aphids With Insecticidal Soap

Insecticidal soaps can be bought at most garden centers. It comes in a concentrate, and you will need to mix it with water according to the directions on the bottle. It is important to follow the directions as too much soap can harm your plants.

Spray the plant leaves with the soap mixture, ensuring good coverage. Pay special attention to the undersides of the leaves where aphids like to hide. Do not spray plants in direct sunlight, as the soap can cause the leaves to burn. This method also works well on outdoor plants and helps get rid of aphids on tomato plants.

Alternatively, you can get rid of aphids on succulents and other houseplants using horticultural oil instead of dish soap. No matter the method you choose, make sure you combine the ingredients in a large bottle and shake until blended. If you know how to clean household leaves, this will be much easier.

Get Rid of Aphids With Neem Oil

Neem oil is a natural pesticide made from the seeds of neem trees. It has been used for centuries to control insects and viruses. Neem oil can be sprayed on plants as a natural remedy to kill aphids.

Get Rid of Aphids With Neem Oil
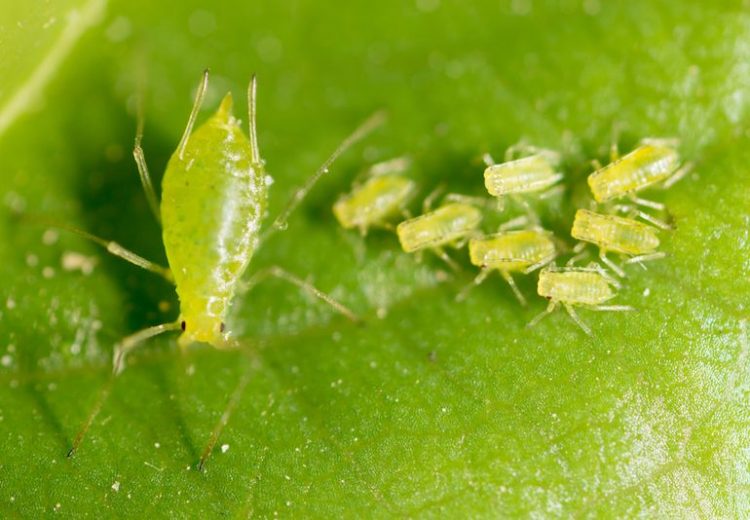
Image credit: https://finegardentips.com/

The one thing you should keep in mind is that it will also kill beneficial insects such as ladybugs and praying mantis, which may make your aphid problem worse if not used properly. Fill a spray bottle with one gallon of water and add two tablespoons of pure castile soap. Shake until blended. 

Then add one tablespoon of neem oil and shake again until blended. Spray on the infested plants every few days, making sure to coat the entire plant, especially the undersides of leaves.

Try Rubbing Alcohol

Aphids are attracted to the color yellow to use this to your advantage. Fill a spray bottle with one cup of rubbing alcohol and add two tablespoons of liquid dish soap. Spray infested plants every few days until the problem is solved. You will need to reapply after rain or watering plants because it washes away easily. 

This is a natural remedy for killing aphids in houseplants. Use a cotton swab and dab the rubbing alcohol directly onto the bugs. Before spraying the entire plant, be sure to test the solution on one leaf of the plant first to ensure it won’t damage your plant.

Eliminate Aphid Problem With Cayenne Pepper

If you’re not keen on using harsh chemicals or you want a more organic approach to getting rid of aphids, cayenne pepper may be the solution for you. Cayenne pepper contains a substance called capsaicin which is lethal to aphids.

Grind up one tablespoon of cayenne pepper using a mortar and pestle or a spice grinder to use this method. Then sprinkle the pepper on your plant, ensuring to get it under the leaves. Don’t worry if you don’t have this pepper. 

Instead, use a hot and chile hot pepper. All you need to do is add the pepper to the water in a small bowl or spray bottle, then soak the plant’s leaves with the base to keep out your indoor garden intruders for good.

Try Baking Soda and Canola Oil to Battle Plant Pests

Baking soda is a great way to kill any pests that like to suck the juice off your plants. To use, mix two tablespoons of baking soda with one tablespoon of canola oil. Put this mixture into a spray bottle and soak your plant’s leaves for five minutes. 

The oil covers the insects and breaks down their exoskeletons, leaving them exposed and more susceptible to toxins. On the other hand, the abrasive nature of baking soda wears down the bug’s outer shell, making it easy to remove from plants. 

There are also a number of other home remedies that you can use to get rid of aphids, such as using soapy water or horticultural oils. However, before using any of these methods, test them on a small area of the plant to make sure they are not harmful.

Use Houseplant Sticky Stakes for Flying Aphids

Another way to eliminate aphids is to use sticky stakes. These are small wooden stakes with a sticky material on the top that will trap the aphids when they land. You can buy them from most garden stores or online. Insert the stake into the soil next to the plant, and wait for the aphids to land.

If you see winged aphids on your houseplant, don’t fret. Instead, get some sticky houseplant traps and put a few around nearby houseplants to capture any winged aphid that might be flying around. Sticky traps can also catch fungus gnats, so don’t panic when you see lots of bugs in the trap; they might be fungus gnats. 

Many people have found that this is the most effective way to get rid of aphids on houseplants since it is simple and easy to use, plus you can catch a lot of aphids in one setting.

Cut Away Infested Areas

If the infestation is bad, you may find that it’s best to cut away any infested parts of your indoor houseplant. This way, you can kill off the aphids without them spreading. Be careful when cutting so you don’t damage or hurt nearby leaves and branches.

You might want to wear some gardening gloves while doing this. Moving the entire plant may also prove necessary when the whole plant is infested with aphids. Place infected plants in an isolated area such as a balcony or a room away from other plants.

Check for Other Household Pests

It’s also a good idea to check your other household plants for pests like spider mites, whiteflies, and scale insects. These pests can often travel from one plant to another, so it’s important to get rid of them before they take over. Aphids release a sweet, sticky substance known as honeydew, attracting other pests.

This watery substance looks like a little sooty mold on the leaves and is a huge draw for other insects, especially ants. So, it’s important to take care of any aphid infestation as soon as possible to prevent other pests from taking over. Also, learn how to get rid of ants because they can also be a danger to your plants.

FAQs on How to Control Aphids on Indoor Houseplants

How do indoor plants get aphids?

Aphids are easily brought indoors on infested plants. They also come attached to the clothing and through an open window by the wind.

Why do aphids keep coming back?

Aphids are attracted to plants with soft new growth. Thus, overwatering and over-fertilizing your plants may make them more enticing to aphid populations which may cause negative connotations to your plants.

Final Thought on How to Control Aphids on Indoor Houseplants

As you can see, there are numerous natural and commercial products from which to choose in your battle against aphids. Make sure you understand what attracts pests to your indoor garden, and you’ll easily be able to decide how to control aphids on indoor houseplants.


The post How To Control Aphids On Indoor House Plants appeared first on Kitchen Infinity.

Did you miss our previous article…
https://www.centrecountyfood.org/?p=658

post

How Types Of Air Conditioning Systems Work

What kind of AC unit should you get? What are your options, and how do they work?

With so many types of air conditioners on the market, it can be hard to decide which one is right for you.

This article will tell you everything about them so that you can decide which one is best for your needs. We’ll also give tips on how to maintain it efficiently and maximize its lifespan.

Keep reading to find out more. 

Types of Air Conditioners

Choosing a type of air conditioning system can be daunting because there are so many options. Here is a list of the four major types and their advantages and disadvantages. 

Window units

These units have an exterior compressor unit that mounts on the outside wall, with an interior split component that sits in the window opening.

dvantages

They are the least expensive type of AC unit and they can cool a single room very well.

Disadvantages

They don’t work well when the temperature outside is over 100 degrees and they can be quite loud.

Central air conditioning

Central AC units are installed in the attic or basement of your home and distribute cooled air through the air ducts you already have.

dvantages

They are very effective at cooling your entire home, so if you live in a large house or have multiple rooms that need AC, this is the way to go.

Disadvantages

Central AC units are the most expensive type of unit and require professional installation. Also, they can be a nuisance to install and may require additional ductwork.

Ductless mini-split

Mini-split systems consist of an outdoor compressor, a remote inside unit placed where you need it, and a series of small tubes that distribute the cooled air throughout your home.

dvantages

They don’t take up any floor space in your home, they are very efficient, and they cool individual rooms very well.

Disadvantages

They can be more expensive than other types of AC units, and they require professional installation.

Portable air conditioners

Portable AC units have an exterior compressor unit that sits on the ground outside your home and a hose that leads inside to the unit that sits on the floor.

dvantages

They are very affordable, they can be moved from room to room, and they are very efficient.

Disadvantages

They can be quite noisy, they require regular drainage, and they only cool a single room at a time.

How AC Units Work

Choosing thebest air conditioners is easier when you understand how they work. Air conditioners use a refrigerant to cool the air and a compressor to circulate it. The refrigerant is a fluid that changes state from liquid to gas as it absorbs heat. This change of state allows the refrigerant to absorb heat from the surrounding air and then release it outside, cooling the air in your home in the process.

Image Credit: http://servicechampions.net

The compressor is a pump that circulates the refrigerant through the system. It pressurizes the refrigerant and causes it to change state from gas to liquid, which allows it to absorb more heat. The compressor then sends the refrigerant to the condenser, which is a coil of metal tubing that releases the heat outside.

From the condenser, the refrigerant goes to the evaporator which absorbs the heat from the surrounding air and changes the refrigerant back to a liquid. This liquid is then circulated back to the compressor, where it starts the cycle all over again.

This process continues until the unit reaches the temperature you set on the thermostat. At that point, it turns off until the temperature rises or falls again, at which point it kicks back on and repeats the process.

How to Maintain Your AC Unit

Like any otherhome appliance, your AC unit needs regular maintenance to keep it running smoothly. Here are a few tips to keep your AC unit in good condition:

Clean the filters regularly.

This will help keep the air flowing freely and prevent the unit from overworking. Your filters should be cleaned every 1-3 months, depending on the type you have. Washing them with soap and water or vacuuming them is usually enough to keep them clean.

If you’re using electronic filters, it’s important to check them at least once a month to see if they need replacing. If your filter stops working properly, the unit will overwork itself trying to circulate air through the clogged filter.

This can cause major problems that require an expensive repair bill, so be sure to check your filters regularly.

Keep vegetation away from the outdoor unit.

The evaporator coils inside your AC unit are very sensitive and often freeze up when exposed to excess humidity in the air. This can lead to costly repairs or even system failure if the coils are damaged.

To avoid this, be sure to keep all vegetation, debris, and other obstructions away from the outdoor unit. A few feet of clearance is usually enough, but check your owner’s manual for specific instructions.

Have the unit serviced at least once a year.

A professional technician can clean and lubricate the parts of your AC unit to help it run more efficiently. They can also troubleshoot any problems you may be having and suggest solutions.

It’s important to have your AC unit serviced at least once a year to keep it running smoothly and prevent expensive repairs down the road. Contact your local HVAC technician for more information.

Make sure the compressor is free of debris and dirt.

The compressor is the most important part of your AC unit, so it’s important to keep it in good condition.

If you see any debris or dirt build-up on the compressor, be sure to clean it off using a soft brush or vacuum cleaner. Do not use water or any other liquids, as this can damage the unit.

Check the refrigerant level regularly.

If the level is too low, the unit won’t be able to cool effectively. This can cause expensive problems down the road as the parts wear out faster.

If you remove your AC unit’s access panel, you should be able to see a copper or silver cylinder near the compressor. This is usually marked with a red line or dot that indicates when it needs to be recharged. Keep in mind that this may vary depending on your unit, so check your manual for specific instructions.

Have an approved repair company make any repairs necessary.

Hiring an AC repair company is the best way to maintain your AC unit and avoid extensive repairs in the future. Any licensed HVAC technician will have plenty of experience with cooling systems and will know exactly what they’re doing when it comes to fixing them.

5 Different Types of Air Conditioning Units

Image Credit: http://ductworksmn.com

An experienced technician will know how to keep your system running properly and what type of maintenance is needed to keep it in top shape. They’ll also be able to troubleshoot any problems you might have, which can prevent major repairs down the road.

How Types Of Air Conditioning Systems Work – FAQ

What are the most common types of air conditioning systems?

The most common types of air conditioning systems are the following:

1) Central air conditioning

2) Room air conditioning

3) Portable air conditioning

How do central air conditioning systems work?

Central air conditioning systems work by cooling and dehumidifying the air in a single room or an entire house. They do this by drawing in warm, moist air from outside, cooling it down, and then releasing it back into the environment. Central air conditioners also have filters that remove dust and other particles from the air, which helps to improve indoor air quality.

Final Thoughts On How Types Of Air Conditioning Systems Work

In conclusion, we can see that there are several different types of air conditioning systems, and each has its unique properties.

Understanding the various properties of each type is important to choose the right system for your home, and this article should help you make that decision.

Once you have an air conditing system in place, taking the time to do proper maintenance is important to ensure that your system is running at its best.

The post How Types Of Air Conditioning Systems Work appeared first on Kitchen Infinity.

Did you miss our previous article…
https://www.centrecountyfood.org/?p=641

post

How to Whiten Yellowed Clothes

White clothing has always been a symbol of purity and cleanliness; however, it becomes dirty quickly due to various reasons such as sweat stains or food spills on the fabric. This makes it look dull and unattractive. You might want to throw away these tainted garments thinking there’s no hope for their recovery but wait.

A few simple tricks can bring back the shine in your favorite whites without much effort from your end. Here are a few home remedies to make your white clothes look bright and new. 

Use Oxygen Bleach

The gentlest method to whiten white clothes is to mix warm water with oxygen-based bleach. Make sure to follow the package recommendations when it comes to the amount of oxygen bleach to use. Add the bleach to the water and submerge the white clothes in the mixture. Let them soak for at least eight hours or overnight.


Image credit: https://i5.walmartimages.com/

Patience is very important. After that, launder as usual using the hottest water recommended for the fabric, then add half a cup of distilled white vinegar to the rinse water. This method is safe for polyester clothes, synthetic fabrics, and natural fibers like cotton and linen.

Use Bluing Liquid

If the yellowed clothes are white, you can use a bluing agent to help restore their color. Add 1/2 cup of the bluing liquid to the rinse cycle and let it run its course. This is an old-fashioned laundry product that can be added to the wash cycle to make white clothes appear brighter.

Use Bluing Liquid
Image credit: https://www.thespruce.com/

All you need to do is mix your bluing agent with cold water, following the instructions on the bottle. You’ll only need a 1/4 to 1/8 teaspoon, depending on what type of wash cycle you’re using. This liquid adds the slightest hint of blue, offsetting that yellowish hue that t-shirts, socks, and sheets can take on.

Use Baking Soda

Sodium bicarbonate or baking soda is an excellent cleaning product that you’ll find in every kitchen. To make your t-shirts whiter, make a baking soda paste with water and some salt. Apply the paste on the stains before tossing it into the washing machine. The t-shirt will come out clean and white as snow. 

There are two methods of whitening your clothes with baking soda. Add 1/2 a cup of baking soda along with your regular liquid laundry detergent at the start of the laundry cycle. You can also create a baking soda soak for your clothes to soak in before washing. If you choose to soak your clothes, allow them to soak for at least an hour and then wash as normal.

If you’re using powder detergent, add sodium bicarbonate during the rinse cycle. Baking soda is chemically similar to washing soda. It’s also a mild antiseptic so that it will protect your washing machine and clothes from bacterial growth.

Wash Your Yellowed Clothes Using White Vinegar

White vinegar is an excellent choice for cleaning clothes naturally because it’s a mild acid which makes it great for cutting through dirt and grease. There are two methods you can use to whiten your clothes with using white vinegar. The first method involves adding one cup of vinegar and your regular laundry detergent at the start of the wash cycle.

Wash Your Yellowed Clothes Using White Vinegar
Image credit: https://img.wonderhowto.com/

Distilled white vinegar is an excellent fabric softener and deodorizer that not only whitens clothes but can be used in stinky laundry. Add 1 cup of the washer’s last rinse cycle to also eliminate soap residue. For extra brightening, mix it with a ¼ cup of lemon juice.

Give Your Clothes a Citrus Soak

Another way to whiten clothes is by giving them a citrus soak. Fill a basin or sink with hot water and add lemon juice to give your white clothes a new glow. Soak the clothes for about 30 minutes, then rinse and wash as usual.

Give Your Clothes a Citrus Soak
Image credit: https://wl-brightside.cf.tsp.li/

The citric acid in the lemon, lime, or orange juice helps break down the yellowing and lighten the fabric. You can also use orange peels as a natural bleach. Wet the peels and rub them on the stained areas of your clothes. Let the juice sit for about an hour before rinsing and washing as usual. 

Lemon juice can also be used to remove stains from your clothing. Apply lemon juice on the rust stain and sprinkle some cream of tartar over the juice. Rub the solution over the stain and let it sit for about 30 minutes. The stain should go away. Wash normally after this if you know how to do laundry

Use Natural Laundry Detergents

Using laundry detergents that aren’t made with chemicals can help you maintain your clothes’ vibrancy. These natural detergents are made up of plant-based enzymes and natural minerals that can clean effectively like their synthetic counterparts.

These detergents are not as harsh on fabric as synthetic detergents, making them suitable for prolonging the life of your favorite clothes. They’re also biodegradable and non-polluting, unlike normal detergents. You can also learn how to make DIY laundry detergent if you want a much safer solution.

Use Bleach

Most bleaches such as chlorine, oxygen, and hydrogen peroxide break up stains through a chemical reaction called oxidation. Detergents remove stains while bleaches turn stains colorless by chemically altering their molecules. When using bleach, only go for whites and bleachable colors.

Check items for non-bleach only before using. To use bleach, start your washer, add 3/4 cup chlorine bleach to the wash water with your regular detergent, and add your laundry load. Note that chlorine bleach can produce dangerous fumes combined with vinegar, ammonia products, and other household chemicals. So, never combine them, as the combination can be hazardous to your respiratory system.

Non chlorine bleaches such as oxygen bleach and hydrogen peroxide are good in whitening. So, if you have any of these around, substitute them for the chlorine bleach in the recipe. They’re gentler and less toxic than chlorine bleach, making them safe for most fabrics and dyes. Hydrogen peroxide brightens whites and removes stains without harsh chemicals. Add 1 cup of hydrogen peroxide or oxygen bleach to your regular detergent when washing whites.

Use Sunshine as a Whitener

Wash your cotton, linen clothes, tablecloths, and other white laundry items. After that, allow them to dry in direct sunlight. Hang them on a clothesline or lay them on the lawn to let the sunshine whiten them. The sun’s UV rays can leave you with whitening whites in just a few hours.

Consider Sodium Borate

Borax is a naturally occurring mineral that helps remove stains. It also deodorizes and brightens clothes. Borax also breaks down the minerals in the water that can yellow clothes over time. Add 1/2 cup of Borax to your regular detergent when washing dingy whites.

Use Sodium Carbonate

Also known as washing soda, sodium carbonate has a higher alkaline level, making it a powerful cleaning agent. Add 1/2 cup to your laundry as a detergent booster. This cleaning can cause skin irritation, so rinse the area thoroughly if your skin comes in contact.

Baking Soda and Peroxide

Combine equal parts of baking soda, peroxide, and water in a small container, then using a toothbrush, rub the paste on the clothing that needs to be bleached. Allow it to sit for several minutes before rinsing with cool water.

FAQs about Whitening Yellowed Clothes

Why do white clothes become yellowed?

White clothes become yellowed for a number of reasons. These include:

When they’re exposed to a chemical and react with a substance in their environment, for example, the sweat stains the white fabricCooking with greasy oils frequently can also cause yellowing in clothes.Clothes will also yellow in storage because they react with substances in the storage container, especially wooden shelves, and cardboard boxes.Nicotine from cigarette smoke can also cause whites to be yellow

Final Thought on How to Whiten Yellowed Clothes

As you can see, there are so many methods of whitening yellowed clothes. It all depends on what is causing the yellowing and how severe it is. In general, the harsher the whitening method, the more likely it is to cause damage to the clothes.

So always test a small hidden area of the fabric before applying any bleaching agents to the entire garment. With these simple tips, you can now learn to whiten yellowed clothes.


The post How to Whiten Yellowed Clothes appeared first on Kitchen Infinity.

Did you miss our previous article…
https://www.centrecountyfood.org/?p=617

post

DIY Washer Repair Guide

You are doing laundry, and suddenly your washing machine starts leaking water. Washing machines are a necessity, but when they break down, it can be incredibly frustrating. They can cause a huge mess and damage to other appliances around them.

The cost of repairs for your washing machine can be expensive and time-consuming. If you have the skills to repair washers yourself, you could save money on the cost of repairs. You can fix this problem in no time at all with some simple tools that you probably already have lying around the house.

Here are seven tips on how to fix your washing machine with common household items that most people already own. These DIY tips can help you save the expenses of a repair call and eliminate some issues, so the problem is easier for the technician to solve. Read on!

Washer Won’t Spin

The lid switch detects the position of the lid and prevents the washer from spinning into the lid. A broken lid will keep the washer from spinning even if the lid is closed. Before you call in the repairman, check to see if the belt is your problem. Your plugs can get bumped loose by animals and fallen objects. 

You can do this by removing the broken lid switch. But first, use a continuity tester to test the switch and if you suspect that it’s broken, replace it with a new switch before spending money on professional help.

Check the Breaker Box

Once you’ve properly plugged your washer into the electrical outlet and still won’t run, check your central home electrical box to see if your fuse has blown and the circuit breaker has tripped. Replace the fuse and turn the breaker back on. If the problem persists, call an electrician immediately.


Image credit: https://howtofixit.net/

If the washer is plugged in, the breakers are okay, but it’s still not working; you may need a lid switch to engage for the washer to work. Today’s washer, both front, and top load models require this lid switch to work. 

These switches can break and need to be replaced. They also get gunked up with lint and detergent residue. Use a cotton swab and a little bit of rubbing alcohol to clean the contact areas.

No Fill or Slow Fill

With front load washers, it will fill up to the water level you choose. The fill valve could be restricted over time because of lint and debris, so turn off the unit, unplug it and remove the hoses. After establishing electrical power, the next thing you’ll need is water.

If there’s no water entering the washing machine, ensure the water valves are open. Make sure you have two valves, a hot and a cold. They should be marked by a red and blue knob or switch. Even if you wash in cold water, some washers won’t operate unless you open both valves.

And if your machine is getting, but it fills very slowly, you may need to open the valve more. If the water valves are open and still the washer won’t fill, you may have a clog in the filter screen. In this case, unplug the machine and turn off the water valves. Use a bucket to catch the remaining water in the hoses.

There are many things that can go wrong with your washer hoses both inside and outside the cabinet. And transferring a small wire clip from the old switch to the new switch can be a real challenge.  Use a screwdriver to unscrew the hose from your machine and check if there’s a clog in the filter. Clean the hoses of any water mineral build-up to reduce clogs and improve washer performance. 

You can also remove the back panel of your washer to access the additional water lines inside the washer that lead to and from the pump and the drain. Use vinegar and hot water for cleaning your washer and clear your clogged and dirty hoses. Any clogs you run into along the way, apply vinegar and hot water and watch the build-up melt away. Make sure you switch the water back on when you’re done with hoses.

Level the Washer to Prevent Noises

Terrible noises happen when you incorrectly load your washer or even your laundry has shifted during the cycle. For standard top load washers, never load clothing on one side of the central agitator; make sure you distribute it evenly around the washer’s tub. 

Level the Washer to Prevent Noises
Image credit: https://www.thespruce.com/

For high-efficiency top load washers without a central agitator, the problem could be overloading while in front load models, the noise can come if your machine is underloaded. If the thumping occurs during a cycle, stop the machine and redistribute the wet clothing.

For weird noises such as humming, clicking, and gurgling, the noise can be caught by objects caught in the washer’s drum and internal mechanism. Clicking and gurgling signals an object caught in the water pump and drain line. Make sure you check the pockets before loading clothes.

If your washer is making screeching and squealing noises, then it’s mechanically challenged and requires a service call. For uneven legs, use a bubble level and a wrench to twist the feet to retract and extend them until the washer is level on top.

Washer Leaks

If you are experiencing water leaks, the first step is to determine if it’s a supply hose leak or a water valve leak. Check your washer’s hose connections to the hot and cold water valves. You can use a dry hand and a paper towel to run down the length of each hose.

Washer Leaks
Image credit: https://applianceexpresstx.com/

If you find any dampness, tighten immediately and if the hose has small splits, replace it immediately. A burst water hose is a huge mess and damages the walls and floors. Make sure you check and replace your washers regularly to prevent this mess.

Pay close attention to where the puddle is located, whether in front of the washer or at the back of the washer. The location will tell you what to do next. If you have a front loading machine, make sure you’re using a high-efficiency detergent to remove soapy puddles on the floor. 

High-efficiency detergent is formulated to be low-sudsing and to be used in the lower levels of water in a front-loading washer. Front-loading machines have a small overflow system on the back of the machine, and if you have too many suds, then they’re escaping from there.

Clothes are Too Wet After Final Cycle

If you perfectly know how to do laundry but your clothes still come out of the washing machine still wet, it might be because the washer is not draining correctly. To test this, pour a cup of water into the washer and start a cycle. If the water doesn’t drain out, then you’ll need to clear the drain.

Your water pump may be clogged with lint or a small object. If the pump isn’t allowed to work freely and properly, it drains out too slowly, leaving your clothes wet. You can remedy this by simple cleaning.

If that’s not the case, your drain hose could be clogged with lint and hair. You can easily clean this with a thin, long-handled brush. You’ll get the brushes at pet shops to clean the aquarium tubes if you can’t find one at a hardware store.

Go Through the Manual

If you have no clue what’s wrong with your washer, your first stop should be the washer’s manual. It will provide you with diagrams and troubleshooting tips. And if you don’t have the manual, visit the manufacturer’s website or download a manual from one of these sites. This will be time-consuming but much less expensive than a repair call.

FAQs about DIY Washer Repairs

Is it worth fixing an old washer?

Yes, especially if the repair cost doesn’t exceed 50% of the cost of a new washer.

Do washers have fuses?

Yes, they have fuses that protect them from power surges. Washing machines require a lot of power to run.

Final Thought about DIY Washer Repairs

lIf you love to fix things DIY, then appliance repair at home is a great option. Don’t be scared of appliance repair with the help of this article, and go ahead and fix your washing machine without any professional help. But if you think the problem may be beyond your knowledge, don’t hesitate to call a professional.


The post DIY Washer Repair Guide appeared first on Kitchen Infinity.

Did you miss our previous article…
https://www.centrecountyfood.org/?p=607

post

The Best Carpet for Basement

Carpet is the most popular choice among homeowners who want to make their basement space more appealing by adding a soft touch to it. If you’re just learning how to buy a carpet that will be best for your basement, there are a lot of options out there.

It is very important that you choose the right one so that it will be comfortable and safe for your family. Basements are hotspots for mold, mildew, and other unpleasantness due to increased exposure to moisture.

This guide will help you to find out the best-suited carpet depending on your needs and budget. Read on!

Synthetic Carpet for Basements

Basement flooring made of synthetic material is highly recommended for basements because it’s moisture resistant unlike natural materials like cotton or wool. It also has a stain protection feature, so it makes cleaning easy.

Synthetic carpet is good for the basement because the materials tend to retain less moisture than natural fibers. They’re also more stain-resistant than natural carpets.

Nylon Basement Carpet

If you’re looking for the best carpet for the basement, look no further than nylon carpet. It’s durable and able to withstand moisture. Unlike other synthetic carpets that are made of polypropylene or acrylic, nylon is made from natural materials that feel soft when touched.


Image credit: https://previews.123rf.com/

Pros of Nylon Carpet

Great stain resistanceEasy to maintainMore durable

Cons of Nylon Carpet

It’s expensiveIt’s not soft like other materialsGenerates a lot of static electricity

Polyester Carpet

There are several types of polyester carpets like Berber and loop, but other than that these materials are really the same. Polyester is the ideal choice for basements, especially if you’re looking for an all-around, versatile carpet. This synthetic material is resistant to spills, accidents, and moisture.

Polyester Carpet
Image credit: https://cache.hedgeapple.com/

Pros of Polyester Carpet

Less expensive than other carpet optionsIt’s a green carpeting material made of recycled bottle caps and tiresEasy to cleanIt’s durable and reliable

Cons

Not the best option in high traffic areasNeeds more tender care and love than other carpets

Olefin Synthetic Fiber

Choosing the right carpet for basements will ensure that they are protected from excess moisture. Olefin fiber is recommended for the basement to protect their carpeting. Olefin is a polypropylene material that’s made from plastic pellets and recycled materials.

Olefin Synthetic Fiber
Image credit: https://www.thespruce.com/

It looks and feels like wool and is waterproof, mold, and stain-resistant. It’s known within the carpeting industry as a material that is tough, reliable, and comfortable to boot. Its woven nature helps prevent clumping and debris from becoming too ingrained into your flooring.

Pros of Olefin

Can be used both indoors and outdoors

Cons

It’s not resilient as other carpetsWears quickly in high traffic areasThe wool-like carpet fibers catch and tear easily on furniture when moved around the room

Triexta Carpeting

Triexta carpet fiber is made from three natural fibers: wool, nylon, and polyester. The soft blend gives it a distinct look and feels that will stay plush for many years to come.

Triexta Carpeting
Image credit: http://www.tedsabbeyblog.com/

Cons of Triexta Carpeting

The fibers electrostatically attract dirt, making it hard to vacuum

Berber Carpet for Basements

Berber carpet, also known as loop pile, is easy to install, affordable and durable compared to other styles. Examples include nylon and olefin. Nylon is the most popular choice for Berber carpets because it’s known to resist stains and holds up under heavy foot traffic.

On the other hand, olefin tends to soil and stain more easily than nylon, making it a great choice for low-traffic places.

Low Pile Basement Carpet

Low pile carpet is a good choice for basement areas because the cut pile fibers keep dirt and moisture from becoming trapped in the pile. Low Pile carpeting makes basements look less like home entertainment rooms and more like cozy family spaces.

It gives you plenty of softness to sink into, but not too much for you and your guests to trip on. The style is soft and low maintenance, making it the perfect choice for most homes. If you opt for a low pile, go for a low pile style like a plush carpet.

Low pile carpets dry out quickly than high pile carpets when they become damp and wet. If your home is frequented by pets, kids, and heavy foot traffic, then a low pile carpet is the right choice. Look for a synthetic carpet with short fibers that are level and dense like thick grass when mowed.

Carpet Tiles

Carpet tiles are an exciting trend in carpets. Carpet tile can be installed on any type of flooring, but it is especially ideal for concrete subfloors. It comes in a range of shapes and sizes, including squares. The squares are easy to install since they do not need seam allowances.

Carpet Tiles
Image credit: https://www.flooringinc.com/

Installing carpet tile is very easy since you only need to peel and stick the tiles on your concrete subfloor. Since these tiles are made of vinyl and rubber, they can easily be cut into fairly small pieces for use as borders or other decorative floors indoors and outdoors.

They’re perfect for the basement because it is easy to clean these carpets without needing any professional help after a spill. Although carpet tiles are easy to lay, homeowners may need help with the big stuff. Bigger jobs can be handled by professionals who will install these tiles for you.

Sectioned Carpet

This is another low risk option for moisture-prone basements. Whether you’ve divided your basement into multiple rooms and renovated into an open living area, you’ll only use a carpet in only a portion of the space. And if you have water damage, you won’t replace the entire basement floor.

What to Look for in a Quality Basement Carpet

Many homeowners prefer carpet over other flooring options such as vinyl, engineered hardwood and laminate because of many reasons. These include the qualities of a carpet such as soft to walk on, insulation and it’s a forgiving material that works well on subfloor that is in less than good condition.

Factors to consider when choosing a carpet include:

The Pile of a Carpet

Low pile carpets are the best bet when it comes to basement carpeting. This is because the low pile carpet dries quickly compared to the high pile and that’s what the basement floor needs. Less time to dry compared to living room and bedroom which needs high pile carpets. Most homeowners opt for Berber carpet which has a closed loop, giving it a flat, textured appearance.

Carpet Padding

One way of controlling moisture from your concrete floors is to install an impermeable rubber pad. However, some carpet experts are against this idea and are recommending pad-less carpet that allows the basement floor to breathe. You should consider such factors for when you go for free carpet installation

Nonetheless, carpet padding is important because it provides extra insulation, protects the carpeting from dampness and provides cushioning which you’ll need when you have a concrete subfloor. Go for the best breathable carpet pads that are made of open-cell synthetic foam or from synthetic fibers to increase the longevity of your basement’s carpet.

Waterproof Carpets for Basement

If your basement is vulnerable to flooding and water damage, you’ll have a material that can handle such a situation. Some of the waterproof materials that you need to go for include synthetic carpet. Opt for the less expensive ones like olefin carpeting and polyester.

Durability and Comfort

Comfort and durability are the two features that people look for in basement carpeting. There are some materials today, such as 100-percent nylon, which is more resistant to dust and mites than other materials. Nylon is also great for homes with small children because it doesn’t stain easily.

If your basement is for relaxing and watching TV, go for comfort instead of wearability, in which the best flooring options would be olefin and triexta.

Sectioned Carpeting vs. Wall-to-Wall Carpeting

You want your basement to look bigger, so it’s a better idea to have divided carpeted flooring. In this way you can create different rooms in the basement for specific purposes. Wall to wall carpeting is not the best idea in the basement because if any part of it sustains water damage, you’ll need to replace the entire carpet.

The Type of Material

Synthetic carpets are the best bet for basements. They’re easy to maintain and they offer a long life if you take proper care of them. Basement carpeting should be moisture resistant and stain resistant at the same time. So, for this purpose, synthetic carpets do better than woolen carpets.

Pros and Cons of Basement Carpet

Pros

Better insulation from the cold concrete than vinyl, laminate and epoxy flooringDIY-friendly installation, especially if you choose carpet tilesCarpet has a breathability factor greater than other types and even light moisture can be mitigated by dehumidifiers.Large water leaks can be dried out quickly before mold and mildew develop

Cons

Prone to mold in damp conditionsWorst option in the event of flooding

FAQs about the Best Carpet for the Basement

What is the best carpet padding for concrete?

Frothed foam padding is a great choice to use in concrete floors because it responds well in heavy-traffic areas. It’s densely packed and will adhere well to the concrete floor and carpet backing.

Final Thought about the Best Carpet for the Basement

As you can see, choosing the best carpet for your basement isn’t going for a carpet that looks pretty in your local store. It requires a different approach. Consider what you’ll be using the basement for, and pick a carpet based on your intended use.


The post The Best Carpet for Basement appeared first on Kitchen Infinity.

Did you miss our previous article…
https://www.centrecountyfood.org/?p=584

post

16 Best Backpacks for College of 2021

Choosing the right backpack can be a difficult task for students, especially in high school or college. It is not easy to pick the best backpack that will suit your needs. With so many options available today, it can be overwhelming and confusing to choose one. Which type of bag should you get? What features do you need?

Below is the list of the best backpacks for college and high school kids in 2021.

1. Herschel Pop Quiz Backpack Herschel

Pop Quiz Supply Co. is an independent designer, distributor, and manufacturer of luxury backpacks, bags, and accessories. One of their best-sellers is the Herschel Pop Quiz Backpack which has everything you need for college. This backpack is spacious, durable, and lightweight.


Image credit: https://www.gadgetreview.com/

It offers enough compartments to keep your must-have organized. This bag comes equipped with a padded laptop sleeve, fleece-lined sunglasses, and a few other compartments you can use to store your go-tos. The base of this bag is also lined with a water-resistant faux leather panel that keeps your items safe from spills and puddles.

2. Moleskine Metro Backpack

This backpack is a multi-purpose bag you can use to store all your college essentials. It has several compartments where you can store your laptop, phone, charger, and even your notebooks. It features padded straps that add extra comfort when carrying the pack for hours.

Moleskine Metro Backpack
Image credit: https://www.moleskine.com/

If you’re looking for a sleek, compact backpack that can help you keep your laptop safe from elements, then this is the right choice. This bag is crafted from water-repellent nylon, and it boasts a protective polyurethane base that keeps your electronics safe from spills and puddles. 

3. Everlane Modern Snap Backpack

For minimalist college students, this backpack from Everlane is a good choice. This pack doesn’t have traditional compartments or zippers. Instead, it features a series of pouches and slots that allow you to store your stuff in the most efficient way possible.

Everlane Modern Snap Backpack
Image credit: https://i.pinimg.com/

Plus, its design allows you to store laptops, notebooks, and other school supplies. It has an exterior side pocket for your water bottle, making it safer for your inside belongings. You can also keep it for the longest time, thanks to its water-resistant cotton twill exterior.

4. The North Face Borealis Backpack

One of the best backpacks for college is this one from The North Face. It has 28 liters of storage space, perfect for carrying your books and notebooks on campus. Additionally, it features a fleece-lined pocket that allows you to keep sunglasses protected when you’re on the go.

The North Face Borealis Backpack
Image credit: https://images.thenorthface.com/

If you need a whole lot of space, the Borealis backpack is a perfect choice. Upfront, it has an elastic bungee system. This bag is also comfortable, and there’s also a version that can fit women’s bodies. It comes in various colors, fitting everyone’s preferences.

5. Mokuyobi Flyer Backpack

This is one of the best backpacks for college students because it’s got a huge amount of space. If you want to carry your laptop, tablet, or iPad with you, there are two pockets in the front that can fit most laptops with screen sizes up to 15 inches. You’ll also find several exterior pockets with zipper closures. 

Mokuyobi Flyer Backpack
Image credit: https://cdn.shopify.com/

There is an open space that’s perfect for carrying several books. If you’re worried about running out of time, this is for you. It has some space for extra clothes, some make-up or perfume, and a few items.

6. Herschel Heritage Classic Backpack

If you’re looking for a stylish backpack for college, this is your answer. Herschel is a brand that’s known for its affordable and trendy bags and accessories. It has several designs to choose from, so you’ll surely find one that complements your style.

This backpack has a bit more than enough space for most students with 19 x 13.5 x 8 inches. If you also like a light, classy backpack, this may be the best backpack for you. It has a large compartment with a sleeve that can hold a 15-inch laptop and a small media pocket with a headphone port. 

The classic black color with a saddle brown faux leather bottom is one of the 23 designs available. It has an air mesh back padding and cushioned straps that keep you comfortable across the campus.

7. Dagne Dover Dakota Backpack

This is a cool backpack for students who are always on the go. It has one main compartment with dividers to provide easier organizing. The exterior also features two front zippered pockets, one of which is padded to protect your laptop or tablet.

There are three colors available, including dark pink camo, midnight camouflage, and navy blue. For comfort and better back support, the designers made the straps adjustable. It also has the signature feature of Dagne Dover’s backpacks and bags, which is the key leash. 

The superior material is made of premium neoprene, making it water-resistant, hand-washable, and one of the most durable backpacks on the market.

8. Modoker Vintage Laptop Backpack with USB Charging Port

This is great for any college student. It can fit most laptops up to 15 inches with its slim design, making it perfect for many carrying cases during the day. With two front pockets, one of them with a built-in USB port, this backpack will make it easier for you to access your phone or tablet while on the go. 

This backpack has a roomy main compartment with a padded laptop sleeve and an internal organization panel. There is also a front pocket for your accessories, such as pens, calculators, tablets, phones, and more. This backpack also boasts spacious main compartments, two water bottle pockets, and two compact pockets.

9. Day Owl Backpack

If you want to live a sustainable life on campus, then the qualities of this backpack suit you well. While the bag looks trendy and small with its circular design, the interior of this backpack is very spacious and can hold your laptops, a few books, and other belongings. You can also send this backpack back for repairs to make it last longer.

Also, if you’re looking for an eco-friendly backpack that will suit all your outfits while carrying all your items in it, then you should consider this one. Since the bag is made with non-toxic materials and the company’s claim that every feature in the backpack has an environmental purpose is convincing, I’d say that there is no reason not to buy this for yourself or even friends who are into sustainable living.

10. Fjallraven Kanken Laptop Backpack

Fjallraven Kanken Laptop Backpack is a highly practical and stylish backpack. If you’re looking for a high-quality, durable backpack that does not look like a typical boring one, this should be your choice. In addition to its durability, the Fjallraven Kanken is also waterproof and highly functional.

It comes with a number of pockets and compartments inside and out, which means you can fit everything you need in the backpack, including assorted snacks for your college days. If you’re looking for something trendy but functional, this might be the best choice for you.

The Fjallraven Kanken comes in 17 colors inspired by nature, including acorn forest green and autumn leaf. The ergonomically designed padded shoulder straps also make a comfortable journey between classes.

11. Timbuk2 Spire Laptop Backpack

This is another great choice of student college backpacks. It’s designed to protect all your 15-inch laptops and tablets. With careful details like the Napoleon pocket that makes it easy to quickly access important items, rugged ballistic zips, and a scratch-resistant lining, this bag is just an example of what you can expect from Timbuk2 products.

If you’re going to school in a rainy city, this bag should be one of your options. It’s made out of canvas fabric and waterproof material, enabling it to keep your laptop dry. It also has a laptop compartment and a zip pocket that can hold your phone, wallet, and other small, significant items.

It has multiple storage spaces for pen holders, water bottles, and other school supplies on the inside. Apart from the laptop compartment, the main compartment can carry books, extra jackets, and other essentials. It has incognito back zip access and a secure pocket for valuable items. It also has comfortable straps which are adjustable and come with a sternum strap suitable for travelling.

12. Vera Bradley Signature Cotton Campus Backpack

Vera Bradley is a globally recognized brand with an extensive selection of luggage and backpacks. This backpack comes in 13 different designs, giving you a wide range of options to choose from depending on your style preferences. 

The bag has double carrying options, a short handle, and adjustable shoulder straps. It has a front pocket with a flap and an additional zipped pocket for your valuables. It also has three pen holders. In addition, it has no natural wool fiber, making it perfect for animal lovers.

13. JanSport Right Pack

The Right pack features the signature suede leather bottom, padded laptop sleeve, two front pockets, and a side water bottle pocket. This backpack is also made of durable Cordura fabric and comes with an organizer. The company is also committed to providing durable and reliable products offering you a lifetime guarantee.

If the bag breaks down, you can send it back, and the company will fix or replace it. Additionally, there are many colors and designs you can choose from. For example, you can display your personality in bright, floral, and evergreen tones.

14. Lululemon City Adventurer Backpack

This college student backpack is for you if you’re a sports enthusiast and want academic success and a fit body. It has enough room for your laptop and comes with an expandable pocket that could hold your gym clothes. It has a water repellent fabric and comes in different colors. 

The minimalist design of this college backpack makes it fit well in both class and at the gym. If you want to save time and money, this is the backpack for you.

15. Kenneth Cole Reaction Women’s Chelsea Backpack

If you’re looking for a feminine backpack with enough for all your school essentials, grab this Kenneth Cole Reaction backpack. It has enough room for your laptop and all the other things you need during class, plus it comes with an extra compartment where you can keep your sunglasses safe. It also has interior pockets where you can place your pens, phone and tablet.

Kenneth Cole Reaction Women's Chelsea Backpack
Image credit: https://qvc.scene7.com/

16. Herschel Dawson Backpack

Hershel backpacks are very popular. However, this one differs from other backpacks belonging to the same brand through its separate front pockets.

Herschel Dawson Backpack
Image credit: https://herschel.eu/

The pocket has a drawstring closure with foam padding for extra protection. Plus, the main compartment has a capacity of 20.5 liters and can hold laptops and notebooks effortlessly.

FAQs on Best Backpacks for College 2021

How do you choose college backpacks?

By the total capacity. It should be spacious enough to carry all your books, laptop, computer accessories, and toiletries.

How do you choose a durable backpack for college?

By its fabric and construction. Good backpacks are made of robust materials like leather and canvas to ensure long-lasting durability.

Final Thought on Best Backpacks for College of 2021

Being a student is already hard enough. Try to make it simple by choosing the right backpack. Remember that a good backpack shouldn’t only have trendy looks and enough space for your things. It will also contribute to your health, and a low-quality backpack can deform your spine and put you in tremendous pain.


The post 16 Best Backpacks for College of 2021 appeared first on Kitchen Infinity.

post

Things Not to Wear to a Funeral

Fashion is not always the top priority when someone you know passes away. However, putting on the wrong funeral attire can be a major concern. Figuring out what to wear to a funeral often comes down to the specifics of the service and the wishes of family members. 

What should you wear to a funeral? Funerals are somber occasions, which is why it’s important to dress appropriately. Therefore, funeral clothes should be conservative and not draw attention. This makes choosing clothes that you would wear for church or job interviews a safe bet.

Below are some things not to wear to a funeral. If you’re getting ready for the services of someone close to you, take note of these tips and make sure that your outfit doesn’t offend any family members or other attendees at the service.

Tips on How to Wear Funeral Clothes

Read the Obituary for Clues

Before worrying about what to wear and not wear to a funeral, consider what the family wants. Most families won’t specify what to wear, while others will request something specific in the obituary details. These family requests involve a break from the traditional funeral attire. 

Some people may want funeral guests to wear bright colors to make it look like a somber affair and more like a celebration of life. Others may suggest the favorite color of the deceased. It can also be a themed request such as superhero shirts to honor a child who has passed away. 

If a family requests something specific, make sure you follow those suggestions to give them great comfort during those tough times to see that funeral attendees are honoring those wishes.

Religious Customs

Religions have different customs when it comes to funeral attire. If this is a religious service, contact the funeral director to learn what kind of clothing is permissible for those in attendance. For example, in Asian cultures, the family wears white. Red should never be worn because it’s considered the color of happiness. Families also don’t wear jewels at the funeral service.

For Hindu funerals, the clothing is white, simple, and casual, and for Buddhist funerals, the family wears white while friends wear black. Knowing these cultural differences can help you choose appropriate clothing to avoid against the family’s wishes and stand out at the funeral service.

Funeral Attire Colors

Black is the traditional color when it comes to funeral clothing, especially in Western culture. Black is still the safe choice for funerals. However, you’re not limited to a dark color. Other dark colors like navy, gray, burgundy, and brown also work well.


Image credit: https://i.pinimg.com/

When choosing colors, consider the tone of the event because most funerals are somber events, which align well with a darker color. Wearing bright colors can make you look like you’re celebrating or you’re in a festive mood.

Location of the Service

When planning your outfit, consider the location of the funeral and visitation services. If it’s a church service, wear formal attire and try to be conservative. If it’s held at a casual location, your clothes can match the more laid-back environment.

Seasonal Considerations

The weather plays a big role in what you wear at a funeral. During summer, wear lightweight clothing while sticking to the guidelines. Keep clothing with muted colors without flashy designs. You want to stay cool but not wear shorts to a funeral. For men, wear lightweight slacks to stay comfortable and respectful.

Seasonal Considerations
Image credit: https://img.huffingtonpost.com/

To women, wear skirts or dresses to keep cool as long as they’re not too short. Your necklines shouldn’t dip down too far. Wear something with a sleeve and avoid spaghetti straps and if you wear a sleeveless dress, try to pair it with a lightweight cardigan. Dress pants and a jacket are now acceptable in funerals.

ccessories

It’s okay to wear accessories but keep them to a minimum. Avoid bold jewelry or carrying flashy purses. Consider how noisy your jewelry is because a stack of bracelets and noisy necklaces will be distracting during the funeral. Avoid flip-flops and tennis shoes because they’re too casual unless the funeral is a casual event. Women should avoid stilettos and flashy shoes. Dress shoes that can easily take you from a funeral home to a burial site.

The Formal of Funeral Clothes

How formal you go with your funeral dress decisions depends on the preferences of a family member and how formal the overall funeral is. Do not wear casual clothes like athletic wear. Too casual doesn’t show respect for the situation. Jeans are a gray area.

Some families may prefer a more laid-back celebration of life where jeans are acceptable. If you wear jeans, pair them with a nice blouse and a collared shirt.

Clothes to Avoid When Attending a Funeral

void Bright Colors

It’s not a time for bright colors and wild prints. Wear something subdued, avoid wearing white and black clothes because they look too formal. In addition to avoiding bright colors, steer clear of shiny fabrics. In many cases, attention-grabbing clothing can be positive, but that shouldn’t be the case in a funeral home.

Don’t Wear Sexy and Revealing Outfits

Funeral etiquette also dictates that you should avoid overly revealing attires. However, it’s not easy to tell where this type of clothing line is since what’s considered sexy can vary from one person to another. But if it’s too sexy for a professional job interview, it’s also sexy for a funeral. 

Sexy and revealing clothes you should avoid include very tight pants, high slits in dresses and skirts, sheer fabrics or mesh, very low-cut tops, and blouses, skirts that make it difficult to bend.

Skip the Casual Clothing and Athletic Wear

A funeral is about showing respect to someone who’s passed away and not a casual event. Proper funeral attire is similar to what you’d wear to a business event. Some of the casual clothing you shouldn’t wear unless it’s an exception from memorial services include sneakers, tennis shoes, flip flops, baseball caps, casual hats, yoga pants, tank tops, and t-shirts.

Others include sweatpants, joggers, hoodies, and jeans unless you know others will be wearing them. Wearing jeans could also be acceptable if paired with a collared shirt and a blazer.

void Controversial Shirts and Other Clothing

A funeral isn’t a place to reclaim your political and social views, even if the deceased person would agree with you. People at the funeral event are already distressed, so it’s not okay to bring up controversial topics at this time. Avoid clothing that might lead to such a situation. 

Controversial clothes to avoid at this point include political t-shirts and sweatshirts, caps, and hats with social and political messages. Others include clothing that promotes religion and a specific belief. Avoid shirts with slogans that may upset people.

void Glittery Items

Avoid glittery things such as sequins, flashy metallic fabrics, heavy cologne, and perfume. These elements can be distracting in a funeral event. In terms of footwear, choose a shoe that can easily take you from a funeral home to a place of worship to a burial site where you might be walking in grass or gravel.

Also, there isn’t really a dress code for visitation or calling hours since many people often attend straight from work and maybe wear whatever they had during the day.

FAQs about Things Not to Wear to a Funeral

Can you wear blue to the funeral?

Even though black is the traditional color to wear at a funeral, gray-blues are also great for this occasion.

Do you have to wear black to the funeral?

Black is the most traditional color when it comes to funeral clothing. It symbolizes death or mourning. The tradition of wearing black also dates back even further to the Roman Empire.

Final Thought about Things Not to Wear to a Funeral

You can never go wrong with funeral attire if you follow these guidelines. Dressing for a funeral doesn’t mean that you can’t be smart. You can still learn how to iron your clothes properly for the occasion and look your best. Just make sure your clothing doesn’t distract from the purpose of a funeral event.


The post Things Not to Wear to a Funeral appeared first on Kitchen Infinity.

Did you miss our previous article…
https://www.centrecountyfood.org/?p=535

post

IKEA Cabinet-Greenhouse Hacks

Space is at a premium in most apartments. You want to grow your food, but you don’t have the space for a full-sized greenhouse or even a small one. Well, with that limited space you have in your apartment, Ikea cabinet greenhouse hacks are the best way to go.

For plant enthusiasts, finding the perfect balance of creativity and plant displays is an art. Everyone loves it when plant parents show off their favorite tropical plants while creating a perfect environment for the plant. And that’s where the Ikea greenhouse cabinet hack comes in. 

Countless individuals have turned their IKEA cabinets into growing systems by adding home components like grow lights, fans, and special herbs. Here are some great ideas for transforming your IKEA cabinet into a greenhouse:

Features of the Ikea Greenhouse Cabinet

Robin Schouten, the founder of a popular Instagram page @Ikeagreenhouse cabinet, states that the Ikea cabinet greenhouse features IKEA cabinets that were converted into greenhouses for tropical plants. 


Image credit: https://www.thespruce.com/

Schouten, the founder of an Instagram account called Ikea greenhouse cabinet, was looking for a glass greenhouse for her humidity-loving plants and found people using these Ikea DIY ideas. In this trending DIY hack, plant parents transformed glass Ikea cabinets into indoor greenhouses, making it ideal for plant enthusiasts to deal with their limited space. 

It’s fairly easy, and all you need is a glass cabinet, grow lights, a small fan, and a humidifier. These Ikea greenhouse cabinets are versatile and can be cheap and simple or expensive and complex as you want. It all depends on your budget, DIY skills, commitments, and the type of plants you want to keep inside them.

cquire Ikea Glass Cabinet Choices for Greenhouse Hacking

Ikea offers a lot of glass cabinets that you can transform into a greenhouse. These include the detolf, fabrikor, milsbo and rudsta. These Ikea glass cabinet hacks are available in different colors and sizes. Make sure you find one that suits you.

Install Grow Light

You can install fluorescent grow lights and a simple timer to keep your houseplants alive. Fluorescent tubes are cheaper, relatively cool, and very easy to set up. You can also use LED grow lights that are more expensive but last longer. They are very efficient compared to normal light bulbs. A fan is also necessary because it helps circulate air inside the cabinet.

Perfect the Air Environment

You can grow any plant you want in your greenhouse, but these plants are helpful for tropical plants which require high humidity. In this case, add a small humidifier and tray filled with water. Include mini fans to help with air circulation and prevent mold from growing. You can also monitor the climate by keeping a temperature and humidity gauge on one of the shelves.

Customize Your Liking

You can customize your greenhouse. There are shelves, hooks, and baskets that you can glue to fit your needs. You can also use Ikea cabinet doors or covers to make sure all of your plants do not go directly on the wall or floor of the cabinet. This is an awesome way to reuse old cabinets. 

This greenhouse will help produce healthy plants, vegetables, and food for your family. Some people add pegboards, fern wood panels, and a wire rack to the back of the cabinet to clip stems and vines as plants grow. Others like adding heat mats, weather stripping, and replacing glass shelves with wire or acrylic ones.

All of these are not necessary. Beyond the main function of houseplants, indoor greenhouses are meant to please the eyes, so arrange the plants as you wish and keep monitoring their conditions to ensure their success.

Ikea Greenhouse Cabinets

Robin Schouten’s Fabrikor and Milsbo Greenhouse Setup

Robin Schouten’s greenhouse setup is pretty simple. A 3-tier Fabrikor shelving unit was attached to the wall, then a Milsbo cabinet just below it, followed by smaller plants on the top shelf. Two mini fans were used to increase airflow, and she uses grow lights in an area that doesn’t get much light. This would be perfect for growing strawberries or other vines that need support to hold them up.

Robin Schouten's Fabrikor and Milsbo Greenhouse Setup
Image credit: https://i.pinimg.com/

Vancouver Collector’s Milsbo Cabinet DIY Greenhouse

The plants inside this setup include basil plants and fig trees, both taking advantage of growing on top of cupboards that have fluorescent lighting that can be turned on at any given time. The Milsbo is retrofitted with wire shelves to allow better airflow than the glass shelves it comes with. 

A Vancouver Collector's Milsbo Cabinet DIY Greenhouse
Image credit: https://i.insider.com/

There are also three grow light panels, weather stripping, a small fan for air circulation, and a water tray to boost humidity. There is a hygrometer to monitor the temperature and humidity.

Gorgeous DIY Terrarium from an IKEA Fabrikor Cabinet

There are a few steps involved in the process of building one of these units. One of the most important is to find an existing cabinet with a backlight that you can remove or buy a Fabrikor piece that allows for this feature.

This unit gets air from a small computer fan that blows into it from the back, and there is a removable water tray for easy watering of the plants. It’s sealed and waterproofed by installing fiberglass at the bottom so that it can open and close.

3 Cabinets for a Huge Aroid Collection

The owner of this house has a nice IKEA Fabrikor unit that he mounted to the wall to store his impressive colocasia and yucca collection. As you can see, it also houses some other plants, like an interesting-looking cactus.

3 Cabinets for a Huge Aroid Collection
Image credit: https://live.staticflickr.com/

The interior is filled with soil, and drainage holes were added to make it easy to keep plants alive. It’s a cheap but interesting approach to home plant storage.

FAQs about Ikea Cabinet Greenhouse Hacks

What can you grow in your greenhouse cabinets?

You can grow anything in your greenhouse Ikea, ranging from succulents, vegetables, and cacti.

Can you use perlite instead of a humidity tray?

Yes, this is an alternative way to increase air moisture for the benefit of your housing plants.

Final Thought about Ikea Cabinet Greenhouse Hacks

Well, that’s all about Ikeas cabinet greenhouse hacks. So, pick one according to your budget, DIY skills, and plant requirements to enjoy your indoor greenhouse.


The post IKEA Cabinet-Greenhouse Hacks appeared first on Kitchen Infinity.

post

What are Faucet Aerators and Why You Should Install Them

As a homeowner, you should constantly look for ways to improve your home functions. Home renovation helps you conserve water and energy, improve user experience and help you save money in the long run. One thing that often gets overlooked is faucet aerators. 

Faucet aerators reduce the pressure at which water comes out of a faucet by reducing the flow rate. This reduces the amount of water used per action and brings down your monthly water bill. The truth is that there are many reasons why installing an aerator can be beneficial to your home, regardless of whether you live alone or with family members. Keep reading.

What is a Faucet Aerator?

A faucet aerator is a round device installed on the ends of faucets that channel water into steady steam. But without a faucet aerator, your faucet will still deliver water, but the stream will splutter and splash. A faucet aerator helps to reduce splashing and spluttering because it uses a small channel to introduce water from the faucet into a larger channel, creating a steady stream.

The result is that your dishes and laundry will be cleaner, and you can also save water. In addition, an aerator is a small screen that breaks up the flow of water into multiple small streams, adding air in between. Today, a faucet aerator is very common in all kitchen and bathroom faucets.

By diluting the water stream with air, the aerator significantly reduces the volume of water flowing from your faucet. The aerator does this while maintaining the feeling of a high-pressure flow.  Aerators also reduce splashing in sinks.

Choosing Faucet Aerators

Daniel O’Brian, a technical specialist with SupplyHouse.com, says that different faucet aerators are designed to enforce different flow rates. Here are what you should consider before installing a faucet aerator

Consider the Flow Rate When Installing an Aerator

You might be tempted to choose an aerator with the lowest flow rate to maximize savings. You should also remember that you’ll rely on certain gallons per minute GPM minimums on activities such as washing the dishes. However, O’Brian suggests choosing an aerator with a flow rate between 1 and 1.5 gallons per minute GPM is a good compromise between conservation and practicality. 

To wrap it up, there’s no rule here, so your personal preference and use cases will dictate what GPM you should choose. For the most part, it’s considered to install an aerator with a flow rate of 1.5 gallons per minute GPM if you want to conserve water while maintaining functionality.

erators Come in Different Sizes

Apart from knowing how many GPMs you require, you should also know the size of the aerator you’ll need. Faucets come in different shapes and sizes, and aerators come in three different varieties. These varieties include standard, junior and Tom thumb.


Image credit: https://upgradedhome.com/

Other than the diameter, you also have to know if your faucet has a male or female spout. You’ll be able to identify this by locating the sprout’s threads, which are grooves found at the end of the spout. If the threads are outside, then it has a male spout and requires a female aerator. If the threads are inside, then it’s a female spout and requires a male aerator.

erators Provide Different Water Streams

You’ll also want to consider what kind of water stream you would like your aerator to provide. There are three different stream designs to choose from. These include the aerated stream, which is the most common in households.

In the aerated stream, the air is introduced to the water flow, causing the water to come out in even. There is also a laminar stream where the air isn’t mixed with water. The laminar stream also differs from the aerated stream by offering more gallons per minute GPM. The last one is spray stream, where faucets require very few GPMs.

Benefits of Faucet Aerators

Decreased Faucet Noise

Also, by installing a faucet aerator, you will end up having a decreased flow rate without actually needing to cut your water pressure. The water stream that comes out of the faucet is frizzy and mist-like. This makes it much quieter than the concentrated streams.

Decreased Faucet Noise
Image credit: https://kitcheneminence.com/

As mentioned above, water flow can be reduced by up to 35 percent. This is a great benefit as the faucet remains to deliver adequate water without causing any inconvenience or discomfort.

Lower Water Bills

As you save more water, your water bills will also get lowered. Though this might not be noticeable in the short term, it is great to note that the faucet aerator can help you lessen your water expenditure over time.

According to the Environmental Protection Agency, installing a faucet aerator is the single most effective water-saving plumbing change you can make. This is true because you’ll use less water when you use an aerator to accomplish the same task.

More Consistent Water Pressure

A mesh screen allows the water pressure to be more consistent. It also slows the flow of water, making it possible for you to use less water and still achieve the same task. Instead of experiencing pressure changes right away as they happen, the steam will stay steady due to water caught behind the aerator. 

Reduced Overall Water Use

Reducing the flow rate of water may cause some people to feel like they need to use more water to get the job done. However, experts say that using an aerator will not cause you to increase your overall water usage. 

They claim that it is possible for you to reduce your total amount of daily and total monthly water usage. Apart from reducing water consumption at home, installing an aerator means less water usage, thus, reducing your home’s impact on the local and global environment.

Increased Filtration

With a faucet aerator, drinking water is filtered as it comes out of the tap. By using a filter, you can ensure that water used for drinking is free from toxic chemicals and metals. This reduces the overall amount of money spent on bottled water which would have been required if no aerator was installed.

The small screens increase the particle filtration for an individual faucet. A high-quality aerator works with a filtration system to keep your water clean and clearer. Ensure that if you have dirt and debris problems, you deal with them by regularly cleaning your aerator to prevent buildup.

FAQs on Faucet Aerators

How do faucet aerators work?

Faucet aerators work by getting air mixed into the flow, reducing the amount of water passing through the tap.

Final Thought on Faucet Aerators

That’s all about faucet aerators! Make sure you clean your faucet regularly to keep it as clean as possible. Do not forget to use a filter if you need it to keep your water pure and clear.


The post What are Faucet Aerators and Why You Should Install Them appeared first on Kitchen Infinity.

post

13 Best Aqua Paint Colors for Your Home

We all know that interior design is a crucial part of home decor, but it can be hard to decide on the right paint colors. There are so many options out there, and you might find yourself overwhelmed with choice. You may also lack inspiration when trying to pick the perfect color for your walls or furniture. 

Try out these bright, cheerful, muted, and relaxing aqua paint colors. Aqua paint colors are a hot choice right now and work perfectly in homes with modern, contemporary, or even rustic decor. Aquatic paint colors provide fresh feelings and look incredibly stylish. 

This blog post will help you choose from the best aqua paint colors for your home. Each option has its personality and style, which makes it unique in its way. Read on!

1. Sherwin Williams Sea Salt

This shade of aqua is the most popular option right now, with its freshness and brightness. It can be used on walls or furniture to provide a contemporary feel to your interior design. It looks great paired with browns, blacks, greys, and whites.

If you’re looking for the best light aqua paint, Sherwin Williams sea salt is the right choice. With its rich colored accents, the green undertones in this light aqua paint shine through. Sea salt aqua paint color is perfect for any room, including bedroom, living spaces, and kitchens.

2. Benjamin Moore Jamaican Aqua

Jamaican Aqua paint color is one of the most popular aqua colors right now. With rich, bright blue undertones, this green aqua color will brighten up your living space instantly. Jamaican Aqua looks great when paired with white accent pieces and fabrics. This is a truly saturated color. 


Image credit: https://st.hzcdn.com/

This shade of greenish aqua is the best choice for painting kitchen cabinets hardware, furniture, and the front door. Jamaican aqua is balanced perfectly between blue and green. Despite being vibrant and striking, Benjamin Moore Jamaican aqua is also relaxing and tranquil. It’s a good choice for bathrooms and cheery laundry. Plus, it’s the perfect blend of green and blue.

3. Sherwin Williams Comfort Gray

Comfort gray paint is one of the best aquamarine colors. This aqua paint color is made up of a gray undertone, making it the perfect shade for any room in your home. This aqua color is not too dark or heavy but also not too bright and vibrant. What makes this shade so unique are its warm gray undertones that make the aqua pop.

4. Behr Marina Isle

If you’re looking for the best dusty aqua paint colors, you’ve just found it. This color is perfect for a bathroom or laundry room to create a relaxing and restorative atmosphere. The best part about this shade is its ability to make the entire room feel more spacious, thanks to its blue-green undertones. 

Behr Marina Isle
Image credit: https://www.behr.com/

This aqua paint pairs well with other muted tones such as beige and olive green. It works well in both large and small living rooms. Make sure you pick the bolder green accents to make this aqua hue pop.

5. Sherwin Williams Aquatint

A soft, light blue aqua paint color that makes your home feel clean and calm. This shade is perfect for a powder room, mudrooms, or even an accent wall behind the bed. This sea foam green shade would be beautiful in a guest room or master bedroom where you want to create a relaxing retreat space.

Pair it with white woodwork and a white tile shower for a crisp feeling. Sherwin Williams Aquatint is a versatile blue-based aqua suited for nurseries because of its cheerful nature. Light wood and crisp white trim would be perfect with aquatint for a contemporary bathroom and master bedroom.

6. Glidden Deepest Aqua

If you’re not afraid of trying deep bold colors, glidden deepest aqua is the right choice. This color is an excellent choice for almost every room. This rich, mermaid-inspired aqua is perfect for a playroom and an accent wall. Plus, it can pair well with other bright colors such as coral and pink.

7. Sherwin Williams Waterscape

Sherwin Williams’s waterscape is a soothing gray-aqua that is perfect for any living space. This color would be great in the bedroom or bath, because of its calm and serene nature. Adding watery blue curtains or an aqua rug could enhance this shade to tie the room together. 

This refreshing aqua paint color works perfectly well in the home office and a kid’s bedroom. It is a great color for any room you want to add some youthful energy and calming feeling to it at the same time.

8. Benjamin Moore Palladian Blue

Palladian blue is a soft, muted aqua with blue undertones that works beautifully in airy, sunny living spaces and bathrooms. If you’re looking for a perfect blend of gray and blue with a calming effect, Palladian blue is your perfect combination.

Benjamin Moore Palladian Blue
Image credit: https://i.pinimg.com/

 Add some little pigment to that small space using these aqua paint colors from Benjamin Moore. This soft aqua can add a little personality without becoming too intense.

9. Sherwin Williams Interesting Aqua

Sherwin Williams Interesting Aqua is bright with a little green in it. It’s like a bright teal and can be the perfect paint color for your kid’s room. It gives an impression of water, which makes it calm and soothing.

With its gray and green undertones, this unique aqua shade is a great choice of color for entryways, kitchen cabinets, and bedrooms. Interesting aqua adds the perfect dose of color without feeling juvenile and outdated.

10. Valspar Beach Blanket

Valspar Beach Blanket has gray and blue undertones, which means it is soothing like water and calming like the ocean. It’s probably not the best choice for your kid’s rooms, although you might want to try it, it can be great in bathrooms since they are usually small spaces that need something light and calm. 

If you love green and beach-inspired vibe that much, then this aqua hue is a great choice. It’s a warmer aqua than others, making it a great paint to pair with neutral beiges and yellows.

11. Sherwin Williams Tame Teal

Sherwin Williams Tame Teal is one of the many sophisticated hues that come in this shade family. It has brownish undertones, which means it’s calming and cozy like the ocean at sunset. When paired with lighter tones, painting your bedroom and office space makes your room feel modern and updated. 

Sherwin Williams Tame Teal
Image credit: https://i.pinimg.com/

Make a modern, contemporary girls’ room with a feature wall painted in tame teal and decorated with golden circles. This beautiful green, blue aqua paint looks excellent in the front door, kitchen cabinets, and tray ceiling as well.

12. Benjamin Moore Quiet Moments

Quiet moments from Benjamin Moore is an aqua paint color that leans more toward the green side of things with a good bit of gray undertone to it. If you’re looking for aqua paint colors to incorporate in your kitchen and dining room, Benjamin Moore quiet moment is one of those aqua paint colors you should never let go of.

13. Benjamin Moore Caribbean Breeze

Benjamin Moore Caribbean Breeze is a cool aqua hue. It’s a romantic color paired with warm colors like oranges and yellows to create a fun girls’ room painting. This soft aqua is also a wonderful choice for a space that has less than ample natural light. With its inner glow, the Caribbean breeze can light up a room regardless of its size.

FAQs on Ten Best Aqua Paint Colors for Your Home

Is aqua warm or cool?

Aqua is a color that lies somewhere in the middle of the spectrum. It’s best to think of aqua as its category and not associate it with any particular warm or cool family.

Is aqua paint easy to work with?

Yes, aqua paint is easy to work with as long as you know how to pick the right paint for your space. It’s important to realize that just because a trending color doesn’t mean it will work in every room. Aqua requires a cool or neutral backdrop so it can shine as its statement.

Final Thought on Best Aqua Paint Colors for Your Home

As you can see, aqua paint colors are trending big time. And their popularity is well deserved. Aqua paints are lively, calming, and refreshing all at the same time. Plus, they go with just about any color palette you can think of, so there’s no shortage of options when it comes to decorating with aqua hues. So, if you’re struggling to choose paint colors, aqua paint is for you.


The post 13 Best Aqua Paint Colors for Your Home appeared first on Kitchen Infinity.