post

6 Best Dumpster Rental Companies

You know that a clean home is the key to happiness. However, you also know that cleaning your home can be quite difficult as there are so many things to do. It doesn’t matter if you have just moved into a new apartment or are looking forward to hosting a party in your house, it’s always good and important to keep everything nice and clean.

There are also times that a standard trash removal routine can’t leave your compound sparkling clean. This is where dumpster rental services come in. Dumpster rental services provide waste containers for rent in different sizes and shapes. You only need to identify the size of the dumpster that can accommodate the volume of waste you have and contact a dumpster rental company. So, what are the best dumpster rental companies? Keep reading!

Factors to Consider When Looking for a Dumpster Rental Company

When looking for the best dumpster rental service, it is important to factor in certain things. Here are some of them:

Consider the cost of service: Different companies charge differently depending on factors like location and duration of renting their services among other things so do not be afraid to compare prices before selecting one provider over another one.The level of expertise that a company has in waste management: This is an important consideration because you want to make sure that the waste you produce is disposed of in the most environmentally responsible way possible. Some companies are better equipped than others to handle this kind of responsibility so it is important to ask about their capabilities before signing on.

Here are some of the best dumpster rental companies to consider.

1. Waste Management

Waste Management is the overall best dumpster rental founded in 1968 Texas. It operates hundreds of waste transfer stations, recycling plants, landfills and offers residential waste and recycling pickups to many homes in the United States. For its roll-off dumpster rentals, bin sizes range from 20 to 40 yards long.


Image credit: https://live.staticflickr.com/

In addition to residential trash and recycling pickup, Waste Management customers can rent dumpsters for construction debris, trash, furniture, and flooring. The cost of these rentals depends on location, dumpster size, waste type, and the length of the rental. Their prospective customers can use the WM website to quote and reserve a rental.

In addition to dumpsters, Waste Management also offers Bagster bags for projects that are too big for normal trash pickup but don’t warrant a dumpster. The company is also committed to handling waste responsibly by using only certified waste disposal facilities and getting several awards for its environmental responsibility. This makes the customers rest easy from their booking time to the time the trash is hauled away.

Pros of Waste Management

Offers roll off residential construction and commercial dumpstersOffers 24/7 online management to customersBagster bags offer a more manageable solution to small projects

Cons of Waste Management

They’re a bit expensive than their counterparts

2. Republic Services

As of 1981, Republic Services is the second-largest waste management company in the world. As one of the best dumpster rental companies, they have a large selection of dumpsters for all types of construction projects as well as customized solutions to meet specific customer needs. They serve both business and residential customers.

Republic Services
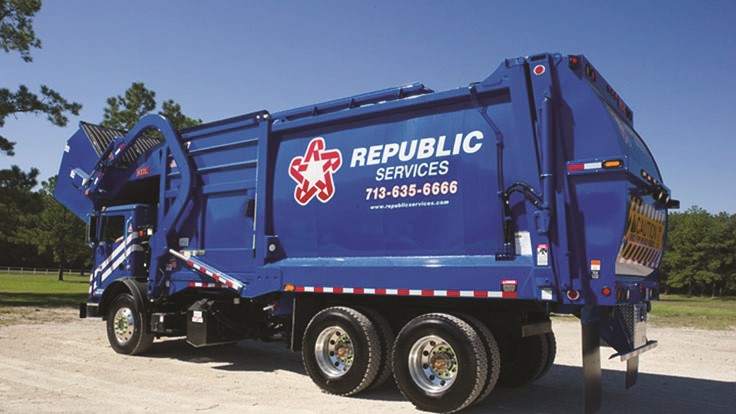
Image credit: http://giecdn.azureedge.net/

For dumpster rentals, Republic offers immediate, transparent pricing by using three factors to determine the cost of the job. These factors include the size of the dumpster, the weight of the material you plan to dispose of, and the distance between the dumpster location and the nearest waste disposal facility. They offer customers full-service yard debris haul-away services to further simplify your next landscaping project.

The prices vary based on location, dumpster size, and materials. So, before booking ensure the bin size is right for your project. As of May 2021, the rental cost of a 10  or 20-yard dumpster in Orlando starts at about $588 and goes up to roughly $592 for a 30-yard dumpster. The quotes include up to nine business days.

Customers also pay around $9 per additional day and $58 per additional tone five tons. Apart from renting Republic’s dumpsters for yard waste, you can also hire its team to haul away grass clippings, leaves, tree branches, and other yard debris after a storm. The company also offers sharps disposal, appliance recycling, household hazardous waste, and electronic recycling.

Pros of Republic Services

Quotes and reservations can be made onlineTheir pricing is transparent and rental periods can be customizedThey also offer yard debris haul-away services

Cons of Republic Services

The available dumpster sizes may vary in location

3. Junk King

Junk King offers a range of junk removal and dumpster rental services. The company works with non-hazardous items, such as household items, furniture, and appliances, but does not take hazardous waste or demolition materials. Similar to Waste Management, Junk King offers several container sizes that can be customized depending on your needs.

While many of the companies listed here offer residential services, Junk King stands out because of the company’s 12-yard MINI dumpsters. Rentals are available for three, five, and seven-day periods and Junk King picks up the dumpster when the rental cycle is complete.

Additional days start at a price of roughly $30 per day for three days. Renters may also encounter extra fees if they exceed 2,000 pounds. That’s if the bedload exceeds four cubic yards and if they dispose of items such as tires and mattresses. Apart from offering convenience and transparent pricing to its clients, Junk removal is also known for its sustainable practices.

Pros of Junk King

Customers only pay for the space they use and not the entire dumpsterOffers junk hauling services, including furniture removal and e-waste recyclingIts eco-friendly mission is dedicated to increasing recycling and reducing waste

Cons of Junk King

Only offers one dumpster size that may be small for large projects

4. Dumpsters. Com

If you’re looking for a cost-effective dumpster rental service, then Dumpsters.com may be a good option for you. The company offers small to large dumpster sizes that come in different dimensions as well as affordability to suit your budget needs.

Operating across the entire US, the company provides its clients with transparent pricing and no hidden fees. In addition, it also has an online calculator which makes it easy to estimate the cost of your rental. Dumpsters.com connects individuals and business owners with dumpster rentals.

In addition to assisting customers with standard residential and commercial dumpster rentals, the company also specializes in waste management for events. They can accommodate all event sizes, including single events, multiple events, and recurring events.

It also offers permanent dumpster rentals for businesses and organizations planning to hold multiple events in the same location. Customers can get the best price range through the Dumpsters.Com website, though you’ll have to call for a quote that’s tailored to your needs.

Pros of Dumpsters.com

Permanent dumpster rentals available for recurring eventsOffers rentals for a single event, bi-monthly and weekly eventsTheir website provides insights into the size dumpster you’ll need for various events

Cons of Dumpsters.com

Only local prices ranges are available online

5. Bin There Dump That

Bin There Dump That offers dumpster rentals to residential customers and businesses in the United States. It boasts of having dumpsters that are available the same day, though additional fees will apply for this service. Costs differ based on your location.

While it’s a national chain, each outlet is locally owned and operated. It’s more committed to homes than businesses which allow it to focus on respecting the needs of neighbors and homeowners associations. Bin There Dump That also builds speed into its business model.

It carries extra inventory specifically for last-minute orders, so once you request a dumpster, it can be delivered within 24 hours. And if you’re not sure of the size, you can request a call and the experts will walk you through booking the right service according to your needs.

If you’re looking for a hassle-free dumpster rental experience that won’t break the bank, Bin There Dump That is a great option. With its focus on customer service and quick turnaround times, you can be sure your project will be off to a smooth start. Plus, with a wide range of dumpster sizes to choose from, you’re sure to find the perfect option for your needs.

Pros of Bin There Dump That

Offers local, national, and international servicesAble to provide same-day dumpster rental servicesConsidered one of the most affordable dumpster rental companies

Cons of Bin There Dump That

Only offers a limited number of dumpster sizes

6. Redbox+

As the only dumpster rental with a built-in toilet, this dumpster stands out for construction and demolition projects. It specializes in combining portable toilets and dumpster roll-off containers. Securing this dumpster combination is as easy as a phone call.

All you need to do is to tell its team the size you’re looking for, when you need the dumpster delivered and where to drop it off. It will offer a quote immediately and the delivery was done within 24 hours. The company can also service your restroom and dumpster separately as needed, especially if you require their facilities for a long duration.

Redbox+ also consolidates two common needs on many construction sites, making it a great choice for home builders, contractors, and anyone looking to take on a major project.

Pros of Redbox+

Offers standard dumpsters and combination portable toilets and roll-off dumpsters10-yard mini dumpsters are perfect for smaller residential projectsWorks for residential waste, construction and demolition debris, roofing materials, yard waste, and commercial waste

Cons of Redbox+

Limited location, unlike other providers

FAQs about Best Dumpster Rental Companies

What is a dumpster rental company?

This is a company offering temporary waste disposal containers, usually in the form of a dumpster, for rent.

What is the average cost of a dumpster rental?

Prices vary depending on the size and type of container you require, as well as the length of time you need it for.

Who should use a rental dumpster?

Any homeowner carrying out home remodeling projects, cleaning large areas such as the garage and basement, and engaging in large-scale tree trimming and landscaping work should rent a dumpster.

Final Thought about best Dumpster Rental Companies

With many dumpster rentals available, it can be hard to narrow your choice and choose one. But, whatever you do you should do with a clear conscience, knowing the dumpster rental company has taken care of your trash responsibly and has taken all necessary safety measures when handling it. After all, it’s not just garbage-it’s someone else’s livelihood.


The post 6 Best Dumpster Rental Companies appeared first on Kitchen Infinity.

Did you miss our previous article…
https://www.centrecountyfood.org/?p=623

post

How to Propose: Marriage Proposal Dos and Donts

If you’re like most people, the thought of proposing marriage to your partner can be pretty scary. Will they say yes? What if I mess up? How do I even propose? The truth is that wedding proposals can be one of the most exciting things in life and one of the scariest. There are a few things you’ll have to avoid to make it work.

If you’ve been thinking about popping the question, make sure you follow these dos and don’ts for a special proposal experience. This guide covers everything from what kind of ring to buy, where you should go on a proposal trip, and how much money you should spend on an engagement ring. Let’s get started!

Dos of Marriage Proposal

Make Sure You’re on the Same Page

Before you pop the question, make sure you and your partner are on the same page about getting married. Marriage is a big commitment, and it’s important to be sure that both of you are ready for it. Talk to your partner about the future and let them know that you’d like to get married one day and ask if they see marriage in the future.

If you feel nervous about making this conversation look like a proposal, try to keep [it broad by discussing your best friend’s recent engagement. Yes, it’s a hard discussion, but hopefully, you’ll come out of it with an idea of what your partner will say when you open the ring box.

Buy the Bauble

There is no need to go overboard when picking out an engagement ring. Keep in mind your partner’s taste and stick with a style that you know they’ll love. Diamonds are always a safe bet, but if your partner isn’t into bling, there are plenty of other gems to choose from.


Image credit: https://static01.nyt.com/

The engagement ring is a piece of jewelry that your fiancé to be will wear every day for the rest of their lives. So, snap photos of the jewelry they wear daily. You can take a peek at their Pinterest Boards, ask a family friend or a family member to help you narrow it down.

After that, find the ring size and if possible, go ahead and ask. If you’re going the surprise route, make sure you check your partner’s jewelry.

Store Your Engagement Ring

Nothing ruins spontaneity faster than your partner seeing the bulge of a ring box from your pocket. In that case, keep the ring box safe and concealed up until the big moment by choosing pants and jackets with deep pockets with no holes.

Engagement Ring
Image credit: https://www.diamondwish.com/

Propose for Your Partner and Not to Him or Her

The traditional phrase is to propose to your significant other. However, if you think of it more as proposing for them, you’re more likely to plan a true dream proposal. Think of your love’s favorite and incorporate those in your proposal.

Plan for a Celebration

No matter how your partner says yes, you’re going to want to celebrate. Whether that means booking a table at your favorite restaurant or planning a weekend away, make sure you have something special lined up to mark the occasion. You don’t need to plan a full-on engagement party but ensure the two of you will celebrate the best moment.

Plan for a Celebration
Image credit: https://upload.wikimedia.org/

Get Personal

Now that you have a ring plan for the proposal. Think about the type of proposal your partner will love, whether it’s a grand gesture, an intimate moment, or a surprise surrounded by family and friends. Make sure you find a cool place that will easily glamorize the set mood. If it’s your cozy living room, deck it out with tons of candles to change the feel of the space. Learn how to decorate a room as you prepare for the big moment.

Chat with Their Parents

If your partner’s parents are still alive, notify them of your intentions before popping the question. You don’t need their approval, but it’s a respectful thing to do and can make for an even more special moment when they’re present to witness the marriage proposal.

Have a Backup Plan

If your partner says no, you don’t want the evening to be a total bust. Have a plan B ready to go that will still make for an unforgettable night. As you brainstorm for your backup plan, choose a few indoor spaces like her favorite museum or the place where you had your first date and in your back pocket should Mother Nature prove uncooperative. In addition, know what to do in case of traffic or if she arrives later or earlier than expected.

Do Make it Meaningful

This is the time you need to get sentimental. Think about the noteworthy moments in your relationship. Take your sweetheart to where you first met, kissed, and said I love you. You can share your favorite restaurant, view, stroll, book, and movie. Be creative with these details to make a special day even more so.

Donts of Marriage Proposal

Don’t Propose When Your Partner is Preoccupied

Proposing marriage is a big deal and should not be done when your partner is preoccupied with something else. If she’s in the middle of a work crisis, for example, propose after the situation has been resolved. Even if you’re eager to get down on one knee, you can’t do it if your partner isn’t in high spirits.

Don’t Tell Everyone

It’s okay to tell your family and friends but not everyone, but it shouldn’t be announced on social media. Avoid giving away the surprise by telling everyone you are planning a big day out with her. Your wedding proposal should remain a surprise. Hold off on sharing the news with absolutely everyone.

Don’t Do Without a Ring

You don’t have to spend a fortune on an engagement ring, but it should be something special. A wedding proposal without an engagement is a huge no. It might seem silly, but without a ring, the engagement might not feel real.

Don’t Rush

Make sure you’re ready to get married before you propose, or there will be regrets later on. You don’t want to regret taking that step, either because her answer wasn’t what you hoped for or it was too fast, and you weren’t ready yet. If you’re not ready and still on the fence, wait a little longer before getting down on one knee.

Don’t Propose in Front of an Audience

A private proposal is better unless she’s someone who doesn’t mind being the center of attention. If you’re planning on getting down on one knee in front of her family or friends, make sure everyone is invited.

Don't Propose in Front of an Audience
Image credit: https://thetempest.co/

Don’t be a Copycat

You can make your long-awaited run as smoothly as possible, but that doesn’t mean you have to copy your proposal planner, that’s not the best idea. Try to personalize your marriage proposal and plan it with your partner in mind. Don’t model to match someone else’s great idea.

Don’t Be Too Much of a Daredevil

Don’t do anything that might put you or the person you are proposing to in harm’s way. Proposals at a baseball game or theme park are cute ideas but take into account where you’ll be and what could happen if things go wrong. When choosing a place for your marriage proposal, stick to dry land and try not to do it on a blustery day, so your bling stays firmly in its box.

Don’t Wing it

While you don’t have to know exactly what you’ll say when you pop the question, make sure you have a plan. Do a little drafting to make sure you’re confident when the time comes. This will make you deliver a romantic speech.

Final Thought about Marriage Proposal Dos and Donts

There you go, marriage proposals dos and don’ts. Make yours memorable by doing something you know your partner will love. Don’t do anything too extravagant or unconventional, but make it yours and not a carbon copy of any other proposal she’s ever seen. The most important thing is to take a deep breath and go for it.


The post How to Propose: Marriage Proposal Dos and Donts appeared first on Kitchen Infinity.

Did you miss our previous article…
https://www.centrecountyfood.org/?p=612

post

19 Best Early Spring Flowers

Are you looking for flowers to add to your garden during the spring period? Well, early spring flowers are not only beautiful, but they also come in a wide variety of colors, shapes, and sizes. That makes it more difficult to choose which type you like the most. 

To make things easier for you, we decided to put together a list of some of the best early spring flowers currently available on today’s market. These spring-blooming flowers can turn your early spring garden into a beautiful scene. Let’s have a look.

1. Creeping Phlox

Also known as moss phlox, this eye-catching spring flower is easy to care for. It forms a colorful carpet of tiny flowers that often spills across the lawns and pours over rock walls. When this creeping variety bursts into bloom in March, it forms a cascading spread of little early blooming flowers, making it a great plant for rock gardens, slopes, and flower bed borders.


Image credit: https://www.thespruce.com/

Grow it in full sun to part shade and trim it back after it blooms. Also, ensure you manage weeds growing in your phlox early in the season so that your plants don’t compete with them.

2. Bloodroot 

Bloodroot is a spring-flowering perennial with unassuming little flowers that form in flower clusters near the ground. This easy-to-grow plant forms rosettes of leaves and an 8″ tall flower stalk in early spring. The top of the main blooming stem has small, white blooms that open just when the leaves have unfurled.

Bloodroot 
Image credit: https://www.gardeningknowhow.com/

It’s more of a ground cover than a bedding plant with white flowers that can easily brighten a shade and woodland garden. Unlike other ground covers, bloodroot isn’t invasive and aggressive. It does well in full sun to part shade and requires well drained and acidic soil.

Plus, it requires minimal maintenance, but ensure you keep it away from children and pets because it’s highly toxic. When you see these late summer blooming flowers, know that warmer weather is on the way.

3. Bleeding Heart

A bleeding heart is a plant that blooms in spring. It can be planted in flower beds, garden borders but also in containers. It adds a unique touch to the surroundings with its white flowers of dark green leaves.

Bleeding Heart
Image credit: https://www.gardendesign.com/

 As the blooms fade, days lengthen, and the temperature warms, this plant goes dormant, and the feeding foliage disappears until next spring, which is the natural habit of spring ephemeral. But that shouldn’t stop you from adding this flowering plant to your garden.

Plant them near late-emerging plants that will fill in the void. The color varieties include pink, red, and white, and it does well in partial shade, moist, and well-drained soil. The blooms of the bleeding heart look like cheery little heart shaped charms dangling down the length of each branch.

4. Hellebore or Lenten Rose

Hellebore’s cup shaped blossoms are a welcome sight after a long winter. This Easter treat springs out of the ground as early as February in moderate winter climates. Its flowers range from white to pink to rosy purple, plus, these flowers last a few months.

Don’t worry if the snow arrives because these flowers can tolerate dusting. Plant them in groups under backyard trees and shrubs since they thrive in partial shade. It’s easy to grow and one of the first flowers to emerge in late winter and early spring.

5. Winter Heath

The Winter Heath blooms from late spring to early summer. Its purple-pink flowers may eventually age into yellow shades at the end of summer. It grows in 6 to 9-inch mounds and creates a dense ground cover over time. It prefers soil that’s acidic, well-drained, and it’s more tolerant than other heaths. It has urn-shaped flowers poking through the snow, which looks delightful. It will begin blooming in January and continue until spring arrives in March.

Winter Heath
Image credit: https://i.pinimg.com/

6. Winter Aconite

It is a perennial plant in the buttercup family Ranunculaceae, native to western and central Europe, northwestern Africa, and southwest Asia. Its early flowers show it’s an ideal winter color for gardeners looking to capture the crisp feel of early spring. The Winter Aconite flowers from January until July, with its purple-pink flowers that are small but numerous.

It is a low-growing plant, making it ideal for filling large gaps in the garden due to its ground-covering properties. Winter aconite prefers free-draining soil, with lots of room for root growth, and if this isn’t possible, you will need to dig around the roots to increase their spread. It’s deer resistant and may even grow near black walnut trees.

7. Dutchman’s Breeches

This is a beautiful but short-lasting woodland wildflower that is gone by summer with its foliage. But a few weeks in the spring, the delicate flowers will be hanging off their arching stems and are pure delight.

8. Woodland Phlox

Woodland phlox is a North American native wildflower that thrives in the dappled shade of the forest. These spring bulbs begin to bloom in April with five-petal flowers stretching one and a half inches in diameter. Its green leaves are around two long. Make sure you keep the soil cool and retain soil moisture by mulching around the plant.

Woodland Phlox
Image credit: https://www.gardenia.net/

9. Flowering Quince

This is a rounded shrub that blooms from March to April. Its five-petaled flowers are about two inches in diameter and start to open even before the dark green leaves begin to unfurl. The speckled yellow-green fruits follow the flowers. They prefer full sun to part shade and loamy, well-draining soil. Prune after flowering to shape the plant.

10. Rock Cress

Plant rock cress in a sunny spot within rock gardens, and dainty white will cascade and spread up to 2 feet. This plant tolerates drought conditions. Give it a haircut after it has finished blooming to make it look tidy for the rest of the growing season. It has fragrant flowers that bloom from April to May to attract bees and other beneficial pollinators to your backyard.

Rock Cress
Image credit: https://www.gardeningknowhow.com/

11. Grape Hyacinth

You can plant these tiny bulbs in the fall for spring blooms. They naturalize themselves so easily, so you can start with a few and end up with a whole swath of grape hyacinths.

12. Solomon’s Seal

Solomon’s Seal pops up from the ground in early spring with a rounded flower that resembles a fan. In its native habitat, Solomon’s Seal will grow back year after year to offer you continuous bloom throughout the growing season. If your environment is more urban, the plant may stop blooming in the summertime, or it can be propagated to give you more blooms.

Its arching stems and dangling flowers make it eye-catching in any shade garden as they are among the shade-loving flowers. After the plant blooms, the glossy black seed pods add visual appeal. And because it’s a short plant that flowers downward, it looks best in large swaths that can spread naturally in a garden bed. Ensure the soil remains evenly moist but not soggy for healthy plants.

13. Virginia Bluebells

With bell-shaped flowers, bluebells are possibly the most popular early spring flower.  The flowers don’t start blue; instead, they begin as pink buds and turn blue later. They have charming dangling clusters of tubular blue flowers.

The bluebell is another perennial spring ephemeral that goes dormant and disappears shortly after it flowers. Divide these spring bulbs between the late summer or early fall as necessary.

14. Corydalis

Also known as yellow corydalis, corydalis has bright yellow to green foliage. Its roots have a delicate sweet flavor and can be eaten in moderation, similar to ginseng. The plant is very easy to maintain and will return every year if the top growth is not removed before it goes dormant in the fall.

It has a long bloom period from spring to early fall, even the first frost date, with small but bright flowers with tubular petals. These spring bloomers can grow aggressively in cool spring weather with rich, moist soil.

15. Stewartstonian Azalea

This early spring flower features glossy, dark green leaves that turn reddish-brown in the fall. Their show-stopping feature is their showy clusters of bright-orange red flowers that bloom in April. Make sure you prune this perennial shrub after flowering to shape it as needed. Also, ensure it gets consistent moisture but does not sit in soggy soil.

16. Korean Spice Viburnum

This early spring flower is, in fact, a variety of flowering viburnum. Its white flowers are organized in rounded clusters and bloom in April to May, with red leaves in the fall season. The tiny fruits that follow later are considered edible for birds, squirrels, and other mammals.

They feature fragrant flowers that bloom in April and May. They also feature attractive mahogany- red leaves that turn beige with the onset of fall. Furthermore, they require little attention and can grow well in any soil type you offer them.

Soil needs include average, medium moisture, acidic to well-draining soil. It also prefers full sun to part shade. It’s fairly low-maintenance but ensures it has good drainage and is not over-watered as it doesn’t thrive in wet soil.

17. Siberian Bugloss

This is a great option for attracting pollinators to your garden. It also provides food for butterflies, birds, and other small mammals. It’s an early-blooming perennial that produces gorgeous flowers of purplish-blue color. 

Siberian Bugloss
Image credit: https://www.thespruce.com/

The heart shaped leaves of Siberian often get more attention than its brilliant blue flowers. Furthermore, it can even grow in partial shade if it has enough sunlight during the day. Therefore, this flower adapts well to all kinds of environments, so it’s a great option to include in your low-maintenance garden.

18. Pigsqueak

Pigsqueak has large, bright yellow flowers that can be spotted from afar. It is a native plant, which grows easily in the wild, but it also does quite well in gardens as long as it finds enough sun and water. While it’s an early spring bloomer, the leaves can stay attractive all season and turn a nice bronze-red in the fall. 

It spreads quickly via rhizomes but not quickly enough to become a nuisance. You can divide it every few years if it becomes overgrown. Sun exposure includes full to part shade and thrives in a soil that’s rich, moist, and well drained.

19. Pansies

This cool, loving plant looks great at home in the earliest spring days. These annual plants look great in border planting and window boxes. The plant comes in a few colors for variety and can be planted for fall color after other flowers have stopped blooming.

FAQs about Best Early Spring Flowers

What flowers bloom early in spring?

Snowdrops are the earliest of the spring-blooming bulbs. They poke out above the snow as early as January and February, even in the Northeast and Midwest.

How do I get early spring flowers? 

The best place to buy spring-flowering bulbs is at your local garden center or hardware store around Halloween or the end of the fall season. Bulbs are planted in the fall and bloom in the spring.

Final Thought about Best Early Spring Flowers

As you can see, there are several types of early spring bloomers. Make sure you plant them in the fall before the ground freezes since some annuals can take frost. But for those that are not tough, plant them after the last expected frost date in your area and enjoy the blooming spring season.


The post 19 Best Early Spring Flowers appeared first on Kitchen Infinity.

Did you miss our previous article…
https://www.centrecountyfood.org/?p=557

post

10 Best Wallpaper Removers of 2021

Removing wallpaper can be a difficult task, especially when you haven’t done so in the past. But with the right tool, removing old wallpaper becomes easy and fast. If you’re planning to remove old or outdated wallpaper from your walls, then we have got an easy solution for you. With the help of these best wallpaper removers, your home remodeling project will be very simple and fast. 

So without wasting any more time, let’s begin with our reviews on Best Wallpaper Steamers in 2021.

1. Wagner Spraytech Multipurpose Wallpaper Remover

Among all the wallpaper removers available in the market, Wagner Spraytech is an ideal choice for you. It’s easy to use and very efficient at removing even wallpapers with glue left on it. It will save you valuable time instead of using other methods like scrapping it out, which can consume a lot of time.


Image credit: https://images.zentail.com/

If you’re looking for an affordable steam cleaner optimized to use as a wallpaper remover, this pick suits you perfectly well. For those tough jobs that call for stronger tools, consider using this wallpaper steamer from Wagner. It’s an efficient and effective wallpaper remover. The steam plate has an easy-grip handle to help you complete long steaming jobs. 

With its large tank capable of producing up to 70 minutes of steam, you’ll get enough working time out of this budget-friendly steamer as you steam and soften wallpaper and its adhesive backing. The steam plate also attaches to an 11-foot long hose, stretching to those hard-to-reach areas.

2. WP Chomp World’s Best Wallpaper Stripper

WP chomp citrus solvent is a darling to many people, thanks to its ability to transform the tedious task into a quick spray bottle. This ready-to-use wallpaper stripper is effective on all types of wallpaper, including vinyl, grass, strippable and temporary wallpaper. Its commercial strength formula is designed to penetrate quickly, making wallpaper adhesive and leftover residue easier to remove. 

WP Chomp World's Best Wallpaper Stripper
Image credit: https://cdn11.bigcommerce.com/

This strip wallpaper remover has a mild citrus scent that won’t leave a strong chemical smell behind. However, WP chomp recommends using this spray with a wallpaper scoring tool, especially when it is tough to remove water-resistant wallpapers.

3. HomeRight Steam Wallpaper Remover Review

The HomeRight Steam Wallpaper Remover is a steam cleaner that can take wallpaper off your walls. The powerful handheld steamer features touch-free technology, which enables you to remove old wallpaper without touching it with your hands. Whether you want to remove double or triple-layered wallpaper, this steam wallpaper remover is equipped to separate paper glued with the toughest adhesive.

HomeRight Steam Wallpaper Remover Review
Image credit: https://cdn.wallpapersafari.com/

It’s powered by 120 volts of electricity, a 40 ounces water tank, heating element, jet nozzle, and a steam plate. These elements enable it to discharge pressurized steam as the only mode of effective wallpaper removal for fast and effective cleaning. 

With different furnished nozzle attachments, this versatile cleaner isn’t only capable of wallpaper removal and works in showers, kitchen stovetops, bathtubs, and grills. This device is also equipped with a pistol-lock mechanism to promote continuous and intermittent steam discharge operation.

4. WP Chomp Wallpaper Scraping Tool

Apart from wallpaper removal, this device is also capable of scraping paint and rust. It’s an effective one-stop solution for various surfaces’ decontamination without the need to use a mop or brush. Vinyl is one of the harder wall coverings to remove due to its thicker construction and two-layer application. This makes it very hard to remove.

Fortunately, you can remove such stubborn wallpaper with WP wallpaper Chomp’s scorer. This wallpaper remover includes dual cutting wheels that are made of tempered steel for added strength and durability. It’s also easy to get into tighter areas, thanks to its compact size, plus the ergonomic design helps reduce fatigue.

5. Zinsser DIF Wallpaper Stripper

This wallpaper stripper from the house of Zinsser is a staple for any DIY enthusiast who wants to remove old wallpaper from their walls. It provides excellent adhesion and durability, giving you an easy time while removing stubborn wallpaper. 

Zinsser DIF Wallpaper Stripper
Image credit: https://images.thdstatic.com/

This best solvent from Zinsser is a basic wallpaper stripper that will dissolve adhesive and soften paper, paving the way for a smooth transition to bare walls. You’ll need to dilute it before application with each 22-ounce bottle yielding two gallons of stripping solution. 

You’ll also need to put in some work when using this budget-friendly wallpaper remover solvent. You can pair it with the best scoring tool and a scraping tool to supplement your efforts.

6. Bates Choice Scraper

If you’re planning to tackle a range of wall renovation jobs, consider this set of multi purpose scrapers from Bates Choice. This inexpensive dual pack comes with two metal scrapers to remove paint and wallpaper. The tool comes with a compact design, making it easy to work in tight spots like behind the toilet and underneath cabinets.

Bates Choice Scraper
Image credit: http://bateschoice.com/

The scrapers can also scrape windows and remove old adhesive leftover from decals or bumper stickers. Each scraper comes with a thick stainless steel blade and wooden handle. The dual edge blade is sharp and rust-resistant, making it ideal for sliding beneath wallpaper, even in damp and steamy conditions. The comfortable and sharp handle provides a soft grip to tackle long jobs with ease.

This wallpaper remover is made for multi-purpose use with a pointed end and a cut-out design to function as a go-to tool for home renovations. It’s also helpful in spackling drywall and removing crown molding to get walls back to tip-top shape.

7. Zinsser Paper Tiger Free-Floating Wallpaper Remover

With its three scoring heads, paper tiger free-floating wallpaper remover can perforate an entire room of wallpaper with ease. It has self-aligning heads that cover greater surface area than single head tools to finish the job in less time and with less effort. Paper tiger also has an ergonomic handle that can fit in the palm of your hand, making it easy to zip across the wallpaper surface.

While it can be a bit challenging to use paper tiger in corners, it still does a great job of quickly perforating large areas of wallpaper. You apply pressure and glide the wheels across the wall for a trail of tiny holes for effective wallpaper removal.

8. Spraytech 915 on-Demand Steamer

The Wagner 915 on-demand steamer is a handheld device that works as a steamer and a wallpaper remover. It’s called on-demand because it heats up instantly when you pull the trigger, producing steam immediately to remove wallpaper.

Once the trigger is released, the device cools down quickly to save energy and help preserve your wallpaper. With warm air and steam cleaner, this steamer can loosen the adhesive and lift the wallpaper without using any chemicals. This steamer cleaner is an essential household tool that you can easily adapt to remove wallpaper from plaster and drywall.

While it includes various attachments for different household cleaning tasks, you’ll be more interested in the wallpaper steam plate. You’ll then press the plate directly against the walls to loosen the paper. Making a few rounds with the steamer for wallpaper removal will take you some time, but it’s worth waiting for a chemical-free experience.

9. Husk Soft Grip Wallpaper Stripper

Wallpaper removal is a tough task, so householders need to have a powerful tool. This wallpaper stripper from Husk does the job effectively. The most impressive thing about this design is its top-loading boiler tank which ensures constant steam pressure for ease of use. 

You can easily remove multiple layers of paper with this steamer within a short time. It features a replaceable blade securely held in a patented blade lock system with added tool-free blade changes. 

With a 4-inch soft-grip handle, this wallpaper scraper is comfortable to hold and offers a safe, secure way to use the razor-sharp blade to peel back wallpaper. Its long handle provides additional leverage and proves useful when you’re working on hard-to-reach areas like ceilings and behind a radiator.

10. Roman’s Piranha Liquid Wallpaper Remover

When removing old wallpaper, you have to deal with both the paper and the adhesive. Some processes might help you bring down the paper quickly and leave behind an adhesive glue. In that case, try to use Roman’s Piranha Liquid Wallpaper remover. 

This wallpaper remover is capable of dissolving wallpaper adhesives to give you a clean, smooth wall surface. Its spray bottle helps you quickly apply it to the wall without wasting too much of its contents.

FAQs about Best Wallpaper Removers of 2021

Do wallpaper steamers work?

Yes, wallpaper steamers use hot steam to soften the adhesive attaching the wallpaper to the wall. This makes it easy to peel and scrape away the old wallpaper.

What is the easiest way of removing old wallpaper?

This depends on the type of wallpaper you have. So, the ideal way to go about this is to know your wallpaper type; then, you’ll be able to use the tools of removing the old wallpaper.

Final Thought on Best Wallpaper Removers of 2021

Removing an old wallpaper doesn’t have to be an uphill task. Having the right tools and the required technology will help you do the job right and have a fresh new wall.


The post 10 Best Wallpaper Removers of 2021 appeared first on Kitchen Infinity.

post

Carpet vs Hardwood Flooring Comparison

When it comes to home interior design, there are many options available. However, you’ll need to make the right choice to get the best results.  There are several types of flooring that can be used for your house interior design, but carpeting and hardwood are the most popular ones.

We’ve created this guide on carpeting vs hardwood flooring so that you can learn what factors may affect your decision when choosing between these types of flooring for your home interiors. So, if you’re replacing your floors and wondering how to choose between carpeting vs hardwood flooring, don’t worry. This article is for you.

Sustainability 

Carpets

Modern carpets are created by threading closely spaced loops of synthetic fibers through large sheets of backing material. There are also some natural fiber carpets made out of cotton and wool. Most carpets come in synthetic materials, and they’re manufactured in huge rolls where they can be bought in any quantity.


Image credit: https://modernize.com/

Hardwood Floor

Modern hardwood flooring comes in one of two forms. There is solid hardwood flooring, which boasts of solid wood that is milled from rough lumber from felled hardwood trees. The boards are smoothly sanded on the top surface and are left slightly rough at the bottom. 

Another hardwood flooring form is known as engineered hardwood flooring. This is the most economical type of modern wood flooring. Engineered wood flooring has the same tongue and groove construction and can be installed the same way as solid hardwood floors.

ppearance

Carpet

Appearance is another big difference between hardwood flooring and carpet. Both hardwood and carpet flooring comes in several styles that can meet any interior design, but carpet offers variety in color, texture, and feel. While there’s a substantial difference between hardwood and carpeted floors, carpets are more available in wood-like, making them more decorative. 

The great thing about carpet is that you can choose any color, making it a very versatile flooring choice as you can mix and match colors and shades based on other design choices in your room.

Hardwood

The look of hardwood flooring is easily recognizable, and its main appeal is natural wood tone colors and the appealing pattern of wood’s grain. Hardwood flooring creates a bold statement, and that’s why it’s called the prestige in flooring. When it comes to appearance, your style and the style of your house will determine the best flooring option.

Cleanliness and Care

Hardwood Flooring

Hardwood flooring is easy to care for and maintain with regular cleanups. This flooring type doesn’t require deep cleaning too often. While cleaning hardwood floors, it’s advisable not to use liquid cleaning products as these can warp and damage the natural fibers that make up the floorboards.

Hardwood Flooring
Image credit: https://res.feednews.com/

It’s also easier to spot dirt on hardwood floors than carpet floors, making it easier to notice when your floors need a wipe and a good cleaning. Hardwood floor cleanings include sweeping and vacuuming with a hardwood vac to maintain its appearance and condition. Periodic damp mopping with the wood cleaner will also remove deeper dirt and most stains.

Carpet

Cleaning carpet flooring seems daunting because stains can soak and settle permanently on the surface. To prevent stains, turn your rug over once a week to let the other side be exposed to sunlight and air for a day. Not doing so can create a musty smell forming on dark spots in your carpet, especially if you have pets at home. 

Carpet
Image credit: https://2avk1yzaj801re7g11oaur7q-wpengine.netdna-ssl.com/

Wipe spills immediately using a clean cloth with warm water or a commercially available solution. Regular vacuuming can also help get rid of dust, dirt, pollen, and other allergens. If left without vacuuming, these elements can get stuck in the carpet fibers causing unpleasant odors.

Durability and Maintenance

When considering the durability of your hardwood flooring vs carpet, there are different things that you must consider. Don’t only concentrate on the lifespan of the flooring type, but consider the impact of your daily life on it. Factors such as foot traffic, your habits, visitors, and pets will greatly influence the durability of your flooring.

Hardwood Floors

Hardwood is a durable material that can last 50 to 60 years if properly maintained. But they’re also more expensive in most cases. When evaluating cost, consider the initial price of the wood flooring and its installation and maintenance costs over time. Think about how much it costs to refinish hardwood flooring

Hardwood flooring will also last longer if you care for it properly, both by taking good care of it and making sure that you clean up spills quickly. Hardwood floors can also warp when exposed to too much liquid and can dent and scratch from furniture movement and shoe traffic.

Carpet Flooring

Carpet is a more forgiving floor type. As long as you deal with spills immediately and frequent vacuuming, you won’t have to worry about dents and scratches. However, carpeting still does need occasional professional upkeep, such as cleaning and re-stretching. Occasional professional cleaning service can also extend the life of your carpet. 

The best flooring type for durability and maintenance is hardwood flooring because it is made to last and does not need any professional upkeep. Even if you do manage to inflict some damage, hardwood flooring can be refinished or patched, unlike carpeting which has to be completely replaced when damage is done.

Cost and Installation of Carpet and Hardwood Flooring

Hardwood

Professionals usually do hardwood flooring installation because of its weight and intricacy. You will need to foot the bill for this aspect of the project, too, as well as for upkeep in general. A DIY installation can save you money and time, but it can cause you some additional cost if not properly installed.

Hardwood
Image credit: https://diy.sndimg.com/

Fortunately, solid hardwood flooring and engineered hardwood flooring products are pre-finished in the factory, but you’ll have to pay more to have them pre-finished. Solid hardwood floor costs start at around $4 per square foot and go up from there. And on average, hardwood floors cost about $8 per square installed.

Carpet

Installation of carpeting can be done yourself or by a professional at your request. Carpet padding is about an inch thick, and if you purchase high-quality padding, it will last the life of your carpet. It will cushion your feet from bumps in the floor and keep the carpet fibers uniform and neat-looking. 

Carpet
Image credit: https://www.timberlinehouston.com/

The most convenient flooring for cost and installation is carpet flooring because it can be pulled back to install underlayment for hardwood flooring. It’s also cost-effective compared to hardwood flooring.

For example, perfectly acceptable carpeting may be available for less than $1 per square foot installed. The cost can also run as high as $20 per square foot.On average, most carpets purchased at home centers cost about $3 per square foot, while solid hardwood flooring starts at around $4 to $8 per square foot installed. Also, the cost of professional installation is higher on hardwood floors.

Resale Value

Hardwood

Most homeowners prefer having hard flooring surfaces such as hardwood and ceramic tiles because they’re easy to clean and tend to hide flaws the best. Even estate agents agree that when it comes to carpet or hardwood flooring, hardwood is likely to increase the resale value of your home. Hardwood is a natural material and is much longer-lasting than carpet.

Carpet

Carpeting tends to wear down over time and may show signs such as wrinkles, spots and footprints after a few years of use. All these tend to lower the resale value of the property which you’re trying to sell. Also, new carpet can also lead to home improvement than an old carpet.

They could also be a turn-off for potential homebuyers who’d rather have hardwood that’s clean and in good condition. Therefore, the flooring type with the best resale value is hardwood flooring. Hardwood resale value wins even when you ask real estate agents in the market.

Radiant Flooring

Both carpets and hardwood floors can be installed with radiant heating. And because of the insulating properties, you must be careful when choosing both carpet and radiant heat systems that can work together. In some cases, you may need to set the radiant heat system higher for the carpet to warm sufficiently.

On the other hand, hardwoods work with many radiant heat systems because they transmit heat with little loss. But it’s not recommended to use radiant floor heating under a plank wider than three inches.

Environmental Impact

Carpet

Some natural carpets such as wool have less impact on the environment than synthetic carpeting. Wool and other natural fibers are renewable and biodegradable. Furthermore, most synthetic carpets are made from petroleum which is not renewable and is a non-biodegradable material. 

They can break down unevenly, releasing volatile organic compounds as they age. The downside of natural fibers is that they cannot be recycled, and when disposed of in landfills, they will take a very long time to decompose.

Hardwood Flooring

If you’re concerned about the environment and want renewable flooring, then hardwood flooring is your best option. Hardwood is a renewable material, especially if you ensure responsible harvesting and planting of trees.

Homeowners who are looking for more sustainable flooring material can look to hardwood flooring as their best option. Most hardwoods are also recyclable, which means they won’t sit in landfills for decades.

Water and Heat Resistance

Carpet

The synthetic fiber materials used in most modern carpets make them highly resistant to water damage. It’s also important to prevent water from seeping down into carpet padding, which can cause mold and mildew growth. This is especially important with groundwater damage from flooding or leaky roofs.

Additionally, tile carpets can be damaged by heat, such as burning cigarettes and hot pans. Some carpet materials can also emit toxic gases if a serious home fire ignites.

Hardwood Flooring

Wood flooring is not recommended in any location with constant water and moisture. It’s also not recommended for below-grade installation against a concrete slab because contact with concrete can cause swelling. Wood flooring materials also emit formaldehyde gas over time. However, engineered wood flooring may be stable to water and moisture.

Engineered hardwood flooring has a moisture barrier to stop water from seeping into the subfloor before it ever reaches your main joists below. You can also install engineered hardwood flooring directly against concrete slabs that are dry and free of cracks or joints where water could infiltrate.

Comfort and Sound

Carpet

With its soft fibers and insulating pad, carpeting is more comfortable to walk on than hardwood floors. High-pile carpeting is soft and thick underfoot, while lower-pile carpeting feels more like an even surface. Carpet can be made from various materials, including nylon, wool, cotton or synthetic fibers. 

The sound absorption of carpet comes from the insulating pad underneath the carpet fibers, but that means the carpet is better at trapping sound inside the house.

Hardwood Flooring

Hardwood floors are loud compared to carpet, especially when installed on the upper levels; the people below will hear footsteps and other sounds from above. The hardwood floors amplify the sound of children running on the upper levels because it’s a harder surface with no insulation capabilities.

Hardwood floors are less comfortable underfoot, but they have a timeless elegance that carpeting can’t match. Also, since hardwood floors are laid in strips, any surface imperfections can be covered up with a strip of wood over the problem area or damp mopped to free the particles.

FAQs on Carpet and Hardwood Flooring Comparison

Which type of flooring is suitable in an active environment?

High-quality carpets can sustain high foot traffic if you keep them level and smooth to avoid irregular wear.

Which one is the warmer flooring type?

Carpeting is warmer than wood flooring, but only when the carpet is not glued directly onto concrete. Wood floors, on the other hand, allow cold air to move through between individual boards.

Final Thoughts on Carpet vs Hardwood Flooring Comparison

As you can see, there’re many factors you need to consider when choosing between carpet and hardwood flooring. The answer on which one is better depends heavily on your particular situation, budget, and taste.


The post Carpet vs Hardwood Flooring Comparison appeared first on Kitchen Infinity.

Did you miss our previous article…
https://www.centrecountyfood.org/?p=470

post

Reasons Why Orchids Won’t Bloom and How to Fix Them

Orchids are beautiful and exotic, but they can also be frustrating if you’re trying to grow them.  One of the most common problems people have with orchid growing is that their plants won’t bloom. It’s very disappointing when your plant doesn’t produce flowers because it’s such a rare event.

If you love orchids, this guide will help you get the most out of your investment in these stunning plants.  Even if it hasn’t flowered for years, there are still things that can be done to encourage blooming. Orchids are one of those flowers that require very specific care, so they don’t wilt and die on you before they even get a chance to bloom. Below are reasons orchids won’t bloom.

Insufficient Light

If you want your orchid to rebloom, try moving it near a brighter location. Orchids need at least 12 hours of bright light so they can survive and grow. You should learn how to care for your orchids indoors so they can grow well and bloom.


Image credit: https://i1.wp.com/

To ensure they get enough sun, there are different places to put them in the house, but the ideal place is by a window to get good sunlight exposure. It will also help if you rotate them once in a while so that all sides get enough light. Move your orchid to a place where it gets a few hours of direct morning and afternoon sun.

This will ensure the plant gets enough energy to make a spike with lots of flower buds. Dendrobium orchids and cymbidium orchids are also orchid varieties that require bright light and not direct sun. Lack of sufficient light is one of the reasons why orchids fail to bloom, so if you plant indoor orchids, you may try to grow light to achieve flowers.

Getting Too Much Light

If you’re trying to grow your orchid in direct sunlight, it may die. However, too much shade can also be a cause of failure orchid bloom. Indirect light or morning sun is best for most orchids, and if the light is bright where you live, go ahead and put your plant in direct sunlight. Avoid excess sunlight for the best-blooming orchids.

If you also place your orchid in full sun, you’ll see severe symptoms such as sunburned leaves, and an overabundance of artificial light can also suppress blooming. In addition to cooler nighttime temperatures, the shortening days of autumn can signal an orchid to form buds.

If you’re keeping an orchid indoors, in a room where the light stays 24 hours a day, then your orchid is missing an important natural cue. If you’re using artificial light, then use a timer to simulate the cycle of natural daylight and darkness.

Overwatering

Overwatering is most often the cause of orchids’ failure to bloom. Just like humans, orchids need oxygen to survive. Excess water displaces oxygen in the potting media, starving roots and suppressing blooms. Most orchids need to dry out between watering, and you should allow them to have wet feet by allowing water to saturate in the root zone.

Overwatering
Image credit: https://imagesvc.meredithcorp.io/

Orchids growing in the right kind of potting mix will rarely suffer from overwatering. Signs of overwatering include roots turning brown, while wrinkled leaves can be a sign of too little water or too much water. Don’t wait to see a pot of muddy mix and a dying orchid; instead, give your orchid adequate care while it’s in bloom and out of orchid bloom.

Varying Temperature

Orchids like to be warm and relatively dry during the day, but they require a drop in temperature at night. Orchid flowers need bud building overnight temperatures (under 10 degrees Celsius). For example, Paphiopedilum orchids need temperatures of 70 to 80 degrees during the day and 50 to 60 degrees at night. Warm temperatures between 20 and 25 degrees Celsius will encourage buds to form on your orchid flower spikes.

Cooler conditions can prevent your plant from forming buds. It is possible to have too much of a good thing if the temperature stays above 25 degrees Celsius during the day and night, as your plant will stop flowering. Try to expose your orchids to nighttime temperatures 10 degrees cooler than daytime temperatures for two weeks at the start of the orchid’s growing season.

Orchids Need Proper Nutrition

If you fertilize your plant too much, the excess nutrients can build up in the potting media and cause your orchid to bloom. You also need to feed your orchid well during its flowering season. Give it a regular fertilizer that has trace elements, which will help promote bud formation. But also be careful because too much fertilizer can stop your plant from blooming.

Of course, orchids are not heavy feeders, but an orchid living in the sterile inorganic potting mix may need a nutrient boost for its best performance. The best fertilizer to use is a urea-free fertilizer that provides nitrogen even in the absence of microorganism activity common in rich garden soils.

Moth orchids, in particular, initiate blooming spikes in response to a month and cool nighttime temperatures. At home, you have two options to encourage blooming. These options include keeping your orchid near a bright window at night in the early fall, keeping air-conditioning low during the day, and turning it up at night.

Roots Need Attention

Most orchid growers find it tricky when it comes to repotting orchids. When your orchid media begins to break down, the orchid roots can suffocate from lack of oxygen. In addition, some orchids will resent having their root zone disturbed, and they’ll refuse to bloom for six months to a year after repotting.

Roots Need Attention
Image credit: https://i2.wp.com/

In order to determine whether your orchid needs to be repotted, evaluate the root system and not foliage. If you see the orchid roots turning brown and the planting material resembling garden soil in its density.

Also, if you see more than two roots creeping over the edge of the pot, it may be time to repot. You can also divide your orchid plant to maintain blooming vigor.

Know Each Season of Your Orchid Variety

Each orchid type has a time of the year when it will naturally bloom. It may not be the same season that the orchid was blooming when purchased since nurseries can force orchids to bloom off-cycle. Many orchids bloom in the fall, winter, and spring.

Knowing the season that your orchid bloom will save you the frustrations of waiting for it to bloom. For example, Phalaenopsis orchid grows new leaves in the summer and early fall and sets a bloom spike in the late fall. Most Phalaenopsis orchids are known for blooming off-season for many reasons, but many will follow this pattern.

After you’ve identified your orchid, make sure you learn about its blooming cycle. Vanda orchids, for example, bloom two to three times a year, with each bloom cycle lasting up to six weeks. On the other hand, popular cattleya and cymbidium orchids only bloom once a year, but they’re very easy to maintain, making them popular choices for novice growers.

Underwatering

Underwatering is one of the most common reasons orchid plants won’t bloom. The best way to avoid this problem is to water your orchid regularly, but don’t over-water it. Water generously during spring and summer season but taper off as fall starts to set in. Stop watering altogether when winter begins because this will help your orchid properly rest.

You can test the moisture of your orchid’s medium by pushing your finger into it. If you feel any moisture, hold off on watering until the surface is dry. Remember not to water again until the top layer is dry because this will cause overwatering and root rot.

To prevent underwatering, mix water with some water-soluble fertilizer at the same strength you’d normally use when feeding your orchid. Water generously, but ensure that excess water drains away from the plant’s roots before drying up.

Cut Spent Flower Spikes for a Stronger lant

After your moth orchid has finished blooming, snip off the flower spike. An orchid needs to rest after flowering to build up its energy, so don’t fertilize your orchid for at least a month after it blooms.

Cut Spent Flower Spikes for a Stronger plant
Image credit: https://images.saymedia-content.com/

After this waiting period, you can feed your orchid with a balanced 20-20-20 fertilizer once every three weeks to keep it happy and healthy. Note that some orchid species and hybrids rebloom on old spikes. You can also contact the American orchid society or contact your seller to get a replacement or refund.

FAQS on Reasons Why Orchids Won’t Bloom and How to Fix Them

How long does it take an orchid to rebloom?

Phalaenopsis orchids take a month or several months to rebloom, while most varieties bloom annually.

Why is the orchid not flowering?

If your orchid is not flowering, improper light exposure, incorrect potting media, and overwatering are the most common reasons.

Why did my Phalaenopsis stop blooming?

Phalaenopsis stopped blooming because of root rot which can be caused by too much water or cold conditions.

Final Thought on Reasons on Why Orchids Won’t Bloom and How to Fix Them

If you perform all these steps religiously, your orchid might begin blooming again in no time and you’ll love your gardening skills. Orchids are blooming plants, and as such, they require a lot of attention. However, by following the basic care tips above, you should have no trouble keeping your orchid blooming.


The post Reasons Why Orchids Won’t Bloom and How to Fix Them appeared first on Kitchen Infinity.

Did you miss our previous article…
https://www.centrecountyfood.org/?p=456

post

How to Clean the Burners on a Gas Stove

Cleaning gas stove burners can be difficult to do by yourself, especially if you don’t have the right tools. There are many different kinds of cleaning products available in your local store, but not all of them will work for all types of stoves. If you’re looking for a quick and easy way to clean your burners on a gas stove, then look no further. 

This article will help you eliminate any build-up of grime from inside your stove’s ports as well as its burners within minutes. If you follow these tips, you’ll understand why you should not ditch your gas stove as it will be as clean as new. Let’s get started!

How Gas Burner Works

The burners on your gas stovetop consist of a burner assembly attached to a small gas intake valve on the front or at the top of the stove. Gas stove burners operate by receiving an air-gas mixture that is sent through the main gas line. Gas stoves have a gas valve that attaches the main gas line to the stove and sends the air-gas mixture to each burner. 


Image credit: https://engineer.decorexpro.com/

When the burner control knob opens the intake valve, it allows gas to flow through the venturi tube. The gas then enters the venturi tube through one of the wide ends, increasing in pressure as it passes into the narrow section of the tube. The burner head is a hollow metal disk with holes and slots in the outside edge.

The burner head sits atop and directs flames emerging from the burner head. The older burners have a pilot light, while the newer gas stove burners have a small spark pilot located on the side of each burner. A light pilot or electric spark pilot controls the airflow, allowing you to generate more or less flames as possible.

How Often Should You Clean Your Stove’s Gas Burners?

Gas stoves are simple and trouble-free. Typically, you can clean the burner once a year. But, it’s important to clean it when the flow of gas becomes hindered due to food residue that may spill on the pots and pans. Food residue can clog the ports around the burner heads.

If left unattended, this food residue can be quite hard to remove. Clean your burners whenever the burner becomes irregular and exhibits a yellow color. Below are the steps you need to take to clean your gas stove burner properly. Take time and refer to your owner’s manual if necessary:

What You’ll Need

Old toothbrushNon-abrasive scrubbing padDish soapDry towelBaking SodaPaper clipDamp cloth

Read Manufacturer’s Instructions

Before you start cleaning, it’s always a good idea to refer to your owner’s manual. This can serve as a safety reminder, and it may reveal some tips on the best way to clean your burners.

If your cooktop didn’t come with the manual, you could always download a manual online via the manufacturer’s site. The manual will recommend tools and cleaning products, saving you from many hassles.

Turn Off Gas Supply Valve

Clean gas stove burners before turning them off. Make sure you shut off the valve before doing anything else. Before removing the burner caps, ensure your gas is off. Look under the burner caps and access the burner heads. 

Proper gas flow is dependent on clean burner heads, so ensure you clean stove burners first. A valve will be nearby, connecting your stove to the main gas line. Make sure you turn off the valve before cleaning. Also, ensure the stovetop and burners are completely cooled before you begin cleaning.

Remove Burner Caps

Remove the burner caps and set them aside. Once a sturdy grip is established, twist each cap counter-clockwise to remove it from the stovetop. The order of the caps does not matter because you will reattach them later on during the cleaning process.

Remove Burner Caps
Image credit: https://www.thespruce.com/

Many gas burners have a removable ceramic disc that sits atop the burner to diffuse flame. If you have this kind of burner, lift the disc off the burner, making sure that the burner is completely cool before doing so.

Remove Burner Heads

Use a flathead screwdriver or other suitable tool to loosen and remove the burner heads and caps. Take care not to damage the gas line connected to the burner because you will be reinstalling them later on during the cleaning process. Set aside and inspect each burner head as you remove it from the stovetop.

Look for built-up debris inside the gas jets, at the edge of the burner head, where it sits on top of the stovetop surface. Be careful not to damage the venturi tube beneath when lifting the burner head.

Soak and Scrub the Removed Parts

Place the burner heads and caps into a bowl or other suitable container. Fill this with warm water and liquid dish soap and let it soak for 30 minutes. If you find that there is still residue on the parts, try soaking them overnight instead.

Once they’ve soaked, pull them out and scrub them with an old toothbrush to remove debris. If the toothbrush can’t remove some debris, use a straightened paper clip to unclog the head and cap holes. Make sure you don’t damage the metal of the burner head as you clean. 

You can also use one part water and one part baking soda to remove stuck-on debris. You can also make your cleaning paste with one cup of baking soda and half a cup of vinegar. Apply a paste on the surface of your stove using a clean cloth or sponge.

Rinse the Parts

Use whatever you used to make the paste and rinse it off with running water. Make sure the area is dry before replacing the parts. Shake to remove excess water, then dry with a damp cloth.

Rinse the Parts
Image credit: https://www.thespruce.com/

Allow all the parts to air dry completely before reassembling the burners. As the parts are drying, turn your attention to cleaning other parts of your stove. Make sure you learn how to clean drip pans and grills. soak and scrub all these parts well.

Reassemble and Test Your Burners

After you’ve washed and rinsed your burners, pat them dry with a towel and set them aside. Let them air dry until they’re entirely free of water. Once the burners are dry, reassemble them. Reassemble the drip pans, grills, burner heads, and caps. 

Reassemble and Test Your Burners
Image credit: https://www.forkandspoonkitchen.org/

Before turning on your stove, inspect all of them to make sure they aren’t dripping water. On electronic ignition stoves, take care not to bend or damage the ignition electrode as you install the heads.

Relight the Pilot Lights

After you’ve reassembled your burners, relight the pilot lights by pressing down gently on each knob. Open each gas valve slowly and light the burners. If there’s no flame, ensure that the knobs are turned to the pilot setting. 

As you do this, make sure you follow the manufacturer’s instructions for relighting the pilot flames. Test the burners to ensure they operate correctly as unusual flame color and shape may indicate that the burner heads are not completely dry.

FAQs on How to Clean the Burners on a Gas Stove

How do you clean the grates and burners on a gas stove?

If the grates contain dirt, grime, or grease, mix three parts of baking soda into one part of water. Coat the grates in the mixture and wait for 20 minutes. Wipe down the burners with a soft cloth and if you have burners coated in baking soda paste, rinse first to avoid damaging the finish.

How do you deep clean a gas stovetop?

You can use a soft bristle brush and a mixture of vinegar and water in a spray bottle with baking soda paste when deep cleaning your gas stove top. If you notice sputtering, shut off the burner and clean out any food build-up left in the gas line before turning the gas back on.

Final Thought on How to Clean the Burners on a Gas Stove

Cleaning your gas stove burner shouldn’t be an uphill task. Take your time and be thorough with your cleaning process. Make sure everything is properly rinsed before drying. This way, you’ll have clean stove top burners that are ready to fire up your next meal. 


The post How to Clean the Burners on a Gas Stove appeared first on Kitchen Infinity.

Did you miss our previous article…
https://www.centrecountyfood.org/?p=444

post

14 Bad Cleaning Habits You Need to Break

Cleaning is a never-ending task. It’s something everyone has to do, and no one wants to do, especially when we think about the time it takes and how much effort it requires. We all have bad habits when it comes to cleaning our homes, but these mistakes can cause damage not only to your home but also to your health. 

You need proper tools and methods to get the job done right. With this guide, you will learn about bad cleaning habits to stop doing to live in a cleaner environment.

1. Using Dirty Cleaning Tools

When it comes to bad cleaning habits, cleaning tools are the first culprit. How can you expect the best results when using dirty cleaning tools to clean your home? If your washing machine has some odor from built-up bacteria from some detergent residue, it will make your clothes stink. 

If your vacuum bag is filled with dust, it won’t do a good job sucking up anymore. A dirty mop and a dirty sponge will push around more soil and bacteria. So, take your time to thoroughly clean tools by emptying completely and washing them in hot water after every use. Also, use enough disinfectant to kill the germs. Replacing new tools is also a good idea.

2. Leaving Wet Towels and Shower Curtains Bunched Up

If you’re tired of spending too much time in your laundry room scrubbing mold and mildew on your bathroom surfaces, don’t worry. You can easily break these bad habits and have more time to focus on other tasks. Avoid leaving wet shower curtains bunched up and wet tower curtains in a heap on the floor.


Image credit: https://www.enchantehome.com/

Always hang up your non-slip shower mat after each use. By hanging the shower curtain, it will dry more quickly and discourage mold and mildew growth. By hanging wet towels to dry, you’ll be able to re-use them without having to wash out the mildew smell.

3. Leaving Dirty Dishes on the Sink

Your dirty dishes are a breeding ground for bacteria and germs that you don’t want in your kitchen. Leaving dirty dishes in the sink is a jackpot for hungry insects. Rinse off your plates before stacking them in the sink. Load the dishwasher every time it’s full, so you won’t have to worry about leaving food scraps from last night’s dinner sitting out on the counter overnight. 

You can also break this bad cleaning habit by training everyone in your household to either put the dishes in the dishwasher or wash them immediately. After washing your dishes, wash out your sink with hot soapy water, spray with Vital Oxide, and let it dry.

4. Using Disinfectant Wipes

Don’t use disinfectant wipes on surfaces that food touches. This includes countertops and cutting boards. Wipes are less harsh, but they don’t do a great job of killing bacteria. 

Using Disinfectant Wipes
Image credit: https://www.lysol.com/

If you want to keep your kitchen clean with disinfecting wipes, it’s important to understand that you can’t swipe on everything and expect your home to be germ-free. Make sure you buy wipes that can kill viruses and bacteria. Also, ensure that you’re using these disinfectant wipes the right way; otherwise, you risk cross-contamination. For better hygiene learn how to make disinfectant wipes for home use.

5. Allowing Paper Clutter to Accumulate

Even with the emerging technology, including online billing and banking, there’s still a mountain of papers that ends up in our homes. These include magazines, newspapers, flyers, school papers, and projects. These papers tend to pile up. However, this is one of the easiest bad cleaning habits to break.

Instead of letting the paper pile up, designate a place in your kitchen for all this paper clutter. Also, keep a shredder and recycling bin nearby and sort it at least once a week. For children’s school papers and projects, opt for a designated storage bin, select a few to save space, frame a few, and hang them up. Learn how to declutter your room properly and you’ll never have trouble with cleaning.

6. Ignoring Product Directions

This is especially true for general cleaning supplies like dishwashing soap, general cleaners, and fabric softeners. Product directions are there for a reason. Ignoring it is a surefire way to make cleaning fail. Also, not following product directions might render the product useless if the solution is wrong. 

The manufacturers will have recommendations on using the product, how much you need, and where it should be used. Application methods are also different, so it’s always important to read the label. This also applies to cleaning tools; follow the manufacturer’s instructions to prevent injuries.

7. Wearing Outside Shoes in the House

This is especially important when you have wooden flooring because this can cause scratches on the surface. It’s highly recommended to remove your footwear before entering the house. This way, you can keep your floors looking new longer. 

If needed, apply an environmentally friendly wood polish to clean and protect the wood from damage caused by extreme weather elements. Whether your entryway is through the mudroom or the front door, make this cleaning habit simple by providing a bench and a chair for shoe removal. Get a shoe tray closed for wet or muddy shoes. Plus, provide a bin to collect each family member’s footwear.

8. Using Harsh Cleaners

Using too much cleaner can be a bad cleaning habit; using a harsh cleaner can damage your floors. Using harsh chemicals can strip the finish of wood floors, leaving them dull looking and requiring you to refinish them. For example, chlorine bleach is good in disinfecting, but that doesn’t mean it’s good on all surfaces.

Using Harsh Cleaners
Image credit: https://4.bp.blogspot.com/

Chlorine bleach is not a good dirt and grime remover, and the fumes can be toxic. It’s important to use gentle cleaning products to produce the best results. One of the safest and widely used home cleaning products is cleaning vinegar

9. Not Completing Tasks

Yes, we all get distracted while cleaning, but always try to finish a task once you’ve started it. For example, if you’re dusting the living room, don’t stop for a social media break until you’ve dusted the entire room.

If you have a few minutes to clean, start by removing the clutter and putting items in their proper place. Then if you’re interrupted, you can come back later to do the deeper cleaning.

10. Waiting Until the Cleaning Task is Overwhelming

If you have a huge cleanup job ahead of you, don’t try to bite off more than you can chew. Break the task into small pieces that are easier to manage. Don’t wait for the task to become overwhelming. Putting off cleaning and waiting until the task becomes overwhelming is one of the worst cleaning habits to break.

But if you do a bit of cleaning each day, like load, empty the dishwasher before the dishes pile, vacuum one or two rooms, and complete your load of laundry, then cleaning the entire house will not be as overwhelming.

11. Relying too Much on Bleach

Of course, bleach has been a household staple long cleaning and disinfecting agent. But it turns out that bleach isn’t as good a cleaner as once thought. Bleach is intensely harsh and can irritate the eyes, lungs, and skin. 

Relying too Much on Bleach
Image credit: https://cominguprosestheblog.com/

The fumes are also toxic. A better alternative is baking soda or vinegar. If you still doubt how harmful bleach is, these reasons should motivate you to skip the bleach next time you begin your spring clean.

12. Leaving Your Bed Unmade

This might not be a big deal in the colder months when you’re bundling up under your covers and keeping your home well heated. But in the summertime, leaving bed linen unwashed can pose a real threat to your health. Experts recommend changing sheets every two weeks for best cleaning results.

Even if the rest of your bedroom looks neat and clean, the unmade bed can make it look messy. Making your bed each morning will keep the rest of the room and the entire house organized. You can as well make this task simple by selecting bedding that is easy to spread up neatly.

13. Storing Cleaning Products Incorrectly

Do you spend a lot of time trying to find your cleaners and tools? Well, this bad cleaning habit is quite easy to break. Gather all the cleaning supplies you’ll need for each area of your home and store them close to that area. Place them in a plastic carryall for bathroom cleaners and stash them on a shelf or under the sink. 

You can also create two baskets of supplies if you have upstairs and downstairs bathrooms. Keep your dusting and furniture cleaning products in the kitchen. And all your laundry products should be kept in the laundry room. Make it easy to get started, and this will likely lead you to clean more often.

14. Hoarding Food in the Refrigerator

It’s a common bad habit to keep too much food in the fridge. Resist this temptation as your refrigerator does not have an infinite capacity and cannot store half-empty containers of milk, cream cheese, cottage cheese, or yogurt that will not be used up within a few days.

Hoarding Food in the Refrigerator
Image credit: https://lh5.googleusercontent.com/

If you and your family hate leftovers, then don’t stash them in the refrigerator. Go ahead and toss it instead of storing it because improperly stored food promotes mold and bacteria growth, making cleaning the refrigerator daunting. 

FAQs on Bad Cleaning Habits You Need to Break

Can cleaning make you sick?

Yes and no. Cleaning will not make you sick, but it can make you sick if you use improper cleaning methods. Plus, using harsh chemicals that can cause mild irritation and affect your health negatively.

Is it ok to clean regularly?

If you maintain a cleaning routine, it will be easier to break these bad habits. Cleaning should not harm your health or make you feel worse.

Final Thought on Bad Cleaning Habits You Need to Break

Whether it’s the cleaning and our lives in general, we all have these bad habits. We like cutting corners when cleaning. Everyone wants to make their chores easier and get them done faster. However, taking these shortcuts can have a lot of negative impacts on your life. 

That’s why it’s important to break bad cleaning habits. They might be tolerable or even bring some benefits, but they shouldn’t be part of your life if you want to live a healthy and cleaner lifestyle.


The post 14 Bad Cleaning Habits You Need to Break appeared first on Kitchen Infinity.

Did you miss our previous article…
https://www.centrecountyfood.org/?p=432

post

What Does a Steam Feature on a Washer Do?

Washing clothes and home upholstery is a chore. It’s even more challenging to do laundry on items with heavy stains, especially for those just learning how to do laundry. The good news is that you can always buy a washing machine with steam features that will clean, deodorize, and sanitize the laundered fabrics while you wash them. 

This feature makes the cleaning process easier for everyone who owns such washers. If you want to make your life easier when washing clothes and other materials, consider buying a washer with steam features. Steam helps remove dust, dirt, allergens, and other contaminants from your laundry items as they get washed during this process. 

Keep on reading to learn more about the work of a steam feature on a washer.

What Is a Steam Feature on a Washer?

A steam washer uses a combination of steam and water to clean your clothes and other fabrics. This feature provides you with the option to replace dry cleaning once in a while and revitalize certain types of clothes such as curtains and upholstery. 

Stain removal is made easy with steam washers because they eliminate the most common stains by using hot steam to loosen them up before washing. The steam also helps to remove wrinkles, make detergent work more efficiently and sanitize fabrics.

How a Steam Washer Works

Before the washing cycle begins, a steam cycle loosens wrinkles, stains, and dirt from your clothes. Steam is very effective in removing the dried-on gunk, so this process will likely improve the cleanliness of your clothing. The steam doesn’t stop there. 


Image credit: https://reviewed-com-res.cloudinary.com/

During the wash cycle, the steam continues to work with water to clean your fabrics. The steam helps to remove germs and dissolve detergent better than water while heating the cycle. When the detergent is mixed with water, the steam increases the temperature of the wash tub to improve the cleaning power.

If you opt for steam dryers, the steam during the dry cycle will get rid of wrinkles and sanitize your clothes. If you have pets at home or any of your family members have allergies, a steam washer and a steam dryer will be perfect for you.

If you want a steam washer and dryer, it can be hard to decide which one comes first in the household. The good news is that they both do a lot of similar functions. They both sanitize your clothes and remove odor-causing bacteria while freshening up your laundry with the help of steam. Both of them also have a cycle that lets you remove wrinkles from your clothes.

If you want to buy both a steam washer and dryer, the steam washer is usually placed first in the household because it has more functions than a dryer. A dryer needs a couple of minutes to remove small wrinkles from your clothes, while a steam washer uses the power of steam to freshen up your laundry and remove all bacteria that can cause bad odors.

How Washing Machines Apply Steam

Washing machines can apply steam in many different ways. Some may heat water in the tub directly to create steam, while others may utilize a steam generator that sends the steam into the tub. But it will still allow you to use water instead if you would like. 

The steam will permeate your clothes to remove dirt and bacteria that may be in your clothing. It also releases wrinkles to make sure that your clothes look great before you put them on. After converting the water to steam, the steam generator then heats the water back up and sends it to the tub for another cycle.

dvantages of a Steam Feature on a Washer

Reduce Ironing

Ironing can take a lot of time and effort, especially if you don’t know how to iron clothes properly. If you don’t like to iron your clothes, then this feature is perfect for you. It will eliminate the need to use an ironing board because it removes wrinkles and creases in clothing so that you can wear them without having to press them first. 

Reduce Ironing
Image credit: https://lh6.googleusercontent.com/

However, not all steam features are the same, they vary in intensity and temperature achieved. So, it’s important to check the type of steaming function your washing machine has.

Steam Wash Cleans Hygienically

How often do you wash your bedding, baby clothes, or do you have extra sensitive skin? If you’re facing these elements, consider a washing machine that washes hygienically in your laundry rooms. The washing machine adds steam during the cycle and removes bacteria and allergens.

The washing machine uses steam to sanitize fabrics of dust mites, pet dander, pet hair, and pollen. It can do this because the high temperatures of the steam break the allergens effectively.

Steam Washing Machines Saves Money

A steam washing machine uses less power and consumes less water than conventional models. A small amount of water can produce steam. When you consider the savings on water and power, a steam washing machine offers greater cost-effectiveness than other models. Steam washers don’t need as much energy to heat as many gallons as other models.

Steam Washing Machines Saves Time

A conventional washing machine can take an hour or more to complete its cycle. But with a steam washing machine, there are very rapid spin cycles that can reduce time in the dryer, making up for some lost energy savings. Many steam washing machines also offer a range of different wash cycles, which you can use to customize the process according to your specific needs.

Freshen up with Steam Washing Machine

If you have a smelly laundry room or your clothes stink, you can always add to the wash cycle from steam washing machines a detergent with a natural odor eliminator. This enables clothes in laundry rooms to maintain a fresh smell.

FAQs on the Function of a Steam Feature on a Washer

Is the steam function on a washer worth it?

The washing machine freshens up with steam without adding water. This can save you money on detergent and energy. Plus, your clothes will last longer and won’t wear quickly.

Is it better to have a steam washer or dryer?

Steam washers clean clothes that may be hard to clean by hand, machine-washable drapes and other delicate clothes. They also preserve the fabric, so there is less need for ironing.

Final Thought on Functions of a Steam Feature on a Washer

Finally, opt for a washer and a dryer that will give you more benefits in your laundry room. If having perfectly sanitized clothes is your concern, or you’re worried about allergies and skin sensitivity. In that case, a washing machine with a steam function is what you need to invest in.


The post What Does a Steam Feature on a Washer Do? appeared first on Kitchen Infinity.

Did you miss our previous article…
https://www.centrecountyfood.org/?p=422

post

Photo Gallery of Wild Bird Nests and Eggs

Birds are probably one of nature’s most beautiful creatures. These creatures have so much to offer when it comes to beauty. From their vibrant colors, soft melodies, comical actions, and straight-out impressive features, birds are pure eye candy. 

In this article, we have gathered pictures of nests and eggs from various bird species worldwide. Read on to enjoy every bit of the beauty that these nests and eggs hold within them.

House Finch Nest

House Finches build open cups nests of grass, twigs, and mud. The male builds the nest while the female oversees its construction. They often make their homes close to humans, which makes them popular around cities and suburbs alike. 

House finch eggs are 0.75 to 0.8 inches long with a very long pale blue color and small. There are also infrequent spots that are typically concentrated on the larger end of the egg.

merican Robin Nest

American robins build large nests in the crotch of a tree, under the overhang of roofs, or in man-made structures. Their nests are built with mud and lined inside with grasses, roots, and hair. American Robin eggs are 0.6 to 0.7 inches long and very pointed at the smaller end of the egg. 


Image credit: https://nestwatch.org/

The color can vary from white to pink, but they usually have brown speckles all over the entire egg. Each female American Robin lays between 3 to 7 eggs, but typically 4 or 5. When two females nest close together, they will oftentimes lay their eggs in one nest and then switch once all of the first female’s eggs have been laid. This is referred to as a dump nesting strategy.

Vermilion Flycatcher Nest and Eggs

The Vermilion Flycatcher will usually make their nests in the cavities of trees, and each female lays between 3 to 8 eggs that are white or cream-colored. They do not have any spots on them at all. With its eye-catching feature, the vermilion flycatcher is a favorite among birders, thanks to its brilliant plumage, and its nests and eggs are just lovely. 

Their cup is very sturdy; plus, it is often decorated with moss and lichen bits that serve as camouflage. The 0.75 inches long eggs are creamy-white with bold, thick blotches of lavender, brown, and grey.

nna’s Hummingbird Nest and Eggs

Anna’s Hummingbirds can be found in the United States, and they like to build their nests in small shrubs or trees. Each female lays between 2 to 4 white eggs with a glossy texture. Look for shiny egg spots on these pale eggs. Females tend to lay one egg per day until all of them are laid. 

Anna's Hummingbird Nest and Eggs
Image credit: https://nestwatch.org/

These nests are often found in precarious locations on thin branches, twigs, on cliff ledges, and even astride wire. The nest is lined with feathers to gently cradle the white, symmetrical oval eggs.

Killdeer Nest

At first, you might think that this isn’t a nest at all. This simple nest is lined with pebbles and twigs and even without lining. Killdeers lay their eggs on open ground, which makes their nests highly vulnerable to predators. 

Its light-colored eggs have black and brown splotches, plus, the eggs are somewhat pointed, so they don’t roll easily on flat ground. However, parent birds will often feign injuries to distract predators away from their nest.

Black-Capped Chickadee Nest in a Tree Hole

The Black-Capped Chickadee nests in natural tree cavities and boxes. The female will line the cavity with grass, mosses, and hairs from mammals then she will lay her eggs on these lining materials. She’ll have anywhere from 4 to 7 eggs that are white or greenish. 

These are cavity-nesting birds and will use birdhouses, snags, and other natural nesting holes such as reusing woodpecker nesting sites. The nests are lined with feathers, moss, and animal fur. Their eggs are oval, 0.6 inches and are marked with brownish speckling.

Mallard Nests and Eggs

Mallard duck eggs are large, smooth with a matte or eggshell rather than glossy feel. They’re typically pale blue-green. Their nests are surrounded by tall grass, and while sitting in the nest, the female may line it with vegetation and twigs that she can pluck from around her and her feathers.

Mallard Nests and Eggs
Image credit: https://images.fineartamerica.com/

It takes a lot of energy for females to lay eggs; it heavily depends on their mate for protection and food. After mating, males will remain potent for an extended period if the first brood fails and females need to mate again.  Eggs are incubated for about a month, but hatchlings can leave the nest in about half a day.

Song Thrush Nests and Eggs Images

Song Thrush eggs are pale blue with a few dark spots and a slight gloss. While females lay 2-4 eggs, males do not contribute to parental care or incubation of the eggs. The nests are usually constructed of mud with no grass lining. 

If you come across eggs in the nest, this can be an easy distinguishing factor of the song thrush versus other birds with similar eggs. They lay their eggs in early spring, and after they fledge, the parents feed their chicks until they reach maturity.

House Martin Eggs and Nests

The house martins lay plain white eggs. You can identify the nests of the house martin from a distance by their hanging upside-down shape. The birds build these cup-shaped nests out of mud pellets and grasses they find on the ground while using saliva as a building material to stick the pieces together. 

These summer nesters depend on flying insects for their diet and to feed their brood. The eggs are incubated for two weeks by both parents, and the chicks can take three weeks to leave the nest, though they remain in the colony for several more weeks.

In case there’s no food, the hatchlings can go into a state of torpor, where some of their metabolic processes are shut off to enable them to survive. The first hatchlings often help their parents to feed successive broods.

Pheasant Eggs and Nests

Pheasant eggs are the size of a small hen’s egg. They’re usually olive-brown eggs but can be brownish and have some bluish tones. Their nests are constructed on the ground by digging out a pit concealed among the tall grass. Like chickens and hatching, Pheasant chicks are already covered with feathers and ready to leave the nest.

Mute Swan Nest and Eggs

Mute Swans live in many parts of the world but prefer cold climates. Their nests are large heaps of reed or bulrush stems, usually built in a sheltered location on the water. They can lay from 3-7 eggs, and they only breed once a year. Their eggs are light grey or blue, though they can have brown and grey stains from marsh material.

Rock Pigeon Nests and Eggs

The cliff or rock nesting blue-grey pied color of a pigeon creates the perfect camouflage for their nests. They are also very protective against predators and will even attack creatures as big as humans to protect their babies. Rock pigeons usually breed twice a year, laying two eggs at a time in flimsy twig nests on cliff ledges or buildings. 

The pale blue-grey eggs can have brown and black spots from the mud used to make the nests. Unlike other birds, rock pigeons can breed at any time of the year as long as there are sufficient resources to raise their young ones.

Herring Gull Nest and Eggs

They are large white birds with a pale-yellow bill and long reddish-orange legs. If you come across an abandoned herring gull nest, you will find that there is no lining in it at all. The eggs are usually laid on a bare spot on the ground, and there may be scrape marks where the parent birds have tried to scratch loose material together. 

Herring Gull Nest and Eggs
Image credit: https://cdn.download.ams.birds.cornell.edu/

They prefer to lay eggs on sheltered ground or roof locations with minimal nest construction. However, the parent birds will line the nest site with weeds, grass, and seaweed. Their eggs vary from grey to brown hue to a faint blue or green. They are also marked with brown, lavender, and black streaks or spots. And because they are not in a deep nest, they’re slightly pointed to minimize rolling.

House Sparrow Nests and Eggs

The House Sparrow, a non-native bird, lays its eggs in an untidy nest of straws and twigs on the ground, often mixed with paper litter. The nests are frequently seen in garden sheds or around human habitation. Their eggs are white with variable, often heavy speckling in browns and blue-greys.

The chicks only take two weeks to fledge, and their parents take further two weeks to care for them as they cannot feed for themselves for the first week out of the nest. The male sparrow is in charge of the chicks while the female prepares the next clutch of eggs.

FAQs on Photo Gallery of Wild Bird Nests and Eggs

How long does it take for a bird egg to hatch?

It can take 10 to 30 days, but the incubation period varies, depending on the bird species. Occasionally, it can take ten to thirty days. You should know how to identify baby birds once they hatch to know which nests they come from. 

How do you identify a wild bird egg?

One way is to use the table as a reference. It also helps to have a bird book with you or to enlarge the photo for better detail. The egg’s color, size, and shape should also guide you to identify if it’s a wild bird egg.

Final Thought on Photo Gallery of Wild Bird Nests and Eggs

As you can see, there’re so many types of wild bird nests and eggs, and it’s a privilege to get a glimpse of their lifestyle. With the photo gallery provided, you can easily enjoy the fruits of Mother Nature. Just make sure you learn how to take care of baby birds and don’t harm them in any way.


The post Photo Gallery of Wild Bird Nests and Eggs appeared first on Kitchen Infinity.

Did you miss our previous article…
https://www.centrecountyfood.org/?p=412