Keeping indoor plants can add a touch of freshness and beauty to your home. Gardening is fun and rewarding, so as keeping pets like cats. But houseplants are toxic to cats, especially the curious ones that like chewing on things. You don’t want your cat to fall sick or get into an unpleasant situation such as vomiting or diarrhea because he ate poisonous plants inside the house.
This article will help you identify which plants aren’t safe for your cat from houseplants to garden plants including vegetables and herbs. Let’s get started:
1. Snake Plant
The snake plant is a popular houseplant because it’s easy to maintain and requires minimal care. It’s one of the best plants for low light conditions and for improving air quality. While snake plant is non-toxic to humans, it’s toxic to cats and dogs.
Snake plants contain chemical compounds known as saponins, resulting in feline nausea, vomiting, and diarrhea if consumed. Don’t hesitate to contact a veterinarian if you suspect your cat has eaten this poisonous plant.
2. Asparagus Fern
Asparagus ferns are evergreen plants that produce long, leafy stems from an underground tuber. They have a bushy appearance and add height to your home décor. Asparagus fern is toxic to cats and dogs, so keep them out of reach.

Image credit: https://images.immediate.co.uk/
If your feline friends rub themselves against asparagus fern frequently, it can cause skin irritation. These plants contain saponins which is a compound that can cause dermatitis, stomach pain, and diarrhea in both dogs and cats.
3. Aloe Vera
Aloe Vera is a succulent plant known for its healing properties, especially for burns and wounds. It also contains an ingredient that can be fatal to cats. All parts of the aloe vera plant are toxic to cats if ingested, so keep them away from your furry friends.
4. Peace Lily
This indoor plant may look beautiful, but it’s highly toxic to cats, so cat owners should skip as much as possible. Peace lilies contain insoluble calcium oxalates, so if your cat consumes this lily, it can cause cats to suffer oral symptoms such as burning, excessive drooling, and difficulty swallowing.
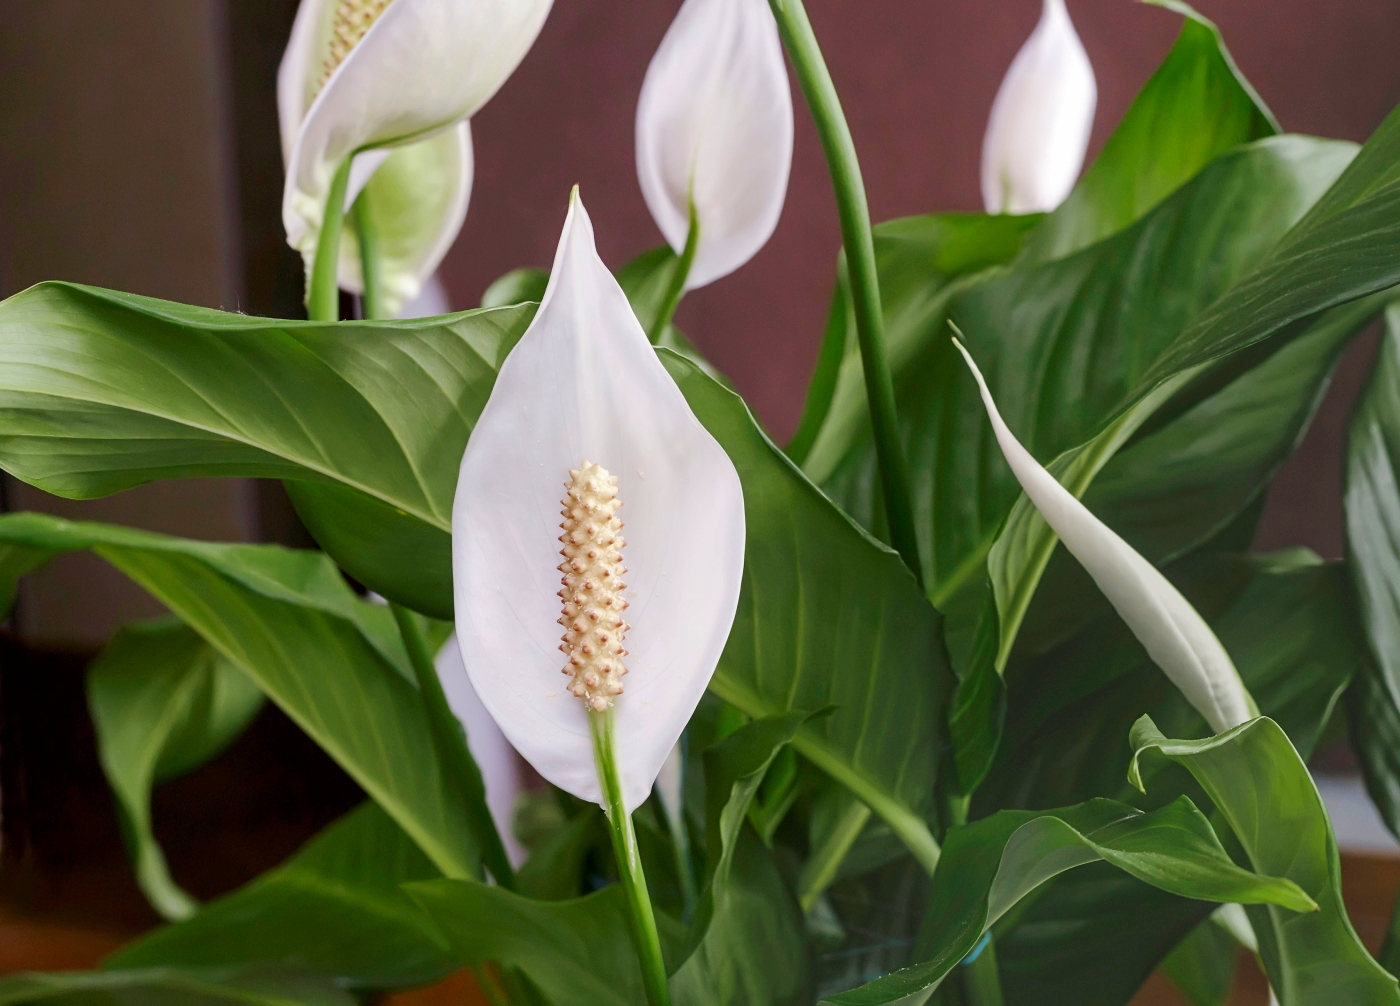
Image credit: https://www.almanac.com/
Instead of peace lilies, you can opt for white orchids, which are non-toxic to pets. Plus, they’re gorgeous and have low maintenance requirements.
5. Easter lily
This year-round favorite can create a lot of issues with furry friends. And it’s not only Easter lily that is extremely toxic. Other lilies such as stargazers, tiger lily, and Asiatic lily can cause acute kidney failure in cats.
No matter how beautiful these flowers look, every part of the lily is toxic to your cat, so avoid these types of lilies if you have cats around your home. It can cause vomiting, loss of appetite, and change in energy level.
6. Jade Plant
Also known as money plants, rubber plants, and lucky plants, jade plants are succulents that are easy to grow and are thought to bring their owner’s good luck and fortune. They have dark green fresh leaves and thick wooden-like stems. Jade plant comes in several varieties, all belonging to the family crassula.
These plants are highly toxic to cats, dogs, and horses. They cause symptoms such as vomiting, lethargy, depression, and in coordination if ingested. It’s better to seek veterinary care if you don’t completely understand its toxic component.
7. Sago Palm
Sago palm is a beautiful evergreen plant that grows in tropical and subtropical climates. They can also be grown as houseplants, but they are highly toxic to cats, dogs, and horses if ingested. Sago palm contains cycasin, a toxin that causes vomiting, abdominal pain, lethargy, convulsions, and coma.

Image credit: https://www.gardeningknowhow.com/
These plants can do wonders for indoor air quality. Their unique structure makes them a great talking point and a lovely accent piece. However, with their defense mechanism, they can be highly toxic to your feline friend. Sago palm can cause even liver failure and death if consumed or chewed.
8. Indian Rubber Plant
The Indian rubber plant has very attractive large leaves and is sometimes used as an outdoor plant in USDA zones 10 and 11. It can cause vomiting, stomach irritation, and difficulty breathing if your cat ingests it. The plant sap contains a chemical irritant that causes drooling, oral irritation and vomiting, not to mention that this sap can also cause severe skin irritations in humans.
9. Elephant’s Ear
One of the most poisonous of all houseplants for cats is Elephant’s Ear. This plant has large leaves resembling an elephant ear. It causes intense gastrointestinal irritation and vomiting if ingested by your cat.
It contains insoluble calcium oxalates that can cause kidney failure. Fortunately, you can swap it with a calathea medallion which offers the same tropical vibes and rich green foliage, the same as an elephant’s ear. It’s non-toxic to cats and is a low-maintenance plant that even those without a green thumb can keep healthy.
10. Devil’s Ivy
This is a common houseplant that has seen its fair share of the limelight in pop culture recently. The best part is it doesn’t even need soil or water to grow, as all you have to do is wet the walls on which the stems grow, and the Devil’s Ivy will do the rest.
This plant also goes by several names, including pothos, golden pothos, and taro vine. It contains insoluble calcium oxalates that cause mouth, throat, tongue, and lip irritation. It can also cause intense burning, excessive drooling, vomiting, and difficulty swallowing.
You can swap it with a Chinese money plant of the pilea genus family that is considered non-toxic to cats and offers the same drooping aesthetic as devil’s ivy. Plus, these types of non-toxic plants may also bring good Feng shui into your home.
11. Clivia Miniata
This indoor flowering plant contains insoluble calcium oxalate crystals, which can cause intense burning and irritation in pets’ mouths, tongues, lips, and throat. This flowering plant contains alkaloids that can cause symptoms ranging from vomiting, diarrhea, low blood pressure, and arrhythmia in both dogs and cats.
12. Ceriman
Also known as the Hurricane plant or Swiss Cheese Plant, the Ceriman is an indoor flowering plant that contains insoluble calcium oxalate crystals, which can cause intense burning and irritation in the mouth, tongue, lips, and throat of pets.
It’s also one of the most popular household plants, thanks to its tropical look. It, however, contains insoluble calcium oxalates making it moderately toxic to cats.
13. Tomato Plants
The tomato plant or the Lycopersicon is a flowering plant with green leaves and red berries containing tomatine. Just like humans, cats can be affected by its toxic alkaloids if ingested in any quantity.
Try to keep your tomato on the patio or in the garden and out of your cat’s reach. And if you have an outdoor kitty, try to grow non-toxic buttercup squash instead.
14. English Ivy
Thanks to its low-light needs and drought resistance, the common English Ivy is a popular choice as a houseplant. However, it contains triterpenoid saponins which are poisonous for cats if any part of the plant is ingested. Make sure to keep your cat away from this plant.
Its gorgeous drapery feature makes it attractive to curious felines, which is extremely dangerous because English Ivy is toxic to cats. When cats chew it, it can cause a range of symptoms, including weakness, vomiting, throat swelling, excessive drooling, dermatitis, rash, and ataxia.
15. Dumb Cane
Dumb cane also belongs to the same group of plants like English Ivy and is just as poisonous. It contains calcium oxalate crystals which cause burning in the mucous membranes, vomiting, diarrhea, and respiratory distress. Like other toxic plants for cats, keep this plant away from your pets at all times.
Dumb canes come in different varieties, varying from a couple of feet high to over ten feet tall when grown in the right conditions. When ingested, they are highly toxic to cats, and their sap can be a mild irritant to humans, so keep them away from bare skin. Symptoms of dumb poisoning in cats include vomiting, burning of the mouth, oral irritation, swelling, and severe cases of difficulty swallowing and breathing.
16. Azalea
Azalea plants, both the species we enjoy as ornamental plants and those used commercially, are highly toxic to cats. If your cat eats any part of the plant, it will cause gastrointestinal irritation along with excessive drooling, vomiting, and loss of appetite. In extreme cases, seizures have been reported.
The leaves from this house plant are very popular in Asian cooking, so if your cat has a habit of munching on house plants, it might be an idea to remove the philodendron from your home. The entire plant is poisonous, with all parts containing calcium oxalate crystals that cause intense burning of the mouth and throat, swelling of the tongue, intense thirst, and oral ulcers.
17. Moss Rose
In recent years, Moss rose has become an extremely popular house plant, but it’s always best to check with your local veterinarian before introducing any new plant into your home.
The leaves are considered to be non-toxic; however, the stems and seed pods are highly toxic. If ingested, they can cause intense gastrointestinal irritation accompanied by an intense burning sensation, excessive drooling, and vomiting. Hops are closely related to cannabis, but they contain no mind-altering substances.
This houseplant is incredibly poisonous to cats, so you should avoid it. It can cause tremors, kidney failure, and hypersalivation if your cat chews it. You should seek immediate veterinary treatment immediately if you suspect your cat has chewed it.
18. Amaryllis
If you’re growing Amaryllis at home, you should know that it’s a poisonous plant to cats. The stem and bulb of the Amaryllis are toxic, but only if consumed in large quantities. Symptoms include vomiting, diarrhea, depression, light sensitivity, and changes in heart rate.
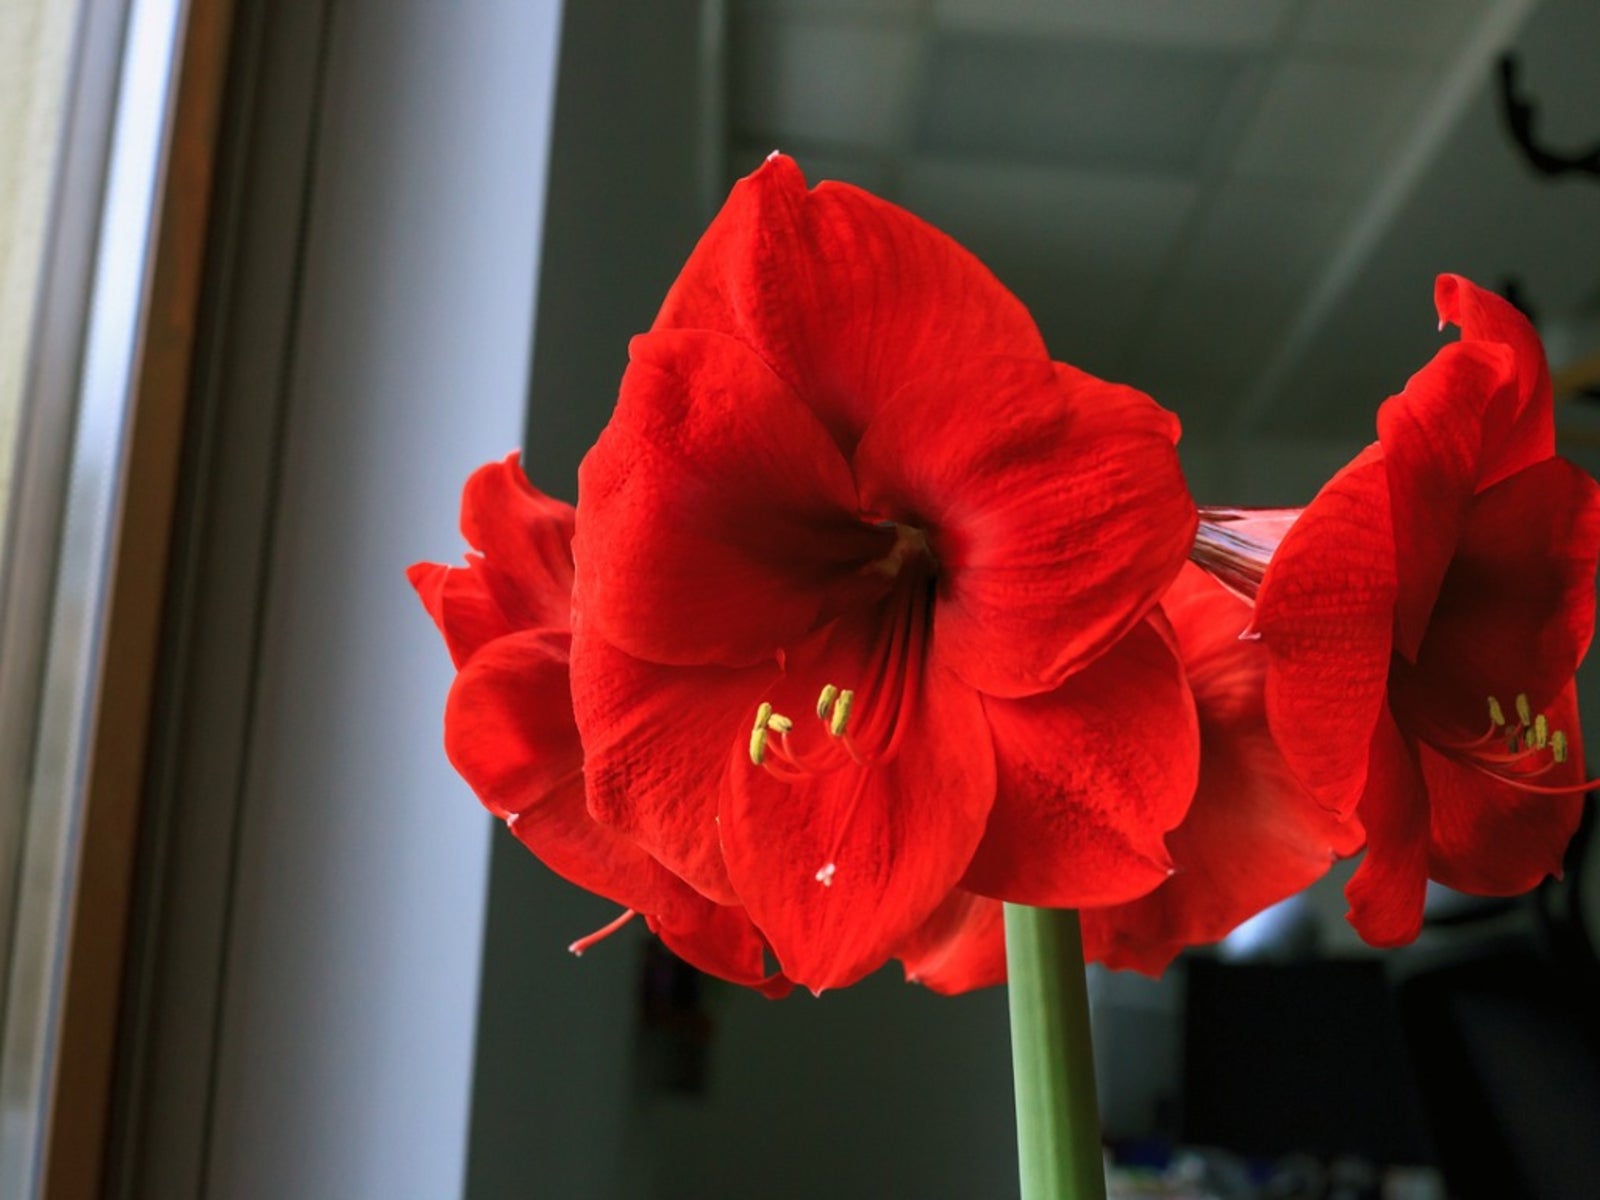
Image credit: https://www.gardeningknowhow.com/
When your cat nibbles on this houseplant, it can experience stomach pain, excess drooling, tremors, diarrhea, vomiting, and a decrease in appetite. However, you can swap it with orchids which offer an exotic outburst of color and are non-toxic to cats.
FAQs on Common Household Plants Toxic to Cats
What are some of the cat-friendly houseplants?
Common plants that are cat-friendly in your home that will give you peace of mind include various succulents, orchids, ferns, and spider plants.
How do you keep your cats from eating poisonous plants?
The first step to keeping your pets safe is understanding which plants are poisonous. Some houseplants can be made less toxic by cutting back on their food supply, exposure to light or water.
Final Thought on Popular Houseplants that are Toxic to Cats
Before bringing new plants into your home, it’s important to research first on their toxicity levels. Learning about these common houseplants will help you make the right decision in keeping your houseplants safe and healthy while keeping your pets protected from possible poisoning or illness that can occur when they eat or chew on poisonous plants.
Keeping your indoor safe from these poisonous plants to cats is very easy. But for an outdoor kitty, it gets a bit tricky but you can reduce the chances of accidental ingestion by removing the most dangerous plants from your garden and checking if there is any toxic plant in your neighbor’s garden. Make sure your outdoor plants are not harmful to your furry friend.
The post 18. Popular Houseplants that are Toxic to Cats appeared first on Kitchen Infinity.
Did you miss our previous article…
https://www.centrecountyfood.org/?p=391