post

Bird Bath Fountains and Why You Need One

Birds are a great addition to any yard, but how do you get them to come? You can’t just put out a birdbath and expect birds to flock. They need more than that; they need food, water, and shelter. To attract the most birds into your garden, it’s important to make sure all of their needs are met. 

All it takes is one little bird bath fountain in your backyard or front yard. The sound of running water will attract many songbirds, including blue jays, woodpeckers, and sparrows. If you’re looking for something more traditional, like a stone basin with plants around it, we have those too! There are dozens of designs available so you can find the perfect one for your home.

Types of Bird Bath Fountains

Hanging Bird Bath Fountains

A hanging bird bath fountain is a great way to add motion and sound to your outdoor space. The sound of falling water refreshes and captivates. It can even contribute to the overall ambience of your yard or garden.


Image credit: https://cdn.shopify.com/

These bathroom fountains for birds are made from durable steel and other metals, making them long-lasting, low-maintenance additions to your garden. You can also use it as a bird feeder if you prefer.

Pedestal Bathroom Fountain for Birds

Built with you in mind, pedestal bird bath fountains add a touch of class to your yard while giving birds the perfect place to get clean and take a drink. Like other bathroom fountains for birds, this type is made from durable materials such as resin and metal.

This classic pedestal-style bath is popular with bird lovers. It can withstand all types of weather to attract birds year-round. The shallow bowl is also ideal for smaller birds.

Water Wiggler Bathroom Fountain for Birds

As the name suggests, this bathroom fountain also wiggles to attract birds. It moves water through an internal tube system that gets birds’ attention with movement and sound. The cup is ideal for tiny songbirds such as finches, flycatchers, wrens, thrushes, and more.

Water Wiggler Bathroom Fountain for Birds
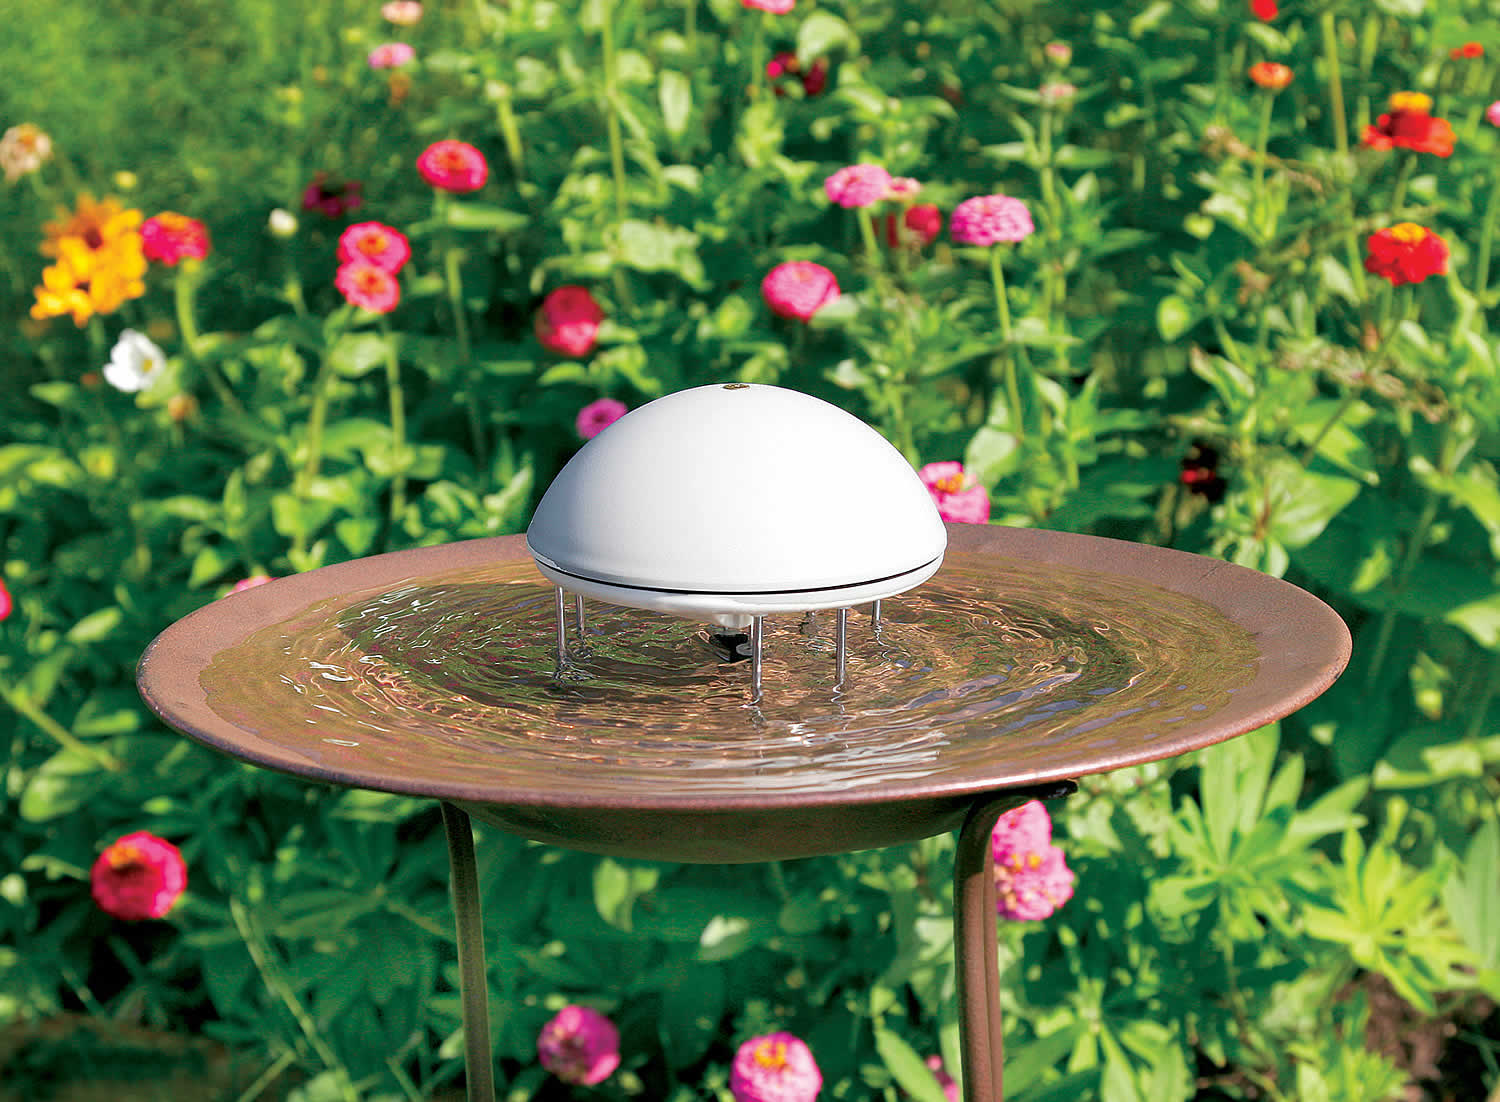
Image credit: https://www.duncraft.com/

Birding experts also recommend the water wiggler to catch the attention of more bird species with moving water. You might also attract migrating birds like warblers that don’t visit bird feeders.

Ground Bird Bath Fountain

This fountain is a ground-mounted bathtub fountain with a very shallow dish. Its design allows water to change directions many times before it eventually falls into the shallow dish. The single tube emits a gentle bubbling noise that makes it readily available for birds in search of water.

It lessens the need for frequent cleaning because dirt and debris do not settle as quickly as they would on a static model. Ground dwelling birds like sparrows and juncos will appreciate the easy access to water. It holds four cups of water in the shallow basin.

Tree Stump Bird Bath Foundation

This fountain provides water for various types of birds in an instant. It is built around a tree stump foundation which offers the user several options in addition to holding water. You can place plants in the water or on top, you can feed the bird’s fruit that will attract them to your yard, and they can even rest inside it when weary.

Tree Stump Bird Bath Foundation
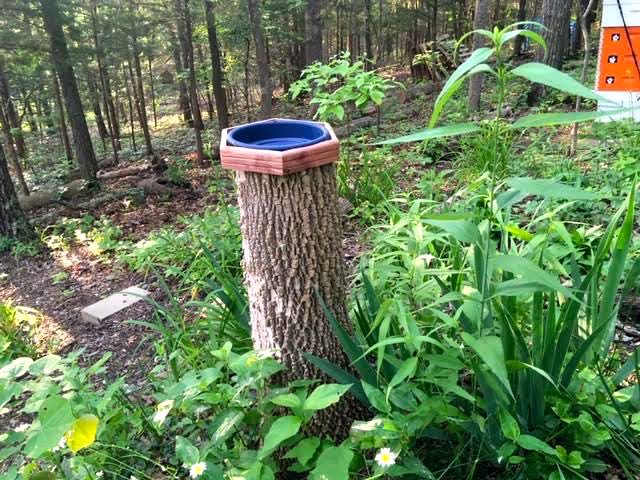
Image credit: https://images.squarespace-cdn.com/

The three-leg design prevents it from being knocked over by other birds or neighborhood kids. If you adore cardinals, then this is the right choice. The natural look will blend well in your backyard.

It’s made of durable resin to last for years. You can also use it as an indoor decorative piece. The realistic-looking tree stump is topped off by a bird’s nest, with faux green succulents growing on the wood.

Glass Koi Bath Fountain

Koi fish baths are remarkable pieces that add an aquatic feel to your home. The inclusion of glass makes it look like you’re gazing into the waters of a river or pond. It has a calming vibe and can add to the serenity in any room.  This glass bowl is bright and light, with a sturdy metal base included. The frame folds up easily to store it in your garden shade.

Sunflower Bird Bath Fountain

If you want a smaller fountain, this one is a great choice. It’s a hollowed-out sunflower complete with a birdbath and foliage around the base. The colors are bright and cheerful, and it gives an old-world feel to your garden or porch setting.

The pedestal birdbath can be used as a beautiful home accent, but it’s also functional. The water falls out of the bowl and into the pool below, which can be used to your pet’s or children’s delight. This is a great way to keep them cool in the summer months.

Mosaic Bird Bath Fountain

How beautiful and unique! This one is made from a mosaic of brightly colored tiles and has a little bird on top that sends water into the bowl below. You can set this in your front yard or backyard, and it will give off a strong sense of style and class. It’s perfect for pet owners who want to keep their animals cool during the warm months.

This handcrafted mosaic piece will also sparkle in direct sunlight and beautify the shade. It doesn’t come with a stand, so the seller recommends the dish on an inverted terra-cotta pot.

Stone Bird Bath Fountain

Here we have a very natural and rustic birdbath fountain. It’s made from mainly stone and is perfect for people who want to keep nature close by but still give their outdoor space a touch of class. It has an upper portion with a little opening that the water pours out of. You can either sit this on dry land or fill it up with water and let the birds drink from it.

This is another natural birdbath fountain that is gorgeous. It uses a large enough bowl to place plants inside of it if you wish to do so. This also has an inverted top portion, so it creates a nice gentle sound when the water starts to flow.

Ceramic Bird Bath Fountain

This is the perfect fountain for anyone who wants a little piece of art in their outdoor space. This has a small base and inverted top but with intricate designs that give it such an uplifting feeling when you look at it. Setup is quick and easy, you screw the bowl onto the pedestal stand.

Concrete Bird Bath Fountain

This is what I ended up getting for my backyard. It has a unique design, with the bowl perched atop the pedestal stand. However, there are no bells and whistles when it comes to this fountain. You can also create your unique design by painting it whatever color you like.

Cast Iron Bird Bath Fountain

This birdbath fountain has a classic look to it. But what makes this stand out from the rest is the little pump that pumps water up and runs down throughout the tiers of this fountain. It adds to its charm and loveliness. If you like an artistic touch to your backyard, then this is just for you.

Solar Bird Bath with Lights

If you want to go green and add some style, then this is the fountain for you. All you have to do is leave it out in the sun and watch your fountain light up your backyard. The solar power powers the pump, so there are no messy wires running all over the place. Just make sure that this birdbath faces south to receive direct sunlight to turn on at night.

Solar Bird Bath with Lights
Image credit: https://wildbirdsunlimited.typepad.com/

Solar Water Fountain with LED Lights

This is the most colorful of the three fountains. You have a simple fountain with some solar panels in front by day. But by night, watch lights light up within the solar panels and reflect off the water for an enchanting glow. Since the lights are solar-powered, you don’t have to worry about hauling extension cords around or even changing batteries.

The three different shine modes allow these lights to turn on at dusk and off at dawn. Just make sure that this fountain is facing south to get enough sunlight to charge during the day.

Plastic Bird Bath and Feeder Fountain

This is the cheapest and simplest of bird bath fountains. It has a little basin for birds to drink from, along with a feeding ring above it, so you can also feed them as they drink. The entire fountain is made out of plastic, so no need to worry about rust or metal pieces that might fall apart.

They included a plastic water tray that holds water, so remove it, and you have a bird feeder. The base is crafted of durable Eastern red cedar wood.

FAQs on Bird Bath Fountains and Why You Need Them

What is the importance of bird bath fountain?

Birds need bird baths in the winter, just as they need the rest of the year. In the very cold months, water can be very hard to find, and they do appreciate a bird bath with accessible water in it. If your backyard has a heated bird bath, then you can expect some activity all year, even in the winter. They give you an opportunity to interact with different bird species and identify baby birds as well. 

How often should you change the water in the bird bath?

You should change the water every two to four days then clean up the bird bath. Remember, taking care of birds coming to your yard involves providing them with clean water in the fountains.

Final Thought on Bird Bath Fountains

Birds need a full and clean bird bath. So if you build it, they will come. Make sure you clean your bird bath with a garden hose every couple of days. If you see dead bugs floating in it or algae starting to form, that’s a clear indication that it’s time to clean. You can also learn different ways to attract birds to your compound such as putting our hummingbird feeders


The post Bird Bath Fountains and Why You Need One appeared first on Kitchen Infinity.

Did you miss our previous article…
https://www.centrecountyfood.org/?p=988

post

Electrical Service Panel Basics Homeowners Should Know

Electrical service panels are an essential part of your home’s electrical wiring system. If you’ve ever wondered what is inside a service panel, how it works, and why it’s so important, then this article is for you. It explains the basics of your home’s electrical service panel so that you can better understand how to use it and stay safe. Read on!

What Is an Electrical Service Panel?

The electric service panel is the connection between internal wires coming from the street and the internal electrical wires of the home’s electrical system. The service panel is the central distribution point that connects the service wire to the exit wires.


Image credit: https://www.dfliq.net/

These exit wires are called branch circuits or branch wire circuits. In single-family residences, the owner of the building owns the electric service panel and not the electric company.

In that case, the owner is responsible for all the electric service panel issues. As a homeowner, you might not realize how much damage can be done if this service isn’t installed or maintained properly.

Where to Find Electrical Service Panel

The home electrical panel is generally kept away from the main household activities. These locations include the garage, hallway leading to the garage, basement, and closet. You can also find your electrical panel by locating the service drop and service head on your roof.

Usually, the service panel should be directly below, in one of the home’s stories. If the power lines are buried, the line will start on the street and connect to the home from the front or side of the house.

Older houses using fuse boxes are placed in the outer part of the house, especially to a section of the wall or in a particular structure constructed to house the distribution box. In most modern households, the electrical service panel can be found near the electrical meter, which measures the electricity consumed every month.

Types of Electrical Service Panel Basics

Main Electrical Service Panel

The main electrical service panel is the connection point for all the electric lines entering the house. This is also where copper cables connect to fuses or circuit breakers that protect wiring in your home’s walls and circuits. This allows current to flow safely through fixtures, appliances, outlets, and light switches.

Main Electrical Service Panel
Image credit: https://www.thespruce.com/

With the main electrical service panel, you can shut off the incoming utility power and receive incoming power from the utility company and distribute it to each branch circuit that supply various fixtures, outlets, appliances, and other devices throughout the house.

Electrical Service Panels are generally referred to as either main or sub-panels, depending on the circuit breaker size. The service panel that supplies electricity to your entire home is the main electrical service panel or main breaker box. Your home’s main electrical service panel should be installed by a trained professional because it must meet specific building codes and requirements. Professionals also know how to calculate electric load capacity for homes, hence ensuring safety.

Sub Panel

A sub-panel is a power distribution center with circuit breakers and incoming electrical service. This type of panel feeds electricity into a smaller area, such as an outbuilding or detached garage. A sub-panel can only be fed by a single incoming circuit from the closest main electrical service panel.

In other words, it cannot be fed by the main electrical service panel you have in your home. A new sub-panel must be installed and wired to the closest main electrical service panel if additional circuits are needed.

Circuit Breaker Panels and Fuse Boxes

When a circuit draws more current than it’s designed to handle, the wiring gets hot and poses a fire hazard. Excessive current in a circuit is prevented by overcurrent safety devices, which disconnects incoming power to individual circuits when necessary.

In most contemporary systems, these are called circuit breakers. A circuit breaker is a switch that may shut off manually or trip automatically by an electric system overload. Fuse boxes are designed to prevent circuit overload. Circuit breakers and fuses are the weakest links in each electrical circuit, designed to fail safely.

It’s important to know what to be aware of when ensuring the proper function of these electrical safety devices in your home.

Service Distribution Panel and Branch Circuits

A service panel is a major component in an electricity supply system. It distributes power from the utility service drop to the individual branch circuits that serve your electrical appliances and light fixtures. All branch circuits originate at the main electrical service panel or the service distribution panel.

The panels are equipped with some mechanical device for disconnecting the home’s electrical circuits from the incoming power if the electric system fails. An overload can cause failure due to excessive heat or even catching fire. Although the main breaker is used to turn all branch circuits on and off at the same time, there are times only one branch circuit to a certain area of the home needs attention.

The most important function of the service panel is safety, keeping you and your family members safe from electrical shock. Any electrical repair in your home involves turning off the power to the circuit to be worked on, and this is only done at the service distribution panel. Depending on when your home was built, your service distribution panel may be either a circuit breaker panel or a fuse box.

What Can Go Wrong with Panels and Breakers

Corrosion

If a branch circuit breaker fails to trip when current flow exceeds safe levels, it could be the result of electrical corrosion. Corrosion occurs when electricity flows through a metal conductor such as copper or aluminum and slowly erodes that metal away.

Corrosion can lead to loss of material and weaken the connection between wires, damaging the breakers and creating a fire hazard. Electrical service panels should be inspected regularly for signs of corrosion.

Overloaded Circuits or Panels

If a circuit is overloaded with too many appliances, the wiring will get hot and may even melt the insulation on the wire. This can damage or destroy a breaker. Most household circuits are rated either 15-amps or 20-amps. A 15-amp circuit breaker can only handle around 12-amps, while a 20-amps circuit breaker can handle about 16 amps.

When you connect too many appliances to the same circuit, the overcurrent safety will frequently trip or blow.

Outdated Fuse Boxes

Older homes may have outdated fuse boxes instead of circuit breakers. They do the job, but they are less reliable and more difficult to inspect for hazardous conditions. You should upgrade any old fuse boxes to a modern service panel with circuit breakers as soon as possible. These older systems have the potential to become unsafe if not well maintained.

FAQs on Electrical Panel Basics Homeowners should Know

What is an electrical panel called?

A distribution board, also known as panelboard, breaker panel, or electric panel, is a component of an electricity supply system containing many electric circuits.

Final Thought on Electrical Basics You Should Know

All wiring in your home should be in accordance with local building and electrical codes. Most homeowners only have the experience of opening the outer door of the electrical service panel to flip on a disabled circuit breaker. 

Even if you’re a DIY master, always hire a qualified electrician to do any work, especially when it comes to any work that involves removing the protective front cover. While the cost of electrical projects can be high, especially if you hire an electrician, it’s always worth it in the long run. It’s better to be safe than sorry.


The post Electrical Service Panel Basics Homeowners Should Know appeared first on Kitchen Infinity.

post

The Dos and Don’ts of Kitchen Color Schemes

Choosing colors for your kitchen is a big decision that can have lasting effects on the way you feel when spending time in this space. When choosing hues, it’s important to consider whether or not they’ll become boring after some time. If so, this could lead to an unpleasant experience and make it harder to enjoy cooking and eating in your kitchen.

To avoid making decisions that will cause regret, later on, follow these dos and don’ts when choosing paint colors for your kitchen. These tips will help ensure you love what you see every day. Read on!

The Dos of Kitchen Color Scheme

Take Expert Advice

When it comes to choosing a kitchen color scheme, it can be confusing. So, take advantage of the knowledge and experience that color professionals and designers possess. They’ll know about how colors work together and will be able to make recommendations based on your lifestyle, preferences and tastes.

Some color advisors will also help you with color selections, while others will work as interior designers or architects that provide color consultation as part of their services.

Consider the Lighting

Lighting is key when it comes to choosing kitchen color schemes. The more natural light you have in your kitchen, the more real the colors appear. If your kitchen is small and dark, consider a kitchen color scheme to make the area look bigger and more inviting.

You can paint your walls a dark tone, but only if your countertops and cabinets are not dark. Along with natural light, think about the artificial light in your kitchen. Colors tend to appear different depending on the light fixtures you use. Adding soft gold light fixtures can be enough color to add depth to your kitchen color scheme. So, whenever you think about coloring your kitchen, also consider choosing the right lighting for your kitchen

Use Chalkboard Paint on the Kitchen Door or a Wall

A chalkboard makes a wonderful addition to any kitchen, whether it’s for keeping track of your grocery list or jotting down recipes as they come to mind. If your walls are dark, paint them with matte black Chalkboard Paint, and you won’t be able to miss them.


Image credit: https://diy.sndimg.com/

You can find a wide variety of chalkboard paint colors from most paint suppliers. It’s perfect for kids to scribble without damaging the walls and for adults to write lists and quotes or draw images while adding color. And if you’re not ready to commit to a wall of chalkboard paint color, a framed DIY chalkboard in your favorite color can also work.

Consider Cool vs. Warm Color Palettes

Most children learn about warm colors and cool colors during art class. Making up two halves of the color wheel, warm colors include reds, oranges and yellows, while cool colors include greens, blues and purples. These color groups tend to evoke different emotions.

Cool vs. Warm Color Palettes
Image credit: https://hgtvhome.sndimg.com/

So deciding on the emotions you want in your kitchen can help you decide on these color palettes to use. Warm colors evoke cozy, warm feelings in a room, especially with yellows and oranges. These colors can also be bold, dramatic or dynamic if you focus on reds.

On the other hand, cool colors are often associated with tranquility and refreshing emotions, especially with blues and greens. Another option other than sticking to one color palette is to contrast them. For example, you can make any yellow kitchen feel more grounded by adding a touch of a cooler color.

Watch Your Undertones

Understanding how to paint undertones will help you get the colors that work best for your kitchen. All colors, even neutrals, have a color undertone that adds gray, green and even pink to an otherwise neutral space. Learning about different undertones can help you decide what colors go together in your kitchen color scheme.

Look Carefully What’s in the Kitchen

You should take a close look at what’s already in your kitchen. This can help you decide which colors go together and which ones clash. Compared to other rooms in the house, kitchens have more things that you need to consider when choosing a color scheme.

Your countertops, cabinets and appliances all bring their colors and hues to the kitchen. These items may clash with whatever paint colors you pick. Decide whether part of your kitchen remodeling plans include repainting cabinets or putting in a new countertop.

If that’s not part of your plan, you’ll have to work around the existing colors. The kitchen floor also adds color to the space, which you’ll have to work with if new flooring isn’t in your plan. Think about how different wall colors will look contrasted against different colors of hardwood, tile or linoleum floors. If your floor pattern contains multiple colors, consider tying in one of those colors when choosing a kitchen color scheme.

Don’ts of Kitchen Color Scheme

Don’t Hesitate to Use Gray Wall Colors in Your Kitchen

Gray is a pretty neutral color, so that it will go with almost any other color in your kitchen. It’s also a great backdrop for artwork, light fixtures and shelves that you might hang above the cabinets or counters. These qualities make gray one of the best colors for the kitchen.

Don’t Overdo it With the Color

It’s easy to get carried away and paint every wall in your kitchen a different color, but this can be overwhelming. Mixing colors well is harder than you might think. Instead of going hog wild with several bright colors, stick to one or two that you like and try pairing them up with neutral shades.

Adding too many colors might also make the space appear cluttered and disorganized. A basic rule of thumb is to use three colors. These include primary color, neutral color and secondary color.

Don’t Forget About Connecting Areas

Don’t forget about adjoining rooms in your kitchen color scheme. An accent wall can provide more color to an open dining hall or a living area. By dividing a few of the room’s colors across the surrounding spaces, you may connect the color scheme. Also, consider the rest of your home.

If you want to go with a modern kitchen design but your property is older, add a few key features for the sake of consistency. And to avoid inconsistencies in the house, keep the color schemes of the room similar. In this case, adding a feature wall in the kitchen is a terrific approach to experiment with color.

Don’t Ignore the Undertones

Paint colors are usually made by combining two separate tones of paint, so when looking at a paint color, you’re looking at two different colors together. One is the primary color or mass tone, and the other is the color that achieves that specific tone.

Since your kitchen has a lot of cool elements, choosing a warm undertone, even if the overall tone is cool, will look odd. Comparing the shade of paint with the pure tone of the same color is the greatest approach to choosing the perfect color for your kitchen. Comparing your shade to the pure shade will help you see the undertone more clearly and decide whether it will look right in your space.

FAQs on the Dos and Don’ts of Kitchen Color Schemes

What colors make the kitchen look bigger?

White or light colors reflect light, making spaces look bigger and brighter. In contrast, darker colors absorb light, making a room feel smaller and cozier.

Final Thought on the Dos and Don’ts of Kitchen Color Schemes

Creating a flowing kitchen color scheme might seem like a daunting task at first. But with time, patience, and a little warmth, you’ll find yourself with the perfect kitchen color scheme within no time.  


The post The Dos and Don’ts of Kitchen Color Schemes appeared first on Kitchen Infinity.

Did you miss our previous article…
https://www.centrecountyfood.org/?p=981

post

9 Best Quiet Bathroom Exhaust Fans

Bathroom moisture and odors can lead to a variety of problems, including slippery floors, damp towels, and unhealthy fungi. Fortunately, installing an exhaust fan in your bathroom is an easy way to keep these problems at bay. Exhaust fans remove moist air from the room so that it doesn’t get trapped inside where it can damage over time.

However, you’ll want to choose the right type of fan for your space before making a purchase. The right type of exhaust fan will also reduce unpleasant odors and allergens like pollen and pet dander without causing any damage to nearby surfaces or leaving behind harmful residue after use.

Here are the quietest bathroom exhaust fans that stand up to the challenge.

1. Panasonic Whisper Fit EZ Retrofit Fan

This is the quietest bathroom fan for those who want a simple and affordable solution to keep the air in their bathroom cleaner, fresher, and free from odors. The Panasonic Whisper Fit EZ Retrofit Fan is perfect for those who want a home improvement project that won’t draw too much attention because it doesn’t look like it came straight out of a science fiction movie.


Image credit: https://dynastybath.com/

This is an incredibly powerful bath fan with a noise rating of fewer than 0.3 sones. This makes it an ultra-quiet bathroom fan with the LED light in the market that you can’t pass by if you’re shopping for the quietest bathroom exhaust fan. This fan is also low profile and comfortably fits a ceiling space or wall.

It’s an affordable choice for delivering quiet, energy-efficient, and effective exhaust ventilation. If you’re doing residential remodeling, hotel construction, or renovations, then this is a perfect choice. Unlike other quiet exhaust fans with plastic blades, this Panasonic product uses galvanized steel blades.

If you’re also looking for a fan that can keep medium to large bathrooms dry without being a noisy nuisance, this is the right choice.

Pros

Ultra silent at less than 0.3 soneEnergy-efficient and durable designPowerful enough to quickly move air and keep the bathroom dryIt’s among the quietest choices in the marketEasy to install in 4 or 6-inch ducts

Cons

It’s one of the expensive options in the marketSome LED bulbs won’t fitUsed for 4-inch or 6-inch, so if you have a 3-inch, you’ll need an adapter

2. Broan Very Quiet Bath Fan

The Broan Very Quiet Bath Fan is for bathrooms up to 75 square feet, which is large enough for the average bathroom. This model is more than half the cost of the most expensive Panasonic fan, allowing you to save a considerable sum of money.

Broan Very Quiet Bath Fan
Image credit: https://i5.walmartimages.com/

It comes with True seal damper technology to reduce air leakage by 50 percent compared to similar models. In addition to being quiet and effective, installing this bathroom fan is easy, thanks to its hanger bars for wall placements. It’s also energy-efficient and durable, ensuring you can use the fan for long periods without worrying about power bills or the system wearing out.

Plus, the plastic body of this fan can blend in and even complement the aesthetics of most bathrooms. It’s also a top choice if you’re looking for a quiet fan that delivers clean air and is super easy to install. The unit is HVI certified and energy star qualified. The manufacturer also recommends that it’s used for bathrooms in 75 to 80 square feet.

Pros

It doesn’t require lots of space or special tools for installationIt’s one of the quietest bathroom fansEnergy-efficient designEffectively dries and ventilates bathroomsHanger bar system includedCertified for use over the bathtub

Cons

Difficult to install in existing roomsRequires professional wiring

3. Broan NuTone Quiet Ceiling Fan

We all know that bathrooms can get steamy and wet, making them ideal for mold, mildew, and bacteria. The Broan NuTone makes it easy to remove moist air from your bathroom while reducing odors with its powerful circulation system.

Broan NuTone Quiet Ceiling Fan
Image credit: https://images.thdstatic.com/

There is no need for an additional ductwork connection. You install this ultra-quiet fan between the joists in your ceiling. The quiet operation of this bathroom exhaust fan makes it ideal for sleeping areas, while its Energy Star efficiency saves money on your energy bills.

This model keeps the bathroom at a comfortable temperature and helps to minimize moisture and fogging. It also comes with a light for added convenience. This fan is suitable for 105 square feet bathrooms. Thanks to the 6-inch hose connector and the anti-vibration mounting, it also comes with easy installation.

Pros

It comes with integrated lightPerfect for medium size bathroomsThe integrated heater helps combat moisture and fogging

Cons

Very expensiveNot as energy-efficient

4. BV Ultra Quiet Bathroom Exhaust Fan

BV Ultra Quiet Bathroom Exhaust Fan is known for its quiet operation. And since it’s also Energy Star efficient, you’ll have the best of both worlds when it comes to this bathroom fan. This model can be used in rooms up to 90 square feet. The humidity sensor helps limit condensation and fogging when the bathroom gets steamy.

BV Ultra Quiet Bathroom Exhaust Fan
Image credit: https://m.media-amazon.com/

It’s made of a stainless steel body, making it durable. It also has a silent clever technology which makes it a whisper quiet bathroom exhaust fan such that it can be challenging to know if it’s on. Its heavy-duty motor fan is suitable for continuous use, especially if you have a busy bathroom that requires it to be on often.

The fan also comes with an adjustable bracket, making it easy to install. The unit comes with a one-year limited product warranty with technical support service.

Pros

Quiet operationStainless steel bodyOne year limited warrantyAdjustable bracket for installation

Cons

It may be difficult to installComplains of unexpected loudness

5. Delta Breez Near Silent Vent Fan

Delta Breez Near Silent Vent fan is an excellent choice for a bathroom exhaust fan that can be used without worrying about it being too loud. The fan comes with a multi-functional control switch, allowing the user to have full control of its operation. The unit is completely portable and requires no ductwork at all.

Delta Breez Near Silent Vent Fan
Image credit: https://images.hdsupplysolutions.com/

This bathroom fan has an indicator light to know if it’s on because at 0.6 sones, it may be difficult to know. The motor is a DC brushless type which will probably outlast many other appliances.

Other features boosting this fan’s effectiveness and convenience are its 6-inch duct and motion sensor. The 6-inch duct enables the fan to extract bad air and bring in fresh air faster while the motion sensor automatically turns on the fan when a person walks in.

It also has a humidity sensor that triggers the fan once the humidity level in your bathroom passes a certain level. On the downside, this is the most expensive bathroom exhaust fan. It’s also the least efficient, making it pricey to use. On the other hand, if you need a fan that’s powerful enough to serve a large or commercial bathroom, then this is a great choice.

Pros

Capable of moving a large amount of airSuper quiet performanceDurable buildIt comes with humidity and motion sensor

Cons

Highly expensiveLess efficient than other bathroom fan options

6. Akicon Ultra Quiet Ceiling Exhaust Bathroom Fan

This is a more standard bathroom ventilation fan from Akicon. It comes with noiseless technology that helps it be ultra quiet. The exhaust fan has a powerful motor that works to remove moisture and odors from your bathroom. It’s rated the most efficient of all the bathroom fans on this list, making it a great choice for busy bathrooms.

Akicon Ultra Quiet Ceiling Exhaust Bathroom Fan
Image credit: https://secure.img1-fg.wfcdn.com/

This fan is suitable for bathrooms with a 4-inch duct connection, and you may need the help of a professional to install it. This is a budget-friendly fan that excels at being quiet, but it’s most effective at keeping smaller spaces dry well and ventilated.

Pros

Long-life ball bearing motorAffordable priceQuiet performanceEnergy star certified for energy efficiency

Cons

Not suitable for larger bathroomsRequires professional installation

7. Kaze Appliance Ultra Quiet Bathroom Exhaust Ventilation Fan Ventilator

The Kaze is a top-rated bathroom fan for less noise and low energy use. The motor is ultra-quiet, making it an excellent option for bathrooms that need to be especially quiet. This unit has a bright LED light with a night light that is easy on the eyes and perfect if you want to avoid turning on overhead lighting. It is also Energy Star certified for energy efficiency and uses only 1.0 watts on the lowest setting.

Apart from being quiet and effective, this fan features high-quality components, including a galvanized steel body and blades. It also features a permanently lubricated motor that keeps the fan running smoothly over long periods. Because of its double hanger mounting bars, installing this fan is easy.

The duct connection also has a backdraft damper that keeps foul air out without stopping the inflow of fresh air. This fan is energy star certified for its energy efficiency, meaning you’ll have fewer worries about your electricity bills.

Pros

Reasonably pricedDurable designQuiet performanceIt comes with a 3-year parts warranty

Cons

The size of the fan’s housing may require resizing your existing ceiling opening

8. Hauslane Ultra Quiet Electric Bathroom Exhaust Fan

Hauslane Ultra Quiet Electric Bathroom Exhaust Fan manufacturers offer a free product warranty for this fan, so you know the manufacturer is confident about its durability. The extra uses suction to remove stale air and smells from your bathroom and is crafted from the highest quality materials.

It’s recommended for spaces up to 120 square feet. This exhaust fan is durable stainless steel housing and comes certified by both UL and ETL. This fan also comes with a double hanger bar system for ideal positioning and standard housing to fit most ceiling joists.

DIY installation also becomes easier, thanks to its 4-inch vent connector. A one-year warranty also backs it.

Pros

Durable stainless steel housingBright LED light panelOne year warrantyImpressive quiet operation

Cons

Unclear instructions in the user guide

9. Win Air Ultra Quiet Bathroom Vent Fan

Win Air Ultra Quiet Bathroom Vent Fan is a powerful and quiet exhaust fan perfect for small to medium-sized bathrooms. Thanks to its simple design, it has a 1/2 HP motor and can be installed in less than an hour.

The white grill matches virtually any bathroom decor, and the unit is pretty simple to install. It’s also designed to be installed with a 4-inch duct.

Pros

0.3 sone ratingRated for small to standard bathroomsDecent price

Cons

It May get louder with usageNot a name brand

How to Pick the Best Quiet Bathroom Exhaust Fan

Sones

One sone of noise is the equivalent to the sound of a quiet refrigerator. The lower the sone rating, the more silent it will be. Sone is a unit of measurement that indicates how much noise a fan produces. Some fans have ratings as high as four sones, but anything higher than one sone isn’t a quiet bathroom exhaust fan.

Cubic Feet Per Minute

This CFM rating tells you how much air your fan can move when it’s on. For example, if the description says this bathroom exhaust fan has an intake of 100 CFM and blows out 106, then theoretically, it will take in 100 cubic feet of fresh air per minute and blow out 106 cubic feet of exhaust air.

Energy Efficiency

Energy-efficient fans will cost more than regular fans, but you could save money by buying one because they don’t use as much electricity. Electronic energy-efficient fans are also quieter because they have a built-in inverter that regulates the speed of the fan, allowing it to run at different speeds depending on how much power is needed for optimal performance.

Price

Exhaust fans are available at a wide range of prices, just like any other product, so what you pay is what you get. Cheaper fans have a lower CFM and less durable components, while pricier ones have more features and last longer.

Instead of settling for the cheapest or most expensive product on the market, opt for ones whose features meet your needs without exceeding your budget.

Ease of Installation

How easy is it to install an exhaust fan? Just like most other products in the market, they come with an installation manual so you can follow the instructions and do the job on your own or contact a professional regarding any questions or concerns you might have.

FAQs on Best Quiet Bathroom Exhaust Fans

How do you choose a quiet bathroom exhaust fan?

This depends on your budget, desired features, and location to mount the unit. Some are easier to install than others, which also affects your choice.

How much noise do bathroom exhaust fans make?

Bathroom exhaust fans are designed to be quiet, but they could still produce some noise depending on their capacity, power source, and location.

Final Thought on the Best Quiet Bathroom Exhaust Fans

Picking out appliances like a bathroom exhaust fan can be a daunting task. However, if you follow the guide above, it would be easier to choose a bathroom exhaust fan that is best for your needs.


The post 9 Best Quiet Bathroom Exhaust Fans appeared first on Kitchen Infinity.

post

Why Window Air Conditioners Freeze-Up

Window air conditioners are not designed to be in super cold climates, which means that if you live in a climate that gets below freezing, your window AC will freeze up. This can happen when the unit is running or not being used correctly – it’s just part of how they work.

In this article, we’ll explain how to prevent your window AC from freezing up, as well as give you some tips on how to keep your energy bills down. Keep reading to find out more. 

Solutions To Try When Your Window Air Conditioners Freeze-Up

To keep this from happening, you should either turn off the unit when it’s not being used or install an insulation kit to help protect it from the cold. If you do have any problems with frozen windows, it’s best to call in a professional to help you out. 

Insulation kits are fairly inexpensive and easy to install, so this is a great solution for anyone who wants to make sure their window AC stays functional all winter long. For more information about the kits, contact your HVAC contractor for advice. They’ll be able to help you find a good insulation kit that will keep your room as cold as possible without having to worry about it freezing up.

Another solution is to shut off the AC entirely when it’s not being used. You can do this by removing the front grille and locating the switch, then moving it into the off position. This will stop it from recirculating warm air back into your room, which should help prevent freezing up while also saving energy costs.

Image Credit: http://storables.com

Even if your window AC does freeze over, you shouldn’t let that stop you from using it – just remove some of the ice before turning on the power again (never use hot water or open flames like hair dryers for this). You should be safe to run it normally again, but keep an eye on the ice levels to make sure they don’t get too high.

Other Solutions To Try

While there are manytypes of air conditioning systems, all with their own ways of working, the following solutions might also be worthwhile trying if the above tips do not work.

If you’re not comfortable installing an insulation kit or turning your AC completely off when it’s not in use, there are a few other things you can do to try and prevent freezing.

One is to keep your windows open while the AC is running; this will help to circulate the cold air and keep it from building up. You can also try using a space heater to keep the room warm while the AC is on, as this will help to prevent the unit from freezing over. While it may not be the best idea to use a space heater if you have small children or pets, it can help a great deal.

Most importantly, it’s a good idea to make sure that any air bubbles in the window seal are eliminated before turning on your window AC. These can build up from condensation and cause issues, so poke each one with a long needle until you don’t see them leaking out anymore. If they’re blown out completely, there will be no pressure buildup to cause ice problems – just make sure your windows are as tight as possible before using the unit again.

Window AC’s should not be left running while unattended for safety concerns and also since doing this could prevent the unit from working properly due to over freezing. Shutting the window AC unit off when not in use is a good way to prevent this. The insulation kit is also an easy and effective solution to try. If these solutions do not work, then freezing may be unavoidable in colder climates. 

In this case, just monitor the ice levels and remove any ice before turning the unit back on. Following these instructions should keep your room cool all winter long without having to worry about your window AC freezing up.

The Importance Of Not Having Dirty Filters

Make sure that you’re cleaning the filter regularly. This will help improve airflow and stop the unit from working harder than it needs to, which can also lead to freezing.

When the filter becomes clogged with dust, debris, and pet dander, it is not able to do its job properly. This can cause your window AC unit to work much harder than it needs to by making it run longer for the room to become cool again after shutting it off (this is known as short-cycling).

If you notice that your filters are dirty or clogged up regularly then you will want to replace them more frequently if possible.

Why Window Air Conditioners Freeze Up – FAQ

Can an AC electronic board be responsible for freezing units?

When window air conditioners freeze up, many people wonder if they need to replace the entire unit. In some cases, the electronic board may be at fault and need to be replaced. However, several other factors can cause an air conditioner to freeze up as well.

How do I know if the electronic board is bad?

The best way to determine if the electronic board is bad is to have it tested by a professional. If you are experienced in electrical work, you may be able to test the board yourself. The most common symptom of a bad electronic board is that the AC will not turn on at all. 

You can usually test the board by checking for power at the connector. There should be power at all of the connectors, each connector should have 12 volts. The voltage may not be exact depending on your model, so you may need to check the manual for the correct reading.

How do I test an electronic board?

You can test an electronic board by removing it from the unit and testing it with a multimeter for a continuity test. If you are not comfortable removing wiring or working with electricity, then you should take your AC to a licensed repair shop to have this done for you. If there is no power at any of the connections when attempting to start up the window air conditioner, then the board is likely bad.

What causes my AC to freeze up during use?

A window air conditioner freezes up for a variety of reasons. The most common reason is a temperature that the unit can’t deal with. However, there are several other possible causes. One common cause is a dirty filter. When the filter is clogged with dirt and dust, it can prevent air from flowing through the unit properly. 

Another common cause is a blockage in the condenser coil. If the coil becomes clogged with debris or lint, it will prevent the unit from cooling properly and can cause it to freeze up. Finally, if the refrigerant levels become too low, it can also cause the AC to freeze up.

How do I fix my window air conditioner that has frozen?

There are several other possible causes, so it is important to determine the root of the problem before attempting to fix it. If the filter is dirty, you can clean or replace it. If the coil is clogged, you can clean it with a vacuum cleaner. If the refrigerant levels are low, you can add more refrigerants. However, if none of these solutions work, then you may need to replace the entire unit.

Final Thoughts On Why Window Air Conditioners Freeze-Up

4 Reasons Your Air Conditioner Is Frozen & How to Fix It | Blair's Air

Image Credit: http://blairsair.com

In conclusion, there are several reasons why a window air conditioner may freeze up. By knowing the most common causes, you can usually fix the issue yourself. If you are not comfortable working with electricity, then it may be wise to seek professional help if your AC freezes up.

Finally, if you want to know what the best air conditioners are, ones that function correctly in different types of weather, you can check out our best air conditioners buying guide


The post Why Window Air Conditioners Freeze-Up appeared first on Kitchen Infinity.

Did you miss our previous article…
https://www.centrecountyfood.org/?p=969

post

Peat Moss: What It Is and How To Use It

Peat moss is a natural growing medium with many applications, but it can be hard to know how to use it in your garden. But what exactly is peat moss? How does it differ from other types of soil or mulch?

This guide covers everything from the types of peat moss available to how much water each type holds. We’ll cover everything from planting trees and shrubs with peat moss as a potting medium or using it as alternative mulch material in vegetable gardens. You’ll also find out which kinds of plants grow best when grown directly in peat moss without any additional soil mixed into the mix. Let’s get started!

What Is Peat Moss?

Peat moss is a soil amendment that is harvested from peat bogs. Many of these peat bogs are found in wet areas of Canada. Peat bogs are formed over a long period as organic materials partially decompose.


Image credit: https://www.gardeningknowhow.com/

Although sometimes referred to as peat, peat moss and peat are not the same things. Peat moss is one of the products harvested from peat bogs. Other types of peat moss come from the partial decomposition of other organic materials. If you know how to make compost then you must know this type of peat moss. The moss in peat moss refers to sphagnum moss.

Where Does Peat Moss Come From?

Peat moss comes from your flower pot or garden from wetlands or bogs. It’s not decomposed material because the surface of the blogs doesn’t allow oxygen and air to filter underground. This makes the fibers of the sphagnum moss remain intact.

Types of Peat Moss

Sphagnum Peat Moss

The most commonly used type of peat moss is sphagnum peat moss. Sphagnum peat moss has a high ability to absorb moisture and holds ten times its dry weight in water. After it’s harvested and dried, sphagnum peat moss is light in color, making it retain 10-12 times its weight in water.

Sphagnum Peat Moss
Image credit: https://www.gardeningknowhow.com/

Don’t confuse sphagnum peat moss with sphagnum moss, even if their names are similar. Sphagnum moss refers to the plant material harvested when still alive and growing above water. The end product is the light, fibrous material often used to decorate line wire baskets.

Black Peat Moss

This is an important type of peat because it has high nutrient content, making it useful in growing orchids because orchids like organic material in their soil. It’s also used for potted flowering plants and nurseries that produce bedding plants. It’s a little more acidic than sphagnum peat moss and holds more water.

Black peat is harvested differently than sphagnum peat moss in a way that preserves the living plant. It’s cut from Sphagnum bogs in Canada and is probably black because of its high carbon content. It requires more processing before it’s sold but has less dust and fewer contaminants than brown peat moss.

History of Peat Moss

Peat was dried and used as a source of fuel in some countries for centuries. This is because it’s rich in carbon dioxide, just like other fossil fuels. It was until the 1940s that peat had a place in horticulture. Today, it’s used as a soil amendment, soilless mix, seed starting, and mushroom casting.

vailability of Peat Moss

Peat mosses are commonly found in bogs and wetlands of the earth’s northern hemisphere. It’s sold in gardening stores, online, hardware stores, and even supermarkets.

Mining Peat Moss

Before peat moss becomes a useful gardening product, it must be harvested by digging the ground and recomposing the bog’s ecosystem. When it comes to mining peat moss, the process is as follows:

Dig a network of ditches along the peatland to drain the water. Second, remove the native vegetation to get the peat exposed. Third, level the harvest to prevent drainage of the surface runoff. Fourth, harrow the top layer to speed up the drying process of peats. Fifth, suck up the dry peat layer using a large vacuum harvester.

Lastly, the harvested peats will be transported to a processing firm for cleaning, drying, and screening into different labels and packaging.

Pros of Peat Moss

Sterile

Peat moss has a natural ability to kill weed seeds and insects. When peat moss is added to the soil, it leaves no chance for mosquitoes and larvae to grow in your garden. This attribute can be very important if you want to avoid diseases such as malaria.

Cleanliness

Most of the growing materials are not clean. However, that’s not the case with peat moss. If you drop some wet moss, pick it up, get it dried or sweep it up.

Moisture Retention

Peat moss is believed to retain water for longer than other composts. This means that you will need less watering of your plants during dry seasons.

Peat Moss Has Slightly Acidic pH

Peat moss has a pH of 4.9 to 6.5, slightly acidic. This makes it better for soil mix because the acidity helps break down other compounds in the soil. This also makes it a good corrector, especially with plants that cannot stand alkaline soil.

It’s Fully Organic

If you are looking for an organic material to improve the content of your soil, using peat moss is a good option. It comes from bogs and is fully natural. The best part is that it’s now harvested at its optimal stage, further adding that this is an organic ingredient. Also, quarrying and transportation do burn a lot of fossil fuels, so if it’s produced organically, it’s not harvested and delivered organically.

Peat Moss Doesn’t Compact

Even though peat moss absorbs water well, it doesn’t compact, unlike soil. Compaction makes it hard to create space for the water and air to pass through. But if you add peat moss to any compact material, you’ll have solved the compaction problem and made the growing mix drain better.

The Drawbacks of Peat Moss

Poor in Nutrients

Some growers consider peat moss to be nutrient-poor. It doesn’t contain much nitrogen, potassium, or phosphorus, but it does have calcium and magnesium, which are essential nutrients for the growth of cannabis plants. Unlike other organic materials such as manure compost, peat moss is very poor in nutrients.

Dryness Issue

Since peat moss is very dry, it’s not 100% suitable for soil. It can be combined with other organic materials to improve the water retention capacity of your growing medium. When starting seeds with peat moss alone, ensure they get enough moisture. It’s also good to mix it with soils and some other soilless media.

Non-Renewable Resource

Peat bogs are made up of wetland plants accumulating for thousands of years. They are only found in areas where the average annual temperature is lower than 64 degrees F (18C). Peat moss from North America or Canada comes from old-growth forests. In other words, it’s a non-renewable resource that has to be harvested. This is not the case for peat moss harvested in Ireland or Scotland. Their bogs are managed wetland areas that grow peat moss yearly, so they can be harvested without causing permanent damage.

Peat Moss is Expensive

Peat moss exceeds the price of comparable mediums such as coconut coir. If you use it in bulk and the price is an issue, a better alternative is compost.

How to Use Peat Moss in the Garden

Soil Amendment

Peat moss is available in several grades, with different particle sizes. The larger the particles are, the more expensive it is. Use peat moss as a soil amendment to lighten heavy soils and increase water retention. For clay and heavy soils that get compact easily, it softens the soil structure and improves the drainage.

Peat moss helps retain moisture and nutrients for plant roots for sandy soil. If you intend to use it as a soil amendment, you should know that it changes soil pH levels. Ensure you measure and watch out if the pH level drifts too much by testing the soil pH

Hydroponic Growing

Peat moss is used in hydroponic systems because it creates a soil and nutrient solution barrier. This layer increases the stability of the system, keeping the plant roots away from harmful products that are designed to kill them.

People using it use it with other growing media like perlite and vermiculite to balance the moisture and aeration. When using peat moss for pure hydroponic growing, you should know some facts about it’s not appropriate.

Because it’s an organic matter, if provided with plenty of oxygen and nitrogen, it will start to decompose, making the material compress around plant roots and choke off your plants. So, better mix it with other materials.

Seed Starting

Peat moss is often used as a base layer to germinate and grow plants like vegetables and flowers. It provides aeration to the root zone, and it’s very easy to use for newcomers in hydroponics. When using peat moss for seed starting, you also need special trays with drain holes on the bottom because if you don’t, the peat moss will expand and block the water flow out of your seedling flat.

For this purpose, use the peat moss alone or in a mixture with some soils. You can also remove the hassle by getting the peat pellets sold on the market. Many people also prefer a soilless mix of peat moss, perlite, coconut coir, and others in different amounts. This prevents diseases, fungi, bacteria, weed seeds, and other bad things commonly found in the soil.

Peat Moss for Plant Transplants

Using peat moss granules is also the best way to transplant young trees and big plants. It can be easily handled since it is lightweight; you can use it with other components like the potting mix but make sure not to include any fertilizers or pesticides.

Peat Moss for Plant Transplants
Image credit: https://www.gardeningknowhow.com/

It provides nooks and crannies where new, tender roots can grow. Peat moss also keeps humidity high, essential when plants have a new home. It also corrects the acidity of the soil and breaks down the consistency and texture of the soil, especially if it’s clay soil.

Growing Acid-Loving Plants

Peat moss is also used to grow plants that prefer soil with low pHs, such as rhododendrons, gardenias, heathers, tomatoes, Pieris, azaleas, and camellias. These plants need a peat moss mixture for their acidic soil. When combined with the correct potting mix, these plants enjoy having an environment where they can take up essential nutrients from the soil and conserve water.

Peat Moss Alternatives

Compost

Compost can be used as peat moss alternatives. These are usually less expensive but do not have the pH balancing effects of peat moss, therefore it should be used in conjunction with other ingredients to create the correct balance for acid-loving plants.

Compost is made from decayed organic materials like rotted plants, leaves, vegetable scraps, and animal manures. It has a lot of commonalities with compost peat, like excellent water holding capacity and great material for soil amendment.

Compost is cheaper than peat moss and fully sustainable in that you can easily make your own. On the other hand, compost won’t last long like peat moss, and you’ll have to add compost regularly. And lastly, compost will compact faster and easier than peat moss, but to have a comparable effect, you can add sand, shells, and eggshells to the soil to improve its texture.

Perlite

Perlite is a volcanic rock heated and expanded with steam to produce a fine white, shiny-type growing medium, which lets good drainage and aeration of the roots. It is also widely used as an additive for potting soil or seed starting mixes as it helps increase the porosity of the root environment.

It provides an excellent oxygen supply to plant roots and will not compact under heavyweight. Perlite is a good natural drainage layer for the bottom of your containers, and it will also help prevent any root rot problems that can occur from sitting water in the bottom of the container.

Coco Coir or Coco Fiber

Coco coir is the partially processed fiber of the coconut husk. It’s sold compressed into bricks or blocks or in a loose form that can be expanded by adding water. Coco produces excellent drainage and aeration qualities with good retention properties.

Coco provides an ideal air to water ratio – twice as much air space compared to water-holding capacity. Coco coir is a sustainable resource that has been used for centuries to protect the health of natural shorelines and reefs. It’s highly resistant to insect, microbial, and mold attacks, making it perfect as a growing medium for both hydroponics and soil applications.

Vermiculite

Vermiculite is a naturally occurring mineral heated to expand it into wormlike particles that absorb moisture and provide aeration. Vermiculite provides the nutritional requirements of plants while allowing for excellent drainage and aeration qualities.

Organic Matter

Organic matter is what makes the nutrients in your soil available to plants. It increases the number of good, healthy microorganisms in your soil by providing them with food and habitat. Organic matter also absorbs water during irrigation, reducing runoff.

What’s more, organic matter improves porosity in your soil by opening tiny spaces between soil particles for air and water, giving your plants room to grow.

Sand as Peat Moss Alternative

Sand has very coarse particles that do not release nutrients to plants easily. It does not change the pH of your soil, but it also doesn’t hold nutrients well, so adding sand on top of a peat moss/vermiculite mix is not ideal. Sand may be preferable if you are planting trees or other plants that don’t need consistent nutrients.

FAQs on Peat Moss

What is wrong with using peat moss?

Peat moss is not a natural substance. It is the partially decayed remains of plants that have been harvested from peat bogs and mires, an ecosystem formed by the incomplete decomposition of organic matter in wetlands. Peat bogs are fragile habitats that take thousands of years to form.

When should you use peat moss in your garden?

You should use peat moss as a soil amendment or potting mix, especially when growing fruits and vegetables such as tomatoes, blueberries, and camellias which are acid-loving plants.

Final Thought on Peat Moss

There you have it. Peat moss is harvested from bogs or mires and is used in planting or potting soil mixes for acid-loving plants. Peat moss is not a natural garden soil ingredient, but it will help your garden grow lovely flowers and delicious foods.


The post Peat Moss: What It Is and How To Use It appeared first on Kitchen Infinity.

post

How To Grow Black Lace Elderberry

If you are looking for a beautiful and unique ornamental plant, black lace elderberry is an excellent choice. It has dark purple foliage and blackberries, making for a dramatic landscape focal point during the growing season. This beautiful shrub goes by many names, including black lace, elderberry, common elderberry, black elder, European elderberry, Judas tree, and blue or black elderberry.

This versatile plant provides year-round beauty without much effort on your part. Whether you’re looking for a new ornamental shrub or simply want fresh fruit at your fingertips, this variety of Sambucus canadensis is sure to please. In this article, we’ll talk about everything you need to know about growing black lace elderberry.

Uses of Black Elderberry

Elderberry plants have gained popularity thanks to their lovely appearance and important uses in traditional industries, culture, and medicine. They fall under early spring flowers since they bloom creamy pink flowers in the spring. These are followed by blackish-red fall berries, which can be harvested for making elderberry wine and jam. You can also leave the elderberry wine on the plant to attract birds and other wildlife.


Image credit: https://www.thespruceeats.com/

Black lace berries are also edible and high in vitamin C. If you want to plant them for food and drink, then the American elderberry, also known as Sambucus canadensis, is the better choice than the European type known as Sambucus nigra.

The intense purple black foliage is finely cut, giving it an effect similar to Japanese Maple, also known as Acer palmatum. Some designers are even using it in the more tender maple varieties since black lace is extremely durable and adaptable.

It can also be used as a dramatic accent plant, planted en masse for a troublesome high hedge, or incorporated into the mix or perennial border. Black lace is also suitable for use in woodland gardens, rain gardens, and attracting birds and butterflies to the yard. You can also plant a black lace next to a shrub with brightly colored leaves to create contrast and interest.

This is a very cold hardy, and easy-to-grow plant adaptable to most sites. In addition, this plant is deer resistant, drought tolerant, fall heat tolerant, and a landscape plant. It can also be used as a potted shrub on the patio. It’s good in groupings or masses or perennial and shrub borders.

Common elderberry plants are deciduous plants or small trees that can reach up to 20 feet in height and width. Some specimens have grown as tall as 33 feet in their natural habitat.

Planting Black Lace Elderberry (Sambucus racemosa ssp. melanocarpa)

Black lace elderberry can grow in USDA plant hardiness zones 4-7 but is susceptible to winter damage. It is best planted in fertile, loamy soil with excellent drainage and receives full sun or partial shade. If planting specimens near homes or other structures, it is a good idea to place a barrier of mulch or fencing around the plants to protect them from being damaged by lawnmowers, mower debris, and deer.

Planting Black Lace Elderberry
Image credit: https://www.gardeningknowhow.com/

They are relatively easy to grow. They can be propagated from seeds, softwood cuttings, or semi-hardwood cuttings. Seeds need cold stratification. Seeds should be sown in the autumn and kept moist for 60 days before planting. A thin layer of vermiculite on top of the soil helps retain moisture. It also does well in wet soils.

These plants also do well in acidic to alkaline soils, but it’s also important to look for slightly acidic soil. Before planting this shrub, amend the soil with compost to ensure healthy growth. You can easily make your compost to use for the purpose. After that, it will benefit from regular fertilizing with compost once every year in the spring.

Due to their sporadic growth, elderberry plants tend to form a lot of suckers. So prune it regularly if you want to maintain size and shape for your shrubs. Pruning involves removing unhealthy, damaged, old, or dead branches in early spring.

Black Lace Elderberry Care

Black lace elderberry is self-pollinating, but if you wish to have as many berries as possible, you can plant another cultivar near your black lace elderberry for increased pollination.

Black Lace Elderberry Care
Image credit: https://i.pinimg.com/

Light Requirement

In the North, while black lace elderberry will tolerate partial shade, it will produce more flowers and a more attractive foliage color if grown in full sun. At the southern end of its range, it will benefit from afternoon shade.

Soil Requirements

Black lace elderberry grows best in slightly acidic, loamy soil that is moist but well-drained. The black lace elderberry bush also tolerates clay soil types better than many shrubs, but it performs better over time if planted in soil that drains well. Black lace does best in moist soil, although it will tolerate dry soils. It thrives under acid or alkaline soils.

Watering Common Elderberry

Black lace elderberry is a drought-resistant shrub and does not require large amounts of water to thrive. However, it benefits from supplemental watering during dry periods and in hot summer climates. The plant prefers evenly moist soil. And since elderberry shrubs often grow near wetlands, it tolerates wet soil better than many other plant species.

Fertilizer and Transplanting

This deciduous shrub needs to be fertilized in early spring by applying a slow-release fertilizer specialized for trees and shrubs. If you wish to transplant an existing plant, do so in spring or early summer while the soil is moist and warm. Elderberry shrubs do not recover well from root disturbance, so take care when moving them. You may harm or kill the plant with poor planning or execution.

When growing elderberry bushes in the home garden, plant them near a water source such as a drip irrigation system or pond, especially if rainfall is infrequent. Ensure that the roots get at least 1 inch of water weekly and keep an eye on soil moisture levels so you can provide supplemental watering during dry spells.

Pruning Elderberry

Best if pruned immediately after blooming. The correct time for pruning this plant is late winter or early spring. Pruning will keep it attractive, vigorous and check its spread. As the woody stems become older, they become weaker and less attractive. So, remove the older stems to direct more energy into the newer, more attractive ones.

Pruning Elderberry
Image credit: https://www.gardeningknowhow.com/

Propagating Common Elderberry

Cutting the branches of the elderberry bush back to four inches gives you a convenient place to collect cuttings.

To propagate common elderberry, remove the smaller tip shoots from grown branches’ end and dip them into rooting hormone. The best time for this operation is fall or early winter. Remove all leaves on the cutting except the top two pairs. This makes it easier to dip into rooting hormone and reduces the chances of disease spores falling into any open cuts.

Shorten all side branches by half their length to direct energy into the main stem. Root the cuttings in a pot filled with sand, peat moss, and perlite at a ratio of 1:1:1. Water sparingly until roots form.

After three weeks, the cuttings should be ready to plant in your garden or for overwintering. Select a location that gets at least six hours of sun per day and has well-drained soil.

Common Pests and Diseases

Prone to a number of diseases, including canker, leaf spot, and powdery mildew. Apply Neem oil once pollination begins for best results. Also, make sure there is proper spacing to promote good air circulation, irrigate at soil level, and keep mulch six inches away from the main stems of the bush.

FAQs on How to Grow Black Lace Elderberry

What plants are compatible with black lace elderberry?

White pine trees and quaking aspen are good elderberry companion plants, especially if you’re looking for something taller than the shrubs.

Final Thought on How to Grow Black Lace Elderberry

Elderberry plants are very popular plants that you can never miss. Not only do these shrubs look splendid and very familiar, but they’re also low maintenance in almost any environment and growing conditions.


The post How To Grow Black Lace Elderberry appeared first on Kitchen Infinity.

Did you miss our previous article…
https://www.centrecountyfood.org/?p=962

post

Sewage Ejector Pump

Sewage ejector pumps are an essential and often overlooked part of a septic system. If your sewage ejector pump is not working properly it can lead to major issues that could cost thousands of dollars in repairs or replacement.

In this article, we will discuss what a sewage ejector pump is, when you should replace it, how to install a new one, and how to maintain and troubleshoot your current pump. We will also answer some of the most common questions about sewage ejector pumps. Keep reading to find out more. 

What is a sewage ejector pump?

A sewage ejector pump is a centrifugal pump that is generally used in septic systems but can also be found in household waste disposals.

Image Credit: http://rooterman.com

It works by drawing water out of the septic tank and forcing it through the building drain system where it eventually leaves your home. Because of this, these pipes are usually located near or in the basement.

There are two main types of sewage ejector pumps – rotary vane pumps and diaphragm pumps. Rotary vane pumps are more common, but diaphragm pumps are quieter and can handle more solids.

When should you replace your sewage ejector pump?

The general rule of thumb is that you should replace your sewage ejector pump every 5-7 years. However, this may vary depending on the type of pump you have, how often it is used, and the condition of the septic system.

If you are not sure whether or not it is time for a replacement, there are a few telltale signs that can help you decide:

If the pump is making strange noises, vibrating, or leakingIf the pump smells bad or is creating an excessive amount of noiseIf the pump is not working properly or is constantly clogging

If you are experiencing any of these problems, it is time for a replacement. All of these issues can cause extensive damage to your septic system and can be very costly to repair.

How to install a new sewage ejector pump

Replacing a sewage ejector pump is not a difficult task, but you must take your time and follow the proper steps.

The first step is to shut off the power to the pump. You can do this by flipping the breaker switch or by unplugging the pump.

Next, remove the cover plate from the pump and disconnect any hoses or wires that are attached.

Then, use a screwdriver or wrench to loosen the bolts that hold the pump in place. Be careful not to damage them as they will need to be reused later.

After you have loosened the bolts, lift the pump out of its cradle and attach it to your new sewage ejector pump. Make sure that the wires are also facing the correct way before you tighten any nuts or bolts.

Once everything is secure, reattach all hoses and wires and replace your cover plate.

Finally, turn on your power supply and test out your new sewage ejector pump. If everything works properly, then you’re done. If not, don’t worry- there are plenty of troubleshooting tips for this later in the article. 

You can also check out this article onhow to install sump pumps if you’d like to know more about similar installation processes.

Sump Pump Cost: Average Prices, Installation – Forbes Advisor

Image Credit: http://forbes.com

How to maintain and troubleshoot a sewage ejector pump

While replacing an old sewage ejector pump can be relatively simple, maintaining it over its lifetime can be a bit more difficult.

There are a few things that you can do to help keep your pump running smoothly:

Clean the pump regularly and remove any debris or build-up that may have accumulated.Make sure that the seals and gaskets are in good condition and properly lubricated.Check the hoses for leaks or damage and replace them if necessary.If the pump starts to vibrate excessively, try adding additional insulation or baffles to quiet it down.

Troubleshooting tips 

If you are having problems with your sewage ejector pump, there are a few troubleshooting tips that you can try:

If the pump won’t turn on at all make sure that you have turned off and unplugged the pump and then check your circuit breaker.If the breaker is fine, try turning it on for 5-10 seconds before turning it back off again. Plug in the pump and see if it works properly.If this doesn’t work, there may be an issue with one of your wires or hoses. Check them out to make sure that they are connected properly or replace them accordingly. If they seem to be working fine, then there may be a problem with your electrical connections. Try tightening any loose wires/connections before calling a professional for help. If water is leaking from the pump check to see if the bolts are tight on the base of the pump. If they are, then there may be a problem with one of your hoses or wires.If these don’t seem to be the issue, try applying Teflon tape or pipe dopes to any threaded connections on your hoses and pipes. This will help seal any leaks that may have developed over time. If you can hear bubbles in your tank but you’re not getting any water out, the first thing that you should do is make sure that both valves are completely closed. Once this has been done, check for cracks or holes in any hoses or pumps leading into/out of the area around the tank.If everything seems to be in order, you may need to add more water to your tank. You can do this by opening up the valve and letting the water run until it is at the desired level. If this still doesn’t work, then you may have a blockage in your line and will need to call a professional for help. 

Hopefully, these tips will help you keep your sewage ejector pump running smoothly for years to come.

Sewage Ejector Pump – FAQ

What is a sewage ejector pump?

A sewage ejector pump is a pump used to remove wastewater from a building. The wastewater is typically removed from the lowest level of the building, such as a basement or crawlspace.

What are the benefits of using a sewage ejector pump?

The main benefit of using a sewage ejector pump is that it can help to prevent flooding. A sewage ejector pump can help to keep the wastewater in the building’splumbing system and out of the basement or crawlspace.

How do I know if I need a sewage ejector pump?

The best way to determine if you need a sewage ejector pump is to contact a professional plumber. They will be able to assess your building and determine if a sewage ejector pump is necessary.

How much does a sewage ejector pump cost?

The cost of a sewage ejector pump will vary depending on the size and type of pump you need. You can expect to pay anywhere from several hundred dollars to several thousand dollars for a quality sewage ejector pump.

How do I install a sewage ejector pump?

Installing a sewage ejector pump typically requires the help of a professional plumber. They will be able to help you install the pump and ensure that it is working properly.

Final thoughts on a sewage ejector pump

In conclusion, sewage ejector pumps are found in many different types of commercial and residential appliances. Though they may vary in size, the pump itself is relatively easy to maintain and repair when needed. 

These devices tend to last a very long time so you will probably not have to worry about replacing one for quite some time. If problems do arise, sewage ejector pump replacement can be done by most people with little technical experience.

The post Sewage Ejector Pump appeared first on Kitchen Infinity.

Did you miss our previous article…
https://www.centrecountyfood.org/?p=958

post

Brown Patch Lawn Disease

Brown patch lawn disease is a common problem that affects many gardens.

Brown patches on your grass are not always caused by the same type of fungus or bacteria, so it’s important to have a professional identify the problem before you try to fix it yourself.

In this article,  we will discuss what brown patch lawn disease is, the signs of brown patch lawn disease, how to prevent and treat brown patch lawn disease, and where you can find more information about diagnosing and treating brown spot diseases in your yard. Keep reading to find out more. 

What Is Brown Patch Lawn Disease?

Brown patch lawn disease is a fungus that affects grasses. It can cause patches of your lawn to turn brown, and in severe cases, it can kill the grass. The fungus thrives in hot, humid weather, and so the best way to prevent brown patch lawn disease is to make sure your lawn is healthy and well-maintained.

Image Credit: http://scotts.com

By watering your lawn properly and mowing it regularly, you can help to keep the grass healthy and reduce the chances of brown patch lawn disease. If you do notice signs of brown patch lawn disease, it’s important to take action right away to prevent the fungus from spreading.

Alternatively, you can also treat brown patch lawn disease with fungicides. There are many different types of fungicides available, so it’s important to talk to a professional about which one is best for your situation.

Signs Of Brown Patch Lawn Disease

The most common sign of brown patch lawn disease is a large, circular patch of brown grass. The edges of the patch will be well-defined, and the centre will be relatively dry. In some cases, you may also see small patches of pink or purple fungus growing on the edge of the brown patch. If you see any of these signs, particularly if you live in an area where the fungus is common, it’s important to have your grass tested.

Another common sign of brown patch lawn disease is the appearance of lesions on the leaves of the grass. These lesions will be dark green or brown, and they will often have a yellow halo around them. If you see any lesions on your grass, it’s important to contact a professional right away.

How To Prevent And Treat Brown Patch Lawn Disease

Brown patch lawn disease is difficult to eliminate, but there are some things you can do to ensure that it doesn’t spread or get worse. The best way to prevent brown patches is to keep your grass healthy by regularly mowing, fertilizing, watering, and aerating it. If you have prolonged periods of hot weather every year, consider installing shade trees so that your yard is cooler. If possible, choose two different kinds of grasses for your yard so they don’t all die at once if one type gets sick.

Moreover, you can also treat brown patch lawn disease with fungicides. There are many different types of fungicides available, so it’s important to talk to a professional about which one is best for your situation.

If you do see signs of a brown patch, it’s important to take action right away to prevent the fungus from spreading. You can treat the fungus with fungicides, or you can try to remove the affected areas of grass and replace them with new sod. It’s important to remember that brown patch lawn disease can be difficult to get rid of, so you may need to take these steps more than once to get rid of the fungus completely. Speaking of fungus, here’show to get rid of mold

Finally, it’s important to remember that not all patches of brown grass are caused by brown patch lawn disease. Many other things can cause your grass to turn brown, such as drought, pests, and poor soil quality. If you’re not sure what’s causing the problem, it’s best to contact a professional so they can diagnose the issue and recommend a course of treatment.

Other Important Considerations

If you hire a company to diagnose and treat your lawn, make sure that they use environmentally-friendly fungicides. Some types of fungicide can be harmful to the environment and even pets and children. It’s also important to water your lawn after treating it with fungicide because too much moisture will encourage the fungus to grow again.

You should also remember that brown patch disease is more likely to attack the cool-season grasses in your yard. Tall fescue, Kentucky bluegrass, and ryegrass are all very susceptible to brown patch disease. This means that some parts of your yard may die while other parts thrive depending on what type of grass grows there naturally.

Bermuda grass is less susceptible to brown patches, so if you have this type of grass in your yard, you’re less likely to see signs of fungus.

In short, brown patch lawn disease is a difficult fungus to get rid of, but there are some things you can do to prevent it from spreading or getting worse. If you see any signs of the disease, contact a professional right away so they can recommend a course of treatment. 

Remember that not all patches of brown grass are caused by brown patches, so it’s important to diagnose the problem before taking any action.

The weather conditions

Humid weather combined with cloddy soils can cause a fungal brown patch. The fungus that causes the disease proliferates in moist conditions. To prevent brown patch lawn disease, strive to keep your grass as dry as possible. Watergrass deeply and infrequently to encourage deep root growth.

How to Identify, Control and Prevent Brown Patch - Lawnstarter

Image Credit: http://lawnstarter.com

Brown patch lawn disease – FAQ

When does brown patch lawn disease show up?

Brown patch lawn disease often appears in late summer or early fall.

What are the symptoms of brown patch lawn disease?

The most common symptoms of brown patch lawn disease are circular patches of dead, brown grass. These patches can often be several feet across and can spread rapidly.

What causes brown patch lawn disease?

Brown patch lawn disease is caused by a fungus that thrives in moist conditions. The fungus feeds on the grass’s leaves, causing them to die and turn brown.

How can I treat brown patch lawn disease?

There is no cure for brown patch lawn disease, but you can take steps to prevent it from spreading. You can start by mowing your lawn at the proper height and removing dead or dying patches of grass as soon as you notice them. 

Finally, try to keep your lawn as dry as possible; don’t let water stand on it for long periods, and make sure that you’re not over-watering your lawn.

What do dark rings around the patches mean?

If you see dark rings around the patches of brown grass, it means that the fungus is also attacking the roots of the grass. This can kill the grass and cause it to turn black.

What should I do if my lawn is severely affected by brown patch disease?

If your lawn is severely affected by brown patch disease, you may need to replace it with new grass. You can start by removing all of the dead or dying grass and then tilling the soil to loosen it up. Next, spread a layer of topsoil over the soil and then sow the new grass seeds. Finally, water the area well and keep it moist until the seeds germinate.

Final thoughts on brown patch lawn disease

In conclusion, brown patch lawn disease is a serious problem that can cause a lot of damage to your lawn. Early detection and treatment are essential for preventing any long-term damage. Be sure to keep an eye on your lawn and contact a professional if you suspect that your garden may have this disease.

For further reading, check out this post onhow to test soil ph. This will ensure that your soil isn’t too acidic and won’t end up having trouble absorbing the right nutrients.

The post Brown Patch Lawn Disease appeared first on Kitchen Infinity.

Did you miss our previous article…
https://www.centrecountyfood.org/?p=954

post

DIY All-Purpose Vinegar Spray

Vinegar is a miracle cleaner and disinfectant. It can be used to clean many surfaces in the home, including kitchen counters and sinks, toilets, bathtubs and showers , windows and mirrors, as well as floors.

In this article, I’ll tell you how to easily make vinegar spray so you can start using it to clean your home. Let’s get right into it.

Making DIY All-Purpose Vinegar Spray

Making and using vinegar and water spray is so easy and cheap, you can almost do it with your eyes closed.

Image Credit: http://livesimply.me

All you need is:

A spray bottle (if it’s plastic go for the 1-litre size if it’s glass get one of 0.5 litres). The small 0.25 litre plastic bottles are also great because they are small enough for storage purposes yet large enough to use when cleaning larger areas.Vinegar. Plain, white distilled or apple cider vinegar will do fine here. You can also make your fruit-flavored vinegar by adding some juice from oranges, lemons, or apples to regular white distilled vinegar in a ratio of about 1 part fruit juice to 3 parts white wine vinegar. For each cup of fruit juice you use, add 1 tablespoon of sugar to the vinegar.

To make the spray:

Fill your spray bottle with white distilled or apple cider vinegar. If you’re using fruit-flavored vinegar, fill it halfway with that and halfway with white distilled vinegar.Fill the rest of the bottle with water.Shake well before each use.

That’s it. How easy was that? Now you’re ready to start cleaning your home with this powerful natural cleaner.

Important Tips To Keep In Mind

There are a few things to keep in mind when using your DIY all-purpose vinegar spray:

Using A Paper Towel 

Using a paper towel will help to avoid streaks on surfaces like mirrors and windows. Just spray the vinegar mixture on the surface, wait a few minutes for it to work its magic, then wipe off with a paper towel.

Safety First.

Vinegar is a powerful cleaner, so always take precautions when using it. Never mix it with other cleaners (such as bleach) or use it near an open flame. Keep it away from children and pets, and never drink it.

Do Not Use On Marble Surfaces 

Vinegar is very hard on marble surfaces so don’t use this cleaner if you have marble floors. This is especially true with marble kitchen countertops. Marble can be damaged by vinegar, so use this spray sparingly if you have marble surfaces in your home.

Using Lemon Juice In Place Of Vinegar

Lemon juice is a great replacement for vinegar in most cases when making DIY all-purpose cleaners. It has the same disinfecting properties as vinegar, but I find it’s less harsh on my hands and smells better too. 

A good way to get rid of bad odors is to mix some lemon juice (room temperature) with baking soda until it forms a paste-like substance, then spread it over the areas that smell bad (such as fridge shelves or garbage bins). Let sit for 15-30 minutes before wiping with paper towels. This will help to remove the bad odor and also disinfect the surface.

Don’t Spray It Directly On Your Skin

If you do happen to get a bit of vinegar spray on your hands or skin, make sure to wash it off quickly with water. If you have sensitive skin, you may want to wear gloves while cleaning with this spray.

Using Baking Soda Along With A Vinegar Spray

While there are manyincredible uses for white vinegar, one of my favorites is using it in combination with baking soda. These two ingredients, when used together, can form an amazing all-purpose cleaner that’s great for tackling tough messes. Here are a few ways you can use them together:

To clean your oven, mix 1/2 cup vinegar with 1/4 cup baking soda. Spray the mixture on all surfaces of the oven and let sit for 30 minutes before wiping off.To clean countertops and kitchen surfaces, mix 1/2 cup vinegar with 1/4 cup baking soda in a spray bottle. Shake well before each use and spray on the surface. Let sit for a few minutes before wiping off with a paper towel or sponge.To remove water stains and mineral deposits, spray some vinegar and baking soda mixture on the surface and let it sit for a few minutes.Cleaning your painted cabinets properly with baking soda is a great way to remove stubborn dirt and grime. Just mix equal parts of vinegar and baking soda in a bowl, dip your brush in, and start scrubbing. Rinse off the brush when you’re done and give it a good shake to get rid of any excess water.

Using Essential Oils In Your Diy All-Purpose Spray

If you like to use natural cleaning products that not only disinfect but also leave behind a lovely scent, adding 5-10 drops of lavender or tea tree oil is an easy way to do this. Adding the essential oils will help mask any unpleasant odours from the vinegar while also ensuring that your home smells fresh and clean. 

DIY Disinfecting Spray Cleaner - Clean Mama

Image Credit: http://helloglow.co

As I mentioned earlier, lemon juice is another great replacement for vinegar (in most cases) when making DIY all-purpose cleaners because of its disinfecting properties and pleasant citrus smell. But feel free to experiment with different essential oils to find the scent that you like best. Just make sure that the oil is labelled as “pure” or “undiluted” so that it doesn’t contain any harmful chemicals.

Final Thoughts On DIY All-Purpose Vinegar Spray

In conclusion, this DIY all-purpose vinegar spray is a huge money saver and works just as well as most off-the-shelf cleaners. It doesn’t matter if it’s vodka or vinegar, if you can clean something with vodka then you can do the same with vinegar since they both have antiseptic properties.

Vinegar and vodka contain about 80% water so unless you want to spend $30 on a bottle of stuff with 60% alcohol content, I’d go for good old-fashioned distilled white vinegar that costs around $3-4 per gallon.

The best part about this whole procedure is also that after doing it once you no longer need to buy any cleaning products anymore because you now have an endless supply at your disposal every day for a very cheap price.

The post DIY All-Purpose Vinegar Spray appeared first on Kitchen Infinity.

Did you miss our previous article…
https://www.centrecountyfood.org/?p=950