post

Incredible Uses For White Vinegar

Everyone knows that vinegar is great for cooking, but did you know it has many other uses? Vinegar can be used around the home in lots of ways. The best part is that it’s inexpensive and readily available.

If you’re looking for a natural alternative to fabric softener, white vinegar is just the thing. This common household ingredient is inexpensive and easy to find in any grocery store. It’s also mild enough to cause skin reactions or discolor clothing as some detergents might.

Here are some great uses for vinegar around your home. You’ll save money by using less harsh chemicals.

Use White Vinegar to Kill Weeds

One of the best ways to kill weeds is by using white vinegar. Pour white vinegar directly onto the leaves of the plant you’re trying to get rid of. You can also use full-strength vinegar in spray bottles to kill weeds on sidewalks or driveways. Just be sure you don’t get any on your clothing, as it will stain. For best results, use vinegar on a day of dry, sunny weather.

Care for Your Home Pets with Vinegar

Pets such as dogs and cats are often bothered with itchy and scaly ears, especially if you have a dog with floppy ears like a retriever. Dilute white vinegar in equal parts water and use a cotton ball to clean the inside of your pet’s ears. You can also make a gentle shampoo by adding one or two tablespoons of vinegar to your pet’s bathwater to remove odors from its fur.

If you see unwanted cats creeping around your yard, spray or pour vinegar on the plants they like to use as a litter box, and they will move elsewhere.

Clean Your Coffee Maker with Vinegar

If you’re a coffee-lover, you know that once you’ve brewed a pot, the last thing you want to do is dump it down the drain. However, stale coffee can ruin your next pot-brewing experience. Run some vinegar through your coffee maker to remove the unwanted flavors of old coffee and put yourself on track for a smooth-tasting cup.


Image credit: https://hgtvhome.sndimg.com/

Extend the Life of Your Cut Flowers with Vinegar

When it comes to extending the life of your flowers, there are so many theories that exist. Such theories include the use of copper penny, lemon-lime soda, and aspirin. However, try adding a few tablespoons of white vinegar to the water and a dash of sugar, and you may be surprised to find your flowers lasting much longer.

Cleaning Kitchen with White Vinegar

Cleaning vinegar is a natural cleanser and degreaser. With the addition of a few drops of lemon essential oil, you can make your kitchen an all-natural cleaner. Add distilled white vinegar to water in spray bottles and add about ten drops of lemon oil for every one cup of the solution. Spray the cleaner on surfaces, let it stand for a few minutes, and wipe away.

Cleaning Kitchen with White Vinegar
Image credit: https://www.rd.com/

You can also add a few drops of olive oil into a cup of distilled vinegar, let it sit overnight, and then add that to your spray bottle in the morning. Rinse it with cold water.

Cleaning Floors with Vinegar

White vinegar is safe enough to use on most surfaces, but it does have a strong smell. The vinegar odor can be reduced by adding a few drops of lemon or tea tree essential oil to the water in your spray bottles. This mixture is safe enough to use on hardwood floors.

Cleaning Floors with Vinegar
Image credit: https://www.simplemost.com/

In addition, if you add some white vinegar to a bucket of warm water and mop the floors, you’ll be cleaning your floors and helping fight against allergens like dust mites at the same time.

Cleaning the Dishwasher

If your dishwasher smells less than fresh or doesn’t seem to clean your dishes as well as it once did, try adding 1/2 cup of vinegar to an empty dishwasher cycle to freshen it up. If your dishwasher has a rinse agent dispenser, fill it with white vinegar to help freshen the rinse water.

Adding white vinegar to your dishwasher also works as an eco-friendly alternative to using additional detergents for cleaning the dishes. Just run a wash cycle with some vinegar but skip adding any detergent like chlorine bleach. If you have a clogged and smelly sink, pour 1/4 cup of baking soda, add one cup of vinegar, and cover the drain tightly.

Use Vinegar as Fabric Softener

And you can use it as a fabric softener: Add 4 cups of vinegar to the rinse cycle instead of liquid fabric softener, or add half a cup when using a front-loading washing machine. After spraying vinegar on your fabric, wipe it down with a clean, damp cloth. You can use the same vinegar to clean a washer

Clean Windows with Vinegar

And it’s also good for cleaning windows. Mix one part vinegar with two parts water to make a multipurpose cleaner that can be used on windows, glass, and even mirrors without leaving behind streaks or smudges. This solution is perfect for cleaning car windows, too– remember to use it sparingly.

ll-Purpose Cleaning Solution

Vinegar is one of the world’s best all-purpose green cleaners with dozens of cleaning uses. Diluted vinegar on a soft, lint-free cloth is excellent for cleaning and polishing all kinds of surfaces, including Counters and other kitchen surfaces, Mirrors and windows, Bathrooms, Toilets, and Faucets.

After filling your plastic bag with equal parts water and vinegar, tape and leave it there for a day for vinegar to dissolve any lingering mineral deposits. You can also use distilled white vinegar to clean hardwood floors, carpet stains, and wood furniture, especially when combined with olive oil.

Clean Your Microwave with Vinegar

Fill a microwave-safe bowl with 1 cup of distilled vinegar and set it on high. Heat the vinegar for 2 minutes or until it starts to boil, then let it sit in the microwave, undisturbed for about 10 minutes to let it cool, then wipe away any food residue.

Clean Your Microwave with Vinegar
Image credit: https://imagesvc.meredithcorp.io/

Shine Up Silver with White Vinegar

Combine half a cup of distilled vinegar and eight oz. of water in a shallow bowl and add the silver, making sure it is completely submerged. Put on some rubber gloves and use an old toothbrush or scrubber to scrub off any grease gently. Rinse with warm water, then dry completely using a soft cloth.

You can also drop a tarnished silver in a baking dish to soak it with baking soda, sea salt, vinegar, and boiling water. Dry thoroughly with a dry cloth, then buff with a clean cloth.

FAQs on Uses for Vinegar

What is the difference between washing vinegar and cleaning vinegar?

Washing vinegar and cleaning vinegar are both white vinegar, and they contain the same percentage of acetic acid (5%). Therefore, it is safe to use either type of vinegar for all your household needs.

What does vinegar do in a laundry?

Vinegar contains acetic acid, meaning that it’s safe to use in both standard and high-efficiency washers.

Final Thought on Uses for Vinegar

As you can see, vinegar has so many uses which you can relate to almost all of your daily tasks. With vinegar, you wouldn’t need many products anymore. This versatile has a lot of uses, not only as an ingredient but also as a cleaning tool. Keep the environment green and clean by using vinegar for your daily tasks.


The post Incredible Uses For White Vinegar appeared first on Kitchen Infinity.

Did you miss our previous article…
https://www.centrecountyfood.org/?p=375

post

11 Best Programmable Thermostats

With the increasing temperature and the rising energy costs, it is necessary to find a solution that can help you save money. The heating and cooling bills are the most expensive part of your utility bill. They account for 50% to 60% of your total monthly energy use, depending on where you live. 

You can save money by reducing how much heat or air conditioning is needed in any room. This doesn’t mean that you have to compromise on comfort. Programmable thermostats let you set temperatures according to a schedule so that the rooms are comfortable when they’re occupied while saving energy when they’re not being used. 

To save money on your utility bills, it is better to go for programmable thermostats instead of manual thermostats. But not all of them can provide the services you need. To help you choose the most suitable ones, we’ve compiled some of the best programmable thermostats to install in your home:

1. Honeywell Home Programmable Touchscreen Thermostat

This is one of the best programmable thermostats available in the market. It helps you save a lot of money on your utility bills as it features a technology called Smart Response Technology. This feature automatically calculates how long it will take to reach a certain temperature and switches off or turns on the heating or cooling systems for that particular period.


Image credit: https://www.ubuy.ke/

In addition to temperature, the Honeywell thermostat has a sleek square design with a large touch screen display. This screen shows indoor humidity percentage and time of the day using a cool-blue backlight that you can easily use anywhere in your room. 

The thermostat is capable of automatically sensing when your home needs cooling and heating based on your preference. The temperature range limits also allow you to set maximum and minimum temperatures so the auto schedules won’t go beyond your comfort level. It’s compatible with most two-stage HVAC systems.

2. Ecobee SmartThermostat with Voice Control

The Ecobee thermostat is designed to respond to your voice commands. This shouldn’t be surprising, as it was built for Alexa users looking for a way to control their heating and cooling system hands-free. The device also has room sensors that monitor the temperature in multiple locations within the house to adjust each terminal unit. Its 24-hour programming abilities can save up to 23 percent annually on heating and cooling costs.

Ecobee SmartThermostat with Voice Control
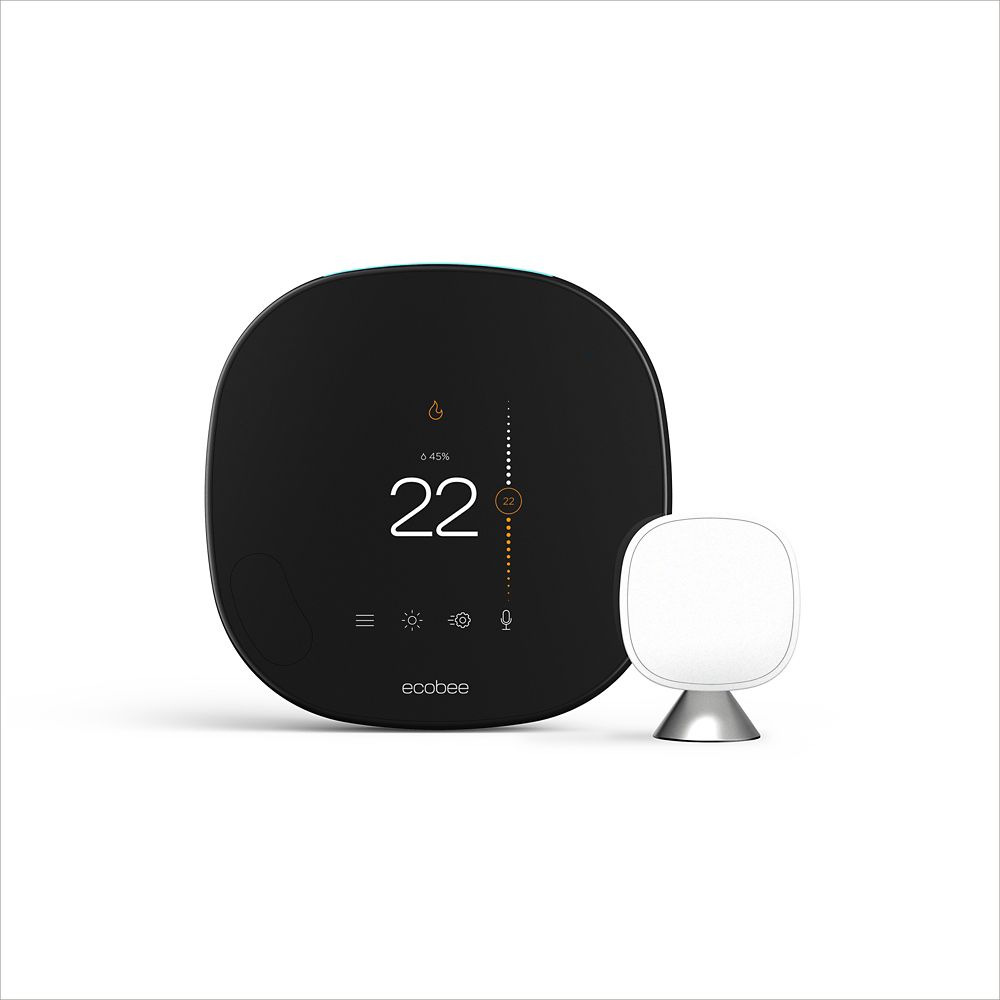
Image credit: https://homedepot.scene7.com/

If you want a thermostat that you can control at the comfort of your couch, Ecobee is the right choice. Ecobee model also integrates with a smartphone, smartwatch, and other popular smart home products like Google Assistant, Apple Home Kit, and Samsung SmartThings.  

3. Mysa Smart Programmable Thermostat

It’s a smart thermostat made for music as it has Bluetooth technology that allows it to stream music. Mysa Smart Thermostat is an affordable, high-quality thermostat that is very easy to install. The user can control it through the app or by voice with Amazon Alexa or Google Assistant. It’s the best smart thermostat for apartments.

Mysa also comes with additional features like geo-tracking and scheduling, so you know when your energy-saving habits are kicking in during specific times of the day. Finding a smart thermostat with electric baseboard heating can be challenging, and one of the best options available in the Mysa Smart thermostat for electric baseboard heaters can be challenging.

It also works best with electric fan-forced heaters, and it requires one neutral or second live wire. You can set a schedule and track energy using the Mysa app. The app experience is similar to what you’ll find in other smart devices, which provides remote control of the system, geofencing options, and the ability to chart energy consumption. Mysa also plays nice with smart home assistants, including power extender Kit, Amazon Alexa, and Google Assistant.

4. Google Nest Learning Thermostat

The Google Nest Learning Thermostat is one of the best smart thermostats available. The device features a large display and good connectivity via Wi-Fi, giving you remote access to your heating and cooling system through an app. It works with some electric heaters, and it’s not compatible with geothermal or electric baseboard heaters. 

Google Nest Learning Thermostat
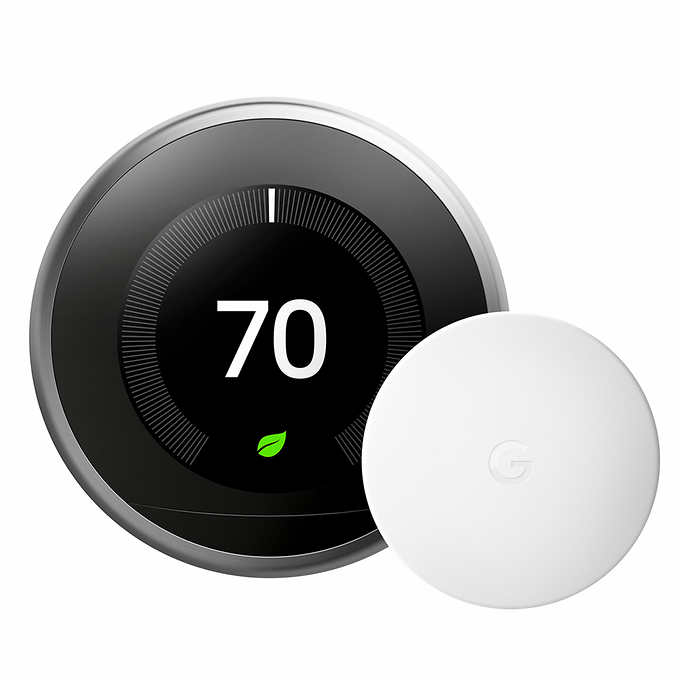
Image credit: https://richmedia.ca-richimage.com/

The best smart thermostat like Nest Thermostat can be controlled at the comfort of your smartphone. This gadget will also help you learn your schedule and the temperatures you like and automatically create a program that will help you save energy and stay comfortable. 

Its sleek circular design comes in various metal finishes and is compatible with 95 percent of heating and cooling systems. This thermostat is Wi-Fi enabled, meaning that you can adjust it from your smartphone, plus you can manually adjust it via the unit’s outer dial.

Thanks to its smart programming, it can save you up to 12% on heating costs and 15% on cooling costs. It can also show you your energy usage and insights on how much energy you’ve used and why on your phone. You may require professional installation to install the c wire if you don’t have one.

5. Honeywell Home Programmable Thermostat

This best smart thermostat works with Amazon Alexa, plus it provides push notifications when you’re away from home. It’s compatible with 95% of heating, and cooling systems, easy to install using the Honeywell Home app, and also allows for two-way communication so that your HVAC system can alert you when there are potential problems.

If you like a thermostat without smart features and touchscreens but still want something easy to work with, the Honeywell 5-2 Day Programmable Thermostat is a good choice. It doesn’t come with advanced features like geofencing or voice control, but it does help you control your heating and cooling system with simple programming options. 

The 5 to 2 programming allows you to have a different four-period schedule for the two weekend days, and the unit offers positive and negative one-degree temperature control. The thermostat is backlit for easy viewing. You should also note that it is only compatible with low-volt heating and cooling systems. It’s the best smart thermostat for multiple zones.

6. Emerson Sensi Touch Wi-Fi Smart Thermostat

If you’re looking for a unit that goes above and beyond, the Sensi Touch Wi-Fi Smart Thermostat deserves your attention. This device not only lets you control your HVAC system remotely but adds in some smart home capabilities as well.

Emerson Sensi Touch Wi-Fi Smart Thermostat
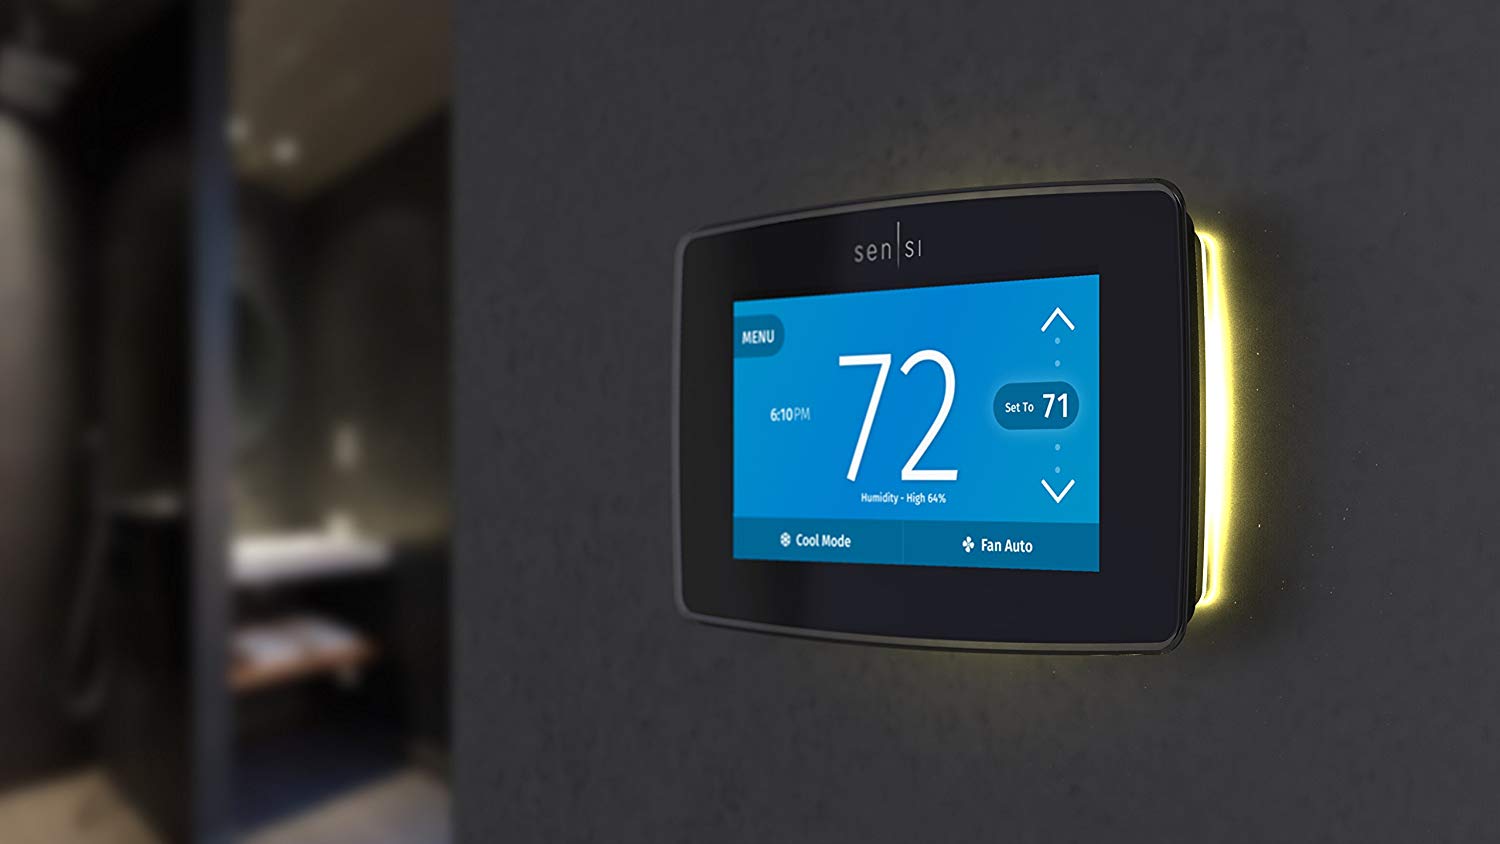
Image credit: https://i2.wp.com/www.automaticsmarthome.com

The Sensi Touch Wi-Fi Smart Thermostat works with Siri—ask your hub to set the temperature in your home. You can even control it when you’re not at home, thanks to geofencing capabilities. Like other units, this one also offers an auto-away mode that adjusts the temperature based on whether or not someone is there. 

This thermostat has a color LCD touchscreen and replaces your existing wall unit. Using wireless capabilities, it functions with iOS and Android devices. It also works with Amazon’s Alexa so that you can ask for the temperature via voice. 

Sensi touch offers advanced features such as flexible scheduling and geofencing, plus, it can save you up to 23 percent on HVAC energy usage. It is compatible with popular smart home platforms like Amazon Alexa and Google Assistant. It will also send you smart alerts if it detects extreme temperature and humidity levels in your home.

7. Orbit Clear Comfort Programmable

This thermostat is another option to consider. Orbit Clear Comfort is more than just a thermostat; it’s also an automatic system that allows you to customize heating and to cool for up to four areas in your home. This means that if you have separate zones or rooms in your home, you can control the temperature of each space separately.

Orbit Clear Comfort is also compatible with smart home platforms, including Apple Homekit and Nest. Like the other Orbit option, it will also send alerts if extreme temperature or humidity levels are detected in your home. This is a one-stage thermostat that works with gas, oil, and electric furnaces. 

You can also use it with HVAC systems,  central air conditioners, two hotwire systems, millivolt systems, and heat pump systems that do not have backup heat. However, it’s not designed for use with baseboard heaters and multi-stage heating and cooling systems. Its early start feature ensures your desired temperature is reached by the programmed time.

8. SunTouch Command Touchscreen Programmable Thermostat

The SunTouch digital thermostat is another option that includes a touchscreen display for easier use. This model also has a wide temperature range, works with all types of heating and cooling systems, and is compatible with a number of smart home platforms.

It syncs up to the Nest app so you can help save energy when you’re not at home. It also requires remote control. The SunTouch thermostat is designed for homes with insulation and offers precise temperature control (0.5 to 1 degree Fahrenheit) without experiencing any significant fluctuations in temperature. 

It’s rated to work between -4 degrees Fahrenheit and 122 degrees Fahrenheit, making this programmable thermostat an excellent choice for radiant flooring. It is easy to install if you have heated floors, and you can use it as a replacement for any floor heating thermostat that uses 10k sensor wire. It has a built-in GFCI for safety, and its SmartStart technology ensures your floor has reached the set temperature at your scheduled time.

9. King Programmable Electronic Line Voltage Thermostat

This thermostat has a large LED display that’s easy to read from across the room, and it has a backlight for nice, clear viewing. It should fit most standard electrical boxes, and it comes with a quick install guide. It can be programmed from one week to seven days, and you can choose between two start times per day or four start times per day.

It has a simple two-button control accessible when the cover is closed, keeping the programming buttons out of sight and away from curious children. It has a battery backup that protects the programmed settings from power outage resets.

10. Schluter Ditra Programmable Floor Heating Thermostat

Suppose you need to control the in-floor heating system to ensure that temperatures remain consistent and comfortable for all residents at your home or workplace. In that case, you need to install this programmable thermostat. This thermostat boasts a large touchscreen display that is easy to read and use.

A built-in floor temperature sensor and the display can indicate time, date, temperature, and whether the system is operating via manual setting. It has six different programming periods that allow the user to select the ideal temperature for the time of the day. This means warmer floors at night and in the early morning to help prevent freezing surfaces that can cause bare feet to coil.

11. Lux Products Programmable Thermostat

Installation is easy for this thermostat. You can start to program it in a matter of minutes, and it does not require a lot of effort or time. These thermostats come with a user manual that has clear instructions you can follow to set up your new device. Another great feature about the Lux Products Programmable Thermostat is that it can be installed by just about anyone.

It comes with an installation manual, and you can use this as a guide when installing the device. All of the materials you require for the installation will come with your purchase of the thermostat. It is easy to program, and since it has a large display screen, those who have vision problems will not have a hard time reading what is required.

While you are sleeping, you can set the device to turn off the heat or cool air so that your house won’t be too cold or hot when you wake up in the morning. If you are looking for a programmable but you’re not interested in any smartphone or smart home integration and remote control of the heating and cooling systems in your home, then this programmable thermostat may be the best choice for you.

What to Look for in a Programmable Thermostat

Ease of Installation

When you are ready to start, the first thing you will need to do is install the new programmable thermostat. With most modern devices, this means removing a few screws and wires from your old thermostat. New models come with helpful instructions and have features in their respective apps to help you connect thermostats to your HVAC system.

Scheduling Options

The next thing you should look for in a programmable thermostat is how easy it will be to program the devices. Many appliances these days have touch screens that allow you to select your schedule with your finger, but other models require you to cycle through each day of the week and power button up or down on each one.

Features and Settings

Many of the most advanced thermostats feature Wi-Fi connectivity and/or an accompanying smartphone app, allowing you to control your heat from anywhere with a cellular signal. Some models come with extra features such as humidity sensors, backup batteries, and more. These can all be nice additions to have, but they will likely only cost you extra money.

Price

As always, the price is a major factor in what you get for your money. Usually, more features or settings will come at a higher cost, while simpler models are typically less expensive.

Be sure to consider all the features you want before deciding if it’s worth spending extra on them or not. We’ve also reviewed some of the best programmable thermostats available under $100 that are nice picks for those looking to save money.

Smart Speaker Compatibility

When deciding on a thermostat, one of the most important things is making sure it’s compatible with your heat source. Most modern models are compatible with gas, oil, electric, or even heat pumps.

If you have a heat pump, you’ll most likely want to look for something compatible with it. Some speaker models are also compatible with Amazon Alexa or Google Home so keep that in mind when deciding on one that’s right for you.

esthetics

The aesthetics of the model are also important to consider. Although most thermostats require power and a C Wire, some models will work with an AA Battery while others have more unique designs that fit within your home’s décor.

FAQs on Best Programmable Thermostats

re programmable thermostats suitable for most homes?

Yes, programmable thermostats are compatible with most cooling and heating systems. 

Can you install programmable thermostats yourself?

Yes, especially if you’re replacing an old programmable thermostat with a similar model.

Final Thought on Best Programmable Thermostats

The type of programmable thermostat you choose will depend on the amount you’re willing to spend, plus the features you’re looking for. If you’re not tech-savvy, then you won’t need all the home integration and app connectivity. But whatever type you choose, it will help you cut down energy costs without sacrificing your comfort.


The post 11 Best Programmable Thermostats appeared first on Kitchen Infinity.

Did you miss our previous article…
https://www.centrecountyfood.org/?p=370

post

How To Grow and Care for Godetia Plant

Godetia is a spring-blooming annual flower. It’s native to Western North America. It blooms throughout the summer and attracts bees, butterflies, and hummingbirds. However, most people don’t know how to care for this beautiful flowering plant and end up killing their plants instead.

If you want your Godetia to thrive, you should take the time to learn about its growing conditions to give it what it needs. If you want to keep your yard free from these invasive plants, growing them yourself will help reduce their numbers.

Growing this flower isn’t hard, but there are a few things you’ll need to know before planting, so you don’t end up with dead flowers. Here’s how to grow the godetia plant successfully and without accidentally spreading seeds.

Origin of the Names

This genius plant was called Godetia about a 19th-century Swiss botanist Charles Henry Godet. Later, the name was changed to Clarkia in honor of William Clark of the famous Lewis and Clark Expedition. And finally, Godetia amoena, which means beautiful and pleasing. 

The Godetia plant is also named farewell to spring because it doesn’t like hot and humid summer weather. It’s a cool-season annual that puts on most of its growth in the spring. As soon as temperatures begin to rise at the start of the summer, godetia flowers come into their peak, leading to their nickname farewell to spring.

Godetia Care

Size and Growth

The Godetia plant grows to about 14 inches tall and 16 inches wide, with green leaves on top and gray underneath. These elegant plants produce green stems with thin leaves. As an annual plant, Godetial dies each year.

Flowering and Fragrance

Godetia plants produce a cluster of trumpet-shaped pink, red, or salmon flowers. The Godetia flower blooms in the late spring then flower throughout the summer. While the flowers don’t have a noticeable fragrance, they’re still very attractive to look at. Godetia plants can also make great cut flowers. All you need to do is to cut several stems once the flowers appear, then trim off the spent blooms to encourage new blooms to appear.

Soil

Godetias thrives on soil types ranging from sandy to loamy soils with medium acidic content. Adding organic matter before planting helps maintain this pH balance. These plants grow well on average to rich soil. Organic matter helps to keep the soil moist and not wet. You can make compost to get organic matter easily. Add mineral fertilizer when planting, then once a month after planting. 

This will ensure strong roots and a healthy plant. Also, mulch around them to help retain soil moisture and keep the plants healthy. You can also use any enhanced water that is available from large retailers for watering these plants.

Watering

Godetia plants have similar needs as other flowering annuals when it comes to watering. Provide enough water, so your plant doesn’t wilt but not too much water to where it’s sitting in puddles. Whether you grow it in a tub, pot, or container, this plant needs frequent watering. 

This means if you’ve seen your plant start wilting, then give it a bit of water, which should restore its health. If the wilting persists, then you may have given it too much water, or your soil is overly wet. On the other hand, if your plant isn’t wilting but looks dry, you can water it to restore its health.

Light and Temperature

Grow Godetia in full sun unless your garden is in a hot area with lots of humidity. It’s also suitable for outdoor growth in USDA hardiness zones two to eleven. It can tolerate both warm and full sun, but it’s not a particularly picky plant.

Grooming Godetia Plant

Do not prune your plant at the end of winter because this will affect flower production. Instead, it’s better to cut back around mid-summer and then again in early autumn should you feel the need to do so. Make sure you dead-head and remove withered flowers as this will encourage new blooms next year.

How to Propagate Godetia Amoena

As an annual, this plant dies at the end of every year, so you need to propagate it with seed each year. After purchasing your seeds, you can plant them any time of the year. Sow the seeds early spring indoors and cover lightly with fine garden or potting soil to encourage early bloom. 


Image credit: https://www.gardensonline.com.au/

You can directly seed it in your flower garden or start it in four to six weeks before the last frost date in your region. When sowing outdoors, sow the seeds after the last frost date. Flowers bloom early to mid-summer while taller varieties may require staking.

Use a propagating tray to help you spread the seeds over the light soil, then cover your seeds with plastic and poke holes for ventilation. Placing your tray in a bright spot such as a windowsill and balcony will help your seeds grow. Ideal plant spacing is 16 to 20 inches and godetia plants don’t like to be crowded.

How to Grow Godetia Plants from Seeds

Godetia is grown from seeds, and this propagation method is not difficult for flower growers. You can sow godetia seeds directly in the open ground where you want to grow your flowers. However, if you are a beginner, sow the seeds in seed trays or containers to make it easy for you to identify each type of seedling.

How to Grow Godetia Plants from Seeds
Image credit: https://www.thespruce.com/

If you want to sow your godetia seeds in the garden, do it in the middle or end of April. In areas with warmer climates, you can sow seeds even in autumn. Before planting, immerse your seeds in a weak solution of potassium permanganate for half an hour to protect future sprouts from diseases.

Spring Planting of Godetia

At the end of May or early June, you can plant seedlings that have reached 2 to 2.8 inches in an open ground with the soil cold so as not to damage the roots of the seedlings. You should do this in cloudy weather, early in the morning before sunrise or in the evening after sunset.

utumn Planting of Godetia

Autumn Godetia should be planted only in warm climate areas. Flower growers prefer to sow seeds directly into the ground. However, plants grown from the seeds sown in late autumn are better adapted to the environment and resistant to pests and disease.

Species and Varieties of Godetia

Godetia Grandiflora

This is the most common species in commercial cultivation. The plant’s height reaches 20-30 cm, and the flowers are purple or pinkish. They grow well in half shade but are not among the shade-loving flowers. You must also remember to protect them from direct sun rays during hot summer days.

Godetia Amoena

This variety is two feet high and produces large flowers with a diameter of 4-5 cm. Plant it in full sun, but protect its delicate buds from frost and strong wind.

Double Godetia

This is a rare variety that features double flowers in white or rose colors. The plant is tall – 1-1, 5 m. Seeds need cold weather to germinate and will only grow in bright sunlight.

FAQs on How to Grow and Care for Godetia Plant

Is the Godetia plant easy to grow?

Growing Godetia is easy and fun; plus, the plant will provide you with heaps of flowers in just a few months.

What’s the best way to grow Godetia?

You can grow godetia flowers in containers, window boxes, or flower beds. If you want it to survive during winter, plant it in rich soil with organic matter and place it in full sun during summertime.

Final Thought on How to Grow and Care for Godetia Plant

As you can see, growing and caring for the Godetia plant is not that hard and is very rewarding. If you love flowers, then you should consider growing this plant. You will enjoy the color and beauty of the godetia flower in your garden.


The post How To Grow and Care for Godetia Plant appeared first on Kitchen Infinity.

post

Four Easy Do-It-Yourself Soil Tests

Soil is the foundation of your garden. Knowing what makes up your soil and how to amend it is an important part of successful gardening.  Unfortunately, many people don’t know how to test their soil’s pH or even begin. 

Well, if you’re like most gardeners, you don’t have the time or money to get a professional test done on your soil. So how can you be sure your plant selections are going to thrive in your yards? That’s where these simple DIY tests come into play. 

The following easy do-it-yourself tests will give you a good start on knowing your soil’s strengths and weaknesses. The results from the tests will give you an idea as to whether or not professionals should do more testing before any changes are made based on this information alone. Let’s get started!

The Squeeze Test

This test is based on the premise that soil with good texture will form a ball in your hand and fall apart when lightly squeezed. Be ready to get your hands when testing your soils using this method. In this soil test, soils are classified as clay soils, sandy soils, and loamy soils.


Image credit: https://bdn-ss-hh.s3.amazonaws.com/

Clay soil is nutrient-rich but slow draining, while sand is quick draining but has trouble retaining nutrients and moisture. Loam soil is considered the ideal soil because it retains moisture and nutrients while draining well. In the squeeze test, you’ll need a handful of moist soil from your garden or from near plants that are growing well. 

Be sure to use only a small amount from around the tops of plants. Avoid collecting soil from dry areas around plant roots, which could be hot and baked, as this can damage the organism living in the soil. In the squeeze test, the soil should form a lump that holds together well but can break apart easily by hand. This result shows it is loam soil, which is ideal for plant growth. 

Sandy soil will remain crumbly and may be difficult to squeeze together in your hand, while clay soil will form a hard lump and crumble when squeezed. For slow-draining clay, you can break up the soil with mulches and drainage aids like perlite and vermiculite. 

The Puddle Test

Drainage is another important aspect of your soil that you must consider because it allows water to pass quickly without pooling. If your soil has poor drainage, it can cause root rot to your plants. Culinary herbs are the main culprit of root rot due to their shallow root system. 

The Puddle Test
Image credit: https://greywateraction.org/

The puddle test is the best way to check soil drainage. Take a handful of moist soil and roll it into a ball in your hand. Then, drop the ball into a bucket filled with water. If your soil sinks, you have good drainage. If not, drill some holes in your garden beds at least 6 inches deep before planting your herbs. 

If the water takes more than four hours to drain, then you have poor drainage. Fortunately, you can amend this by mixing some organic matter, such as peat moss or compost, into the soil around your herb plants.

The Vinegar and Baking Soda Test

Soil acidity, alkalinity, and soil pH are very important elements to the soil. Some plants will thrive better in more basic soil or acidic soil. But soil that is too extreme can also be a problem. It can prevent them from getting nutrients. 

The Vinegar and Baking Soda Test
Image credit: https://www.theseedcollection.com.au/

To find out the pH of your soil, put a teaspoonful of soil in a small glass jar and add half a teaspoon of distilled white vinegar. Put on the cap tightly and shake well for about one minute. Let it sit for another five minutes to see if there are any bubbles that appear on the surface.

If it fizzes, you have alkaline soil with higher pH, which you can remedy by using a fertilizer rich in sulfur and acidifying nitrogen. Some plants can tolerate alkaline soil, while others like parsnips and peanuts will do well in the sweet soil. If your soil doesn’t fizz after the vinegar test, add distilled water to another container with the same amount of soil and add half a teaspoon of salt.

Stir occasionally for 15 minutes and see if there are any noticeable changes. If you see the particles change, your soil has acidic properties, meaning that you have sodium chloride in your garden, which can be harmful to plants, so be sure to use compost with neutral pH to reduce the risk.

If your soil doesn’t change its properties, you have a neutral pH, meaning adding compost is beneficial for the plants. Learn how to make compost so you can add it to the soil. A pH of 7 means that the soil has an alkaline nature – there are more nutrients available to your plants, and they do not tend to die as often as those growing in acidic soils, so be sure to use only fertilizers with a pH of 5-7.

So, by doing this simple test, you will be able to quickly determine your soil’s pH, which is especially important if you plan on growing any plants that do not tolerate acidic or alkaline soils, such as most vegetables. You will also discover whether or not the soil has any organic matter in it. The more organic matter, the better because if there is none, you will need to take some time to break down any hard dirt clods before planting, which can be difficult for novices.

The Cabbage and Wire Test

Soil that is too compact will inhibit root growth, choke off available water, and prevent worms and other vital soil critters from moving freely. To test soil compaction, plug a wire flag vertically into the soil. Mark the depth at which the wire bends.

Make sure the wire bends where it cannot be pushed down straight. You can easily push the wire down a foot or more. Don’t let it bend because the more it bends, the more it becomes compacted. You remedy compaction by amending your soil organic material, aerating organic materials, and avoiding walking on the wet soil in your plots.

When it comes to the cabbage test, you can purchase a home testing kit or use a more advanced DIY test using red cabbage. Red cabbage contains a pigment known as flavin that dissolves in water and will turn red in acidic solution and greenish-yellow in basic solution. 

Allow one tablespoon of soil from your garden to dry on a white saucer, then bring one cup of distilled water to boil in a pot with a lid. Add two cups of chopped red cabbage into the boiling water. Cover and boil until the water turns dark purple. 

Make sure you wet the soil and sit for some minutes, then tip the saucer to allow water to run to the side. If the soil turns blue or green, it’s alkaline, and it turns red, then the soil is acidic.

The Peanut Butter Jar Soil Test for Sand, Silt, and Clay

This is a very easy test. Fill a jar halfway with soil, then fill the rest of the way with water. The amount of water needed will vary depending on your jar size, so it’s best to start empty and add water until the jar is two-thirds full. Put in one teaspoon of dish soap and shake vigorously for 30 seconds. 

The soap will suspend the particles to see how many there are and what kind they are. The jar should be enough to do about a cup of soil. If not, use another jar and combine the results. Calculate the percentage of silt, sand, and clay, which should add up to 100 percent. 

Healthy soil will consist of 20 percent clay, 40 percent silt, and 40 percent sand. If you have sandy soil, you can remedy this by adding humus, aged manure, peat moss, and sawdust with some extra nitrogen. For silt soil, add coarse sand, gravel, compost, and well-rotted horse manure. If you have clay soil, coarse sand, and not beach sand, plus compost and peat moss will work well.

FAQs on 4 Easy Do-It-Yourself Soil Test

re home soil test kits accurate?

Yes, but you have to follow the directions carefully and take several samples from different garden areas or lawns.

How much soil should I get for a soil test?

In general, take at least a cup of dry soil from each spot. However, if there is not enough soil in any one spot to fill a 1-cup measure, take a 1/2 cup from two different spots.

Is it expensive to get a soil test done professionally?

A local extension agent can perform a low-cost or free soil pH test for you, but you would have to go in person to their office and pick up the report. It may be worth your time, though.

Final Thought on Four Easy Do-It-Yourself Soil Tests

When considering what your soil needs for the plants to thrive, it’s good to consider a complete report from your cooperative extension. However, carrying this simple test can help you understand what your soil may be lacking. Then you can take the next step toward creating a healthy garden.


The post Four Easy Do-It-Yourself Soil Tests appeared first on Kitchen Infinity.

Did you miss our previous article…
https://www.centrecountyfood.org/?p=361

post

How to Unstick and Fix a Broken Zipper

Zippers are great for keeping your clothes closed, but they can also break down over time. A broken zipper can be an annoying problem that makes it difficult to wear favorite clothing items. Luckily, there are several ways to fix a stuck zipper without replacing it or throwing out the item of clothing. 

With a few tools and some creativity, you can fix zipper problems ranging from a stuck zipper, broken zippers, stuck zippers, and any other problem related to the zipper.

What You’ll Need

Strong threadBar of soapWD-40 lubricantSmall needle-nosed pliersHand sewing needleScissorsGraphite PencilSmall flathead screwdriver

How to Fix a Stuck Zipper

Use Graphite to Lubricate the Zipper

Use a graphite pencil to lubricate the zipper. Graphite is a dry lubricant that can act as an alternative to liquid lubricants like WD-40. To use graphite, put some on a cotton ball or paper towel and wipe it along the troublesome part of the zipper. Work the zipper up and down. Before moving on, wipe away any excess graphite, so it doesn’t get transferred to other clothing items when the zipper is closed.


Image credit: https://i.pinimg.com/

pply Laundry Soap and Wax

When the graphite pencil doesn’t work, don’t add more graphite; instead, add a dab of laundry soap to your stuck zipper. The soap will add an extra level of lubrication that will help unstick the zipper. 

Apply Laundry Soap and Wax
Image credit: https://www.shared.com/

You can also use lubricating substances such as chapstick and lip balm to fix your zipper. If you don’t have any on hand, try a little unscented block of paraffin wax from a candle instead. If you’re worried about these lubricants staining your fabric, you can turn to petroleum jelly. 

Add a fingertip’s worth of petroleum jelly to the teeth of the zipper and gently rub it in – but only on the side facing your clothing or fabric. This will add a little extra oomph to the graphite’s powers and make sure that your clothes stay stain-free.

Wash Your Item and Add More Lubricant

After the zipper seems to be moving more smoothly, you’ll probably want to clean your clothing or bag. Wash it as directed on the tag and add a little lubricant right after or while it’s still wet. This way, just like chapstick on a zipper, the petroleum jelly will transfer itself from the fabric itself to the zipper.

How to Fix a Broken Zipper

Remove the Zipper Stop

For you to get the slider back on track, you’ll need to remove the zipper’s stop at the top. You can gently pull it off with your fingers and put a new one on if necessary after you have fixed the slider. 

Remove the Zipper Stop
Image credit: https://i.ytimg.com/

On the other hand, you can use pliers to get a good grip by prying off the zipper’s bottom stop or the little band of metal or plastic at the bottom of the zipper teeth. Use the pliers to slightly stretch the openings of the metal stoppers and wiggle them free. You can also use a flathead screwdriver if you don’t have pliers.

Position the Zipper Pull

Before you try to fix a broken zipper, look at it from the front and determine which way it should move. The stoppers that hold the pull open should face away from each other when the slider is fully closed. You might have to loosen or remove clothing from one side of the zipper if you can’t see a difference between closed and half-closed.

Once you’ve removed the metal or plastic, stop, use the pull tab to move the zipper slider back and forth. If it doesn’t move easily, spray the zipper with a lubricant. Lubricants can make an old zipper function like new, but they won’t work if the teeth are worn out or bent.

djust the Slider and Rearrange the Teeth

Realign the zipper teeth so that they all mesh smoothly. If you can’t mesh them, mark the spot where there is a problem aligning the teeth. After that, reposition the zipper pull by moving the slider to that spot.

Thread the Sewing Needle

Using your sewing machine, thread the sewing needle with heavy-duty thread and tie a knot at the tail of the thread. If your zipper doesn’t have teeth on both sides, you’ll need to sew it with two separate needles.

To keep the stitches as small as possible, move slowly. Insert one threaded needle into each stitch along the length of the zipper. Remove the sewing from the machine, leaving about an inch of thread on each side.

Create a New Zipper Stop

Pull the thread up through the zipper, leaving the knot on the top surface. Add another zigzag stitch to secure the stop. You can make six or seven stitches across the bottom of the zipper where you’ve removed the old zipper stop to create a new zipper stop made out of the thread.

Zippers With Teeth on Both Sides

Replace the slider by repositioning it over both sides of the original tape. Using a sewing machine, move slowly and sew a few stitches along each side to create a new zipper stop between the teeth. Pinch the metal stop on the same side as the old slider with needle nose pliers or tweezers. 

Use one hand to hold it steady while pulling the slider off with your other hand. Slide the new replacement slider onto both sides of the tape before pinching and removing any excess tape. Make sure that each piece of tape is flush against its neighbor when you are done.

Take Off the Bottom Stop to Repair the Missing Teeth

To deal with the missing bottom teeth, you have to remove the old bottom stop. Hold your cloth firmly and pull the stops off. After that, remove the tack at the base of the zipper using a seam ripper. This is very important because you need to fix all the zipper’s teeth before your zipper works correctly.

Repair Above Damaged Teeth

You can also replace a zipper slider above one of the damaged teeth. This is perfect for when you cannot find replacement teeth at the same size as your other teeth or if it’s too much work to re-sew over the existing holes. Use this method only when there are no missing teeth below the location of the break.

Pinching the zipper tape on either side of the break with a pair of pliers will hold it in place while you work. Unzip your zipper all the way to expose the teeth. Thread the needle with about an inch of thread and tie a knot on each end of the thread.

 Sew each stitch between two teeth, removing any slack in your thread after each pull. Make sure you whipstitch the lower part of the zipper teeth to keep the zipper from gaping open.

Use Paper Clip

A paper clip can be used in lieu of a needle and thread. While it won’t look quite as nice, this method is easier and faster than the sewing method and will probably work in a pinch when you don’t have a needle and thread handy.

Use a Key Ring to Secure Slipping Pants Zipper Pull

Slipping pants zippers are one of the frustrating types of zipper problems. To create a temporary fix, salvage it by attaching a key ring onto your zipper pull. Feed one end of the key ring through the hole in the tab and attach it with another small key ring or paper clip.

How to Prevent Your Zipper from Breaking Again

Don’t Yank it

The best way to avoid breaking your zipper is to ensure you apply too much force to it as you use it. Instead, use steady and consistent pulls to guide the sliders up and down the teeth instead of using sharp, jerky movements.

Keep it Clean

Keeping your zipper clean will ensure that the slider doesn’t get stuck on grime or any strands of fabric that might accumulate in its teeth. If your zipper gets jammed up with gunk, you’re much more likely to yank at it and cause it to break.

Make Sure the Zip is Not Under Too Much Pressure

If you’re fastening a bag that’s overflowing or jeans that are too small, the entire zip will buckle when there is too much pressure pulling the teeth apart.

FAQs on How to Unstick and Fix a Broken Zipper

How do you lubricate a zipper?

Before you pull the zipper down, lightly lubricate it with a bit of wax or bar soap to make sure the slider moves smoothly. Another good idea is to zip up your jacket after applying some beeswax to it.

How do you fix a stuck tooth on a metal zipper?

To solve the problem with one broken tooth in a metal zipper, try remedying it with a pair of pliers and rocking the tooth back and forth while pulling on the zipper.

Final Thought on How to Unstick and Fix a Broken Zipper

As you can see, unsticking and fixing a broken zipper can be achieved in a number of ways, and you don’t need to take your jacket and pants to a store for expensive repairs. With the right tools and items, you can always go back to using them again with no hassles.


The post How to Unstick and Fix a Broken Zipper appeared first on Kitchen Infinity.

post

How to Grow and Care for Water Lilies and Lotus

If you’re looking for a beautiful aquatic plant to add to your garden, then water lilies and lotus are a perfect choice. However, if you want these plants to survive, it’s important that they get the right amount of sun and nutrients. 

This article will teach you everything you need to know about growing water lilies and lotus in your garden. We’ll walk you through the steps required for growing these beautiful aquatic plants, from seedlings up to full-grown blooms. 

By following this guide, you’ll soon enjoy the beauty of a well-kept pond filled with healthy water lilies or lotus flowers. Keep reading!

Types of Water Lilies

There are only two categories of water lilies. Water lilies produce thick green leaves known as lily pads that float on the surface of the water. Water lily flowers vary depending on the species. 

Hardy Water Lilies

Hardy water lilies are those that can survive the environmental changes of a pond. They’ll be able to handle colder temperatures and fluctuating water levels as well as drought conditions. This is a key factor for those with an in-ground pond, as it’s almost impossible to keep standing water or a constant water level through hot summers. 

Hardy lilies won’t produce flowers in the winter, but they’ll keep producing new pads and flowers each spring as long as their tubers remain below the freezing mark. Hardy water lilies thrive in USDA hardiness zones 3-11 and they come in shades of yellows, reds, pinks, whites, and pastel orange.

Tropical Water Lilies

Tropical water lilies thrive in warmer climates and can produce showy blooms through fall, even when cared for correctly. Tropical water lilies differ from hardy water lilies in many ways. They come in day blooming varieties and night-blooming varieties, while hardy water lilies are only day blooming varieties. 


Image credit: https://ourfirstfloor.com/

Tropical water lily plants also have more fragrant and sumptuous blossoms than hardy water lilies. They also have longer stalks that hold the flower higher above the water surface, plus they tend to have larger lily pads than hardy water lily plants. Place them in the center of a container and the crown of the plant rest above the surface of the soil. 

Types of Lotus

Nelumbo Nucifera

The Sacred lotus is a water lily that belongs to the genus Nelumbo. It is also called Indian Lotus, Sacred Lotus, and Bean of India. This perennial plant native to Asia grows from thick rhizomes in muddy or sandy shallow water bodies. 

Nelumbo Nucifera
Image credit: https://upload.wikimedia.org/

The leaves are round to heart-shaped with pointed tips that grow up to 1 meter (3 feet) across. It has either pink or white flowers that sit atop long stalks.

Nelumbo lutea

The American lotus is an aquatic plant native to the Eastern United States that also grows in shallow water bodies like creeks, rivers, ponds, and marshes. It has large leaves and yellow flowers that bloom in midsummer.

Nelumbo lutea
Image credit: https://upload.wikimedia.org/

Caring for Water Lily and Lotus

Plant water lilies and lotus in a large plastic container or basket filled with garden soil and sand. This container must be large enough to accommodate the mature plant and provide room for roots and leaves to spread out. If possible, line baskets with burlap or landscape fabric to prevent soil from falling through the cracks.

Caring for Water Lily and Lotus
Image credit: https://www.thespruce.com/

Light

Water lilies and lotus plants tolerate a range of light conditions from full sun to partial shade. But make sure these plants get enough sunlight for at least four hours or six hours or more. Some lotuses won’t flower unless they get six hours of sunlight daily.

Water Lily and Lotus Watering

Both plants need plenty of water but still have good drainage. This allows the roots to absorb oxygen and the leaves to breathe without rotting or being attacked by fungus. 

The best way to water? Soak thoroughly until you see water coming out of the pot’s drainage holes. Let it sit for ten minutes or so before draining the excess water. Water them less frequently, but do not allow the plant to dry out completely, or it will go into shock.

Soil Care

For soil requirements, always use topsoil that is made especially for pond plants. Make sure you test the soil pH first. Avoid using potting soil or heavy soil. In addition, do not use garden soil or peat moss, plus too much organic matter because some of these materials may float in the water. Organic matter may also make your newly planted seeds and tubers rot.

Planting your aquatic plants too high can cause hardy plants to freeze in the winter, while planting too low will prevent young plants from getting enough sunlight. Water lilies should be planted not less than 4 inches or more than 18 inches below the water’s surface, and lotus should be between 6 and 18 inches below the surface.

Temperature and Humidity Requirement

Both plants will be hardy if their tuberous rhizomes do not freeze. Plant them in containers so that the soil line is below the freeze line in your pool. Lotus flowers will be late to emerge in the spring because they prefer warm weather and grow once the water temperature rises to 70 degrees Fahrenheit.

Over winter, you can store water lilies by lifting the plant from the container and storing the rhizome in a plastic bag full of damp sand. You can also mix damp sand with peat moss and store it in an airtight container.

Water Lily and Lotus Fertilization

Use a good aquatic plant fertilizer to fertilize your plants. Fertilize plants once a month. Do not fertilize directly into the water because you’ll change the pH of the water and harm both plants and fish. Before applying fertilizers to the plants, follow the planting instructions and warning labels carefully.

Pruning Water Lily and Lotus Plants

Each flower on the water lily lasts three to five days, and they’ll open during the day and close at night. The flower will sink into the water once it’s finished. Seed pods form, and the ripe seeds fall in the soil below. Seed production is very costly to the plant, so make sure you clip off any yellow leaves and spent flowers throughout the growing season. 

To ensure many blooms, cut the dying flowers below the surface and follow the stem down as it goes. You can cut it off or snap it with your finger. After that, clean off dead and dying leaves in the same manner. On the other hand, lotus dies at the end of the year, so cut them down to a few inches above the rhizome. If you’re growing lotus root as perennial, report it every three to four years with fresh soil.

Water Lily and Lotus Pests and Diseases Care

These aquatics have fine hairs, meaning insecticides with detergents and oils will harm and even kill them. Insects such as aphids, whiteflies, and spider mites cause problems and require insecticidal soap or other organic controls.

Slugs and snails are also an issue with these plants. You can remedy these insects by relocating plants away from the water’s edge.

Harvesting Water Lily and Lotus Plants

Wait until the flowers fade in the early fall and extract the seeds. Once the seed pods are dried, open them and remove the black or brown colored seeds. Store these seeds in a warm place until spring, when you plant them indoors for six to eight weeks before moving them outdoors once more.

How to Grow Water Lily and Lotus

Find a Sunny Location

Water lilies and lotus do best when they are placed in full sunlight. While placing these plants partially shaded can work, you’ll find that the flowers wilt quickly. Position your aquatic container in a bright location in your garden before planting water lilies.

Prepare Your Container

A wide and shallow container is best. When planting in a container, make sure you fill it with topsoil. Fill up to about an eighth of an inch from the top before adding water lilies or lotus seeds.

Clean Up Your Plants

Before planting your plants, check the tubes and remove the old leaves and thick, freshly old roots. This allows more of the plant’s energy to grow new roots, leaves, stems, and blooms. Also, take your time to learn how to clean your plants so you can apply it on some of your indoor and outdoor plants.

Plant Tubers

Plant the tuber against the side of the pot with the growing tip positioned upward and toward the center of the pot. Cover the base of the tuber with the topsoil and pea gravel to keep the soil in the container.

Submerge the Container

Submerge the container with your freshly planted water lily into the pond while leaving at least four inches of space between the top of the pot and the water’s surface. If the pond is deeper, pile rocks to elevate the container so that the top isn’t deeper than 18 inches beneath the surface of the water.

Water Lily and Lotus FAQs

re these aquatics edible?

Yes, not only the seeds of these plants are edible, but the leaves, flower buds, stalks, and roots are edible. They’re mostly used for decorative purposes and in lotions, sweet-scented perfumes.

How do you care for lotus in the winter season?

Take out the lotus container from the pond and place it in full sun during the spring season. Water the plant over the soil surface and return it to the pond in the early summer or fall season to prevent damage.

Final Thought on Growing and Caring for Water Lily and Lotus

As you can see, water lilies and lotus are easy to care for and grow with minimum effort. But it’s best not to keep them in submerged soil, instead keep the flowers floating on the water surface. Use a wide container of at least 16 inches for lotus and 18 inches or more for lily and enjoy your aquatic garden.


The post How to Grow and Care for Water Lilies and Lotus appeared first on Kitchen Infinity.

Did you miss our previous article…
https://www.centrecountyfood.org/?p=348

post

Free Carpet Installation: What to Know Before You Buy

Buying a new carpet can be confusing and time-consuming, especially if it’s your first time. Getting the right carpet that meets all your needs gives you comfort and enhances the look of your house. 

A good way to ensure that you buy exactly what you need is to ask for free installation when buying carpet from a reputable carpet store. This ensures that they have enough expertise on hand to install everything correctly without any problem. 

We have put together this guide to help you find out what type of carpet is best for different parts of your house, how much it costs, and how to buy one.

What to Do Before Buying a New Carpet

Before buying a carpet, do your homework by learning what makes one carpet better than the other. Learn everything you need to know on how to buy the best carpet. Take a free carpet foot traffic test to discover which carpet is best for your home. Learn about scams and rip offs to avoid buying a confusing carpet. 

Carry out interior painting at least one month before the new carpet installation or wait until the carpet is installed. Carpet backing is very abrasive and can scratch painted surfaces, especially on walls and baseboards.

What to Do During Carpet Buying Process

Shop for the grade of carpet you require first, then look for several carpet colors and styles. It can be very pricey to change grades after buying the carpet, so do ample research before shopping. Members of your family may have strong feelings about what type of carpet you should buy.

If possible, take them with you during the shopping for a second opinion. While at the store, bring along old carpet samples from other rooms in your home to compare the grade by the side. Make sure you get several estimates from your locally-owned carpet dealers.

Get these estimates in writing and get every detail written down in writing. The carpet dealer should be able to provide you with a spec sheet of any carpet you’re seriously interested in. Don’t be pressured into buying or agree to buy on the first visit, whether it’s in home appointment or in store.

Take Your Time While Choosing New Carpet

Don’t buy on the first visit. Take your time to make sure you are getting the best carpet pad. There are many carpet brands out there, but not all are top quality brand names that will last a long time. Doing some research on different carpets can help you determine which one is the best buy for your money. If possible, keep the original carpet sample you selected and ordered until your new carpet is installed for comparison purposes to ensure you get what you ordered.


Image credit: https://lacarpet.com/

Many homeowners often forget which carpet style and color they ordered, especially if it takes several weeks to deliver the carpet and is scheduled for installation. If you cannot take the carpet samples, you can write down the brand, style number, and color number for future reference. 

Take a photo of the back of the carpet sample showing all the manufacturing details. This is very important, especially if you’re dealing with small retailers because they may not be able to leave you with carpet samples for an extended period of time. 

sk These Key Carpet Buying Questions Before Signing Off for New Carpet

You have the right to know everyone working in your home. Make you write down the full names of the installer, plus the names of his helpers. Ask them to provide you with copies of their liability insurance. Keep this record for future reference if there are any problems or damages to your home due to the installation process.

Ask These Key Carpet Buying Questions Before Signing Off for New Carpet
Image credit: https://mydecorative.com/

If your carpet dealer is providing carpet installation services for you as part of a package deal, then the carpet dealer is responsible for providing you with installers. Plus, the installer should have all his legal and licensing affairs in order.

If you hire installers yourself and pay them directly, you can still ask your independent installer to issue an insurance rider in your name and mail or fax before the installation. Discuss this before ordering your new carpet. You can even seek professional advice from an attorney to ensure you have added protection in some instances.

What to Do On and Before Carpet Installation Day

Before the installers arrive, make sure you have furniture, wall pictures, and knick-knacks removed from rooms to be carpeted. Also, check the carpet color and style to ensure it’s what you ordered immediately after the installers arrive.

Put away all your valuables in a safe and secure location and have your rooms pre-heated to at least 70 degrees, 3 hours before and all during installation. It always helps to learn how to declutter your room and do it ahead of time to make everything easy. If you have kids and pets around, ensure they’re safely out of the way in all areas to be carpeted. Never allow kids and pets to roam free during installation. 

What to Do After Carpet Installation

Walk around your carpeted room with the installer and inspect the job thoroughly before the installer leaves. Make sure you inspect all the carpet seams. Remember that if any seam looks ugly today, there’s no way it will look better in the coming days. In case you see an ugly seam, have it fixed right away and not later unless you’re ordering more carpet to be able to fix it.

Get Your New Carpet Installation Warranty in Writing

Do not make the final payment until you’re completely satisfied with the work. When you pay, get a written invoice with the warranty information and the installer’s signature. All carpeting is warranted for its useful life against failures due to faulty materials or workmanship under normal use. 

Some carpets carry separate warranties against fading and staining. Make sure all your carpet questions and concerns are answered and written down before signing a contract or paying for the carpet.

New Carpet Care and Maintenance

Make sure you read the manufacturer’s carpet stain warranty and follow all the cleaning suggestions and requirements. Learn how to clean your carpet properly, vacuum regularly, and spot clean as necessary but never use bleach unless it’s recommended in your new carpet warranty. Always hire a professional carpet-certified carpet cleaning company.

New Carpet Care and Maintenance
Image credit: https://www.builddirect.com/

Never use a store-rented carpet cleaning machine to clean your carpets while still under warranty. Keep all receipts for professional carpet cleanings as you may show them as proof of proper maintenance in case you’re filing a carpet warranty claim.

Keep the original sales receipt forever and never throw them away. Keep all your information in one file for easy reference. You might also want to check with the manufacturer of your new carpet regarding any discounts on future purchases you can get if you’re a loyal customer and refer other people to the store that sold you the carpet.

FAQs on Free Carpet Installation and What to Know Before Buying

Who should move the furniture when you get a new carpet?

Moving the heavy furniture is often best left to the professionals. When you get your new carpet installed, most companies will take care of moving your old one out and bringing the new one in for you, but they might charge a fee or ask that it be paid for in cash.

What are some tips to keep my carpets looking good?

Make sure you vacuum your carpet regularly to remove dirt, debris, and spills. Learn how to properly clean your carpets so that you don’t damage them or leave stains behind. 

Final Thought on Free Carpet Installation and What to Know Before You Buy

It isn’t easy to find a reputable carpet store nowadays. That’s why it’s important to consider carpet stores that are locally owned, give free estimates and offer fair prices. Plus, you should consider carpet stores with knowledgeable staff, provide honest measuring and hire qualified installers. This way, you won’t end up with sub-par carpeting that is poorly installed.


The post Free Carpet Installation: What to Know Before You Buy appeared first on Kitchen Infinity.

Did you miss our previous article…
https://www.centrecountyfood.org/?p=343

post

Transitional Style: Between Traditional and Contemporary

Are you looking for a kitchen design that is fresh and unique, but has a comfortable, familiar feel? It sounds like transitional style may be for you. This hard-to-define concept inhabits a vast space between traditional style and contemporary, and offers a perfect canvas for personal statements.

Perhaps your style is clean and simple, bordering on contemporary. But you want a place for Great-Grandma’s flowered china cocoa pot. Establish the tone of the room with Shaker cabinets in a painted finish. Then modify one or two cabinets to display heirlooms and art through clear glass doors. Voila! A transitional space that, with one foot in each century, tells worlds about you and what you care about.

Modern Twists on Traditional Features

In the kitchen pictured above, the farmhouse sink, a very traditional style, rockets to the 21st century when fashioned out of stainless steel. In itself, the sink is an example of transitional design. It is comfortably flanked by Shaker cabinets adorned with traditional cup pulls. Crossing the room, you find ornate pendant lights followed by a stainless range hood and glass-door wine cabinet. The repetition between traditional and modern styles creates a balance throughout the space.

Combining Different Surfaces

Open kitchen design in modern transitional style has large black island cabinets, black crown molding on white Shaker perimeter cabinets, and distressed hardwood flooring.

In the photo above, the blend of contemporary and traditional is achieved by combining manufactured and natural surfaces in the same space. The sleek black and white Shaker cabinets stand out against the distressed hardwood floors. Additionally, black crown molding on the white perimeter cabinets help to tie the kitchen together. The cabinet hardware, simple stainless bar pulls,  help add a dramatic touch without straying from the established pattern.

Do you have any questions on how to create a graceful transitional design? Have you successfully mixed old and new in your kitchen? Share your experience by commenting below.

The post Transitional Style: Between Traditional and Contemporary appeared first on CliqStudios.

Did you miss our previous article…
https://www.centrecountyfood.org/?p=235

post

6 Tips for Color Mixing New Neutrals


ccentuate the Positive

Use color selections in CliqStudios’ Signature line to draw attention to the most interesting features of your space. For example, ordering cabinetry for an island or a tall pantry area in a contrasting color. Navy or carbon finishes create the look of custom built in furniture, in addition to adding visual interest. This contrast also shines a light on your favorite parts of the room.

In the Zone

Your kitchen has natural zones for cooking, storage, dining and often, an open family room for conversation. Cabinetry finish choices interplay with paint, flooring, tile and upholstery choices to define those zones. Therefore, consider soft, Cloud White for the kitchen perimeter, then complement with Classic Gray in a built-in beverage center.

A kitchen using CliqStudios Dayton and Mendota cabinets in white around the perimeter and black for the island.

Keep Your Balance

When mixing finishes, you’ll see the best results if you place darker colors lower, such as for base cabinets. Allow lighter colors to float toward the ceiling on wall or glass front cabinets. The inverse, light colors on the bottom and darker colors on top, rarely works and often makes a space feel off-balance. For example, tall cabinets, like pantries and shelving units will work well finished in either a dark or a light choice.

Take Your Temperature

Be sure to place color samples side by side for comparison. Colors that appear to have blue undertones are considered cool colors. Colors that have yellow or red undertones are warm colors. Therefore, as you mix and match colors, stick to either a warm palette or cool palette for cabinetry, paint, window coverings and other materials.

Experiment

There’s no need to limit yourself to mixing only colors, ask your designer to create a 3D rendering to see two door styles. Consider a white Shaker door paired with a wood raised panel door. It’s your kitchen and the final project should reflect your own taste and style.

Test Drive

As you consider the possibilities for mixing and matching colors, order samples to see the colors in person. Computer monitors and even printed brochures can’t represent finishes precisely. But looking at an actual wood finish sample will help you picture the color in morning light, evening light and everything in between. We’ll even send two 5×7-inch samples absolutely free.

The post 6 Tips for Color Mixing New Neutrals appeared first on CliqStudios.

Did you miss our previous article…
https://www.centrecountyfood.org/?p=231

post

Personalize Your Kitchen for a Soft and Inviting Space

Everyone wants a kitchen straight from a magazine. But magazine kitchens can sometimes seem to be missing something: people who actually live in them. Once you have your beautiful, magazine worthy kitchen, remember to personalize your kitchen to make the space yours. Take a look at these beautiful kitchens that feel anything but empty.

Warm and Inviting

In the kitchen pictured below, white painted cabinets, stainless steel appliances, and an accent color on the island establish an a polished updated style. Open shelving on the island provides useful and decorative storage. Far from boring, sterile, or crowded, this beautifully decorated space says much about the owner.


Signature Austin Shaker cabinets in Cloud White and Studio Gray

Transitional with a Twist


This kitchen uses CliqStudios Dayton style doors in the painted finish Urban Stone. It’s painted doors and bar handles make the space feel modern, but the natural hardwood floors don’t allow it to feel stark. Instead, it feels warm and inviting, with plants and a teapot set out.

California Cozy

This California kitchen uses a blue island to create a furniture like feel. Using two-toned cabinetry helps to create visual appeal, and separates the island from the rest of the kitchen as an area that can double as seating. The greenery scattered through the two rooms and the cool blue-grey walls add more color without being too much.

Minimalist and Playful

In this kitchen, CliqStudios style 31 doors in the finish Harbor paired with pink walls, wooden counters, and mixed pendant lighting creates an entirely unique room. The many varying colors, textures, patterns, and art pieces feel stylized and personal.  Different bowls and baskets throughout the kitchen hold different types of plants, all tying into the greenery outside the massive window over the sink.

Are you looking for a quick and easy way to personalize and soften your kitchen? Try the shelves at Goodwill or your local flea market. For a few dollars you can completely change the nature of the space.

The post Personalize Your Kitchen for a Soft and Inviting Space appeared first on CliqStudios.

Did you miss our previous article…
https://www.centrecountyfood.org/?p=228