
 If your tile isn’t square, it may look cockeyed when guests enter the bathroom. To avoid this, make a chalk line at the room’s center. This will be the starting point for your layout. Most wall and floor tiles are applied on a cement or backer board base. You must prepare this surface by sanding and priming to ensure the thin-set adhesive adheres properly.
Regarding bathroom tile installation, costs vary widely depending on the type of tile you choose and the size of your project. For example, vinyl tiles are the cheapest option, while natural stone tiles are the most expensive. The cost of labor is also a significant factor in the overall price of your project. To determine how much your Jacksonville Bathroom Remodeling tiling project will cost, consider the area’s square footage, the amount of grout and sealer required, and the cost of materials.
You may need to pay extra for other materials necessary to complete the job, such as a backer board or a cement subfloor. These are especially important when laying tile on floors that will be exposed to water, like showers and tubs. Backer boards provide a sturdy, solid surface for laying tile that will prevent moisture from seeping underneath the tile and damaging the floor. You should expect to pay an additional $10 per square foot for these materials.
Ceramic tiles, which are common in bathrooms, are reasonably priced at $3 to $30 per square foot. These tiles are available in a wide range of colors and shapes and can mimic the appearance of other types of material, including wood, concrete, and metal. Porcelain tiles have a low water absorption rate and come in glazed and unglazed options. They can be textured or polished, and you can even get slip-resistant porcelain tiles.
Other types of tile are more exotic, such as glass or marble. These tiles are more expensive than ceramic, but they have a unique look that can add elegance to your bathroom. They are also very durable and require very little maintenance. If you want to save money, you can purchase a cheaper alternative such as travertine or slate.
If you are planning to lay your tile, you should plan the purchase of a tile saw, high-quality mortar and grout, and a variety of trowel sizes. You should also invest in a rubber flat and a level to help ensure the smooth application of your tile. You should also purchase 15% more tile than the amount your project calls for, to ensure you have enough.
Materials
If you’re planning to install tile in your bathroom, it’s important to know what materials are needed. Some types of tiles require special tools and adhesives, and other varieties are best installed with a certain type of grout. Consult a tiling expert to learn more about the specific requirements of your bathroom. A tile contractor can also recommend some of the best tools for the job.
Before you begin laying tiles, make sure your wall surface is even and dry. If necessary, use a power grinder with a diamond blade to smooth out any bumps or irregularities. Once the surface is ready, take measurements and plan your layout carefully. This will ensure your tile fits the space perfectly. It’s also a good idea to have extra tile on hand in case of any break or crack during installation.
Once you’ve determined the size of your space, estimate how many tiles you need. It’s a good idea to pad this figure by 10 percent. This will help cover any unexpected breakage and allow you to make repairs in the future if necessary.
After your tile is laid, wait 24 hours before grouting. You can then use a rubber grout float to spread the mortar between your tiles and give your bathroom a cohesive look. To keep your hands clean while working with the mortar and grout, wear a pair of safety goggles and gloves.
While home centers and tile specialty shops carry the most common tile styles, you may need to order some specialty tiles or require them to be delivered from a distributor. A tiling expert can assist you in finding the right style for your project and help you select an appropriate adhesive.
You’ll also need to purchase a variety of supplies for the actual tile installation process. Start by purchasing the thin-set for your space, which is usually a cement-based glue made from Portland cement, fine sand, and water-retaining agents or a latex additive. If you choose a pre-mixed adhesive, consult the manufacturer’s recommendations to determine how much to use for your space.
Layout
If you’re going to invest in a tiled bathroom, it’s essential to think about the layout of your design before you start laying tiles. It’s a good idea to mock up and measure the tile layout before you install it so that your results look more like those of a professional tile worker than those of a do-it-yourselfer who hasn’t yet mastered the craft.
If your bathroom is small, a single door makes it particularly challenging to get the tile layout right. It’s tempting to just start tiling at the back corner of the room, but this can lead to misaligned tiles down the line. The best way to ensure that your floor tiles line up correctly is to use tile spacers in between them before laying them out.
Wall tile can also be tricky to lay out, especially if you’re working over an existing surface that may not be perfectly even. A good way to avoid this problem is to build up the substrate with cement boards before laying the tile. These are available at any home improvement store and provide a solid base that will not flex or warp once the tiles are installed.
When tiling the walls of your tub or shower, it’s important to have a full row of tile that extends past the edge of the tub. This will help prevent water from collecting behind the tub, which could cause mold and mildew. To achieve this, start by marking the center point of each wall. Then, draw a line connecting the two points. You can then use this line as a reference when measuring your tiles and determining the placement of the tile layout.
When tiling the wall of a bathroom with a window, it’s important to make sure that your tiles overlap the windowsill so that they aren’t visible. This will keep your bathroom looking clean and polished. You should also pay attention to the grout lines on your tiles. Thinner grout lines can be harder to install, but they’re more forgiving if your tiles aren’t exactly uniform in size.
Installation
Tile is one of the most durable, moisture-resistant types of floor and wall coverings you can choose for your bathroom. It comes in a wide range of styles, colors, and finishes and can be installed on most surfaces. However, it requires special materials to be properly installed. The process can be tricky for do-it-yourselfers, so hiring a professional may save you time and money.
The first step in tiling your bathroom is to prepare the surface. The subfloor needs to be flat and smooth before you begin, and the drywall or cement board should be primed for a long-lasting finish. You should also remove all existing tiles, linoleum, and wallpaper. If you are replacing the floor, it is important to add a new baseboard to protect the subfloor from water and sewage damage.
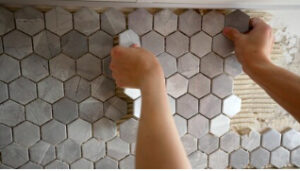
Next, you need to mix your thin-set mortar according to the manufacturer’s instructions. You can use a hand or power mixer to achieve the best results. Once your thin-set is mixed, apply a small amount to the application area and spread it with a notched trowel. When you begin laying the first row of bathroom wall tiles, make sure that you place the spacers correctly to maintain uniform spacing.
Depending on the size of your tiles, you may need to trim them to fit your installation area. Be careful not to over-cut them, or they will crack once they dry. Once the first row of tiles is complete, it’s time to grout. Grout not only adds color and texture, but it seals the tile and prevents moisture from seeping in between the joints.
Before you finish your grouting, make sure that the surface is completely dry. It will take 24 hours for the tile to cure, and you should avoid using your bathroom until then. This is why it’s important to have a plan in place for how you’ll manage the bathroom renovation, including where your furniture and accessories will go while it isn’t usable.
Tile installation is an intermediate-level project that most do-it-yourselfers can accomplish with a bit of planning and the right tools. Several aids can make the job even easier, including uncoupling tile membranes, plastic tile spacers, notched trowels, and pre-mixed thin sets. With these helpers, most do-it-yourselfers should be able to tile their bathrooms with no trouble.