post

How to Plan a Successful Kitchen Renovation

Kitchen Renovation is a large project that requires professional design and architecture services, permits, and licensed contractors. It will also have strangers working in your home and causing disruption for weeks or even months.Kitchen Renovation

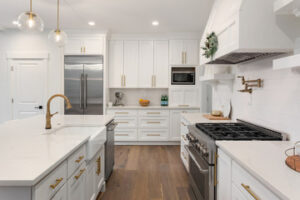
When homeowners are constantly piling groceries on the refrigerator or losing cooking tools in cluttered drawers, it’s a sign that storage needs to be addressed. Adding in or reconfiguring storage space can significantly impact overall kitchen renovation costs.

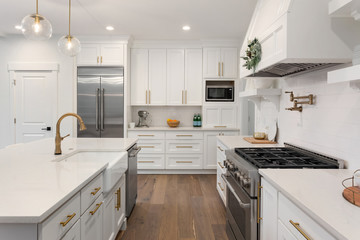
Cabinets, or cupboards, are one of the most important aspects of any kitchen. They can help create a beautiful, inviting aesthetic while offering plenty of storage space for your food and cooking supplies. Cabinets are available in a wide variety of styles, materials and finishes to suit any home design. Some cabinets are freestanding, while others are built in to a wall.

It’s important to choose the right cabinets for your renovation project. The wrong material can make your room look dated, while the wrong style may not fit in with your existing décor. Additionally, if you’re planning on selling your house in the future, it’s important to consider the resale value of your cabinets. If they’re outdated or damaged, potential buyers may be turned off by them.

Another factor to consider when choosing your cabinets is durability. Different types of wood and finishes are more durable than others. For example, natural wood cabinets are durable and will hold up to water better than painted cabinets. It’s also a good idea to choose low-maintenance materials during your kitchen renovation. For instance, lacquer-finished cabinets wipe clean easily, while luxury vinyl plank flooring is easy to maintain with just a daily sweep.

It’s also a good idea to replace cabinets that are old, worn or damaged. Cracked or chipped countertops, peeling paint and warped, sagging or bowed cabinets can all negatively impact the overall look of your kitchen. If your cabinets are showing signs of water damage, such as swelling, warping or bubbled veneer, it’s likely more cost-effective to replace them rather than try to rework them.

Countertops

Countertops are the most visible part of your kitchen, so they can make a big impact on your home’s overall look. They’re also a major kitchen work surface, able to support the weight of heavy pots and pans as well as sharp knives.

They’re also a major focal point in the kitchen, and they come in a range of styles to suit your personal design aesthetic. Granite countertops are a popular choice for homeowners, and they’re available in an array of colors and patterns to accommodate the needs of almost any kitchen. They’re also a durable option that resists damage and stays looking new.

Cracked and eroded countertop surfaces aren’t just a visual blemish, but they can also pose safety risks as the edges can become sharp and dangerous. It’s a good idea to replace your countertop when it’s damaged, rather than waiting for the cracks to get worse.

Other reasons to replace your countertop include wanting a more modern or minimalist look, and needing a material that’s easy to clean and stain resistant. Concrete countertops may sound industrial and unappetizing, but they’re actually a sturdy option that can be finished with appealing colors and textures, and it’s a great way to add a unique touch to your kitchen.

Marble is another durable natural stone that can stand up to the heat of hot pans and stains, and it’s available in many different colors. Quartz Lawrenceville is another durable choice, and it comes in a variety of color options and looks. It’s also an affordable option for those balancing budget with style. And of course, wood counters can be a warm and inviting option for a kitchen, offering warmth both visually and tactilely.

Flooring

A major design decision that can be influenced by many factors is flooring. Choosing an appropriate type and style will have a significant impact on your kitchen, from the overall aesthetic to how easy it is to clean and maintain. Hardwood floors are a classic option for kitchens, but consider tile and engineered woods if you don’t want to spring for solid wood. In addition, playing with floor patterns can add a unique touch to your kitchen.

Unless you’re a DIY-er, this is one of the steps that should be left to a professional. It’s not only time-consuming, but a mistake could have serious consequences for your home and even your health. Turning off the water and power, wearing protective gear and following safety precautions should be a top priority.

Once the rough-ins have passed inspection, it’s time to hang the drywall. This is typically a straightforward step, but it can take weeks if there are unforeseen issues. It’s also a good idea to hire a home inspector to make sure everything is up to code.

If you’re undergoing a minor renovation, it might be worth hiring a designer to help reimagine the space. A professional kitchen remodeler can offer expert guidance on everything from layout to color and finish selection. Their services can cost anywhere from 10-20% of your construction budget, depending on the level of service and complexity of the project. They can also recommend the best products and materials based on your goals and style preferences. For example, a backsplash may not be an essential update for a cosmetic refresh, but it could be an important factor when deciding between custom cabinetry and a granite countertop.

Appliances

The kitchen is one of the most important parts of our house and hence it needs to be kept clean, tidy, and updated on a regular basis. It’s a multi-purpose area where cooking is done and even family members sit and discuss their day-to-day activities. Moreover, the kitchen has various appliances which become less efficient and obsolete after a period of time. Hence, kitchen renovation is essential to make the appliances more proficient and useful.

A modern and trendy kitchen looks attractive and also provides a comfortable working environment. Moreover, a well-organized and beautiful kitchen enhances the overall look of the house and increases its value. Besides, it is beneficial for our health as we tend to eat healthier food in a nice and pleasant atmosphere.

During kitchen renovation, we often replace or add new appliances. Typically, we upgrade the refrigerators, stoves and ovens, as well as installing new cabinets, countertops and flooring. We also add features like islands and additional storage areas. Additionally, we may also choose to install energy-saving appliances.

When choosing new appliances for your home, it is important to consider the size of your space and how you will use the kitchen. If you have a small space, you can opt for smaller or slimmer appliances. On the other hand, if you have a large space, you can select larger or more luxurious appliances.

It’s important to consider appliances early on in the process, as cabinetry and all other surfaces are designed around them. It’s also helpful to know if you will be adding or replacing current appliances before starting the remodel so that you can plan accordingly. For instance, if you’re planning to add a dishwasher, you’ll need to ensure the new one is the right size for your space.

Lighting

It’s easy to focus on cabinets, countertops and appliances when planning a kitchen renovation, but the right lighting can transform the space. As food preparation areas double as living/gathering spaces, “using lighting to create ambiance is more important than ever,” says interior designer Jenn Feldman.

Layered lighting, which includes recessed and accent fixtures, is a key element of a well-designed kitchen. Dimmers allow homeowners to control the intensity of the lights for different purposes and moods, and LED technology offers an array of energy-efficient options that save money over time.

Pendant lights are popular in kitchens, and there are many different styles to choose from. Some are decorative and some are functional, but they all help illuminate a kitchen without taking up too much visual space.

Under-cabinet lighting is another great option for illuminating work surfaces. This type of fixture can be hardwired to a switch or dimmer, or it can be plug-in (which is great for temporary uses such as parties).

Shed light on art: “As homeowners use their kitchens as living/gathering spaces, canvases, framed photographs and other pieces are being used, and lighting is critical,” Whitehead says. He recommends recessed, adjustable fixtures that can be matched to the size of the artwork for maximum effect.

Shed light on architectural features: “Lighting can highlight unique or interesting architectural details in the home, and we often install recessed, directional lights to do this,” Whitehead says. For instance, a ceiling-mounted light that casts a soft glow around a fireplace mantel is a lovely way to highlight the feature while also providing task lighting for cooking.

post

Growth Cave Reviews – Is Growth Cave a Legitimate Business Opportunity?

Growth Cave is an online program that teaches you how to create a lead-generation business model. The program promises to help you earn $10,000 per month quickly.Reviews

However, some customers have complained about false promises and misleading tactics. One customer claims that Growth Cave uses a bait-and-switch tactic to lure prospective students into its program with unrealistic expectations. Checkout Growth Cave Reviews for more information.

If you’re looking for a legitimate business opportunity that offers a real way to make money online, check out Growth Cave. This program teaches its students how to build a digital marketing agency that helps local businesses generate leads. It also provides one-on-one consulting. The best part is that you can get started right away.

Lucas Lee Tyson is upfront with his students and he doesn’t hide the fact that he was once a struggling local marketer. He knows the struggles of putting together a local marketing agency and this is the whole reason why he created Growth Cave. The course is a great start for anyone interested in starting their own business.

The course begins with a module on how to identify your niche and what kind of clients you should be targeting. Then, you’ll learn how to connect with those businesses and close the deal. The course will also teach you how to create your own website and manage your social media accounts. It will even help you set up your own Google AdWords account and show you how to use the software that will help you automate your processes and keep track of your data.

Another module teaches you how to optimize your website and set up Google Analytics to monitor and track your progress. The final module is about scaling your business and leveraging your client list. You’ll also learn how to use automation software like Zapier and Loom.

This is a great course for people who are looking to start a profitable online business on a budget. It is also a good choice for those who want to make money from home. It is important to remember that you won’t become rich overnight, but it will be worth the effort in the long run.

Lucas Lee Tyson is a 22-year-old internet marketer who has been working in the industry since he was 15. He was able to turn his marketing skills into a profitable business that can be automated, outsourced and scaled. He used what he learned from his internship experiences and the resources that he found on YouTube to build his own business.

Costs

Lucas Lee Tyson is the founder of Growth Cave, which has been providing training and coaching for digital marketing since 2018. The company offers a range of courses in Facebook Advertising, lead generation, and other areas. It also provides free introductory training that can be helpful for developing basic skills in digital marketing.

The company’s flagship program, Productized Profits, teaches students how to build a profitable digital marketing agency. The program includes six training modules and two live coaching calls. Students receive access to ClientBolt, a client acquisition software, and join a Mastermind Community where other members can support and encourage each other. Students can also access email support and two live phone calls to address questions and business concerns.

Lucas-Lee Tyson, the creator of the Productized Profits course, is a digital marketer and entrepreneur. He began his career as a freelancer and launched his first marketing agency with $10 and massive credit card debt. He has a passion for creating and implementing systems that make businesses more efficient. He has a unique perspective on the digital marketing world and is able to provide valuable insight for those who are willing to listen.

Many people are skeptical about online programs that promise fast and easy results, but he promises that the Productized Profits course is legit. He claims that the program will teach you how to make more than $10,000 a month in passive income with just an hour or two a day. This is an amazing idea for anyone who wants to create a sustainable, recurring revenue stream that can grow as large or small as you want.

The Productized Profits program is a great way to learn how to automate your lead generation process and how to create a successful social media marketing agency. The course is designed to teach you how to generate leads using Facebook and YouTube ads. You’ll also learn how to build a client base, and how to manage your social media marketing agency. This program will help you earn a substantial income while working from home, and it’s a great option for busy parents who want to work from the comfort of their own homes.

Bottom Line

Lucas Lee Tyson is a 22-year-old internet marketer who has created a comprehensive training program called Growth Cave. The program teaches students how to create a digital marketing agency and generate leads for local businesses. Its teaching methods are based on Tyson’s own experiences and successes. This program is ideal for anyone interested in launching their own online business and earning passive income.

However, some people might find that running a digital marketing agency is not for them. It can be time-consuming and requires a lot of hard work. In addition, there is no guarantee that you will succeed in your new business. For this reason, you may want to consider one of the many other business models available online.

Moreover, if you decide to take the Productized Profits program, you should be aware that it will not come cheap. The course costs $1,497 and includes several bonuses that can increase your chances of success. These include access to client acquisition software (ClientBolt) and participation in a mastermind community for networking opportunities. It also includes email support and two live phone calls.

Another important factor to consider is whether a program offers a money-back guarantee. This is particularly important for programs that promise specific results, as they may not be able to deliver those results. In such cases, it is critical to verify any claims and ask for detailed explanations of how those results will be achieved, preferably in writing via email.

In addition, some customers have reported that Growth Cave’s practices of soliciting early positive reviews are misleading and can lead to unrealistic expectations about the program’s effectiveness. The company’s policy of requiring full upfront payments and short timeframes for programs may also limit the opportunity for users to determine whether or not a program is right for them. In addition, some customers have complained about the lack of support from coaches and a perceived bait-and-switch strategy. It is important to keep in mind that the success of any business or money-making program depends largely on the perception and expectations of those who buy it.

post

How To Estimate The Cost Of Bathroom Tile Installation

remodeling
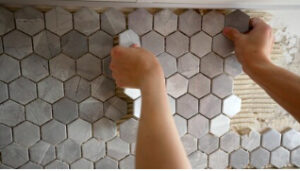
If your tile isn’t square, it may look cockeyed when guests enter the bathroom. To avoid this, make a chalk line at the room’s center. This will be the starting point for your layout. Most wall and floor tiles are applied on a cement or backer board base. You must prepare this surface by sanding and priming to ensure the thin-set adhesive adheres properly.

Regarding bathroom tile installation, costs vary widely depending on the type of tile you choose and the size of your project. For example, vinyl tiles are the cheapest option, while natural stone tiles are the most expensive. The cost of labor is also a significant factor in the overall price of your project. To determine how much your Jacksonville Bathroom Remodeling tiling project will cost, consider the area’s square footage, the amount of grout and sealer required, and the cost of materials.

You may need to pay extra for other materials necessary to complete the job, such as a backer board or a cement subfloor. These are especially important when laying tile on floors that will be exposed to water, like showers and tubs. Backer boards provide a sturdy, solid surface for laying tile that will prevent moisture from seeping underneath the tile and damaging the floor. You should expect to pay an additional $10 per square foot for these materials.

Ceramic tiles, which are common in bathrooms, are reasonably priced at $3 to $30 per square foot. These tiles are available in a wide range of colors and shapes and can mimic the appearance of other types of material, including wood, concrete, and metal. Porcelain tiles have a low water absorption rate and come in glazed and unglazed options. They can be textured or polished, and you can even get slip-resistant porcelain tiles.

Other types of tile are more exotic, such as glass or marble. These tiles are more expensive than ceramic, but they have a unique look that can add elegance to your bathroom. They are also very durable and require very little maintenance. If you want to save money, you can purchase a cheaper alternative such as travertine or slate.

If you are planning to lay your tile, you should plan the purchase of a tile saw, high-quality mortar and grout, and a variety of trowel sizes. You should also invest in a rubber flat and a level to help ensure the smooth application of your tile. You should also purchase 15% more tile than the amount your project calls for, to ensure you have enough.

Materials

If you’re planning to install tile in your bathroom, it’s important to know what materials are needed. Some types of tiles require special tools and adhesives, and other varieties are best installed with a certain type of grout. Consult a tiling expert to learn more about the specific requirements of your bathroom. A tile contractor can also recommend some of the best tools for the job.

Before you begin laying tiles, make sure your wall surface is even and dry. If necessary, use a power grinder with a diamond blade to smooth out any bumps or irregularities. Once the surface is ready, take measurements and plan your layout carefully. This will ensure your tile fits the space perfectly. It’s also a good idea to have extra tile on hand in case of any break or crack during installation.

Once you’ve determined the size of your space, estimate how many tiles you need. It’s a good idea to pad this figure by 10 percent. This will help cover any unexpected breakage and allow you to make repairs in the future if necessary.

After your tile is laid, wait 24 hours before grouting. You can then use a rubber grout float to spread the mortar between your tiles and give your bathroom a cohesive look. To keep your hands clean while working with the mortar and grout, wear a pair of safety goggles and gloves.

While home centers and tile specialty shops carry the most common tile styles, you may need to order some specialty tiles or require them to be delivered from a distributor. A tiling expert can assist you in finding the right style for your project and help you select an appropriate adhesive.

You’ll also need to purchase a variety of supplies for the actual tile installation process. Start by purchasing the thin-set for your space, which is usually a cement-based glue made from Portland cement, fine sand, and water-retaining agents or a latex additive. If you choose a pre-mixed adhesive, consult the manufacturer’s recommendations to determine how much to use for your space.

Layout

If you’re going to invest in a tiled bathroom, it’s essential to think about the layout of your design before you start laying tiles. It’s a good idea to mock up and measure the tile layout before you install it so that your results look more like those of a professional tile worker than those of a do-it-yourselfer who hasn’t yet mastered the craft.

If your bathroom is small, a single door makes it particularly challenging to get the tile layout right. It’s tempting to just start tiling at the back corner of the room, but this can lead to misaligned tiles down the line. The best way to ensure that your floor tiles line up correctly is to use tile spacers in between them before laying them out.

Wall tile can also be tricky to lay out, especially if you’re working over an existing surface that may not be perfectly even. A good way to avoid this problem is to build up the substrate with cement boards before laying the tile. These are available at any home improvement store and provide a solid base that will not flex or warp once the tiles are installed.

When tiling the walls of your tub or shower, it’s important to have a full row of tile that extends past the edge of the tub. This will help prevent water from collecting behind the tub, which could cause mold and mildew. To achieve this, start by marking the center point of each wall. Then, draw a line connecting the two points. You can then use this line as a reference when measuring your tiles and determining the placement of the tile layout.

When tiling the wall of a bathroom with a window, it’s important to make sure that your tiles overlap the windowsill so that they aren’t visible. This will keep your bathroom looking clean and polished. You should also pay attention to the grout lines on your tiles. Thinner grout lines can be harder to install, but they’re more forgiving if your tiles aren’t exactly uniform in size.

Installation

Tile is one of the most durable, moisture-resistant types of floor and wall coverings you can choose for your bathroom. It comes in a wide range of styles, colors, and finishes and can be installed on most surfaces. However, it requires special materials to be properly installed. The process can be tricky for do-it-yourselfers, so hiring a professional may save you time and money.

The first step in tiling your bathroom is to prepare the surface. The subfloor needs to be flat and smooth before you begin, and the drywall or cement board should be primed for a long-lasting finish. You should also remove all existing tiles, linoleum, and wallpaper. If you are replacing the floor, it is important to add a new baseboard to protect the subfloor from water and sewage damage.

Next, you need to mix your thin-set mortar according to the manufacturer’s instructions. You can use a hand or power mixer to achieve the best results. Once your thin-set is mixed, apply a small amount to the application area and spread it with a notched trowel. When you begin laying the first row of bathroom wall tiles, make sure that you place the spacers correctly to maintain uniform spacing.

Depending on the size of your tiles, you may need to trim them to fit your installation area. Be careful not to over-cut them, or they will crack once they dry. Once the first row of tiles is complete, it’s time to grout. Grout not only adds color and texture, but it seals the tile and prevents moisture from seeping in between the joints.

Before you finish your grouting, make sure that the surface is completely dry. It will take 24 hours for the tile to cure, and you should avoid using your bathroom until then. This is why it’s important to have a plan in place for how you’ll manage the bathroom renovation, including where your furniture and accessories will go while it isn’t usable.

Tile installation is an intermediate-level project that most do-it-yourselfers can accomplish with a bit of planning and the right tools. Several aids can make the job even easier, including uncoupling tile membranes, plastic tile spacers, notched trowels, and pre-mixed thin sets. With these helpers, most do-it-yourselfers should be able to tile their bathrooms with no trouble.