post

Reasons for Yellow Leaves on Houseplants

It’s very frustrating when your favorite houseplant starts to show signs of stress, isn’t it?

Those yellowing leaves could mean that the plant is getting too much or not enough water. It might also be a sign that the light in the room isn’t right for this type of plant. Maybe you’re using tap water with chemicals in it or it could also mean that you’ve been fertilizing your plants every other week, which might be too little.

No matter what the cause is, understanding why your particular houseplant is showing these symptoms will help you find solutions more quickly and easily.

In this article, I’ll discuss the possibilities of why yellow leaves are happening to your houseplants, what the symptoms mean, and what you can do about it, so if you’re ready to learn about all these things – read on.

Image Credit: http://gardeningknowhow.com

Plants need the right amount of light, water, and nutrients to grow well 

All plants need the right balance of light, water, and nutrients to grow well. They use sunlight to create food through photosynthesis, and if they’re not getting enough light, they might start to turn yellow. This isn’t just true for houseplants – outdoor plants need the right amount of light too.

If your plant is getting too much water, the leaves might start to turn yellow because the roots can’t get enough air and the leaves will wilt. This happens because when you water your plants, the water doesn’t have time to evaporate between watering, which is what helps keep the roots healthy.

Low humidity in the air can also cause houseplants to lose their moisture more quickly, leading to yellow leaves. You can increase the humidity in the room by using a humidifier or placing your plants near a water source.

If you’re using tap water to water your plants, it’s important to check if any chemicals in it might be harmful to your plants. If so, you can use filtered or distilled water instead.

Houseplants need the right nutrients to stay healthy, and you can provide these nutrients by fertilizing your plants at least once every two weeks with a general-purpose fertilizer. Fertilizing your plants regularly will help them grow big and strong.

Different solutions to consider

Now that you know all about the reasons for yellow leaves on houseplants, let’s move on to the solutions.

If your plant is getting too little sun it’s best to find a brighter spot in your home. A south-facing window is great because it will get plenty of sunlight throughout the day.

If you’re using tap water that has chemicals in it like chlorine, you can use filtered or distilled water instead. If you have well water, the chemicals are most likely coming from your pipes. You can talk to someone at your local hardware store for more information about removing these chemicals from your house’s plumbing system if this is an issue you face.

You may find that even after fertilizing regularly with products made especially for houseplants, that they still start to show signs of yellowing leaves because of lack of nutrients – this is likely because you’ve been fertilizing every other week, but plants need supplemental food every week. If you find that this is the case, switch to fertilizing more often.

If your plant is losing moisture quickly, try using a humidifier or placing your plant on top of an inch-thick water-filled tray so the bottom sides of the leaves are touching – this will help increase humidity levels in your room.

You can also try moving your plant to a brighter place since bright light helps increase humidity levels.

If you have tried all of the above solutions and are still having issues with yellow leaves on your houseplants, then it might be time to talk to someone who knows about plants at a garden center nearby. If you’re not very familiar withgardening or plants in general, don’t worry about trying to diagnose what is wrong – it’s better not to guess and risk doing something that harms the plant.

Considercleaning your household leavesand flowers to remove dust and other particles that can settle on the leaves and block sunlight. Regularly wiping your houseplants’ leaves with filtered or distilled water will also help remove any dirt or residue that might be clogging the pores in the leaves and causing yellowing – this is especially important if you’re using tap water because of its chemicals.

Other factors to consider

It’s also important to remember that sometimes leaves start to turn yellow simply because the plant is growing older – this is normal, and if it happens just once or twice then there probably isn’t anything to worry about.

5 reasons your houseplants are yellowing or wilting | Fox News

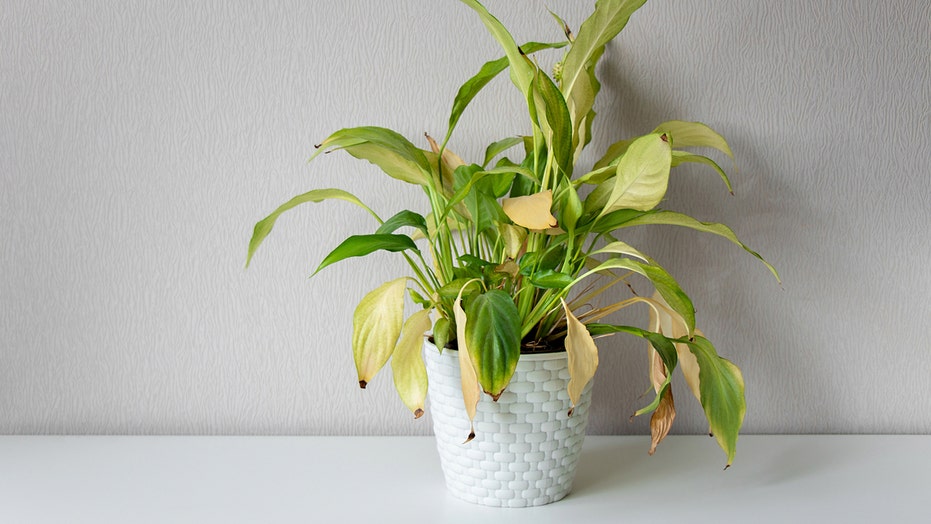
Image Credit: http://foxnews.com

 But if your plant seems like it’s getting worse over time (the reason for yellow leaves might be different every time), you should take note of the changes. If multiple plants in your home are turning yellow at the same time, or you find areas on the leaves where they look brown instead of green, these could be signs that something more serious might be wrong with your plant(s).

If you’re concerned about any changes to your plants, now is a great time to do some research before reaching out to someone who knows about plants for help. The internet is a great resource for learning about the specific problems your plants might be having, and garden centers usually have experts on staff who can help you out as well. With a little detective work, you’ll be able to get to the bottom of the problem and solve it in no time.

Reasons For Yellow Leaves On Houseplants – FAQ

Why are my houseplants’ leaves turning yellow?

The most common reasons for yellow leaves on houseplants are overwatering and under-watering. Other causes can include pests, diseases, or nutritional deficiencies.

How can I prevent my houseplants’ leaves from turning yellow?

The best way to prevent your plants’ leaves from turning yellow is to water them properly. Make sure to water deeply but infrequently, and never allow the soil to become soggy. You can also fertilize your plants regularly with a balanced fertilizer, and keep them free of pests and diseases by using regular pest control measures.

Final thoughts on reasons for yellow leaves on houseplants

In conclusion, there are many reasons why your houseplants might be turning yellow. It could be a sign that they need more water, or that they’re getting too much sun. It might also mean that they’re being overfed, or that they have a nutrient deficiency. By pinpointing the cause of the problem, you can take steps to correct it and help your plants get back to their healthy green selves. 

The post Reasons for Yellow Leaves on Houseplants appeared first on Kitchen Infinity.

Did you miss our previous article…
https://www.centrecountyfood.org/?p=836

post

How to Grow an Amazing Flower Garden

To have an amazing, vibrant garden full of flowers that are in bloom all year round, there are many things to take into consideration. It is important not only to know what type of plants and flowers you want but also where they should be planted, the conditions needed for their survival, and protection from pests or other problems.

This article will help walk you through each step so that your flower garden can be the envy of everyone else’s. Keep reading to learn more.

Image Credit: http://gardendesign.com

How to grow an amazing flower garden

1. Make sure your soil is healthy

One of the most important things to consider when planting flowers is the quality of the soil. All plants need some type of nutrients to grow and thrive, and the soil provides these essentials. 

If your soil is poor or has a lot of clay in it, you will need to add organic matter such as compost, peat moss, or manure to make it more hospitable for plant growth. You can also purchase fertilizer specifically designed for flower gardens, which will provide everything your plants need.

2. Choose the right type of flowers for your garden

Not all plants are suited for every climate or growing condition. Some flowers thrive in full sun while doing better in partial shade. Some like to grow in rocky, sandy, or clay soil while others prefer rich, moist dirt. Before you start planting your garden, choose some plants that are appropriate for your area of the country so they can get all of the nutrients they need to survive.

Thebest evergreen plants to grow in a flower garden are:

Morning glory (Ipomoea purpurea) – A vigorous vine that is easy to grow and produces lovely trumpet-shaped flowers in shades of blue, purple, pink, or white. It blooms all summer long and can be grown as a climbing plant or trained to grow on a trellis.Confederate Jasmine (Trachelospermum jasminoides) – This vine produces clusters of fragrant white flowers that bloom all summer long. It grows best in full sun or partial shade and can be used to cover an ugly fence or wall.Trumpet Creeper (Campsis radicans) – This fast-growing vine is covered with large, trumpet-shaped flowers in shades of red, orange, or yellow in the summer. It thrives in full sun but can grow in partial shade as well. It needs a structure to climb on and will need regular pruning to look its best.

Thebest shade-loving plants to grow in a flower garden are:

Coral Bells (Heuchera spp.) – This easy-to-grow perennial produces pretty blooms and is an excellent choice if you want to color in your shade garden. It blooms in spring and fall with shades of red, pink, white, or coral and will tolerate just about any soil type.Jacob’s Ladder (Polemonium caeruleum) – A delicate, foliage plant with beautiful bell-shaped flowers that come in shades of blue, purple, or sometimes even pink. It tolerates partial sun but prefers shade and moist soil where the roots can spread out.

3. Planting flowers in a pattern can create an amazing design

There are many ways to plant flowers in patterns and designs so that you get beautiful results without having to try too hard. You can line plants up along paths or sidewalks with different colors of blooms at each end for a simple but impressive decoration. If your garden is on slopes, you might want diagonal rows following the hill instead of side-by-side lines. These kinds of flower gardens will add interest to any outdoor setting.

4. Mulch around plants to keep them healthy and prevent weeds from growing

Mulching is the process of adding a layer of organic or inorganic material around plants to protect their roots, retain moisture and suppress weed growth. It is especially important to mulch around newly planted flowers until they are well established. You can use shredded bark, straw, leaves, grass clippings, or any number of other materials for mulching.

5. Add some water into the ground to help with plant growth, but don’t over-water.

Container gardens need more frequent watering than those planted in the ground since the soil in containers dries out more quickly. But be careful not to overwater, as this can cause root rot and kill your plants.

TIP: One of the best ways to water flowers in a container is to water from below by setting the flower pot in a larger container filled with water. This way, the roots won’t sit in soggy soil which can also cause them harm.

6. Design your garden around something special

If there’s a favourite place you’d like to highlight or a particular view that you want to enjoy while tending your garden, think about how you can bridge it into your design so that it becomes an integral part of the overall look. Flower gardens work well when they are set near benches or loungers where people can relax among nature and admire their hard work.

How to Start a Flower Garden: 3 Steps for Beginners | Garden Design

Image Credit: http://gardendesign.com

Other factors to consider

When designing a flower garden, there are a few other factors to take into account, such as:

The amount of sunlight the area gets – Flowers need at least 6 hours of sunlight per day to grow and bloom properly.The soil type – Not all flowers do well in all types of soil. Make sure to check the requirements of the plants you choose.Drainage – Poor drainage can kill plants quickly, so make sure your flower garden has good drainage before planting.

All of this information can help you create a beautiful and unique flower garden that will be enjoyed for years to come. With a little bit of planning and some thoughtful design, you can have the garden of your dreams.

How To Grow An Amazing Flower Garden – FAQ

What type of soil should I use to garden with flowers?

Good-quality topsoil is always a great option when planting any kind of flower. If you don’t have access to topsoil, you can also create your mix by combining equal parts of compost, sand, and clay.

What are some good flowers to start a garden with?

There are a lot of different flowers that can be planted in a garden, but some of the most popular varieties include roses, lilies, sunflowers, and daisies. Be sure to choose flowers that are suited for your climate and growing conditions.

How often should I water my flower garden?

It’s important to keep your flower garden well-watered, but you don’t need to water it every day. A good rule of thumb is to water your plants when the top inch of soil feels dry to the touch.

What should I do if I see pests or diseases in my flower garden?

If you notice any pests or diseases affecting your flowers, take action immediately to get rid of them. You can usually treat pests and diseases with organic or chemical pesticides, or by using natural methods such as soap spray or garlic oil.

Final thoughts on how to grow an amazing flower garden

In conclusion, there is so much more that goes into a flower garden than just planting seeds and watching the flowers grow. Even if you have green fingers, there’s still some planning and preparation involved to get those beautiful blooms that we yearn for. Remember that each plant has specific needs, whether it be water or sunlight, and provide them with what they need.

The post How to Grow an Amazing Flower Garden appeared first on Kitchen Infinity.

Did you miss our previous article…
https://www.centrecountyfood.org/?p=832

post

Remove Tile Grout in a Few Simple Steps

Removing tile grout can be a long, messy project. You have to use buckets for water and vinegar, wear clothes that can get dirty, and deal with the mess of paste-like grout remover floating around the room.

However, it doesn’t have to be all bad. If you want to avoid all this work, you can get your tile grout looking new again with little effort by following tips used directly by the pros.

Image Credit: http://thepincer.com

In this article, we will give you the best ways to remove tile grout- with a tool, a blade, a chemical solution, or even through prevention. We will also provide some simple tips on how to clean up afterward. Let’s get started. 

The Tile Grout Removal Tool

One of the best and easiest ways to remove tile grout is by using a grout removal tool. This is a handheld tool that has a small blade on the end. You can buy these tools at most home improvement stores.

To use the tool, you simply put it in between the tiles and pull out the grout that has collected there over time. The grout will come out of the tiles in small sections and may take some time to remove completely.

However, if you feel that this step is too much work, there are other methods to consider.

How To Remove Tile Grout With A Blade 

Another easy way to remove tile grout is by using either a utility knife or a box cutter blade. Simply prop up one end of your tile on some spare boards or bricks so that the bottom side is facing up at an angle. 

Then slide your blade into the crevice where the tiles meet, then forcefully push it forward. The grout will pop right out. Once you have removed all the grout in this way, you can then go over the tiles with a wire brush to remove any leftover bits.

If you have a lot of tiles to clean, this may be the quickest and easiest way to do it. However, it is not without its dangers- be careful not to cut yourself while doing this.

How To Remove Tile Grout With A Chemical Solution

If you don’t want to use a blade or a removal tool, you can also tryremoving tile grout with a chemical solution. There are many different products on the market that promise to do this job quickly and easily, but our personal favorite is muriatic acid.

Muriatic acid is a very strong chemical that can be bought at most hardware stores. It is used to clean concrete and masonry, so it is perfect for removing tile grout.

To use the acid, you will need some safety equipment- rubber gloves, goggles, and a respirator. You should also avoid any contact with your skin or clothing.

Pour the acid into a bucket and dip your brush in it. Then start scrubbing at the grout between the tiles. The acid will eat away at the grout and start to dissolve it. Keep scrubbing until all the grout is removed.

Be very careful when using this method- muriatic acid is a dangerous chemical and can cause serious injuries if not handled properly.

How To Prevent Future Buildup of Grout in the Tiles

If you want to avoid having to remove tile grout in the future, there is one simple solution – seal the grout lines with a sealant. This will create a barrier between the grout and the tiles and will help keep it from collecting dirt and bacteria over time.

There are many different sealants on the market, so be sure to do your research and find one that is right for your needs. Some sealants need to be reapplied every few months, while others can last up to 10 years.

Once you have sealed the grout lines, you will never have to worry about removing tile grout again.

Which rooms can you remove grout from?

There are various areas in your home where grout can get dirty and need removal. Here are some of the most obvious ones.

Bathrooms: Grout lines in bathrooms are exposed to moisture regularly, which can lead to mold build-up over time. If you see signs of this phenomenon beginning to happen, it is best to remove the grout as soon as possible.Kitchens: Kitchen floors usually have tile grout lines with food particles stuck inside them. This attracts dirt and bacteria, which can cause dangerous cross-contamination issues if not cleaned regularly.Laundry Rooms: The same goes for laundry rooms- tile grout lines collect soap scum and lint from clothes, so they should be kept clean at all times.ShowerGrouting a shower is a tricky business- it is constantly exposed to water and can easily become dirty. If you notice that your grout is starting to look stained or mildewed, it is time for a good scrubbing.Basements: Basements are often damp areas, and this can cause grout lines to become discolored and dirty. Make sure to check your basement for this problem regularly, and remove the grout if necessary.Anywhere there are tiles: If you have any tiles in any other room of your house, it is a good idea to keep the grout clean and free of buildup. This will help keep the room looking its best and will prevent any future problems.

Removing tile grout can be a daunting task, but it doesn’t have to be. With the right tools and techniques, it can be a quick and easy job. Follow these tips and you’ll be on your way to a sparkling clean tile floor in no time.

How to Remove Grout: 8 Steps (with Pictures) - wikiHow

Image Credit: http://wikihow.com

Cleaning up after yourself

Once you have removed the bad grout, you should seal it with a new layer or reapply the old one to prevent future wear and tear. It is also a good idea to clean the work area so you’re not left with a mess.

Pour some diluted bleach onto the floor and use a mop to clean it up. This will remove any remaining residue from the acid and will help disinfect the area. Be sure to rinse the mop thoroughly after each pass, and don’t let the bleach come in contact with your skin or eyes.

When you’re finished, your floor should be clean and grout-free. Congratulations on a job well done.

Final thoughts on removing tile grout in a few simple steps

In conclusion, removing tile grout is a process that can be done relatively easily with the right tools and techniques. There are many different areas of your home where grout can become dirty and need to be removed, so be sure to stay vigilant and keep on top of it. A clean tile floor will brighten up any room in your house and will make it look newer and more inviting.

The post Remove Tile Grout in a Few Simple Steps appeared first on Kitchen Infinity.

Did you miss our previous article…
https://www.centrecountyfood.org/?p=828

post

Window Air Conditioning Tricks

Window AC units are a great way to stay cool during the hot summer months. But at the same time, they can be tricky to install and maintain. The wrong installation can lead to the AC unit falling out of the window, or not cooling your room as well as it should.

In this article, I will give you some tips for installing and maintaining your window air conditioner so that it works well all summer long. Let’s get right into it.

Installing and maintaining your ACs correctly

Understanding howdifferent types of air conditioners work is the first step in learning how to maintain them.

For example, most window ACs are cooled with simple, CFC-free R410A refrigerant gas. For these types of air conditioners, water is the cooling agent that absorbs heat from inside the room and passes it through the AC’s compressor. 


Image Credit: http://popularmechanics.com

The compressor increases the pressure of the water vapour until it becomes a hot gas (steam). The gases are then released through a set coil outside your home which cools it down before pumping it back into your room. The AC fan blows cool air into your house or office space to lower its overall internal temperature window air conditioning tips

With that said, installing a window AC unit is very similar to installing a normal window. The first and most important step is measuring your window. Make sure you have the right size AC unit for your window otherwise it will not cool your room properly or may even fall out of the opening.

Once you have the correct sized air conditioner, carefully read over the installation instructions before taking any steps. A lot of units can be flipped horizontally or vertically depending on what suits your window best, so make sure you’re doing that correctly as well.

After you’ve got everything set up, it’s time to plug in your AC and enjoy some cold air. Because most units are installed inside a window, keeping them dust-free is important for keeping them running smoothly and reducing wear and tear.

Make sure to keep an eye on your filters and have them replaced when needed. Also, because you are dealing with water vapour, do not place anything that can melt or catch fire near your unit.

The last step is making sure the AC itself stays secure in the window so it does not fall out. Some ACs come equipped with locks but if yours does not have one, installing a few screws at the top of the unit will usually suffice to make sure it doesn’t accidentally slip out of its casing window air conditioning tricks

The importance of having air conditioners installed securely

As we mentioned before, one of the dangers of installing a window AC unit is that it can fall out of the window.

This happens most often when the window opening is too narrow for the AC unit, or if there is no installation support on the inside of the window frame.

To help prevent your air conditioner from falling out, make sure you are using the correct size unit for your window and that it is properly installed. You can also use a locking mechanism to keep the AC in place.

If you are still worried about your AC unit falling out, it’s best to contact a professional to install it for you. They will know how to properly secure your air conditioner so that it doesn’t move an inch over the long term.

Other factors to consider

In addition to proper installation and maintenance, there are a few other things you can do to keep your window AC unit running smoothly all summer long.

One of the most important things to do is to keep the area around your AC unit clear. This means not placing any furniture or other objects near the unit that could obstruct the airflow.

How to Install Window Air Conditioner Units | Clera Windows + Doors

Image Credit: http://clerawindows.com

Finally, set a schedule for using your AC so that you’re not turning it on and off constantly. This will help reduce wear and tear on the unit and save you some money on your energy bill.

Window air conditioning freeze-ups

Window air conditioner freeze-ups do happen, but there are steps you can take to lessen the frequency at which they occur.

The first is keeping water out of the unit. A window AC unit pulls in air from outside and then pumps it back into your room. If that air has any moisture in it, it will lead to ice forming on the coils which prevent it from cooling down your space again.

Just like for all other units, avoiding places where frost can form is important for keeping your unit running smoothly throughout the year.

Finally, be sure not to cover your AC with blankets or furniture when it’s turned on as this can trigger ice build-up very quickly.

Window Air Conditioning Tricks – FAQ

What is the best way to clean the filters on my window air conditioner?

The most effective way to clean filters on a window air conditioner is by vacuuming them with the brush attachment. You can also use a damp cloth to wipe them down, but be sure to let them dry completely before putting them back in the unit.

How can I improve the airflow through my window air conditioner?

If you are having trouble getting enough airflow through your window air conditioner, try cleaning or replacing the filter. You can also make sure the unit is in an open area with plenty of room for air to circulate.

What should I do if water starts leaking from my window air conditioner?

If water starts leaking from your window air conditioner, the first thing you should do is turn it off and unplug it. Next, try to determine where the leak is coming from and take appropriate action to fix it. If you are unable to fix the leak yourself, contact a professional for assistance.

Can I use a space heater with my window air conditioner?

Yes, you can use a space heater with your window air conditioner as long as it is placed at least three feet away from the unit. Be sure to keep a close eye on the space heater while it is in use to avoid any potential fires or other hazards.

Final thoughts on window air conditioning tricks

In this article, we’ve gone through a few window air conditioning tricks that you can use to keep your home cool and comfortable. By following these tips, you can save money on your energy bills and make the most of your air conditioning unit.

Always take care of your window air conditioning unit by keeping it free from dirt, debris, and other materials. This will help to keep the unit running efficiently for as long as possible. If you have any trouble with your unit or you notice something is wrong with it, be sure to contact an expert who can give you specific advice for your situation.

Finally, check out this article on the best air conditioners to buy if you’d like to get your hands on the best ACs in the market right now.

The post Window Air Conditioning Tricks appeared first on Kitchen Infinity.

Did you miss our previous article…
https://www.centrecountyfood.org/?p=824

post

How to Build a Wooden Gate for Your Yard

A wooden gate that is not maintained will look ugly and uninviting. It can also be a safety hazard for your family, pets, or guests. The good news is that you don’t need to hire a professional to build or repair your gate. You can do it yourself with the right tools and instructions. 

You can build your good-looking wooden gate from start to finish and make it as durable as you like. Here’s how to do it.

The Tools and Materials Needed for the Job

Other than the gate, you’ll need a few common hand-held carpentry tools to get started. These include:

Tape measureWheelbarrowScrewdriverPencilMiter sawCordless drillSmall diameter drill bitCarpenter’s glueStraight edge rulerHammerShovelSafety glassesSpeed squarePosthole diggerHearing protectionOne-handed bar clamps

Steps to Building a Wooden Gate

Step 1: Preparations

When planning the materials needed to build your gate, it’s important for you to do a little math to make sure that both of the posts will be at the same height. The idea is to set one post in concrete in one corner of your yard and then make another post on the opposite side of your yard match up with it. Think through the location and weigh out all the considerations and locations where you want to build your gate.

Step 2: Dig Holes and Plumb Posts

Take the time to dig your post holes to have the same depth and size. You will also want to make sure that your posts are plumb before you set them in the concrete. Use a level or speed square to test for plumb and adjust as needed.

Step 3: Measure and Cut the Tongue and Groove Boards

Once you have the posts in place and are sure of the height, it’s time to measure and cut the tongue and groove boards. You will want to cut four pieces that are each 72 inches long. Use a measuring tape to make a pencil mark at 72 inches on each tongue and groove board. After that, cut the boards 72 inches long using your miter saw.

The frame for a basic wooden fence gate should be a simple box with four sides, usually smaller than the gate opening. Typically, you would use the same variety of wood you used on the fence. If you want a different color, redwood is sometimes used for large gates.

Step 4: Measure and Cut the Horizontal Bases

Next, you will need to measure and cut the horizontal bases for your gate. You will need a measuring tape to measure three 42-inch segments on two of the 1×6 cedar boards and not tongue and groove boards. Cut these segments, so you have three boards that are 42 inches long.

Step 5: Lay Out the Boards

Once you have your boards cut, lay them out on a flat surface and make sure they line up with each other. If the tongue and groove boards fall apart while doing this step, then move them to where they will not get in the way of your layout. This won’t be hard if you understand other carpentry work such as building a floating deck


Imag credit: https://diy.sndimg.com/

Step 6: Attach the Tongue and Groove Boards

You will need to clamp the boards together while attaching them with screws. This keeps the boards in place while you attach them. Attach them to the 1×6 horizontal brace boards underneath the 7/8-inch exterior screws. Pre-drill holes for the screws to eliminate splitting. Keep a close eye on the lower boards, so they don’t move out of position when you work.

Step 7: Anchor and Plumb the Brace Posts

You will want to make sure the posts are plumb or vertical. You can use a level to check this. To keep them in place, you will need to anchor them to the ground. If your soil is soft, you can use a post hole digger to make a hole deep enough for the post to be stable. Post length should be at least ⅓ longer than the planned height of your gate.

Pour some gravel into the bottom of the hole to allow for drainage and place a cement brick at the base of each post. Make sure your posts are tall enough to reach about three feet off the ground when they are all put together or tall enough to be bent around by hardware cloth. Cover with soil and tamp down until it is solid. 

Take your next two posts and place them about a foot from each other. The closer they are, the more support you will have. Decide which direction you want your gate to swing, then place one of the corner posts in between them so that it is even on both sides. Use a level again to make sure this post is straight.

Step 8: Measure and Cut the Diagonal Brace

Next, use a measuring tape to measure the length of your hardware cloth and cut it so that it is just a bit longer than the width of your yard. You can use wire cutters for this task. Put the hardware cloth into place and attach it at each corner with hog rings, pushing them down on either side of the post.

Now it is time to install the diagonal brace. This will help keep the gate stable and prevent it from sagging. Measure from the top of one post to the opposite of the other post. Mark this spot on each post and then use a level to draw a line between the two marks. Lay your straight edge over this diagonal brace, staying parallel with the lines of the horizontal slats.

Make six pencil marks on a diagonal brace parallel to the top and bottom of each horizontal brace. Remove the temporary screws, then cut the diagonal brace with your miter saw at those six marks. Three cut pieces will be discarded, leaving two cut pieces that you’ll use as the diagonal brace.

Step 9: Attach the Diagonal Brace

Run a line of carpenter’s glue over the end of the diagonal brace, then drive in a 3-inch screw. Then, press the pieces on the gate in between the horizontal braces. Weigh down the two glued pieces with cinder blocks, rocks, and anything sufficiently heavy. Let the glue dry for about two hours, then remove the weight. Drive-in two more screws, one at each end of the diagonal brace.

Step 10: Cut Frame Pieces to Size with a Miter Saw

Using a miter saw, cut the pieces of the frame to size. You can start the gate by cutting the top and bottom pieces to the same width or length as you planned for, slightly smaller than the opening in the fence. Cut the upright side planks about 3 inches shorter than the height of the gate. 

Step 11: Screw-in Top and Bottom Planks

Screw the top and bottom boards to the gate frame. Position the plank, so its edges are flush with the frame, then screw into place every 16 inches or so, using three screws per board. Drill a pilot hole for the screws before putting them in to not split to the wood. Fasten with deck screws, pre-drilling to keep the wood from splitting.

Screw-in Top and Bottom Planks
Image credit: https://4.bp.blogspot.com/

Measure from the top bend to the opposite bottom corner and make sure both sides are the same. As you start assembling the gate framing, it’s good to lay it out on a flat surface such as a patio or driveway. Attach the top and bottom rails to the side rails, ensuring it’s square.

Step 12: Cut an Angle Cross-Brace and Attach it to the Top and Bottom Rails

This will help to maintain strength and rigidity. Connect these to the frame boards that match the rest of the fence by using deck screws, pre-drilling. Use a miter saw to make your diagonal cut and place diagonally onto the box and trance with a pencil where the angles go. Place the cross-brace at a 45-degree angle extending from the bottom corner of the gate to the opposite corner of the top of the gate. But if it’s a rectangular frame, make a drawing to scale and measure the angle you’ll need with a protractor.

Step 13: Cut and Install the Planks

Place the first plank with its bottom side against the foundations and side rails and tight in between them at both ends. Use a combination square to ensure all of your planks are even before screwing down. Cut the planks using a table saw and secure them using deck screws, drilling pilot holes to keep your planks nice and clean.

Step 14: Design the Top of Your Gate

The top of your gate should have a nice curve to it. Cut the two 2x6s to the desired length and then use a jigsaw to cut out the arch. Drill pilot holes and then screw the boards together using deck screws.

Start by drawing an arc across the top of the fence gate using a string and a pencil, filling it with decorative curves of your taste. If you’re a woodworker, feel free to get fancy with your decoration. Use the jig to cut along your pattern.

Step 15: Install Hinges and Mount Your Gate

Once the top is finished, it’s time to install the hinges. Place them on the upper left and right corners of the gate. Pre-drill holes and then screw the hinges in place using 3-inch screws. The final step is to hang your gate. Have someone help you hold it in place while you screw it into the hinges.

Install Hinges and Mount Your Gate
Image credit: https://i.ytimg.com/

Leave about a 1/4 inch of distance on the hinge side of the gate. Using the cordless drill and screws included with the hinges, screw the hinges at the top, middle, and gate frame. Check to ensure the gate swings properly. Adjust the hinges to level, tighten or loosen the gate if necessary. Add diagonal cross brace to keep the gate square and prevent sagging. Remember that installing a brace with a little pressure in the opposite direction will make your gate warp. So, take diagonal measurements to check for squareness. 

Step 16: Mount the Gravity Latches

Mount the gravity latches on the gate frame, one near the top and one near the bottom. The latch should be positioned so that it will snap into place when the gate is closed and hold the gate shut. Drill pilot holes and then screw in place using 2-inch screws. 

Use a cordless drill and the screws included in the latches to screw the slide latches in place on the top and bottom of the gate. Screw the receiving section of the latches to the gate frame and mount the flip latch in a similar fashion at the center of the gate.

Step 17: Seal the Wood

Seal the wood with a sealant or weather proofing product. This will help protect the wood from the elements and keep it looking nice for years to come. You can use a paintbrush or garden sprayer to apply your sealant. 

Try to cover the whole surface evenly, making sure you hit the bottom of the planks, which absorb more water than the end grain. This area is likely to rot or become discolored so let it dry for a couple of hours in dry climates or a day in more humid climates.

Step 18: Use Your Wooden Gate

Now that your wooden gate is complete, it’s time to enjoy it! Not only will it add beauty and privacy to your home, but it will also provide a secure barrier for your family and pets.

Use Your Wooden Gate
Image credit: https://thearchitecturedesigns.com/

FAQs on How to Build a Wooden Gate for Your Yard

What are the benefits of having a wooden gate at home?

The benefits of using a wooden gate over another material are many. If you’ve already learned how to build your own house, adding a gate with the traditional look can be the best decision. It can blend in with all home styles, from modern to Victorian to an earthy farmhouse. Unlike other materials, it requires very little maintenance and looks as good as the day you installed it years later.

How can you attach pickets to the frame?

Use one angled piece from the bottom of the hung side to the corner of the latch side. Lay out pickets on the frame to check spacing and mark when you’re not satisfied.

Final Thought on Building a Wooden for Your Yard

Wooden gates provide a sense of privacy and security for your home and yard. They also add beauty and value to your property. Installing a wooden gate is a relatively easy project that can be completed on the weekend.

If you have any questions or need assistance with this project, don’t hesitate to contact a professional contractor. They will be able to help you with the planning and installation of your wooden gate, ensuring that it is a beautiful and safe addition to your home.


The post How to Build a Wooden Gate for Your Yard appeared first on Kitchen Infinity.

Did you miss our previous article…
https://www.centrecountyfood.org/?p=818

post

Creative Bathroom Organizing Ideas

Bathrooms can be a total mess. It seems like you never have enough storage space, and every time you need something in there, it’s always at the bottom of a pile somewhere. Most bathrooms are small spaces that make organizing hard, if not impossible. 

On top of that, we all have our personal preferences for keeping things clean and tidy. Luckily we have lots of easy ways to organize your bathroom with little to no cost involved. We’ve rounded up some bathroom storage ideas below so you can get started on making yours look neater immediately.

dd a Shelving Unit Above the Toilet

There are lots of ways to store toiletries above the toilet. You can put up a cabinet, use a wall-mounted shelf, or get creative with what you have around your bathroom. Many companies also sell shelving units made to fit around standard-size toilets.


Image credit: https://cdn.decoist.com/

Another great option is to build open shelving above the toilet for additional storage. Doing it on your own provides more opportunities to match the shelving with your home decor style. Also, consider open shelving.

These open vanities are classic and can make any sink look like a modern floating style and they don’t take up too much visual space in small bathrooms. You can easily add floating shelves underneath for attractive storage baskets that can even disguise the plumbing.  

Lean a Ladder for Towel Storage

The space between the bottom of your shower and the ceiling is a great place for storing towels if you have an old ladder lying around. This is one of the straightforward ways to hang towels in your bathroom, especially when you add hooks or a towel bar to the wall. 

Lean a Ladder for Towel Storage
Image credit: https://i5.walmartimages.com/

Incorporating ladders into your modern bathroom for hanging towels lets you maximize that vertical storage. Plus, you can hang hooks and baskets from a ladder to store washcloths and other toiletries.

Mount Shower Caddy Using Suction Cups

Hanging a shower caddy from the ceiling is an easy way to free up space in your bathroom. All you have to do is screw a hook into your ceiling, then fix strong suction cups or adhesive hooks to the shower surround. This frees up both counter and floor space while also giving you easy access to your bath products, linens, candles, and other toiletries when you’re in the shower.

Mount Shower Caddy Using Suction Cups
Image credit: https://m.media-amazon.com/

A wall-mounted bath caddy allows you to store more items without taking up any extra storage. A bath caddy is one of the easiest and inexpensive small storage bathroom ideas to implement.

Store Your Reading Material

One of the best ways to free up counter space is to store your reading material elsewhere when it comes to bathroom organization. A great place to put it is in a magazine rack or bookcase that’s mounted next to the toilet. This way, you can grab your reading material when you’re finished with your business, and you won’t have to clutter up the countertop.

Store Items on the Inside of a Cabinet Door

If your bathroom doesn’t have a great deal of counter space, every inch is valuable. However, there are several items you can store on the inside of cabinet doors to free up room. For example, place an over-the-door shoe rack on the back of your bathroom door or in another inconspicuous area so you can store extra towels or shampoo bottles. 

You can also buy a tension rod and hang it on the back of your cabinet door to store washcloths. You can also take advantage of this space by attaching clear bins to the doors in which you can store everyday essentials. Label each bin and add dates to items that have an expiration. This way, you’ll know where everything is, and nothing will go to waste.

Create Some Space for a Hair Dryer

If you don’t have a lot of space in your bathroom, try to find an alternate spot for your hairdryer. You can hang it on the back of your bathroom door or a hook on the wall. This way, you’ll have more room to store other items.

To implement this bathroom organizing idea, you can use an over-the-door rack to fit wider items, including hair tools. The nest part is that you won’t need to drill holes to hang it.

Keep Stylish Items on a Tray

If you want to keep your bathroom looking stylish, try placing all of your luxury items on a tray. Everyday household items, such as hand lotion, perfume, jewelry, cotton swabs, makeup brushes, and tissues can be placed in canisters or jars so they don’t take up room on the counter. Decorate your bathroom countertop with a stylish tray to hold some of your most-loved and visually appealing items.

Use Lazy Susan in Your Bathroom Cabinet

A Lazy Susan is a round turntable that can be installed into your bathroom cabinet. You can use this to store all kinds of items, including makeup, hair appliances, and personal hygiene products. Simply spin the lazy Susan to find what you need. 

Use Cups or Jars for Storage

Add three mason jars to your medicine cabinet to make quick work of organizing toothbrushes, cotton balls, and swabs. You can even use cups or votive candle holders for storage on the countertop to hold your makeup brushes or favorite perfumes.

By storing items vertically inside a jar or cup, you can make better use of the vertical space inside the cabinet. This bathroom organizing idea requires you to keep items together. These include one jar for cotton balls, one jar for cotton swabs, and another for other necessities.

Create a Skinny Alcove

Use a skinny alcove in your bathroom to store smaller items like lip balm, sunscreen, or hand sanitizer. You can also fit larger items into the space by turning them to their sides. By using the vertical space within the alcove, you can stack extra towels and hold baskets with all your skincare products without sacrificing surface area in your bathroom.

Designate a Place for Dirty and Clean Towels

You can keep your bathroom neat and organized by designating a place for dirty towels. After you’re done in the shower, hang the towel on a hook right next to the shower or tub. If possible, create a small spot for a hamper so clothes and wet towels don’t end up in a pile on the floor. You can roll some clean towels and store them on top of the hamper to save space.

Roll Up a Bar Cart

If you have an unused bar cart sitting around, grab it and roll it into your bathroom. You can fit the cart perfectly in the corner, so you will free up some counter space if there’s no room next to your sink. You can also use this area as a makeshift vanity area since there are many drawers for all of your beauty. This is also a good place for flowers to freshen up a guest bathroom or powder room.

Blend It in with Colors and Patterns

If you’re aiming for a more sophisticated and chic style, match your bathroom organizer with the colors and patterns on your shower curtain. For example, if your shower curtain is white with colorful flowers, an all-white or cream laundry hamper will fit right in. 

Paint it the same color as your wall for a clean, cohesive look if you’re looking to keep your bathroom storage shelving from standing out as a focal point. This also allows the entire space to feel sleek, clean, and fresh. Check how to paint the bathroom to get some amazing ideas.

Create Storage Unit Under the Sink

If you’re short on storage space, consider creating a hidden storage unit under the sink area. This is a great place to store bins for toiletries, cleaning supplies, and towels. You can even buy a special cabinet or organizer specifically for this purpose. While a decorative shelf is mounted on the wall for decorative items, the under-sink area offers you room to stow items out of sight, even if you have a tiny bathroom.

Fake a Linen Closet

Don’t panic if you’ve got a space that doesn’t have room for an actual linen closet or the previous owner took the closet when they purchased your home. Instead of having no place to hang damp towels and hand towels, give this idea a try. Take advantage of the free corner wall and add a shelving unit there. You can also attach baskets to the wall for a spot to fold extra towels and washcloths. A slim wall unit will also work.

Organize Bath Toys in Waterproof Bins

Do your kids have bath toys that they never seem to put back when it’s bath time? Turn a cheap plastic organizer into something functional. Niches in the wall are a great spot for storing such toys in a small plastic bin. If you don’t have a niche, turn to a strong suction cup near the bath. You can also hang an extra shower curtain tension rod along the back wall of the tub and add hooks so that you can hang toy bins.

Divide Vanity Drawers into Sections

Don’t let your bathroom vanity drawers look like junk drawers. Instead, purchase drawer dividers and group items together to make your drawers functional and appealing storage spaces. Curate your new vanity drawers with commonly used products that make sense in your household.

FAQs on Creative Bathroom Organizing Ideas

What are the three types of bathrooms?

Bathrooms are categorized as the master bathrooms, containing a shower and a bathtub adjoining the largest bedroom. There is also a full bathroom or full bath, containing four plumbing fixtures, including a toilet and a sink, and a half bathroom or powder room, containing just a toilet and sink.

Final Thought on Creative Bathroom Organizing Ideas

As you can see, bathroom organization isn’t as simple as throwing everything into a cabinet and closing the door. You have to plan out where things will go and what you want to bring together in one place. 

Try these bathroom organizing ideas to spice up your space. Don’t let the lack of storage or time be an excuse for not washing your hands after using the restroom! Take some time out of your day to organize, and you will thank yourself later.


The post Creative Bathroom Organizing Ideas appeared first on Kitchen Infinity.

Did you miss our previous article…
https://www.centrecountyfood.org/?p=813

post

How to Prepare a Vinyl Floor for Ceramic Tile

If you’re looking to make upgrades in your home, the kitchen or bathroom floor is a great change to consider. Many older homes and rental units come with kitchen and bathroom flooring made from linoleum. Installing ceramic tiles in your kitchen or bathroom flooring is a great way to improve the look of your home.

If you’re looking for an easy and cost-effective way to redo the floors in your kitchen or bathroom without breaking the bank, then installing ceramic tiles is a great place to start.

The best part about installing ceramic tile flooring on linoleum floors is that no special tools are required for installation. You just need some basic household items like tape measures and tiling knives. You will also want access to plenty of water during installation because ceramic tiles can get hot when they dry out.

Before You Begin

When planning to install a ceramic tile in your kitchen or bathroom, you should always make sure that you test the flooring first by pressing the tiles firmly against it. Ensure there are no bumps or ridges under your tile; if there are, try sanding them down before installing the tiles. Make sure the subfloor and joists making up the floor structure are in good condition and have minimal flexing and deflection.

Soft, thin, and damaged subflooring or undersized joists can flex too much, leading to cracked tile and grout joints. If your cement subfloor is thin and lacks stiffness, install a layer of new plywood over the resilient flooring, followed by a layer of thin cement board.

If removing the vinyl or linoleum before tiling appears to be an easy task, it’s better to do this instead of tiling it. There are several reasons why it might be a bad idea to tile directly over resilient flooring. These reasons include:

The Floor Maybe Too High

An additional layer of flooring applied directly over the old vinyl flooring will make it thicker and raise the overall height of the flooring. Since vinyl flooring is thin, it’s less of an issue than laminate, engineered wood, or solid hardwood flooring. But, even with vinyl flooring, the extra floor thickness can still cause problems along with the baseboard trim or at door frames.

The Resilient Flooring May Not Be Suitable

While standard sheet vinyl flooring that’s well bonded usually makes an acceptable base for the ceramic tile, that’s not true of all forms of resilient flooring. Loose lay sheet vinyl can shift beneath the new flooring, making it unsuitable for a base for a ceramic tile. Vinyl tiles can also show the possibility of shifting.

Also, no resilient flooring with cushioned construction will work beneath the ceramic tile. Most luxury vinyl planks are also not suitable for tiling over because this flooring is laid as a floating floor with no adhesives. This means that the flooring can easily shift beneath the tile, causing damage to grout joints.

Here’s How to Prepare Vinyl Floor for Ceramic Tile

Tools and Materials

You’ll need the following tools and materials to make this project work:

Bucket and mopHearing protectionSandpaperTSP cleanerEye protectionThin-set adhesiveNotched trowelUtility knifeOscillating sanderCement board seam tapeDrywall knife or smooth-edged trowel1/4 inch thick cement board panels11/4 inch cement board screwsBreathing protection

Prepare Your Floor

Follow the manufacturer’s recommendations for cleaning your vinyl floor. Ensure the subfloor and cement underlayment have a combined thickness of at least 11/4 inches. A Cement board, tile, and grout will add significant dead weight to your flooring system, meaning you’ll need a hefty substrate with minimum deflection.


Image credit: https://cdn.shopify.com/

Thoroughly clean your vinyl with plain water and a scrub brush and let it dry. It must be free of dust, dirt, and any oily residue. After that, lightly sand the vinyl flooring with an oscillating sander while wearing a breathing project and eye protection. This will create some texture for the thinset adhesive to bond. Finish by wiping down the vinyl with plain water again to remove all sanding dust.

If your room is small enough and you don’t mind going down on your knees, then you don’t need to rent a floor sander. Instead, use any power hand sander such as random orbit sander to get the job done. 

Clean and Repair the Floor

Clean your vinyl flooring with a TSP to remove dirt, soap, and oil residue. Check for protrusions such as nails and pound them back to place. If any of the parts of vinyl or linoleum flooring bulges out, use a utility knife to slice out the bulge. Your floor needs to be smooth as possible to accept the thinset adhesive and cement underlayment.

Skim Coat the Fabric with Mortar

Mix enough mortar to cover the floor with a skim coat. Apply it evenly over the surface of the vinyl with a notched trowel, then use a float to smooth it out. Let the mortar dry overnight. The mortar should be about the consistency of ketchup.

The skim coat needs to be very thin and only thick enough to bond with the fabric. After drying for about 30 minutes, you’ll have created a smooth masonry surface ready to install your tile.

Test-Fit Cement Board Panels

Lay down a 1/4 inch thick cement board panel over the entire floor. Wear breathing, hearing, and eye protection if you’re cutting the panels using a circular saw. You can also score the panels with a utility knife and snap them along the score lines.

Make sure you leave a 1/4 inch gap along the walls and between all cement board panels. Once you have test-fit the entire floor, remove the panels and set them aside. In most flooring installations, 1/2 inch cement board panels are always recommended as the underlayment for ceramic and stone tile. But when laying tile floor over an existing flooring material, it’s best to use 1/4 inch panels, given the thickness of the floor.

Set the Tile

Now it’s time to set the tile. Start in one corner and work your way out, using a level to ensure each row is straight. Lay ceramic tile so that the grout joints are staggered and use spacers if needed. Be sure to create even ridges over the entire surface to prevent air gaps. Air gaps can lead to cracked tiles down the line.

Set the Tile
Image credit: https://www.builddirect.com/

Set the tiles into the mortar, ensuring to wiggle each tile into position to ensure uniform coverage of the mortar onto the back of each tile. The edges will be cleaner if you place the edge of the tiles to edge and slide them apart to create the correct spacing.

You’ll also want to make sure you leave a 1/8-inch gap between the tile and the wall. After laying all the flooring material, remove any excess mortar from between the tiles using a grout float. Once your tile is in place, cut it to size using a wet saw.

Install Cement Board Panels

Lay cement board panels into position, starting at the wall and working your way to the center of the room. This will prevent creating a gap between two panels next to each other if you ever decide it’s necessary to remove one.

Tape the Joints

Use self-adhesive cement board joint tape to cover the joints, working from one side of the room to the other. The seams are where all your tiles will connect, so make sure they’re tight. Use a drywall knife or a smooth trowel to apply a layer of thin-set adhesive over the taped joints, filling in the gaps between panels. Allow the thin-set adhesive to dry completely before laying the ceramic tile.

Install the Grout

After setting all the tiles, carefully spread the grout across their surfaces using a rubber trowel. Use enough grout to fill in all the little nooks and crannies, but be careful not to use too much, or it will start to ooze out from between the tiles. 

Install the Grout
Image credit: https://networx.global.ssl.fastly.net/

Wipe away any excess grout with a damp cloth, then allow the grout to dry completely. Polish the tiles once the grout has dried, use a soft cloth to polish the tiles until they shine.

FAQs on Preparing a Vinyl Floor for Ceramic Tile

What should you use when installing ceramic tile over an existing vinyl floor?

In most flooring installations, 1/2 inch thick cement board panels are used to ensure a stable base for the tile.

Final Thought on How to Prepare a Vinyl Floor for Ceramic Tile

Installing ceramic tile over linoleum flooring requires a significant change to the existing floor. However, you can still create a beautiful finished product by choosing the right tile and completing the installation process correctly over the existing floor.


The post How to Prepare a Vinyl Floor for Ceramic Tile appeared first on Kitchen Infinity.

Did you miss our previous article…
https://www.centrecountyfood.org/?p=808

post

How to Troubleshoot Your Clothes Dryer

Your clothes dryer is a very important appliance in your home. It helps you save money by drying the laundry at home instead of going to the Laundromat. However, there are times when it breaks down and stops working properly. 

Since most people don’t know how to fix their broken clothes dryers, they will buy a new one or take their laundry elsewhere for drying. You don’t have to do that as fixing the clothes dryer is as easy as how to do laundry itself. Below is how to troubleshoot your clothes dryer without calling the repairman or buying a new one. Let’s get started.

Tools and Materials

Voltage meterLong-handled bristle brushRigid dryer ventNew dryer fuseNew dryer power cordCotton swabRubbing alcoholNew dryer belt

Instructions

1. Check if the Dryer is Plugged In

Dryer problems happen because of power interruptions. Before you do any troubleshooting, make sure your dryer is plugged in. Check the voltage meter if there is electricity running through it.

If not, check the circuit breaker or fuse that provides energy to your dryer. Make sure that all electrical connections are tight and secure to avoid loose wiring. If you have an electric dryer, it runs on two circuits, including one for heating the element and one for the rest of the dryer.

So, if your dryer is getting hot but not drying, it could be that one of the two circuits is tripped. In this case, check the circuit breaker and reset the circuit as necessary. Also, learn how to install a dryer electric cord to avoid any electrical issues.

2. Make Sure Your Dryer is Not Overloaded

If you’re trying to dry a lot of clothes at once, your dryer might be too overloaded to function properly. In this case, try drying fewer items or use a larger dryer. Overloading the dryer can cause drying performance and noise issues when too much weight is inside the dryer.

When you squeeze too many clothes into your dryer, you decrease the airflow needed to dry clothes properly. Overloading also makes your dryer work harder, use more energy and increase drying time. Avoid filling your dryer drum more than three-quarters full.

3. Check the Breaker or Fuse

If your dryer is plugged in but won’t turn on, the power source is the first thing you want to check. It’s possible that the breaker has been tripped or the fuse needs to be replaced. Check the Breaker Box If you have an electric dryer, turn off the circuit with a tripped breaker switch and reset. 

If you have a blown thermal fuse, replace it with the same amperage and rating. Also, check the voltage in the outlet using a voltage meter and make sure your outlet is functioning properly. If it’s not functioning, call the electrician immediately.

If you have a gas dryer, make sure the pilot light is lit and that you have an adequate supply of gas if the dryer is fueled with liquid propane. Both electric and gas dryers require 240 volts to operate. And if the dryer power cords fail, check the voltage and replace it if needed.

4. Inspect the Fuse, Switch, and Belt

If you have a power outage or surge in your home, it’s possible that the thermal fuse in the dryer control panel is damaged. Dryers also require a door switch to engage for the appliance to work. However, these switches can break.


Image credit: https://upgradedhome.com/

You can get them coated with lint or use a cotton swab and a bit of rubbing alcohol to clean the contact areas. Check the rubber belt that connects the motor to the drum if your dryer heats up, but the drum doesn’t turn. If it’s loose or broken, replace it. It’s a good idea to inspect the fuse, switch, and belt before a service call.

The fuse is located on the dryer wall and is usually a small, round glass tube. If it’s blown, replace it with one of the same amperage and rating. The switch is located near the dryer door and is either a toggle or rocker switch. If it’s not working, replace it. 

The belt is located around the dryer’s drum, and if it’s broken, worn, or loose, it will need to be replaced. After getting the new belt, place it on the drum where the old belt had been and wind it onto the idler pulley and the motor pulley. 

5. Check and Clean the Temperature Sensor

If the sensor is dirty, it will not read the correct temperature, and your clothes will not dry properly. To clean it, unplug the dryer and remove the screws that hold the sensor in place. Clean it with a soft brush and replace it.

Check and Clean the Temperature Sensor
Image credit: https://fleetappliance.com/

Test the dryer to see if it’s working properly. If your dryer turns on and shuts off very quickly, the problem could be either the thermostat or thermal resistor. The thermal fuse blows and turns off the dryer to prevent overheating. 

Use a voltage meter to check the temperature sensor to determine if it’s working properly. Also, check the heating element and timer to be sure they’re receiving power. Check the user or repair manual.

6. Clean the Lint Trap

Clean the lint trap after every load of laundry to ensure your dryer is running properly and efficiently. A clogged lint trap can cause your clothes to take too long to dry. Hard lint buildup in the trap can cause your clothes to dry slowly, if not at all.

Clean the Lint Trap
Image credit: https://images2.minutemediacdn.com/

If your lint filter is full, the air is not flowing freely, and your machine is forced to work longer than necessary. After emptying your lint filter, wash with warm soapy water and let dry completely to remove any residue from the dryer sheets. Use a bit of rubbing alcohol to clean the electronic moisture sensors. This will leave your dryer working more efficiently and prevent a possible fire.

7. Check the Air Vent and Ducts

The air vent and exhaust duct play a key role in the drying process. Make sure they are clear of any debris or obstructions. If you have pets, their hair can clog up the vents and ducts, resulting in a clothes dryer that does not work properly.

If your dryer vent system is kinked, clogged, or disconnected, use a long-handled bristle brush to clean out the dryer vent. The vent should be as short as possible between the machine and the outside exhaust vent to prevent clogs. If your venting system is long and you can’t reach the entire length with a brush, use a leaf blower to clean the system or hire a professional.

If you still have a flexible white plastic dryer hose, replace it because this is a fire trap waiting for a disaster. And that’s why new building codes require a rigid dryer vent. Make sure you check the outside vent as well.

Most of them are designed with a trap door that only opens when dryer air and lint are blown out. The trap door won’t open if the vent hood gets coated with lint, especially in high humid climates.

8. Make Sure the Dryer is in a Ventilated Space

Your dryer needs to be in a well-ventilated space so the hot air can escape. If the dryer is too close to a wall, the air won’t circulate, and your clothes will take longer to dry. In fact, if the back of the dryer is against a solid surface, it can cause the motor to overheat.

If you’re installing your dryer in a closet, make closet doors have ventilation openings at the top and the bottom of the door. The front of your clothes dryer requires a minimum of three inches of airspace, one inch on the sides. 

9. Check for the Heat Problem

If your clothes take too long to dry, first check the heat problem. The most common reason for clothes not drying is that the dryer isn’t getting hot enough. Hold your hand under the outside exhaust hood to check air movement. If the air movement is less than a hair dryer at high speed, clean the lint from the entire length of the system and exhaust hood.

The dryer isn’t heating if you can’t feel any air coming out. One way to test if the dryer is getting hot is to use a thermometer. Put the thermometer in the exhaust pipe and ensure it reads at least 130 degrees Fahrenheit. If it’s not reading that high, you need to troubleshoot your heat problem.

10. Check the Dryer Blower Wheel

Another common reason for the lack of heat is a blocked dryer blower wheel. This can happen if the lint screen isn’t cleaned often enough. To check if the blower wheel is blocked, open the dryer’s back panel and look at the blower wheel.

If it’s dirty, clean it with a vacuum cleaner. With the back panel open, check the blower wheel for cracks or obstructions that may be preventing it from spinning. To remove the blower wheel, open up the dryer by separating the top and front panels away from the main dryer cabinet. Pull the drum off the drum bearing to have full access to the motor and then unscrew the blower wheel from the motor.

11. Replace the Control Panel

If the dryer isn’t getting any power, you’ll need to replace the control panel. Before doing this, unplug the dryer and remove the back cover. During this step, you will find your thermal fuse, and its location will be dependent on where it is in your particular model of appliance. Read your owner’s manual for information about control panel components to order the correct replacement.

Replace the Control Panel
Image credit: https://i.ytimg.com/

FAQs on Troubleshooting Your Clothes Dryer

What is the common problem with dryers?

Excessive noise is the most common problem with dryers. A new drum belt can help eliminate some of the noise during operation, but there could be other problems if it doesn’t work.

How do I know my dryer isn’t working?

If you have no power, your dryer isn’t working. Begin troubleshooting by unplugging it and checking the power at your electrical outlet to be sure.

Does my dryer need an electrical reset?

If your dryer is making some noise but isn’t tumbling, you can check to see if the drum needs to be reset by pulling the lint out of the back of the machine where you would normally clean it. There’s a small red button on the motor that you can push with a paperclip or something similar to reset it.

Final Thought on How to Troubleshoot Your Clothes Dryer

As you can see, troubleshooting your clothes dryer can be easy if you know what to look for. If you don’t, it can be difficult and time-consuming to learn while trying different things that may or may not work.

Before getting a new dryer, make sure you try these troubleshooting methods, and if you have no clue where the problem might be coming from, don’t hesitate to call a professional.


The post How to Troubleshoot Your Clothes Dryer appeared first on Kitchen Infinity.

Did you miss our previous article…
https://www.centrecountyfood.org/?p=802

post

Types of Under-Sink Shutoff Valves

Also known as fixture shut offs or stop valves, under-sink valves allow you to turn off the water to the sink without shutting it off to the whole house. The number and type of fixture shutoffs you choose will depend on how many fixtures there are and where they’re located.

The following guide will take you through different types of shut off valves that can help you identify what you have under your sink.

What is Shut off Valve?

Shut off valve is a valve that stops the flow of fluid in a plumbing system. This valve cuts off the water supply to a pipe once activated. However, shut off valves are not exclusive to plumbing systems.

They’re also used to regulate the flow of gasses. 

ngle Stop Valve

The Angle stop valve is the most popular of shut off valves, being used in over 75% of homes. The valve can be rotated around its main axis to cut-off water flow. The design of the angle stop valve allows it to rotate easily, but it also makes them prone to wear and more likely to leak.


Image credit: https://images.saymedia-content.com/

Also known as a compression valve, an angle stop valve is found on the pipe which exits the wall. It allows you to turn the water off to the specific toilet or faucet when replacing it without shutting all water off to the entire house. Angle stop valves are very durable and can last many years without issues. In addition, angle stop valves are generally found in either brass or chrome-plated finishes.

Straight Shut Off Valve

Straight stop valves are typically found when the water supply pipe comes out below the flow or cabinet. A straight stop valve keeps the water from traveling in the same direction where it came from before entering the valve.

Straight Shut Off Valve
Image credit: https://assets.leevalley.com/

Straight stop valves have handles that point in the same direction as the valve, and handles are located in the middle of the valve body between the inlet and outlet ports. Similar to angle stop valves, a straight stop valve also allows you to turn off the water supply to one specific area. Also, you can do the replacements and maintenance on these appliances without shutting the water supply in the entire house.

Iron Pipe Stop Valve

Iron pipe stop valves are fitted with iron-pipe sized threads to thread a female inlet port. This type of under sink shut off valve can also be adapted to other pipes by using a male iron pipe adapter that can be fitted into plastic pipes or copper pipes.

Iron Pipe Stop Valve
Image credit: https://www.pvcfittingsonline.com/

This shut off valve can be screwed or unscrewed from the end of the water pipe. You’ll only need two pliers. One to hold the water line in place and the other to tighten the valve.

Copper Sweat Shut Off Valve

A copper sweat valve is usually at the end of copper pipe sections. They are threaded to screw into the end of the pipes. Sweat is a term used by plumbers for soldering. This type of shut off valve is known as copper sweat valve because it needs soldering to copper pipe, and it’s made of copper.

Copper Sweat Shut Off Valve
Image credit: https://m.media-amazon.com/

To install these copper pipes, you’ll need common household tools like emery cloth, solder, flux, and torch. The copper pipes are installed at the time of building construction. Professional plumbers prefer this permanent and low-cost solution because they last longer.

Push Fit Stop Valves

Push fit stop valves use a collet to grip the pipe. Also known as push on stop valves, these valves are inserted into the end of the pipe, and the pipe is pushed home so that the collet grips the pipe tightly. They consist of a rubber o ring and stainless steel locking teeth.

Push fit stop valves are easy to install and can be used with copper, PEX, and CPVC pipe. The valve grips onto the pipe with metal teeth and creates a watertight seal with a plastic o ring. The small CPVC is inserted inside its intake port, and cement used with CPVC often works with PVC.

However, the adhesive used on PVC doesn’t bond with CPVC. It’s kind of overwhelming learning about this at first, but once you grasp the idea, you can fit a CPVC stop valve to a pipe by yourself.

PEX Shutoff Valve

PEX Shutoff valves are an innovation to help with fitting a pipe. The one-way valve does not let anything in or out of the line. It’s great for reducing water backflow into your home, but it can’t reduce pressure or prevent scaling on the inside of the pipe.

PEX Shutoff Valve
Image credit: https://images.fineartamerica.com/

PEX shutoff valves are more expensive than copper or brass shutoff valves. This stop valve is often attached to pipes with crimp rings or clamp rings. A ring compression tool compresses the crimp ring against the outside of the pipe while a clamp ring tool squeezes a tab on one side of the ring.

The PEX stop valves can be removed, but you have to cut off the ring, which can cause damage to the pipe. This means that the pipe needs to be shorted to get a fresh section of pipe for the new valve.

CPVC Stop Valve

CPVC stop valves are one of the more expensive types of stop valves. CPVC stop valves are used in CPVC piping systems. CPVC stands for chlorinated polyvinyl chloride. They use a specific type of cement known as glue when installed. In addition, a CPVC valve can be used on PVC pipes. But PVC adhesive doesn’t bond well with CPVC material.

CPVC Stop Valve
Image credit: https://images.thdstatic.com/

Compression Shutoff Valve

A compression stop valve is used on copper pipes. It consists of a compression nut that squeezes a brass ring into the space between a water pipe and its body. Buildings with copper water pipes use compression stop valves with a compression intake port. This allows for more compression power and reduces the need for repairs.

Ball Valve

A ball valve is a type of stop valve that uses a ball to control water flow. The valve has a threaded body and nut that screws into the water pipe. This valve is quite large and features a lever handle. It’s commonly used in places where a quick turn-on is necessary, such as the main pipe.

You can open and close it fully with a simple quarter-turn of the lever. The internal ball will align with the pipe when the valve is open, allowing water to gush. The ball will rotate 90 degrees and completely block the hole when closed.

FAQs on Types of Under-Sink Shutoff Valves

Where is the shutoff valve located at home?

The main shutoff valve for the home is generally found on the perimeter of the house. A good place to look is where the water first enters your home. The smaller valves can also be found close to appliances and fixtures such as toilets or faucets.

Final Thought on Types of Under-Sink Shutoff Valves

Shutoff valves are an essential part of any plumbing system. They allow you to turn off the water supply to a particular area, which can come in handy when you need to make repairs or in an emergency. Also, if you’re experiencing low water pressure in your kitchen sink, the first place to check is the shut off valve. Installing these stop valves is an easy task if you know where they are and which type to use.


The post Types of Under-Sink Shutoff Valves appeared first on Kitchen Infinity.

Did you miss our previous article…
https://www.centrecountyfood.org/?p=791

post

How to Grow Scallions

Scallions are fresh, fast, and fabulous in salads, stir-fries, and savory tarts. Also known as green onions or salad onions, scallions are harvested before they reach maturity and can be grown year-round indoors.

Fast-growing plants like lettuce that you plant directly in the ground get tall quickly but have a short harvest window of just a few weeks. Indoor onion plants grow slowly over several months with an even longer harvest window than outdoor varieties.

Scallions are also one of those crops that can be sown in late summer to give one of the earliest harvests next spring. Here’s how to grow scallions from seeds indoors, so you always have these tasty vegetables on hand for cooking or snacking.

What are Scallions?

Allium fistulosum, also known as green onions, is called bunching onions or scallions.  Scallions are produced from specific cultivars of the bulbing onion and have a mild flavor.


Image credit: https://s3.amazonaws.com/

Green onions look similar to the traditional onion known as Allium cepa. They have tall, green stalks that are usually 1 to 2 feet tall. Scallions have slender white bulbs at their base that do not get large enough to form an onion.

Scallion Varieties to Try

There are several scallion varieties. These include:

Guardsman

Guardsman scallions are known for their slow bolting. They grow to about 20 inches tall and have green leaves that are blue-green at the base. The white bulb is slender, cylindrical, and has a mild flavor. This variety takes 50 days to grow, and it straddles the line between a spring onion and scallion for taste.

Evergreen White Bunching

Evergreen White Bunching is a green onion that grows best in the spring and fall. It has thick, blue-green leaves with white bulbs at its base. The plant grows up to 12 inches tall and keeps growing every 45 days until frost. This scallion takes around 60 days to grow from start to finish.

Nabechan

Nabechan is an oriental green onion that grows about 8 inches tall with white stalks and blue/green leaves. It takes around 60 days for these scallions to grow. It’s a Japanese variety prized for its flavor.

Nabechan
Image credit: https://www.activevista.com.au/

Tokyo Long White Bunching

Tokyo Long White Bunching is a white scallion that grows to about 12 inches tall. The leaves are long and slender, with a white bulb at the base. It takes around 90 days for these scallions to grow. This variety is also known as Welsh Onion or Scallion.

Red Beard

Red Beard is a red scallion that grows to about 12 inches tall. The leaves are long and slender, with a white bulb at the base. It takes around 90 days for these scallions to grow.

Red Beard
Image credit: https://www.australianseed.com/

How to Grow Scallions from Seed

You can plant seeds indoors about 8 to 10 weeks before your projected last frost date. You can also direct sow in the garden once the threat of frost has passed. Sow your seed about 1/4 inches deep. Other onions may have slow and poor germination. So, the most important element scallion seeds need is constant moisture, making starting them indoors a good choice.

How to Grow Scallions from Seed
Image credit: https://images.saymedia-content.com/

Seedlings emerge in one to two weeks. Once you have grown, thin the seedlings to about 2 inches apart. For a continual harvest, plant new crops every four weeks.

Potting and Repotting Scallions

Scallions can be grown in pots or containers on a sunny windowsill. Use well draining soil and organic potting mix when growing scallions in containers. Cover the seeds with a loose layer of soil and water them thoroughly. Make sure you keep the soil moist and not soaked.

Potting and Repotting Scallions
Image credit: https://imagesvc.meredithcorp.io/

If you want more instant gratification, then scraps and starts are two methods that are too quick for growing green onions. You’ll have scraps left over when you buy and use scallions from the grocery store. Get your container and rich potting soil. You can make your own compost to add some nutrients to the soil.

The scallions leave between three and four inches of the white bulb intact. Make 1/2 inch deep holes an inch apart in your container and drop the scrap in. Keep the soil moist and not soaked.

The final method of growing green onions is to get the starts from your local nursery. Take your starts off from the soil and gently shake off excess dirt so you can see the roots. Get a container and fill it with rich potting soil. Trim your roots back until they’re two or three inches long.

Your pot should be narrow and at least six inches deep. Make sure your container is in an area that will get direct sunlight. Keep the soil slightly moist and don’t overwater because this allows for decay and diseases. This way, you should be able to harvest and plant more scallions after every three weeks.

Scallions Care

Sun Exposure

Give your scallion plants at least six hours of direct sunlight per day. If you’re planting indoors, put them by a south-facing window. When planting outside, put them in an area that gets the most sunlight. Plant them in a partial shade if you don’t have that area.

Soil Requirement

Scallion plants prefer rich, sandy soil with sharp drainage and a slightly acidic to neutral soil pH. Amend your soil with organic matter to ensure good drainage. If you live in heavy clay soils, add sand or gravel to the mix. Consider doing some DIY soil tests to get the best for your scallions.

Fertilizing Green Onion

Fertilize green onions with a balanced fertilizer like 10-10-10 when you first plant them and again every four to six weeks. Fertilizer rich in nitrogen such as fish emulsion is ideal for green onions because it will provide the plants with a steady stream of nutrients over an extended period and keep them green and growing.

For a longer-term solution, use granular fertilizers released slowly into the soil. You can also top-dress with rich compost.

Watering Scallions

Scallion plants have a shallow root system, so regular watering is important. Keep the soil moist and do not let it dry out. While this may seem difficult in areas with long periods of hot, dry weather, you can greatly reduce the amount of time between watering by mulching with straw or pine bark nuggets. You can also try planting scallions in a raised bed to improve drainage and provide better access to water.

If you’re growing scallions in a container, make sure the pot has drainage holes and keep it evenly moist; they will likely need more frequent watering than they would get in your garden. A well drained soil also protects foliage from excess moisture, which can cause rot.

Temperature and Humidity

Allium cepa grows best when the air temperature is between 68°-78°F. If you’re growing scallions from seed, place a heat mat over your flats to ensure even soil temperatures around 45°F.

Ensure your flats get at least 6 hours of light each day for optimal germination rates and shoot growth. Scallion seeds do not mind humid conditions as long as they have good drainage to prevent rot and other diseases.

Pruning Scallion Plant

Most of the time, pruning is done by removing wilted leaves, which should be left until it’s time to pick them. If your green onion bolts to seed and you want to prevent seed drop, trim off the flower stalk. You may also experience leaf wilt during flowering.

Pruning Scallion Plant
Image credit: https://i.ytimg.com/

Once you notice that the flowers are fading, cut the stalk once it begins to droop and set it somewhere to allow the head to dry out and the seeds to drop out of the flower.

Propagating Scallion

One method of propagation is bulbs or sets. The best way to use sets is by planting them in late fall and overwintering them in the garden. In the spring, they’ll start pushing up new growth. You can also use nursery starts of Allium cepa and plant them to achieve the green onion stalks.

Remember that only Allium fistulosum will produce green tree onions without onion bulbs. True scallion has a milder flavor than A. cepa, which has a stronger onion flavor.

Harvesting and Storing Scallions

Harvesting

Start picking your spring onions once they reach a usable size. The best time to do this is when the bulbs are white and have a diameter about the size of the pencil, but even smaller sizes can be harvested.

You can dig up the whole plant if you plant to eat the mild white bulb or snip the stem off just above the soil level and allow it to continue growing. When growing traditional bulb onions as green onions, harvest the green leaves earlier and use them like scallion plants. 

Storing

Store your green onions in a partially filled jar in your fridge with enough moisture to keep the leaves from wilting. If you harvest stalks without bulbs, store the stalks wrapped in a paper towel in a plastic storage bag. You can also slice and refrigerate them in a plastic bag.

To freeze your onions, rinse them off and thoroughly pat or air dry them before freezing. Their texture will be a bit mushy when they thaw out, so it’s best to use them in cooked food rather than as a garnish. Dehydrating the stalks and grinding them into a powder is a great option for long-term storage if you have a dehydrator.

Common Pests and Plant Diseases

Pests

Thrips and aphids are common pests in onion crops and can be remedied by using a strong stream of water from a hose. If they persist, use insecticidal soap or neem oil or treat severe infestations with pyrethrin. Cutworms, onion maggots, onion nematodes, slugs, and allium leaf miners are also potential pests but can be dealt with by using prevention methods such as crop rotation or organic mulches.

You can also use a beer trap to trap slugs and snails. As long as the trap is deep as a pie pan, snails and slugs will be attracted to the beer’s aroma, which will be deep enough to drown them.

Diseases

Botrytis neck rot, purple blotch, and Fusarium basal rot are the most common onion diseases. They can be controlled by planting disease-resistant varieties and spacing plants properly. You can also remove infected plants and leaves, and use a fungicide.

White rot can also cause mold or rot at the base of the plant and yellowed, wilted leaves. If you notice the diseased plants, remove and dispose of them. Avoid planting Allium in that location for a couple of years. Practice crop rotation for the benefit of your plant’s health.

FAQs on How to Grow Scallions

Do green onions grow back every year?

These spring onions are biennial and can live for several seasons. They’ll come back after being cut down but won’t regrow if the bulbs die or are frozen.

Final Thought on How to Grow Scallions

As you can see, growing scallions is easy and can be done in almost any climate. With a little bit of care, you’ll have plenty of these delicious onions to enjoy all season long. So, what are you waiting for? Get started on your scallion garden today.


The post How to Grow Scallions appeared first on Kitchen Infinity.

Did you miss our previous article…
https://www.centrecountyfood.org/?p=784