Is your toilet leaking at the base? Are you spotting water on your bathroom floor without knowing where it’s coming from? This can be an alarming experience. However, toilet leaks aren’t something to panic about as long as you know how to fix the problem quickly and easily.
Luckily, fixing a leaky toilet is often easy and inexpensive. Toilet leaks around the base are generally easy and inexpensive to fix. In this article, we’ll talk about the reasons for your toilet leaks, the tools you’ll need to repair them, what to do about the leak, and tips to prevent future leaks. Let’s get started!
Why Toilets Leak at the Base
Loose Tee Bolts
The bolts that connect the toilet tank to the bowl are called tee bolts. These bolts can become loose over time, which will cause the tank to leak. To fix this problem, you’ll need to tighten the bolts.
Improperly Seated Wax Ring
A wax ring is a seal that sits between the toilet and the floor. When the toilet is installed, the wax ring should be properly seated to create a watertight seal. If the wax ring isn’t seated properly, it will cause the toilet to leak.
Loose Water Supply Line
A water supply line is a hose that supplies water to the toilet. If this hose becomes loose, it will cause the toilet to leak. You can fix this problem by tightening the hose connection.
Water is Condensing on the Toilet and Dropping Down
When the weather is cold, water can condense on the outside of the toilet tank. This water can then drip down and cause the toilet to leak. You can fix this problem by installing a tank heater.
Tank Lid
If you notice a toilet leaking at the base, remove the tank lid and check if the leaks are coming from inside there. Look for cracks and if water is getting too high.
If you’re having problems with your toilet leaking around the base, there are a few things that you can do to fix the problem. The most common causes of a toilet leaking are a loose water supply line or water condensing on the toilet and dripping down. By following the tips in this article, you can fix these problems and stop your toilet from leaking.
What You’ll Need
Adjustable wrenchPutty knifeBucketClean towelsLatex glovesBathroom cleanerToilet wax ringPlastic toilet bolts and nutsGasketsWashersScrewdriverHacksawCaulkCordless drill
How to Stop Your Toilet from Leaking Around the Base
Check for Condensation
The first thing you should do is check for condensation. If the toilet is leaking because of water condensing on the bowl, you can fix the problem by adding a coat of wax to the bowl. To do this, put on some gloves and clean the bowl with a bathroom cleaner.

Image credit: https://www.expresssewer.com/
Once it’s clean, apply a coat of wax to the bowl using a putty knife. Let the wax dry, then apply another coat. After that, install a tray and insulate your water tank. Also, make sure your flapper is not faulty, take short, cooler showers, and turn the fan on.
Shut Off Water Supply
The easiest way to stop your toilet from leaking around the base is to turn off the water supply. You can usually find a shutoff valve behind your toilet, but it may be underneath the sink or at a water heater in a closet. There is a supply tube connecting the valve to the tank. If you cannot find a shutoff valve quickly, take your tank lid off and remove the water supply line from the tank.
Flush the Toilet Water Out
You can also stop the leak by flushing out the water in the tank. This will lower the water level and might stop the leakage. Once you have stopped the leak, you can turn the water back on and continue to fix your toilet. Make sure no new water enters through the fill valve in the corner of the tank.
If water continues to enter the tank through the fill valve, then the supply valve to the tank is not providing a complete water stop. Try to locate the main water meter in the home and valve off all the water. Disconnect the supply line from the bottom of the tank using a pair of slip joints or channel lock pliers. Twist the supply line nut counterclockwise to disconnect it from the tank completely.
Tighten the T Bolts
Remove the plastic covers from the base of your toilet on both sides. Tighten the tee bolts using adjustable pliers or a wrench. If the bolts are too tight to turn, spray them with WD-40 and wait a few minutes for the lubricant to work. Reconnect the supply line to the tank and turn on the water at the main valve. Test your toilet by flushing it.
If the t bolts are already tight and can’t be tightened, you may remove and reinstall the toilet to install a new wax ring and new bolts.
Disconnect and Remove the Toilet
Carefully lift the toilet off the floor or ground and sit it on a pair of sawhorses. Separate the tank from the bowl by unscrewing the nuts on top of both. Disconnect all water supply lines from both tank and bowl. Shut off the water to your toilet before disconnecting.

Image credit: https://www.sunrisespecialty.com/
The shutoff valve is located on the left side of the toilet near the water supply tube and the water valve tailpiece. Flush your toilet to drain all water from your toilet and the tank. You can use a sponge or cloth to get rid of excess water in the toilet tank and bowl.
Then, use a screwdriver to unscrew the nut that mounts the supply tube to the fill valve tailpiece. Use a wrench to remove the nuts for the t bolts at the base of your toilet. You can also use a hacksaw to sever each bolt if the t bolts are corroded and won’t turn.
Remove the toilet by lifting it up and away from the floor drain. You may need someone to help you with this or take your time to learn how to remove a toilet before you proceed. Make sure you set the toilet on its side to prevent damage. Also, protect your flooring using a cardboard sheet and place your toilet bowl in this cardboard sheet after removing it.
Remove the Wax Ring and Install a New One
You will need to remove the old wax ring from under your toilet. However, you do not want to use this wax ring again. Use a putty knife to pry up any sections of the old wax ring that are still stuck in place around the drain opening.
Take your new wax ring and place it on top of the floor drain opening. Make sure that it goes beyond the edges to prevent any leaks. Place the ring with the plastic cone facing down toward the drain. Make sure the tee bolts are positioned correctly in the key openings on each side of the flange.
Get everything as clean as possible by using a rag to wipe the underside of the toilet base and the floor flange.
Slide New Bolts into Flange and Place Toilet
When installing a new toilet, it’s important to replace the toilet bolts. Ensure you clean the slots for the bolts in the flange and the bolt holes in the toilet.
Slide the bolts into the slots and place the toilet over the flange. If it doesn’t fit snugly, wiggle it around until it does. Slip the plastic washer over the bolts to compress them to the floor flange and hold them in a vertical position.
Reinstall the Toilet Seat and Tank
If the tank is still attached, carefully lift it and set it aside. Place the new toilet seat on the bowl and line up the bolts with the holes. Push them through until they protrude from the other side. Press the toilet down onto the wax ring, rocking it gently, so the toilet compresses the wax to create a tight seal.
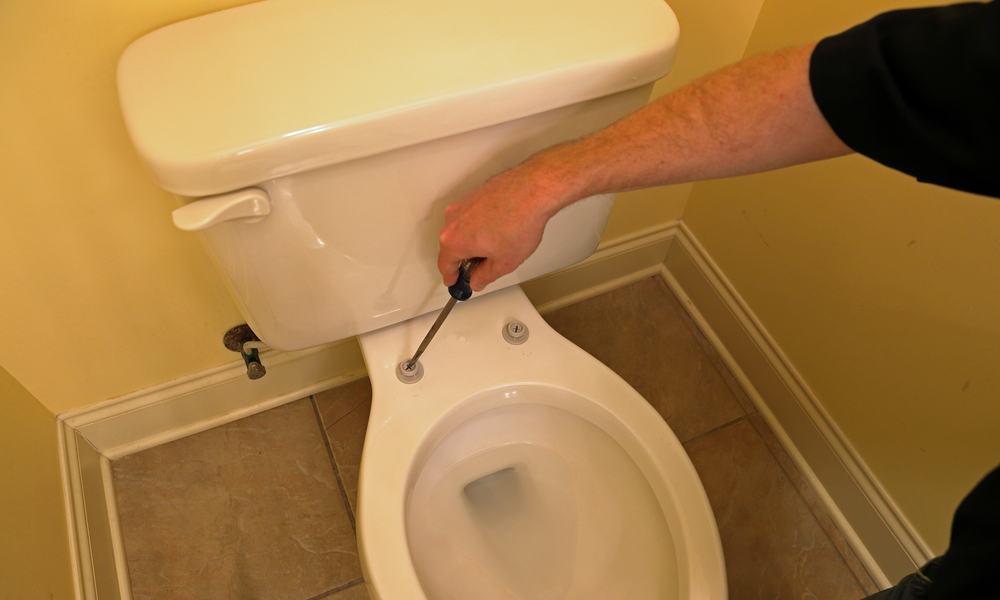
Image credit: https://www.sunrisespecialty.com/
Removing the toilet can be difficult, but placing it back can be more difficult because lining it up correctly over the hole in the floor. That’s why it’s important to call a professional plumber when the need to remove arises. Use a wrench to tighten tee bolts while ensuring they’re not over-tightened, which may cause the porcelain to crack.
When you decide to replace your old toilet with an old chrome plated copper supply tube, think of replacing it with a flexible one made of stainless steel enmeshed polymer.
Reset the Toilet
Turn the water supply back on. Flush the toilet to check for leaks. Sit or kneel on the toilet bowl rim or seat lid, applying your body weight gently, compress the new seal and drive the toilet base down, so it sits flush on the floor surface. Do not wiggle or rotate; apply straight downward pressure.
Reconnect the Water Supply Line
After the toilet has been reset and is not leaking, reattach the water supply line to the tank. If you have a flexible hose connection, make sure the hose is kink-free and no slack in the line. Reconnect the water supply tube to the fill valve and turn the water on.
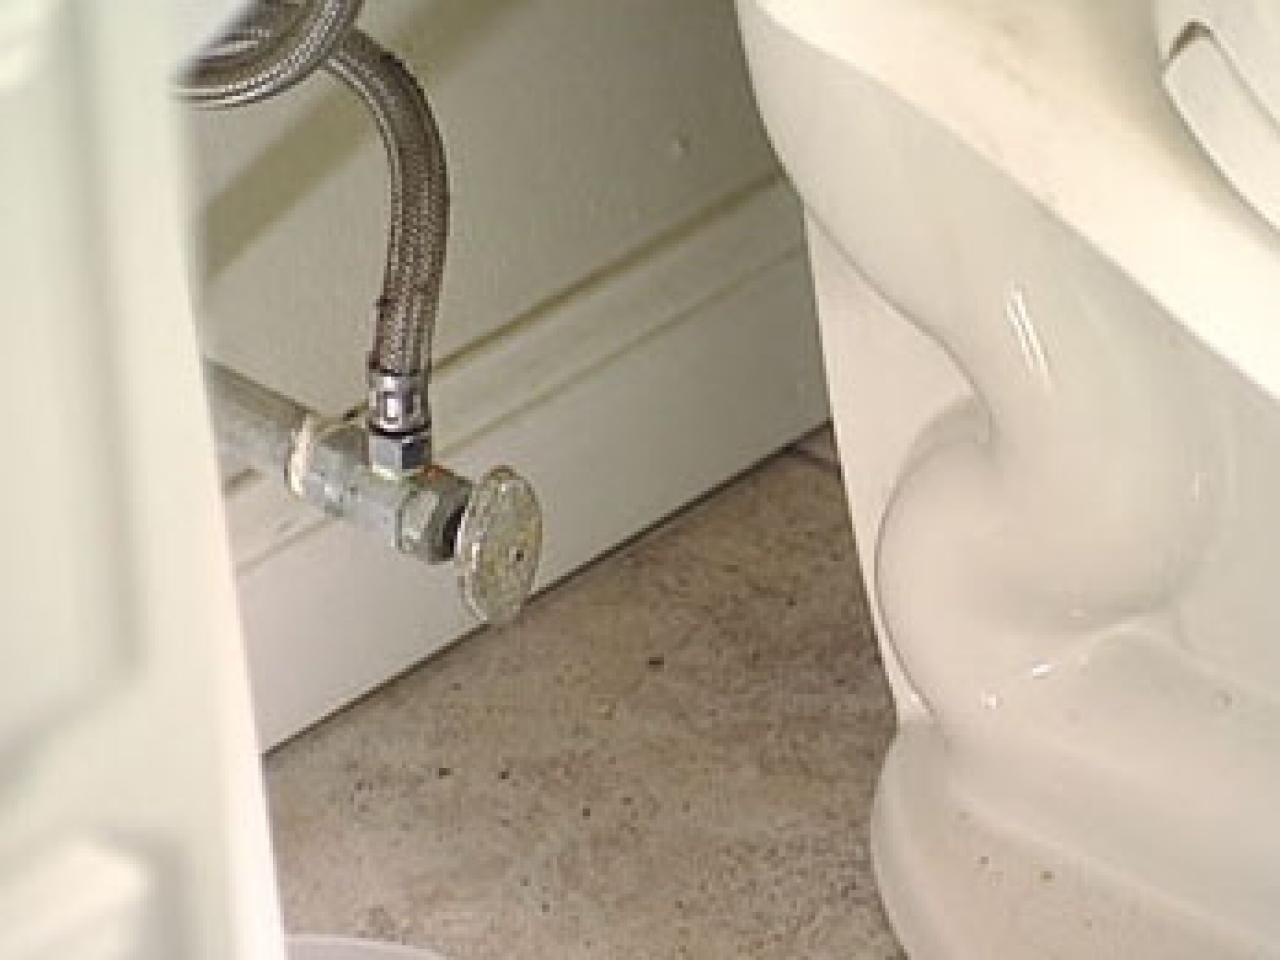
Image credit: https://diy.sndimg.com/
After returning the supply valve, allow the tank to fill until the tank fill valve shuts off. Then, use a hacksaw to carefully cut the brass toilet bolts to the height of 1/2 inch above the tops of the nut. Snap on the decorative plastic caps and apply a bead of bath caulk around the toilet base and floor to provide a sanitary seal.
Flush the toilet after the toilet tank fills up, then inspect for leaks. Once you don’t see any leaks, apply caulk to the floor around the base of the toilet. Be sure to wipe down surrounding tiles or wood floors, then allow the caulk to dry before using the bathroom again.
FAQs on How to Fix a Leaking Toilet Around the Base
Which is better between wax and rubber seal?
Most people prefer the rubber seal because it is easier to install and lasts longer. However, some people say that the rubber seal doesn’t create a tight enough seal and causes the toilet to run. Ultimately, it is up to the individual to decide which seal they want to use.
Final Thought about How to Fix a Leaking Toilet Around the Base
As you can see, dealing with toilet leaks at the base is a very simple task. Toilet leaks can be attributed to the toilet being loose, so tighten everything up, and it should stop having problems. If it is not the problem, go over your checklist about what you think might be causing the issue and fix it accordingly.
If you have a severe problem that’s beyond your knowledge, don’t hesitate to seek help from a professional plumber to help you with your toilet leaks. Also, make sure you properly set your toilet to prevent leaks
The post How to Fix a Toilet Leaking Around the Base appeared first on Kitchen Infinity.
Did you miss our previous article…
https://www.centrecountyfood.org/?p=676